I’ve been waiting to go to 4K/HDR until high-performance, laser source projectors became reasonably affordable, but it looks like that’s going to be a while yet. (Similar to the wait for high def projectors in the early 2000’s.) So, here we go, it’s the JVC DLA-RS640U projector (full specs here) and it’s quite the nice jump up from my older JVC RS55U projector, from early 2012. By the way, I recommend contacting AVScience for a purchase – they offer steep discounts from the retail prices and are great to work with. I’ve purchased from them multiple times over the years.
Both my old and new projectors are able to display video at 4K (3840 x 2160 pixels), but the RS640 can take 4K input sources while the old RS55 could only take HD content (1920 x 1080) and upscale it. More importantly though is the ability of the RS640 to display high dynamic range (HDR) content, giving a much wider range of colors and shadow and intensity. In addition, the RS640 provides even higher contrast ratio, even tighter spacing between pixels, more lumens, better motion enhancements, better 3D display and a low latency mode for gaming (yay!).
There is one negative to all these improvements and that’s long HDMI sync times. When the incoming signal changes format (resolution, color space, etc), it can take upwards of 10-20 seconds for the projector to sync up and display the content. Until it does, you’re looking at a black screen. This never happens in the middle of a movie or anything, but there can be several re-syncing points on say starting up an UltraHD Blu-Ray disc for example. (Displaying the previews, displaying the menus, displaying the movie rating screen, finally starting the movie – all depending on how the disc content was encoded.) This long syncing issue seems to be common with other 4K/HDR-capable projectors as well. I don’t really understand how it can take this long. (Processors/electronics are fast!)
Anyway, that aside, the JVC RS640 puts out an outstanding image. JVC DILA projectors have long been remarkably great, particularly with contrast ratios and producing truly deep blacks and shadows, but now being able to display content in HDR on a huge projection screen is fantastic. The range of intensity and color is outstanding. Very cool. ;-)

Now, on to some tips for setup and configuration:
HDMI Cables for 4K/HDR
4K/HDR requires a lot of data to be streamed over those HDMI cables. Up to 18 Gbps in fact, with full resolution, frame rate and bit depth. This isn’t too hard over short runs though you will find that some cables are too cheaply made to even handle a short distance. Getting that much data across a room 20-40 ft or more is surprisingly challenging with copper wire cables. When I set up this incarnation of my home theater in early 2012, I did buy what was then considered a high quality, high performance HDMI cable but things have changed and now HDMI has to carry a whole heck of a lot more data. I was really hoping my old HDMI cable would work with 4k/HDR so I wouldn’t have to feed a new cable up through the walls from the crawl space below the house again. Well, while it continued to work for 1080p, no joy for the 4K/HDR signal.
There are lots of HDMI cables sold at the length of 40-50 ft that I need (active and passive) but it turns out a lot of them don’t actually work. (See the complaints on Amazon and various home theater forums.) Happily, I came across this fantastically thorough test of many different cables from Arrow Audiovisual posted on the AVScience forums with all the results organized in a nice big table. (You’ll need to click the link in the first post to download the full report in pdf form.)
Amazingly, most of the cables failed at least some of their tests, including some that folks had been recommending. Two models passed all their tests though. I ended up going with the Ruipro Ultra-Slim HDMI Active Fiber Optic cable at 15m/50ft and it’s working great so far. I recommend it or the alternative from Monoprice: SlimRun AV HDR Cable for HDMI.
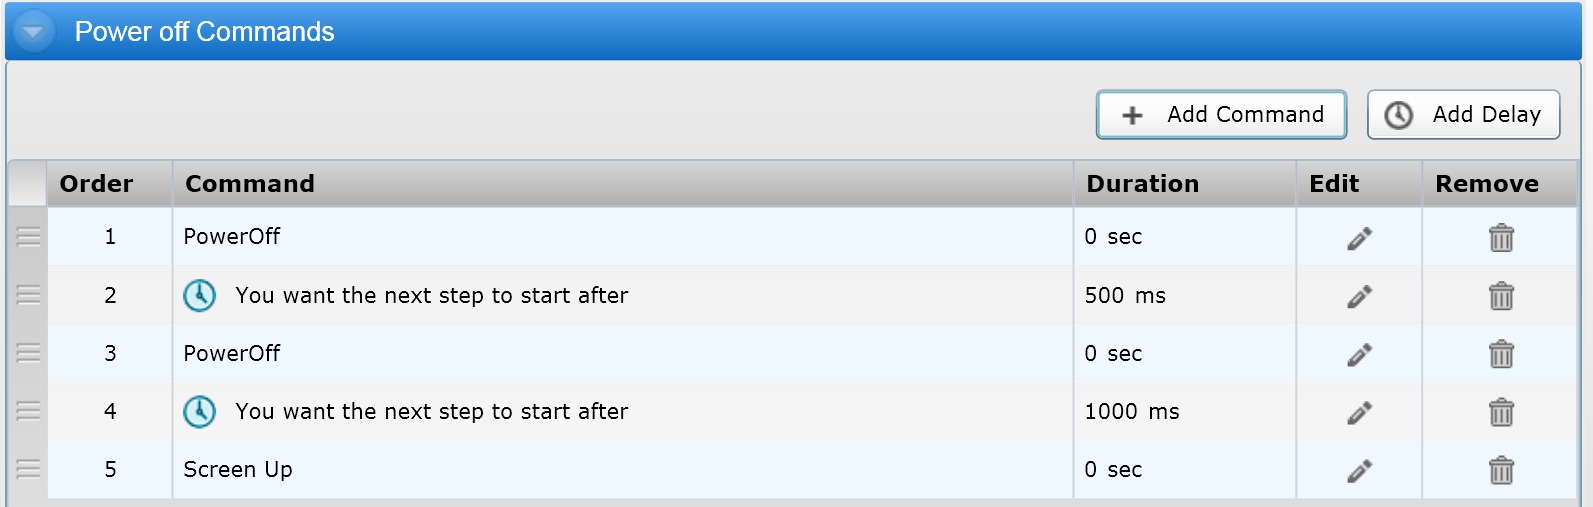
Harmony Remote Power-Off Settings
Just a quick tip for Harmony remote users: to get the projector to power off successfully, you’ll need a delay between and after your power off signals:
3D Glasses for JVC Projectors
The JVC RS640 projector works with the radio frequency based JVC PK-EM2G emitter and 3D glasses. The JVC-branded glasses (PK-AG3G) work well but they are pretty pricey at $160-180 or more, depending on where you get them. (I found the best price at AVScience.)
There are also third-party 3D glasses that are compatible and much cheaper (like around $40) from XpandVision but this is where things get tricky. The readily available version (Xpand X105-RF-X1) will work, but they’re noticeably dimmer than the JVC model. (See my photos below.) However, I found out with a bit of web searching that others have noticed this problem and discovered that there is another, hard-to-find model that works well with JVC projectors.
Apparently the issue is that JVC projectors emit horizontally polarized light and some projection screens (like my Stewart Filmscreen StudioTek 130) retain some of this polarization and the Xpand X105-RF-X1 apparently are polarized in such a way that they block this light and so you get a noticeably dimmer image with them. (All 3D glasses dim the apparent image somewhat though.) According to XpandVision customer service, JVC is the only manufacturer that uses horizontally polarized light. It’s also true that many projection screens don’t retain polarization so this won’t affect everyone equally.
Xpand X105-RF-X1’s give a dimmed view as compared to the JVC’s (click to enlarge):


However, there is another Xpand model that lets the horizontally polarized light through: Xpand X105-RF-X3. The X3 version works much better and is quite comparable to the more expensive JVC glasses and I’m happy to recommend them. Here’s what they look like compared to the JVC model:


The weird thing is that XpandVision is keeping them almost secret. They appear to be currently only available online from the UK. They’re not even mentioned on XpandVision’s web site outside of their support forums. So currently you have to email them to request ordering the X3’s from them directly. And they cost several times more than the X1’s at $100/pair currently but still much less than the JVC’s. They say that this higher price is because there isn’t much demand for them but it would seem difficult to gauge demand if you don’t tell anybody about them and you currently sell another model that you advertise as fully-compatible!
Picture/Gamma Settings for 3D
I haven’t worked on optimizing my 3D image display yet (besides getting better glasses as explained above) but I found this good looking set of suggestions for brightening the 3D image in this review, under “Configuration 4 Settings – Bright 3D Picture”. The default 3D settings work well so far, but I’ll be trying out these settings and update my comments here.
Picture/Gamma Settings for SDR (non-HDR content)
I haven’t really spent any time calibrating for SDR (standard dynamic range or non-HDR) content as I found that the “Natural” picture setting looks pretty good as is. At some point I’ll put a little time into SDR content and make sure the clipping point for blacks and whites is spot on. I’ll update this section when I do:
Picture Setting: “Natural”
Contrast: 0
Brightness: 0
Picture/Gamma Settings for HDR
This is where things get a little complicated. You’re going to want to make some adjustments to the projector’s settings to get the best picture for your environment. You most likely won’t see anything that close to what your projector is capable of in your environment with the default settings. This has always been true with any projector because the resulting picture will vary widely based on so many factors: screen size, screen material, screen gain (if any), distance from projector to screen, the color and distance of the walls and ceiling and how much light they’ll reflect back on to the screen and of course personal preference. It’s not possible to just punch in somebody else’s settings and expect to get the best picture. It’s even more of a challenge with HDR, but you’re obviously going to want to see the results of that promised, spectacular, high dynamic range and wider color gamut. (And speaking of color gamuts, there are multiple gamuts to choose to support with HDR.)
There are several options to calibrate the projector for your room. The easiest and most expensive of course is just to hire a professional calibrator to do it. (Of course, there’s always the difficulty of finding someone who really does have the skill and knowledge of your equipment that they claim to have.) You can also get your own calibration equipment and software and learn to use it to calibrate the projector. Lastly, you can just make adjustments based on viewing various scenes from various sources (including test patterns) to work towards a satisfying picture. This does take some understanding of what all the various possible combinations of adjustments do to the picture. Presumably this won’t be as ideal as a professionally calibrated setup but you can get great results – and certainly much better than the defaults. As with my previous projectors, that’s what I proceeded to do here.
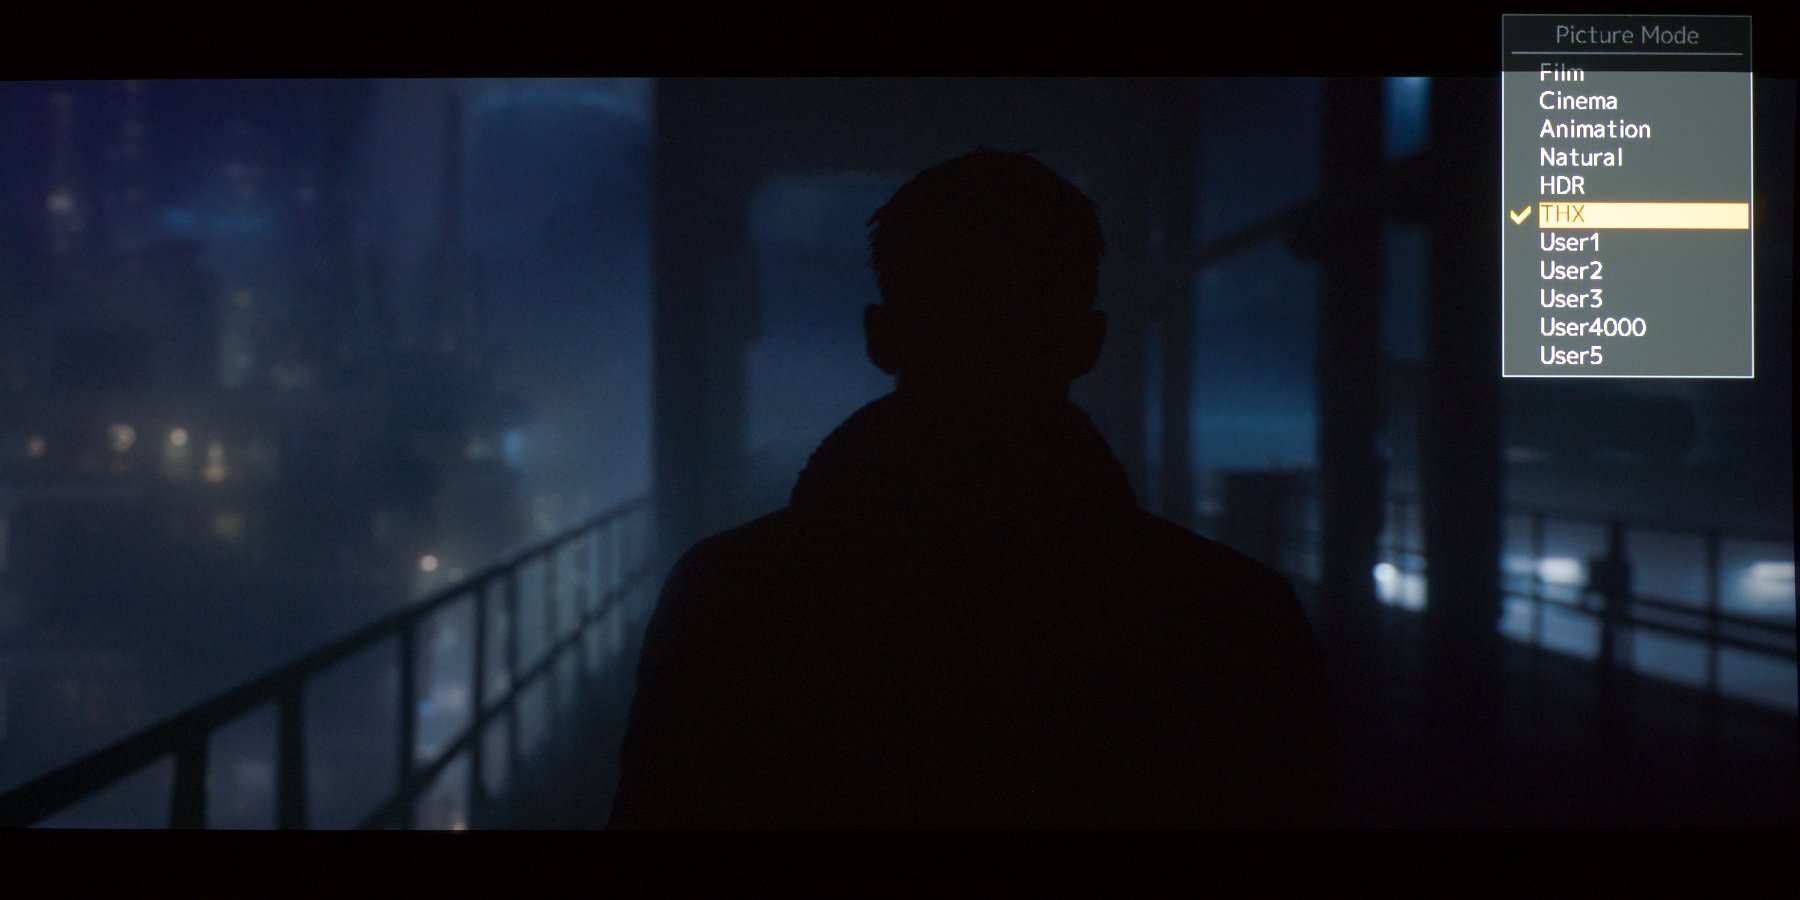
Note that the JVC RS640 projector will automatically select the picture mode “HDR” when it receives HDR input. This is very convenient as it means you can set up the “HDR” picture mode separately from whatever other picture modes you want to use for non-HDR input and it will automatically select one or the other.
I started with some suggestions from others that seemed like a good starting point – all for the “HDR” picture mode:
Lens Aperture: AUTO2 and 0 – Both auto settings engage the dynamic iris which adjust the aperture in real time to improve contrast, as opposed to the manual setting where the aperture is fixed. Note that if you switch to manual and set a smaller aperture, both auto settings will use that as the maximum aperture for the dynamic iris. I’ve read that the difference between AUTO1 and AUTO2 is that AUTO1 also applies some image processing to improve contrast. I’ve also read various suggestions on what to set as the maximum aperture to enhance contrast and the black floor. Here’s a great, detailed write-up on this setting and the effects of the dynamic iris.
Clear Black: LOW – This apparently involves some sort of processing (sharpening?) to improve localized contrast. Most people recommend leaving it set at low or, if being a purist, turning it off.
Low Latency: OFF – This function greatly reduces the amount of latency before each frame is shown which is greatly helpful when playing games requiring fast response to events on screen. However, I’ve read that you get a better image if it’s left off for watching movies, etc.
Clear Motion Drive: LOW – This option does frame interpolation to smooth motion. Typically such features give a film the infamous “soap opera effect”, like it was recorded in video, but JVC has improved this function so that the low setting no longer has that effect. It looks good.
Lamp Power: LOW – As with other projectors, I feel the noise of the fan in high mode is just too distracting. (And it also shortens the life of the lamp.) This presumably means the overall picture won’t be as bright as possible, but as I use my projector in a darkened room with no bright lights or bright reflective surfaces to overcome, I find that low lamp power mode is already glaringly bright when a bright scene is on screen.
Color Profile: BT.2020, Color Temp: HDR
MPC Level: see below
Gamma Settings: see below
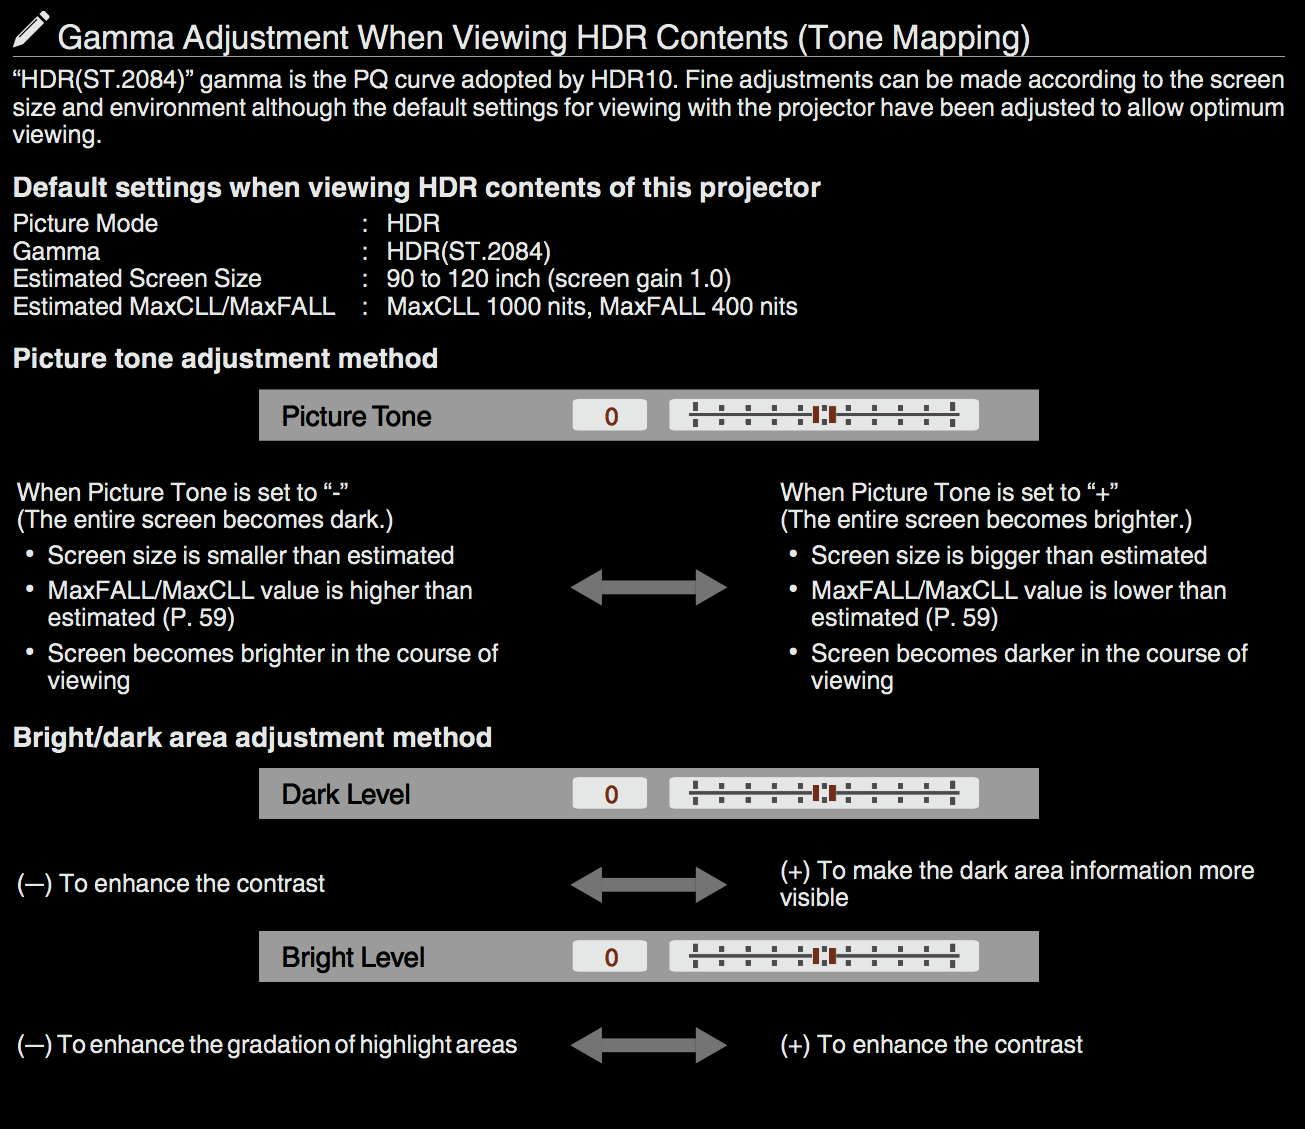
Leave all the general settings (contrast, brightness, color, tint) at zero for now and proceed to explore the gamma settings. This is where the finest effects on dynamic range, contrast and gradation will be made. The goal is to get the broadest range from black to white, but not merely a flat, lifeless image. You want enough contrast to create “depth” and “punch” and bring the image alive without clipping/losing either the shadows to black or the highlights to white.

I recommend starting with HDR(ST.2084) but then switch to one of the “Custom” gamma slots to try out the various Gamma Correction values. Once you find some favorites, you can assign a group of settings to each of the three custom gamma slots so that it’s easy to switch between them, retaining different settings of Picture Tone, Dark Level and Bright Level for each Gamma Correction value. You’ll then also want to use several of the User Picture Modes to combine these gamma settings with various contrast/brightness or other picture settings. Remember to look at very dark scenes, very bright scenes, wide dynamic range and mid-tone scenes to tweak all these values and see their effects.
Here’s the relevant section on gamma adjustments from the JVC RS640 user manual – note the recommendation to compensate for screen size:
I used the Ultra HD Blu-ray version of Blade Runner 2049 and selected a number of different scenes to pause on and try out many different gamma settings to see how well each handled shadows, highlights and overall contrast. It was necessary to also adjust each gamma selection by tweaking Picture Tone (affects contrast and intensity), Dark Level (pulls up dark shadows) and Bright Level (maintains highlights). I also used the wonderful Ultra HD version of Planet Earth II from the BBC to confirm these settings with more natural landscapes. It was particularly useful for checking highlights with scenes of snow and surf.
Keep in mind that using the full menu to make adjustments will interfere with both the projector’s display of the image and your perception of it. If you set up some custom picture modes or gamma settings, you can switch between them with the dedicated remote control buttons and keep the big menu off the screen.
Admittedly, I got a little frustrated switching back and forth between a few scenes on a couple of different disks to judge whether the shadows or highlights were being crushed and the corresponding impact on other scenes. I couldn’t find any HDR calibration/test pattern discs for sale on Amazon but I did eventually find a nice, comprehensive set of UHD test patterns which can be purchased and downloaded from Diversified Video Solutions. These did the trick. With the provided black clipping and white clipping patterns, I could finally adjust the gamma settings and contrast/brightness with confidence to clip at the appropriate level.


Testing out the various gamma curves, I like the HDR(ST.2084) gamma a lot as it makes for a very contrasty, intense image although it tends to run a bit dark and without significant adjustment it will crush the deepest shadows into black. The following settings lighten things up enough and bring out the deeper shadows to just above reference black:
Gamma Settings: HDR(ST.2084), no correction value
Picture Tone: +9, Dark Level: +7, Bright Level: -7
Contrast: +13 (near 1000 nits clipping pt) OR 0 (4000 nits clipping pt)
Brightness: +8 (deeper black) OR +16 (reference black and more extreme shadows visible)
The other gamma curve I like is “B” which runs brighter and it makes it easy to bring out the deepest shadows while still keeping that depth and intensity. It’s not quite as punchy as the ST.2084 gamma setting.
Gamma Correction Value: B
Picture Tone: +6, Dark Level: +7, Bright Level: +7
Contrast: +28 (near 1000 nits clipping pt) OR 9 (4000 nits clipping pt)
Brightness: -4 or -3 (deeper black) OR +3 (reference black and more extreme shadows visible)
With the “B” gamma curve and using the UHD test patterns for black clipping, I found that I needed +3 for Brightness to meet the recommended proper clipping for reference black (0% or 64). However, I found I might prefer bringing the black point up a little bit (with Brightness at -4 or -3) so that scenes like the following have deeper blacks. (Here’s someone who came to the same conclusion with some nice additional tips.) On the other hand, it may just be that this scene was intended to be rendered this way, not so black. For what it’s worth, the THX gamma shows it blacker:

The white clipping point (most affected by “Contrast” setting) isn’t straight-forward at all as apparently UHD sources can vary between targeting 1000 or 4000 nits (or even 10,000nits?). So what’s the best to shoot for? I found that making it clip near the 1000 nits point (723/75.2%) made for brighter, more intense images with both Planet Earth II and Blade Runner 2049. I’ve saved a separate set of picture settings with white clipping at 4000 nits in case that proves useful for some sources. (I’ve read, for example, that Mad Max: Fury Road has highlights up in that range.)
I’m finding that my settings based on the ST.2094 gamma seem to make a hard curve at the top so that the brightest whites are completely crushed with the (rare, so far) 4000 nits sources but the settings I made based around the “B” curve must make for a softer roll-off because detail is still discernible up there. Unfortunately, the “B” curve is not quite as punchy or dramatic with mid-tones as ST.2094.
My understanding is that if I were to use a tool to create a custom gamma curve, I could have a soft roll-off between 1000 and 4000 nits so that I would not have to switch gamma settings for different HDR sources. Also, a custom gamma curve would eliminate the need to use the Contrast and Brightness settings to set the black and white clipping points. On the other hand, I’ve read arguments that there really isn’t much above 1000 nits since studios tend to optimize for common consumer displays. (“Clipping at 1000-1500nits means that 99% of the time, you clip nothing in real content and 1% of the time, you clip a few highlights in a non visible way. You lose barely anything (because most of the time it’s simply not there, even in titles which occasionally reach above this) but you get a lot of brightness and native contrast back.”)


Remember that these settings are what optimized the image for my home theater environment (and my tastes) and would not necessarily be ideal for yours. My home theater is light-controlled and the walls and high vaulted ceiling are painted a dark color to avoid reflecting light back on to the screen, but I do have a light-colored carpet that reflects a fair amount of light. The projector is mounted about 22 ft back from the screen which is set up as a 2.4 aspect ratio at 12 feet wide and five feet tall. The screen is a Stewart Filmscreen StudioTek 130 which has a 1.3 gain surface (30% brighter than matte white). I tend to run the system with the lights out, though it works well with some indirect lights on.
Keeping in mind how very different these images will look on one display vs. another, I’ve provided a bunch of photographs of different scenes to try to illustrate the differences in some of the various gamma settings I used as I tried to optimize for various scenes.
Click through and use your arrow keys to quickly switch between them:


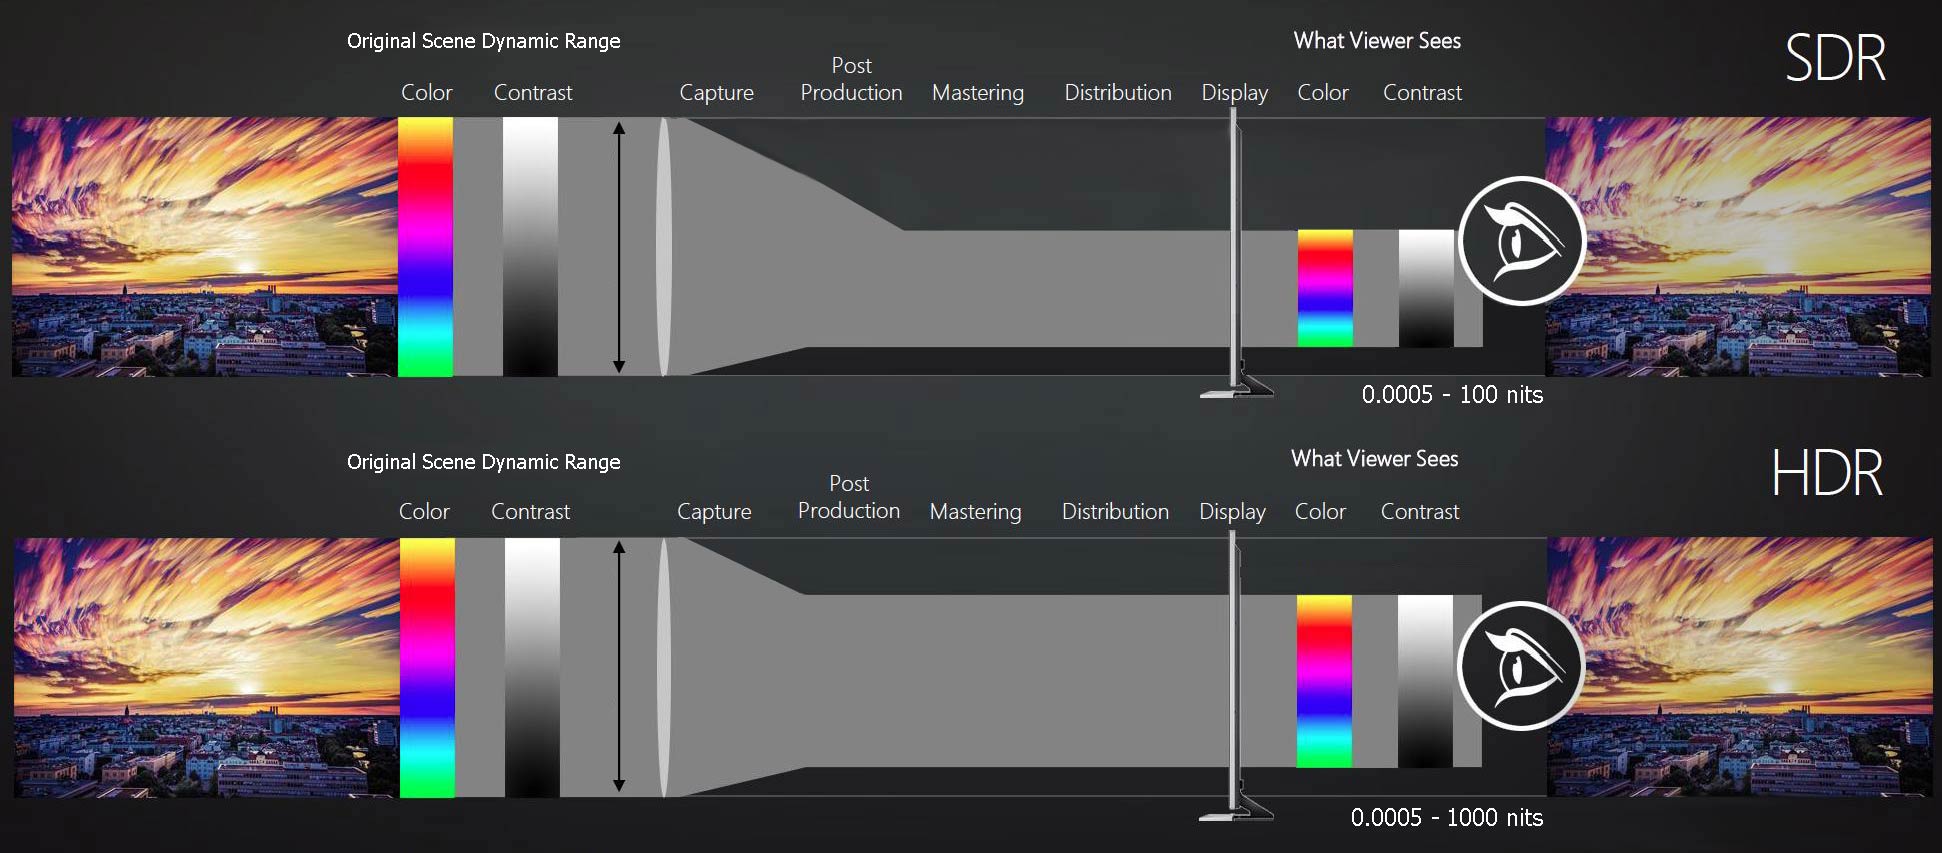
For anyone interested in more background information about Ultra HD (4K resolution, high dynamic range (HDR), wide color gamut (WCG), etc), this guide offers an extended and well-illustrated explanation of the various aspects of the technology. Here, for example, is a nice, corrected representation of the difference that HDR provides over the older, standard dynamic range (SDR) display technology:
MPC (Multi Pixel Control) Settings
I noticed after working with the gamma for a while (and after putting in the UltraHD version of The Fifth Element), that the default MPC settings (Enhance: 5, Smoothing: 2) was bringing out a lot of noise in The Fifth Element. It looked okay with Blade Runner 2049 and Planet Earth II, but pretty awful with The Fifth Element. After trying out various levels of MPC and switching between all the discs, I settled on the following settings which strike a nice balance in bringing out detail:
MPC Level – Enhance: 2, Smoothing: 0; NR: 0
This happened to be the same settings for MPC recommended elsewhere, like in this review.
Click through to see some more sample photos of the differences between the default, zero enhancement and my settings:


Pixel Adjustment
The JVC DLA-RS640U provides a mechanism to fine tune the alignment of your pixels (red/green/blue) in both whole and fine sub-pixel increments. I found that my projector arrived in good alignment but I was able to identify and get rid of just a tiny bit of color fringing (apparent only on the white grid) using the “Whole Adjust (Fine)” feature. These were the results for me:


7 comments
Do you know where I can find the xpand 105 X3. Can’t seem to find that anywhere
Hi Levi, as I wrote above, besides some online listings in the UK, the only way to get the X3 version is to contact XpandVision directly. That’s how I got mine.
And for others, it looks like the X3 version is no longer needed for newer JVC projectors as they’ve changed how the light is polarized – at least according to someone in an av forum post.
Excellent write up. I will be using the setting here to setup my X790 projector. Do you have recommended settings for SDR (regular Blu-ray?netflix etc) ?
I have not yet tweaked settings for SDR but I’ll add notes to this page when I do. I haven’t noticed any issues in SDR so we’ll see. I’ve been using the “Natural” picture setting without any further adjustments.
What is annoying is that I’m seeing that I really do need to switch between two different HDR settings (1000 nits vs. 4000 nits) depending on the specific movie/source, which is nuts! Why did we have to end up with multiple HDR encodings?! And the need to switch the settings manually?!
Have you tried Jav’s curves? I have used your settings and they are a good starting point but with 4K mkvs, the HDR is too contrasty and picture looks weird so switching back to “Natural” makes it better but then the “pop” is gone.
Also, on some of the movies I have noticed there is excessive noise that I don’t recall seeing before. Movies like Braveheart and Saving Private Ryan show a lot of noise causing lack of detail. Maybe that’s how just how they are in 4k?
I haven’t tried Jav’s curves or mkvs but I’m not seeing contrast issues. I’m surprised that you’re using Natural for HDR sources – are you sure your mkvs are providing HDR? It sounds like they’re not which is why you get contrast issues and have to switch to an SDR setting.
As I described in my write-up, the only issue for me has been dealing with how different HDR encodings can have different absolute white levels (max nits) which requires either switching between two different settings or setting up a custom curve to roll off near the top to better compromise between the multiple absolute white levels.
As for excessive noise, did you see my comments about that above with certain sources? See my “MPC (Multi Pixel Control) Settings” topic.
i very much enjoyed your review and opinions. in a couple of weeks i will try to post more comments after i receive my rs640.