|
[May 2000:] The Sony
VPL-VW10HT video projector is an LCD projector designed for the home.
It is relatively compact (compared to normal televisions, rear
projection TV's, or CRT projectors) and yet can project a very large
image (Sony says up to 300" diagonally). This projector is also
remarkably easy to set up and you get a pretty darn good image right
out of the box. That is to say that you don't *have* to do any
expensive modifications or buy additional hardware or do lots of
tweaking to get an exciting image. However, it's a nature of the beast
of home theater that you can spend a great deal of time perfecting the
image. As with all projectors at this time, it's not perfect. There are
complications.
I ordered my Sony VPL-VW10HT projector from  ProjectorPeople.com in early February 2000 after
seeing a demo in my area. There was a pretty long waiting list with
every dealer back then, but near the end of March 2000 it appeared that
Sony was finally getting this projector shipping in quantity. My
projector finally arrived on 4/19/2000. I've put this web page together
to help others (as I was helped) to create a little dream home theater.
The information on this page comes from using this particular
projector, but much of it applies to other projectors. ProjectorPeople.com in early February 2000 after
seeing a demo in my area. There was a pretty long waiting list with
every dealer back then, but near the end of March 2000 it appeared that
Sony was finally getting this projector shipping in quantity. My
projector finally arrived on 4/19/2000. I've put this web page together
to help others (as I was helped) to create a little dream home theater.
The information on this page comes from using this particular
projector, but much of it applies to other projectors.
[February 2002:] I've never quite
completed this page, but after two years I figured it was time to stop
claiming that this page "was still under construction". (Yeah, right.)
Hopefully you can get some value out of the information I already have
here. I recommend that you also check out some of the links I provide
at the bottom of this page to other sources on Home Theaters.
Oh, and to answer the single most common question I get
through email: Yes, I *am* still enjoying this projector. (Two years
now at the time I write this.) So, stopping putting it off! I know
there are new projectors coming out every few months but how many more
years are you going to wait for the "perfect" model?? Go get one and
enjoy it!
And to answer the same question another way: I won't be
interested in upgrading until somebody puts out a full HDTV (1920x1080
resolution) projector, in a compact package (like this one), with solid
blacks, excellent contrast, same or better color rendition, an
excellent scaler, same or less fan noise, no hacks or extensive mods
necessary, and for a reasonable price (same or less than this one).
(Click on any image on this page
for an
enlargement.)
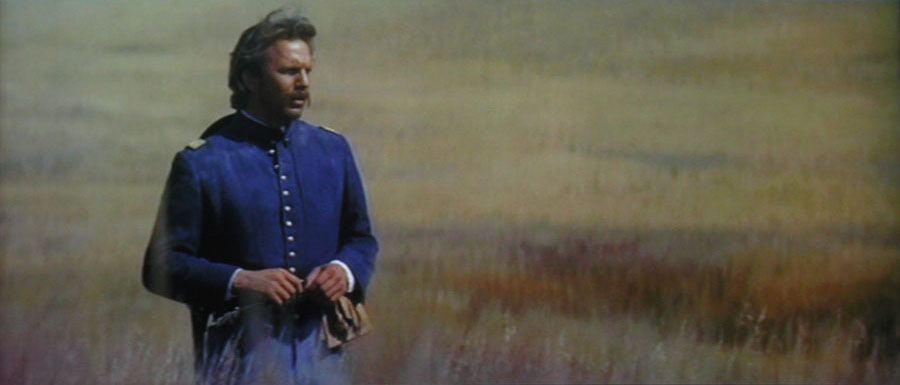
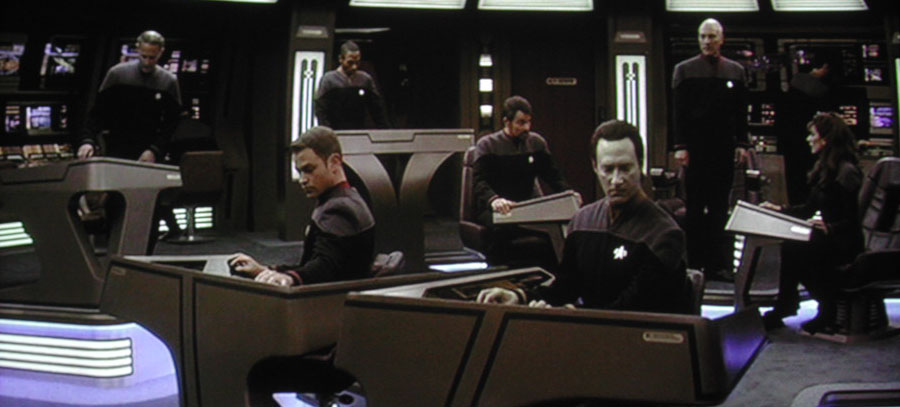
Overall Image Quality
For the price, the ease of setup, and the small form factor,
this projector produces a pretty wonderful image. I'd say its strengths
are probably its color rendition, brightness, and resolution (1366 x
768). Its weaknesses are its black levels, field uniformity, and the
built-in line doubler -- I'll get to these negatives later. First,
however, take a look at what this projector can do. Imagine these
images displayed in your home on a large (six foot? eight? ten?) wide
screen -- as big as you lilke:
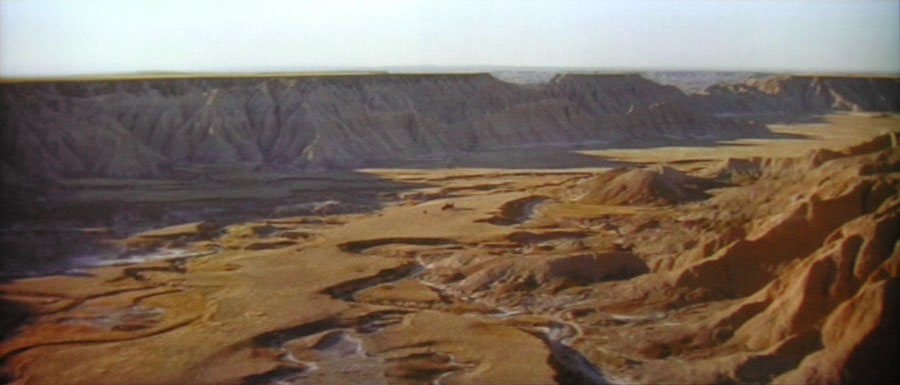
Yes, these are photos of the actual output of my
projector's image.
Not bad, eh? (Click for enlargements.) Look at those
colors! Look at the detail in the shadow areas!

Now, I must note here that these images were taken after I
made adjustments to the default factory settings. [At some point I'll
take another photo of what one of these scenes looks like using just
the default settings.]
Black Level
There's been a lot of discussion and worry over the black
levels that this projector can produce. The problem is that LCD panels
in current consumer LCD technology can't block all of the light from
the projector bulb to produce true black (absence of light). So some
light passes through and the projected result is a dark gray rather
than true black. Of course, you're most likely projecting onto a white
screen anyway and that's not going to appear black unless no light
reaches it all. (Note that a normal television set doesn't even have a
black picture tube -- it's just a very dark gray.) Those parts of the
image which are not black are going to reflect light back towards the
audience and the rest of the room. This light will scatter off the
walls and ceiling and eventually fall on the part of the screen that's
supposed to be dark.
Thanks to the way the mind interprets what we see, we can
perceive black from a pure white surface if everything around it is
much brighter. This is contrast. With higher contrast, the difference
between the "whites" and the "blacks" is greater and so is the
perceived brightness and darkness.
It is also possible to reduce the amount of scattered light
which reaches the screen. Painting or covering the walls with darker
colors can help a great deal. There are also many screen material types
and some screen material is more directional and will reflect light
more towards the audience and less towards everything else. Of course,
there is a trade-off with these screens in that this also means that
the image won't be quite the same from all viewing angles.

|
You can see in this photograph that a great deal
of light is scattering off of my matte white screen on to the very low
white ceiling, the walls, and then back to the screen (note the parts
of the screen above and below the image).
This effect can be reduced if desired by
darkening the surrounding walls and ceiling or by using a
retro-reflective screen. A retro-reflective screen sends the light from
the projector mostly back towards the projector and less light is
scattered.
|
Another possibility with screen materials is to get a
non-white screen -- even a silver screen! Da-Lite has a pretty nifty,
silver material but it's not available at large screen sizes. (See Choosing a Projection Screen below.)
There are also other forms of projection. Two other
varieties of LCD projection involve reflecting light off of or from
LCD's rather than passing light through the LCD's. These technologies
(DLP and DILA) can offer better blacks, but as always there are
trade-offs among technologies and various manufacturers'
implementations. (Check out prices, color rendition, white levels, fan
noise, ease-of-use, scaling and doubling quality, etc.)
Back to this projector's black levels... it's not bad. It
certainly doesn't compete with CRT projectors in this aspect, but then
CRT projectors can't compete in the ambient light category (see below).
With the following adjustments made, this projector does an acceptable
job for me:
1) Turn on Cinema Black mode. This lowers the output of the
bulb from 1000 lumens to 750 lumens. The bright scenes still seem
plenty bright and the dark stuff is much improved.
2) Turn up the contrast (white level) relative to the
brightness (black level). It's best to use a video setup disk like that
from Avia. But even simple adjustments can make a major improvement.
3) Extra credit: If you want to go further, you can adjust
the RGB Gain and Bias settings using the hidden factory menu and get
much more fine control. Adjusting your RGB Gain and Bias settings can
make a big difference in eliminating common green cast and greatly
improving black level without losing detail. (See Factory and Service
Modes below.)
 Okay, so the blacks aren't all that they could
be. See the difference between the black of this page (if your monitor
is adjusted correctly) and the black of space in the image above?
Okay, so the blacks aren't all that they could
be. See the difference between the black of this page (if your monitor
is adjusted correctly) and the black of space in the image above?
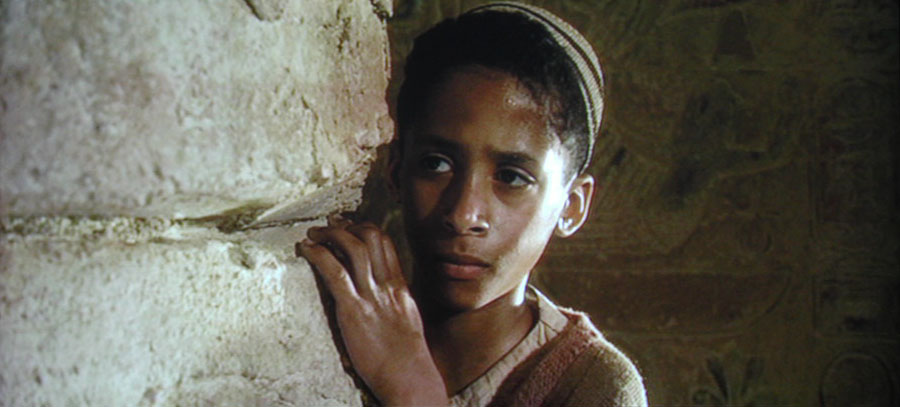
 On the other hand, look at the excellent shadow
detail in this image.
On the other hand, look at the excellent shadow
detail in this image.
|
 So, yes, there is room for improvement... but
while watching these bright, color rich, eight foot wide images in my
home, I'm not complaining!
So, yes, there is room for improvement... but
while watching these bright, color rich, eight foot wide images in my
home, I'm not complaining!
|
I certainly wouldn't complain about getting blacker blacks
and some day I may replace this projector with something new, but I'm
pretty thrilled with what I've got now (particularly in this price
range).
I should mention that a number of people have been using a
large neutral density camera lens filter (or similar material) to
darken the output from the projector and thus lower the black level.
Unfortunately, this also reduces the white level making bright scenes
seem a little dim by comparison to what you normally get with this
projector. I tried it with a graduated ND filter that I happen to have
but I wasn't happy with it.
UPDATE: There are now grey screens available which, by all
reports, perform remarkably well with LCD projectors and this projector
in particular. They are available from Da-Lite and Stewart but the
favorite seems to be that from Stewart despite the premium cost of
their screens. You can find out more about these screens in various home theater forums like the one at AVScience.
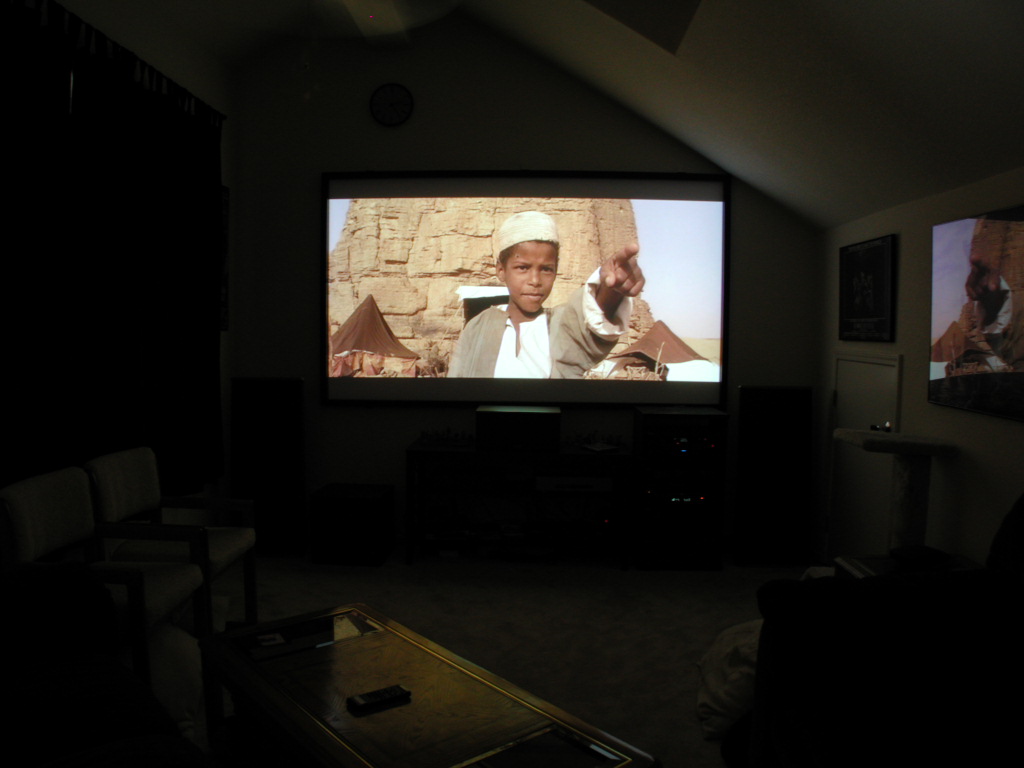
Ambient Light
This projector does extremely well with lots of ambient light,
particularly when compared to CRT projectors.
 In this shot, there's LOTS of ambient light in the
room and yet the projected image is quite watchable.
(Keep in mind that this photo does *not* depict how
the projected image appears to the eye. The image appears overexposed
in this photo due to the limits of the camera. There's much more light
reflecting off of the screen than there is light reflecting off
everything else in the room. Unlike a camera, the brain can compensate
for an extreme range of light in a scene like this and allow you to
still see everything.)
In this shot, there's LOTS of ambient light in the
room and yet the projected image is quite watchable.
(Keep in mind that this photo does *not* depict how
the projected image appears to the eye. The image appears overexposed
in this photo due to the limits of the camera. There's much more light
reflecting off of the screen than there is light reflecting off
everything else in the room. Unlike a camera, the brain can compensate
for an extreme range of light in a scene like this and allow you to
still see everything.)
|
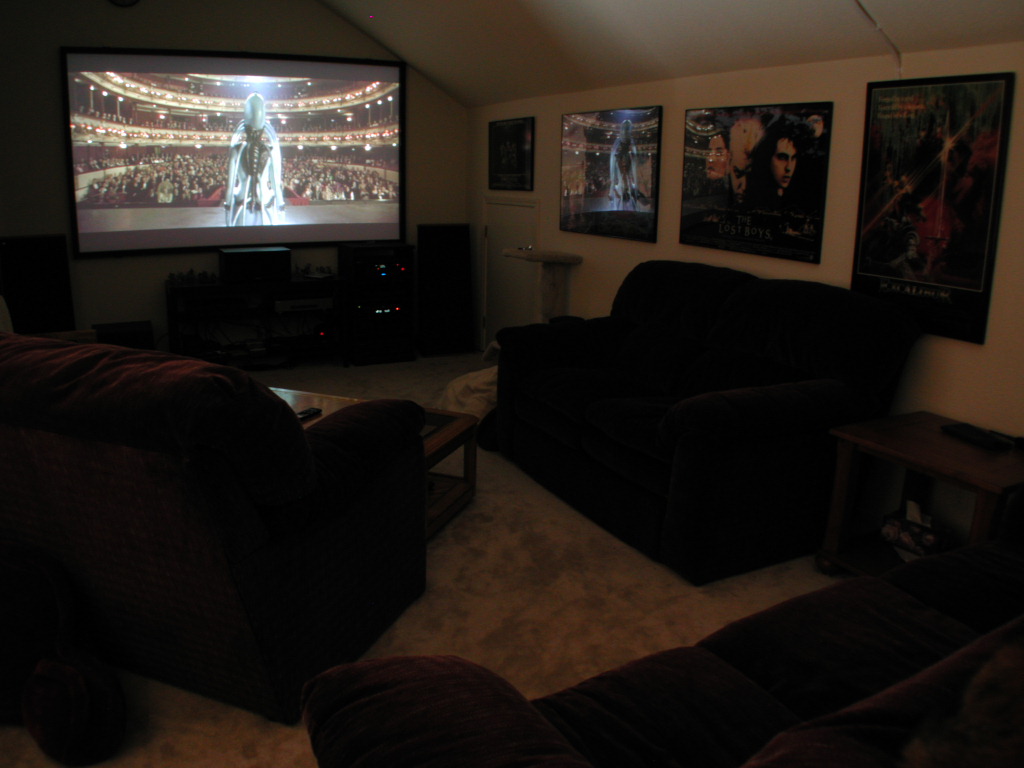
 In this shot, the overhead lights have been turned
off, but reflected light from downstairs (this is a loft) still fills
the room with plenty of ambient light. The point is that the output
from this projector is still very enjoyable with ambient light present.
In this shot, the overhead lights have been turned
off, but reflected light from downstairs (this is a loft) still fills
the room with plenty of ambient light. The point is that the output
from this projector is still very enjoyable with ambient light present.
|
Fan Noise (or the lack thereof) and ~Heat~
A common issue with all projectors is the amount of noise
that they put out as a result of discharging all the heat that their
lamps produce. Many projectors are downright aggravating and people
have gone to various lengths to build "hush" boxes or isolated
projection closets. Happily, Sony has managed to greatly reduce the fan
noise with this projector as compared to earlier LCD projectors. The
noise is comparable to an average desktop computer's fan. Certainly not
quiet, but very tolerable.
Another aspect of this is the heat itself. Most projectors
can easily make an unventilated room uncomfortable over the period of
an average movie. Since this is a loft, it already collects all the
heat in my home. I've found it necessary to run the central house fan
while using the projector in the summer to move the cooler air from the
lower parts up to the loft. The ceiling fans just don't help much when
you've got a virtual room heater running.
Problems, Issues, Caveats
These issues are all covered in great detail in Don Munsil's
Frequently Asked
Questions page.
Green "Fog" -- Field Uniformity
... explanation, improvements
Colored Blobs
... dust in optic path, describe defocus test. I've got two
now...
Dead Pixels
Yeah, I have one stuck blue pixel that I've noticed -- don't
worry about it. If you can see it from your normal viewing distance it
sounds like you're either sitting too close to the screen or your
projected image is too large. You shouldn't be able to see the pixels
at a normal viewing distance! For an eight foot wide image, you need to
get about four or five feet away to see the pixels if you have 20/20
vision. (This probably varies based on the type of screen material.)
Remember the image size to viewing distance rule of thumb -- you
probably won't be happy if your viewing distance isn't at least twice
the height of your projected image height.
Pixels vs. Artifacts -- "Screen Door Effect"
I don't know what all this talk about seeing pixels and a
screen door effect from 11 feet back is about. I have very good vision
and I see the pixels disappear after about five or six feet back on my
eight foot wide screen. Not one of my friends see the pixels any
further back and most are looking for them since they are aware of what
LCD technology is. I wonder where this 11 foot report is coming from.
Perhaps from a much larger image size than my eight foot wide one?
I also wonder if some people are confusing the MPEG
compression pattern from DVD's with the pixel pattern they expect to
see from LCD projectors. Is the compression pattern more apparent on
this projector? Could it be an effect of the scaler? There definitely
is often a grid-like block pattern visible when watching DVD's (as
opposed to HDTV). The grid pattern is made of many pixels per square
(if you get close enough to look). Now that I have a big screen, I wish
that DVD's had higher resolution! For poorly done DVD's with really
heavy compression, I find this square pattern to be distracting even
from very far back. Too bad they can't look like high-definition.
UPDATE: Since I've been using a higher-end,
progressive-output DVD player (Sony DVP-S9000ES), I've found that the
MPEQ blocky compression pattern is no longer as noticeable on even
average quality DVD's. (Junk DVD's still look pretty bad.)
Choosing a Projection Screen
I waited to order my screen until after my projector arrived
because I wanted to see the image quality at various sizes before
deciding how large a screen to go with.
It's surprising how good an image you can get with just a
plain white wall (textured yet!). Many have opted to just paint a
smooth wall with an appropriate latex paint and project onto that. I
decided I didn't want that quite a pemanent installation.
I also didn't have the need for the screen to roll up
(either electrically or manually) and I liked the idea of getting a
flatter, smoother surface by going with a wall-mounted, framed screen
where the surface is kept taut.
I went on the advice of many to order screen material
samples from some of the screen manufacturers (the samples are free)
and try them out. I also had a loaner screen from a friend to compare
with. The following page of results and photos is the result of trying
out these materials:
 Check out my extensive screen
material test page here for the details and photos.
Check out my extensive screen
material test page here for the details and photos.
So, how about that.... I originally had the impression that
I should just get the Da-Mat matte white but I get these samples and do
all these tests and take all these pictures and agonize over my choices
and narrow them down and then have my remaining choices eliminated for
me to where I'm left my original notion!
Funny that.
Well... I ordered my screen from Medical Video
Systems (Dennis Shepard was very helpful -- I recommend them
wholeheartedly)... it's Da-Lite's Da-Mat material mounted on a Da-Snap
screen. I also got a ceiling projector mount through MVS which is
designed for vaulted ceilings -- it's from Peerless. It's worth noting
that there is a great difference in pricing of screens of different
material, different frame types, and from different manufacturers. My
screen and frame was under $800 in May of 2000 while others of the same
size can cost over $2000.
Hanging Your Screen & Keystone Correction
Just a tip here. I'd suggest hanging the projector first and
getting the image positioned on the wall where you want it and get it
level and sqaure WITHOUT using the digital keystone correction feature
AND THEN hang your screen to match your projected output. The reason I
say this is that one, it just seems easier to me to position the screen
to match the projector's output rather than the other way around and
two, the digital keystone correction feature will degrade the image
quality. Sony's digital keystone correction is designed to compensate
for placement of a projector above or below the screen and eliminate
the naturally projected trapezoid (rather than rectangular) image. It
certainly works well, but it does it by scaling the video image
unevenly (either the top or the bottom will use more pixels
horizontally the the other). This will have a definite effect on your
image quality which is readily apparent when displaying high resolution
computer output, particularly straight lines and text. So, just avoid
it by placing your projector in such a way that you display an image
that doesn't need keystone adjustment. (In other words, project the
image directly forward rather than slightly up or down.)
Also, remember the image size to viewing distance rule of
thumb -- you probably won't be happy if your viewing distance isn't at
least twice the height of your projected image height.
Line-Doublers and Scalers
Line-doubling is necessary to compensate for this old
interlaced video format we all still have to live with. Interlaced
video reduces the bandwith of video by splitting a full video image
into two frames (or fields) of alternating lines. Each field contains
one half of all the lines of the image. If the two frames were present
at once, you'd see the entire image intact. Unfortunately, since
objects are moving in the image and each frame is taken after the
other, you see every other line of where the image was followed by the
alternate lines of where the object is, and so on. The result is that
moving objects and images appear to have jagged edges.
Line-doubling tries to eliminate these motion artifacts by
combining these two fields and applying some algorithms to clean up the
image.
Here's a great explanation of line doublers and scalers from
Don Munsil -- posted on The Big
Picture Forum on April 30th, 2000 -- reprinted here with permission:
I wrote up a quick description of
the difference between line doubling and scaling on the D-ILA forum,
that I thought was apropos here as well. If I got anything wrong,
please post or email; this is just my attempt to gather together a
simple description of the technology.
There are two things that need to be
done to display an interlaced image on a digital (LCD, DLP, or DILA)
projector: de-interlacing (also called line doubling) and scaling.
De-interlacing can be done really simply by just doubling each of the
interlaced lines so it's repeated twice on each of the progressive
frames, but you lose perceived resolution and detail, because your
apparent pixels are twice as tall. Effectively you're turning a 720x480
interlaced frame into a 720x240 progressive frame. This method of
de-interlacing is called "bob."
You can also grab the first field
(the first half of the interlaced frame, just the odd lines), hang on
to it in memory, and then fill in the even lines from the next field,
then output the whole frame as a full 720x480 progressive frame. This
technique is called "weave."
On certain kinds of material, weave
works perfectly, specifically static pictures, and video that was
originally sourced from film, like most movies on DVD. On normal video
material that came originally from a video camera, weave looks really
bad, because moving objects are captured at different positions on the
two interlaced fields, and when you weave them together, they look
funny, like they have spiky "combs" sticking out on the sides. And when
the camera pans left or right, every other scan line is slightly
offset, which makes the whole display look strange.
So the next step up in linedoubling
is to automatically detect whether to use bob or weave. If there's lots
of motion, the doubler bobs. If the scene is relatively static, it
weaves.
The next step up is to selectively
bob or weave different areas of the screen, on a pixel-by-pixel basis.
If the doubler believes that the area of the screen is remaining static
(or close enough), it weaves that area, and if there's lots of movement
(i.e. the pixels are changing quickly), it bobs that area of the
screen. When this is done poorly you see odd artifacts around moving
objects, where the transition from bob to weave happens.
The next step up is to do motion
analysis on the image to see if perhaps the doubler can weave in the
next field, shifted slightly a few pixels so it matches up correctly.
This can be done for the whole screen, to make pans look good, or
selectively for moving areas. Again, done poorly the result is strange
artifacts around moving objects.
And this is just the beginning.
Really expensive doublers like the Faroudja are appplying lots of
different proprietary algorithms to attempt to compensate for motion,
smooth artifacts, selectively weave, etc.
Now, once the image is
de-interlaced, then it needs to be scaled to the native resolution of
the display. This is not necessary for CRTs, which can change their
resolution as needed to match the source, but for a digital display,
there are exactly X by Y pixels, and the image needs to be scaled.
Scaling is a much easier and better
understood operation, and there are well-known algorithms that scaled
bitmapped images with very few artifacts, but some of those are
relatively computationally expensive, and so some projector
manufacturers (really, most of them) have opted to cut corners and use
more approximate scaling that is "good enough."
From everything I've seen, the
scaler on the Sony, in contrast, is very very good. The line-doubler is
adequate, but not the best. So if one wants to get better looking NTSC
video, a pure linedoubler like the IScan Plus would be a great match,
but a doubler/scaler like the Quadscan or Crystal Image would be
overkill, and at this point would be unable to drive the projector at
its native resolution anyway, so you'd have to either output 480p from
the scaler, which wouldn't scale NTSC sources at all, or output 720p or
1080i, which would still be scaled by the Sony, resulting in double
scaling, which is generally bad because sharpness is almost always lost
every time you scale to a non-integer multiple.
Similarly, pairing a
progressive-scan DVD player or PC that can output 480p is a great
addition to a 10HT, because the output is de-interlaced in the digital
domain (in the case of film-sourced material, it was never *really*
interlaced to begin with), and again the only thing the Sony does with
the image is scale it, which it does well.
Hope this is useful.
Don
I agree with Don that that the scaler on this projector is
very good and that the line-doubler is probably adequate for many
people. However, I *really* get distracted by motion artifacts like the
"jaggies" that this projector's built-in doubler leaves behind. You can
see this on smaller television sets as well, it's just more pronounced
on a BIG screen.
Even when watching normal film projection in a movie
theater, I find it impossible to see what's happening when the camera
pans -- everything just appears to be flashing to my eyes. The illusion
of motion is lost for me if the whole scene is panned. I can't even
make out the action until the camera stops again. This problem is
caused by the relatively slow frame rate of film today: 24 frames per
second. It's normally plenty to fool the brain in to seeing things as a
steady image rather than as the flashing of 24 different images every
second. However, for some people, 24 fps is not enough when the entire
scene changes (because the camera is panning).
Anyway, this projector does have a built-in line-doubler but
it doesn't do a great job. You will see jaggies. Thus, this brings me
to external line-doublers....
External Doubler/Scaler: AVScience Crystal Image
The AVScience Crystal Image video processor does cost much
less than the expensive stuff but it is still not that inexpensive
compared to the cost of this projector. I bought the Crystal Image to
improve on the projector's built-in line doubler/quadrupler and it does
do a great job in this respect. However, the Crystal Image is a full
video processor and as such it also lets you muck with the color, tint,
contrast, etc. Unfortunately, that means that I then have TWO places in
the chain to adjust.
I found that the default settings for the Crystal Image
resulted in extreme flaring of white areas and some bleeding and
over-saturation of colors. I had to set some pretty darn low values for
brightness and contrast to get a proper picture with the combination of
the Crystal Image and the Sony 10HT. I've also encountered some
limitations using the Sony 10HT with this scaler since the projector
won't sync at its native resolution and still give control over aspect
ratio. (This is the projector's fault, not the Crystal Image.) I have
to sync at DTV 720p signal or 480p in DTV GBR mode, rather than at
native resolution because the projector won't do 16:9 when it sees any
other signal.
The projector won't sync to output of Crystal Image while
fast-forwarding a tape -- the projector loses the sync. This doesn't
happen when using the projector's S-Video connection.
I've sold my Crystal Image and purchased a progressive scan
DVD player. I decided I didn't really care about upconverting other
video sources (VHS, non-HDTV) and this projector does a good enough job
with its built-in doubler/scaler for these other sources. I primarily
use my system with DVD's and a progressive scan dvd player can do a
better job then an external scaler.
External Doubler: DVDO IScan Plus
I've seen demos of the DVDO and it does do a remarkable job.
However, I don't own one. Rather than trying to describe what I've
seen, I'll just suggest that you search some of the home theater forums
for information on this product. See my links to forums at the bottom
of this page.
External Doubler: Progressive DVD Players
Progressive DVD players convert the interlaced video on the
DVD to non-interlaced form (progressive) immediately. This seems like
the optimal solution to me. By doing the line-doubling in the DVD
player it's possible to do this digital manipulation while the image is
still in its original digital form inside the DVD player -- as opposed
to converting it back to digital after it has been converted to analog
on the way out of the DVD player. This seems like it would result in
less degradation. And don't forget the signal still has to go back to
analog after being doubled! (When are we going to get digital inputs
and outputs with home video?)
There's even a long promised progressive DVD player from
Proton that's supposed to make use of DVDO's newer chip and provide
inputs for all your other interlaced video sources. This player will
then do line-doubling on all your video sources (much as the Crystal
Image and other expensive doublers do).
I'm now using a Sony DVP-S9000ES progressive player. I've
found that this player produces an excellent image which is noticeably
better than my previous not-too-shabby player (Sony 7700). It's better
in that DVD/MPEG compression artifacts are not as noticeable and it
does an excellent job with deinterlacing. For more information about
this DVD player and others, check out some of the home theater sites
listed at the bottom of this page.
Factory and Service Modes
... describe access to modes, show table of factory settings
and adjusted values, describe differences between factory and service
modes
To enter service mode, press: [ENTER] [ENTER] [UP] [DOWN]
[ENTER]
To enter factory mode, press: [ENTER] [ENTER] [LEFT] [ENTER]
ROM version accessible under "Status" panel
...Recommend adjustment of RGB Gain and Bias; explain goal,
quote some settings. <--- VERY WORTHWHILE ADJUSTMENT!
See Frequently Asked Questions link below!
My current custom setting: Gain -- R: 255, G: 180, B:
170 Bias -- R: 90, G: 101, B: 95
Cables, Ground Loop Hum, and Other Interference
Are you getting hum from any of your speakers or audio
components? Do you see video noise on longer lengths of cable?
Ground Loop Hum: I had a subwoofer that made a loud
enough when my audio compoents were on that I couldn't use it. I sent
it for repair several times and nothing ever improved. And then I found
out about ground loop noise introduced by.... your cable TV system!
Well, check this out: Ground
Loops... Or "Let Me Hum a Few Bars" and then go buy a coaxial ground breaker.
Problem solved! (I wish I had searched the web to begin with!) This
also seemed to eliminate noise I was seeing on a long run of S-Video
cable.
Cables: Just go buy some coaxial cable! It makes all the
difference! Just be sure to get RG-6 (available in most hardware stores
and Radio Shack) as opposed to the slightly cheaper, less insulated
RG-59. You can also go for cables that are somehow custom designed for
home theater systems (see the FAQ below) but I don't know if there is a
significant difference. There IS a big difference though when using
coaxial over normal RCA-type shielded video cables.
Video Scan Noise: Do you see a horizontal pattern of
interference that travels up or down your projected image for some
video sources?? Get your AC power cords away from your video cables!
And try to avoid coiling them -- that produces a stronger
electromagnetic field.
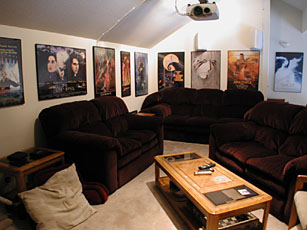
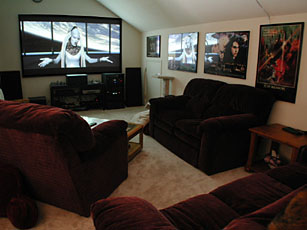
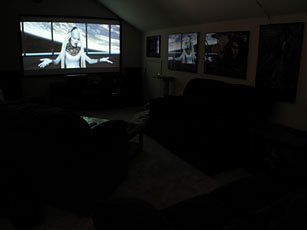
More Photos and Information
More views of the loft I
converted into a home theater.
Images and notes from a demo I saw
before deciding to go with the 10HT.
Frequently Asked Questions
Here's an archived copy of the excellent FAQ
(Frequently Asked Questions) page put together by Don Munsil.
|