(First published January 2014)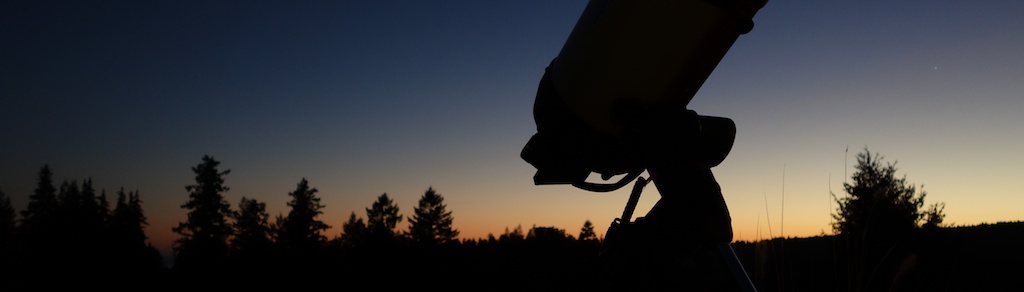
Thank goodness for the wealth of easy information sharing on the web. Would’ve been quite different diving in back in the early 90’s. Of course the gear has advanced a lot too. So here I am sharing the experience of jumping in relatively new. And how foolish for a newbie to write a guide for other newbies? Well, you’ve been warned – though I’ve long had an interest in astronomy, I’m really only just now getting into this very deep!
(Please note: As an Amazon Associate I earn from qualifying purchases via my links to Amazon.)
Selecting an Optical Design
I was looking for a catadioptric design, specifically a Schmidt-Cassegrain style telescope for the promise of lots of light gathering in a relatively convenient size and weight for transport to remote viewing sites as well as the versatility to both gather enough light to see faint deep space objects (DSO’s like nebulas) and enough focal length for nice planetary views.
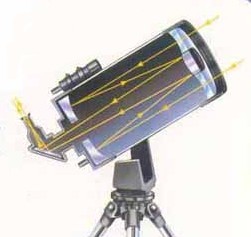
Schmidt-Cassegrain telescopes (SCT’s) do this by folding the optical path on itself, thus requiring a much smaller space for a given focal length. SCT’s also have a closed optical tube keeping out dust and image-degrading air currents. (More here about different telescope designs)
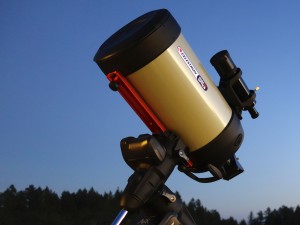
Celestron’s EdgeHD
I was drawn in particular to Celestron’s excellent EdgeHD design because it has additional optics to flatten out the image plane so that stars all across the field of view appear as round, focused pinpoints rather than only those in the center of the view.
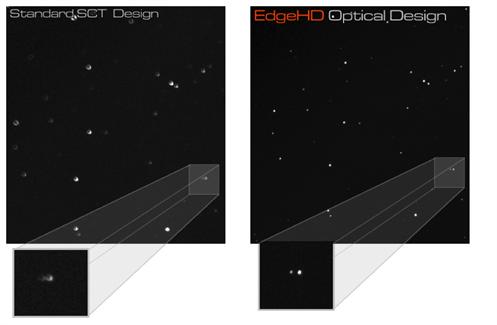
Typically the stars away from the center of the view would appear distorted with comas, blurred and dimmer, less visible. Correcting for this in the design of the scope leads to fantastic images of deep space objects that span the entire field of view and also simply contributes to wonderful edge-to-edge views. (More on Celestron’s EdgeHD Optics here)
Celestron’s EdgeHD telescopes feature mirror clutches to help prevent the primary mirror from shifting (“mirror flop”) as the scope is moved across the sky, potentially ruining long term exposures. It features tube vents with mesh filters to help the optical tube to cool while also keeping out dust. And this optical tube supports Fastar/Hyperstar imaging, where you can temporarily replace the secondary mirror at the opening of the scope with a lens and camera and convert what would normally be an f/10 aperture (less light) into an f/2 aperture (25 times more light) and thus use much shorter exposure times to collect the same amount of light, though at an equally much wider field of view. (More on HyperStar Imaging here)
This also greatly cuts the focal length though from 2302 mm to 425 mm, making for a super wide view for large scale objects. Independent of Fastar, it’s also easy to add a focal reducer lens to the back of these scopes to get f/7, a full stop faster than the native focal ratio and an increase in the field of view by about 43%.
And then the question of aperture size. Celestron’s EdgeHD design is available in 8″, 9.25″, 11″ and 14″ aperture sizes. Bigger is better in the sense that a larger aperture means the ability to collect more light and thus see more but that of course also quickly makes the scope bigger and heavier. This in turn requires a bigger and heavier mount, tripod and counterbalance weights all of which make it much more difficult to take the telescope to remote viewing locations, which was important to me. The consensus seems to be that about 8 or 9 inches is the limit for portability with a Schmidt-Cassegrain design and most recommend going with 8 inches. I debated between the 8″ and 9.25″ EdgeHD models but the 9.25″ is significantly larger and heavier for only a small gain in aperture and it would also force a big jump in the size of the mount and tripod to support it.
Selecting a Mount
Despite the warnings of the extra time and effort in properly aligning a German equatorial mount (GEM) every time you want to use it, I knew I had to choose this due to my keen interest in photography and wanting to try to see and capture all of those gorgeous deep sky objects, requiring lengthy exposures and super-accurate tracking. There are workarounds to help in doing long exposures with simpler mounts but they have their own limitations and issues. I was going all in for the mount most suited to photography.
The German equatorial mount works by having one axis meticuously aligned with the celestial pole, the point around which all the sky appears to rotate around over the course of the day and night. This point happens to currently be fairly near Polaris (thus known as the “North Star”). With the mount exactly aligned with the true celestial pole, it’s possible then to follow the motion of the stars in the sky by simply slowly rotating around this axis, keeping whatever you’re looking at in the scope in the same apparent position over long durations. At least, that’s the ideal… more on that later.
I found a package combining the telescope (or optical tube assembly) I wanted with a relatively portable, fully-computerized “goto” mount from Celestron called the Advanced VX.
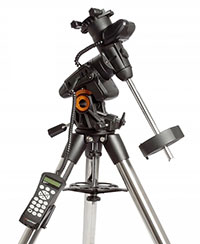
A “goto” mount is one that not only has the ability to automatically drive the motion of the scope to track the sky’s motion but also to provide a database of positional information on tens of thousands of known objects in the sky. Once the mount is setup and aligned for your current position and time, you can then select any object in the database and the mount will automatically slew the scope over to that object’s current expected position. How close that is to its actual position depends on how well you’ve aligned the mount.
The Advanced VX includes Celestron’s “all star polar alignment” feature which greatly assists you in achieving good polar alignment by letting you select any star to fine tune your polar alignment. You must first do a normal two star alignment including your initial jab at getting the mount roughly pointed to the celestial pole, using a compass and dialing in your current latitude and/or based off sighting on Polaris through its polar axis guide hole. Then you can select any star and enter into polar alignment mode where the mount will first move to where the star should be and then you use the polar alignment knobs to fine tune the position. (The important thing to remember here is that you’re moving the mount’s position, not the telescope’s position relative to the mount.)
Even if you do get the mount precisely aligned with the celestial pole (no easy task), the reality is that the worm gears driving the motion in consumer level mounts aren’t that precise anyway and there will still be very minor errors that will add up over the course of the night. Some modern computerized mounts, like the Advanced VX, add “periodic error correction” – the ability to record the pattern of at least these recurring errors and incorporate this information over the course of a session to help improve the tracking.
The Celestron Advanced VX is also designed to be able to track across the meridian without interruption (or running into itself), it is supposedly powerful enough to handle small load imbalances well and it includes support for auto-guiders and other remote control options (see below). This mount seems to be a fairly robust and sophisticated design for smaller telescopes and is supposed to be able to handle 30 lbs of gear, not including counterweights. (And the gear does up: main scope, finder scope, eyepieces and diagonals or imaging equipment, auto-guiders, filters, etc.)
Okay, so I had selected an optical tube assembly (OTA) in the form of a Celestron 8″ EdgeHD and a mount/tripod in the Celestron Advanced VX. The OTA weighs in at 14 lbs, the mount is 17 lbs, the tripod is 18 lbs and one counterweight at 11 lbs. is included. So far, we’re at 60 lbs. Doing great for portability! The three times more expensive 11″ EdgeHD would be 28 lbs with a correspondingly heavier mount (152 lbs), tripod (52 lbs) and counterweights (27 lbs) coming to a total of 154 lbs!

Selecting Eyepieces
The Celestron 8″ EdgeHD package comes with a 1.25″ visual back and diagonal and a single 1.25″ eyepiece: a 40mm Celestron plossel. The visual back piece is what allows you to attach visual gear, diagonals and eyepieces to the back of the scope. The diagonal is a right angle mirror which lets you place the eyepiece at a more comfortable level for viewing, rather than simply pointing down at the ground.
The 8″ EdgeHD has a nominal 2032 mm focal length (at f/10) and combined with the one included low power (40mm) eyepiece, this gives a magnification of about 51x. (You divide the focal length of the optical tube by the focal length of the eyepiece, so here it’s 2032 mm / 40 mm = 50.8.) It’s desirable to be able swap out eyepieces and enjoy everything from wide fields of view of large objects to more narrow, highly magnified power views of details to the limit of your scope and the atmospheric conditions. However, there are several definite limits to magnification. The first is the theoretical limitation of the telescope based on the physics of optics and this is simply 50 times the aperture size, or for an 8″ aperture, 8×50 = 400x. But this limit will never be reached due to limits of seeing through our atmosphere. On an average night, the max would be about 250x but it can easily be much less (100-150x) though occasionally more based on “seeing conditions” or how calm or turbulent the particular column of air is between your point of view all the way into space. If the seeing conditions are poor, than all detail is lost in a blur of motion from the movement of the air. Here’s one of many great articles on the limits of seeing and magnification.
Also keep in mind that increasing magnification not only reduces the field of view (and many objects are quite large in the sky, larger than the moon appears) but increasing magnification also greatly diminishes the amount of light to where many elements completely disappear. Besides magnification and dealing with the limits of seeing conditions, there’s also several other factors that affect the quality of the view like contrast, field of view and eye relief. And so begins the challenge of selecting additional eyepieces….
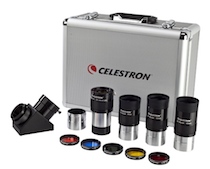
When I was researching my telescope, I came across a nice-looking 2 inch eyepiece kit that had some favorable comments from others around the web over the qualitative advantages of using 2 inch eyepieces to get wider, more expansive views. The 8″ EdgeHD comes with a 1.25 inch visual back but this can be swapped out for a 2 inch back and mirror allowing for the use of larger 2 inch eyepieces. This inexpensive kit from Celestron provides a 2 inch mirror diagonal, three Celestron E-Lux 2 inch eyepieces (40mm, 32mm, 26mm), a 2x Barlow lens that doubles the focal length of either a 2 or 1.25 inch eyepiece and a set of five lunar and planetary filters. A 2x Barlow lens, for example, makes a 26mm eyepiece behave like a 13mm one and you go from a magnification of 78x on an 8″ SCT to 156x without needing another eyepiece. This was certainly enough to get me started. Take note that the 1.25″ adapter the comes with the Barlow lens also works with the 2″ diagonal – so you don’t have to keep switching out diagonals when you want to switch between 1.25″ and 2″ eyepieces – it took me several months to realize this! ;-)
[Update (April 2014): I’ve since bought equipment to supersede about everything in this kit. I got a higher quality 2″ diagonal from William Optics, a couple of nicer wide view eyepieces from TeleVue, a 2.5 TeleVue PowerMate (plus a camera adapter), a larger case to accommodate more gear (Pelican 1500) and really the color filters aren’t nearly as useful as a set of neutral density filters and a nebula filter.]
Keep in mind that eyepieces are not all created equal. You can get very different results in contrast and apparent field of view at even the same focal length. (And find the same focal length eyepiece ranging from tens to hundreds of dollars due to these differences and optic quality.) Soon after, though, I started reading about various options and recommendations in eyepieces and decided to select a couple of additional ones to round out my collection. I ended up going with three… nope, now four different eyepieces from TeleVue that produce dramatically large fields of view. Here’s a nice collection of articles from TeleVue to help in selecting eyepieces and choosing a range of focal lengths for a particular telescope.

First I selected the 2 inch 20mm TeleVue Nagler Type 5. The Nagler line provides 82 degrees of apparent field of view – a big open view compared to the Celestron 2″ kit 24mm eyepiece with 56 degrees of apparent field. I also decided to get the massive 31mm TeleVue Nagler Type 5. On the high power side, I selected a 1.25 inch 9 mm Televue Nagler Type 6, also with 82 degrees of apparent field. And, for a big finale in the middle, I chose an Ethos with 100 degrees of field in the 13mm version, which supports both 1.25 inch and 2 inch.

Here’s a great diagram and explanation from Orion about the difference between the apparent field of view and the true field of view for a given eyepiece: the apparent field of view is the cone of light that your eye sees when looking through the eyepiece vs. the true field which is the portion of the sky that you’re actually viewing. Or, as in their example, a larger television screen gives you a larger apparent field of view, but the video image contains the true field of view, the scene: whether that be a tight view of someone’s face or a wider view of the room the person is standing in.
Here’s a really in-depth exploration of astronomical optics with all varieties of telescopes and eyepieces.
Hopefully Helpful Tips
• For the Advanced VX mount, don’t buy the 2.5 amp Celestron AC adapter, get the 5 amp version!
I originally bought the 2.5 amp version that appears to be associated with the Advanced VX mount and was annoyed to find that it doesn’t have the locking nut that the DC power plug does — and yes, it can easily be pulled out – and I did do so accidentally several times, cutting off power mid-session. I went looking on-line to investigate this nuisance and stumbled on to this forum thread where someone was having power troubles with the Advanced VX and someone else pointed out that this mount actually requires 3.5 amps. Oops! So, the correct AC adapter to get for the Advanced VX is the Celestron 5 amp version (targeted to the CGEM and CGE Pro series mounts). What’s more, this AC adapter has a lock nut on the power connection. Woo-hoo!
• Quickly and easily get accurate focus with a Bahtinov focus mask!
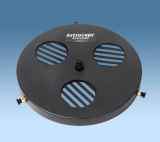
A Bahtinov mask creates a diffraction spike pattern that makes it super easy and quick to get a very accurate focus, particularly when setting up for photographic imaging. This Astrozap Focusing Cap is even cooler because it incorporates the mask into a cap for your scope. Plus you can remove the mask pattern to create three open holes forming a Hartman mask. Update: As much as I like the concept of combining the mask with the cover, it’s not really as nice a fit or as secure (or as sealed) as the original cover so I haven’t been using it as a cover at all. I intend to replace it with a dedicated, less bulky mask now.
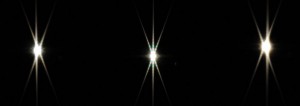
To use any Bahtinov focus mask, you simply place it over the opening of your scope and this creates diffraction patterns of three intersecting lines out of each star. You then adjust your focus until the middle diffraction line is centered over the cross of the other two lines.
Oh and apparently those star spikes you see in some astrophotography are diffraction patterns caused by the vanes supporting the secondary mirror in reflector telescopes. And here I assumed people were intentionally using a cheesy filter to get that spiky star effect.
• Line up on that star in seconds with an unmagnified reflex finder!
 Okay, I was really looking for something just like this. When you’re trying to point your telescope at a given alignment star to set up your mount, it can be challenging and time-consuming hunting around to find that so-obvious-to-the-unaided-eye star among that narrow field of magnified stars in your typical finder scope. But with an unmagnified reflex finder, you just line up the finder on the star as you see it with your unaided eye and boom! You’ve got it. Then you can fine-tune with your magnified finder scope or even just go straight to your telescope. Perfect.
Here’s a comparison of a bunch of different zero-magnification finders: Reflex Finder Shootout. And here’s a lengthy comparison between just the Rigel QuikFinder to the bulkier Telrad version. I ended up going with the smaller but full-featured and still easy-to-use Rigel QuikFinder Illuminated Reticle Finderscope.
Update: I’ve actually since removed the original finder scope that came with my Celestron optical tube. The Rigel QuikFinder is so much more convenient that I never used the finder scope any more. This also meant I was able to cut a little weight. It would of course still be necessary for finding targets if I didn’t have a computerized goto mount, but for doing alignment on bright stars, it’s certainly much easier and quicker to use the simple reflex finder.
• Take the time to check and correct your mirror collimation!
Collimation refers to the alignment of the optical elements in your telescope. You check the collimation of your scope by pointing at a star (or a distant point light source), de-focusing and examining the resulting out-of-focus diffraction pattern of concentric circles. These concentric circles should be perfectly symmetrical. If they’re not, then this indicates that your telescope is out of collimation and this can dramatically degrade the view through your telescope. Here’s examples of poor collimation:

If you ignore this, you may well find yourself disappointed with what you can (or can’t) see with your telescope. Don’t blame your scope! Check your collimation! If you’re not yet convinced, here’s a couple of before/after images from other people after correcting minor collimation errors:

There will be instructions in your telescope’s user manual on how to do this and even more detailed instructions and video demonstrations around the web, just be sure to take the time to do it!
Other Useful Accessories
Tele Vue 1.25″ 2.5x Powermate
Although I have that two inch 2x Barlow lens, I decided to also add a 1.25 inch TeleVue PowerMate at 2.5x power to specifically use with a 1.25″ digital camera for planetary imaging and get near the max usable magnification for my 8″ EdgeHD SCT. (They unfortunately don’t make a 3x PowerMate; it jumps to 4 and 5x.) The advantage of a PowerMate over a Barlow lens for magnification is that the PowerMate design avoids creating diverging rays, keeping the rays parallel to the optical axis, retaining full field sharpness and without moving the exit pupil.
Astrozap Solar Filter
 Here’s a great accessory to have on hand *before* the next solar eclipse. It’ll also be interesting to try some normal solar observing (flares and sunspots) some time, though I haven’t yet and don’t yet know much about it. I’m aware that you can do “white light” observing (with the solar filter on, be careful!!!) but also add other filters like for hydrogen. Here’s a forum thread talking about how to avoid distortion from heating up air currents in the tube. And I’ve seen there are solar observing wraps you can put on your telescope to help minimize heating.
Celestron Dew Shield
I haven’t actually encountered any dew yet, but it made sense to me to get one of these and leave it on while observing. The idea is just that it helps to shield the collection of dew on the exposed front correcting lens, unless of course you’re pointing almost straight up. It also shields the lens from any light glare that may be around you. I see there are also battery powered “dew heaters” to help keep dew from forming.
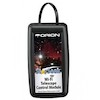
Orion StarSeek Wi-Fi Telescope Control Module
 The Orion StarSeek is pretty cool in that it let’s you wirelessly control your “goto” telescope using mobile or desktop astronomy software. I’ve been using it to allow me to find observing targets using SkySafari on my iPad. I can explore candidate objects in SkySafari and then just tap to direct my telescope to the target. No wires!! Slick!
The Orion StarSeek is a little battery-operated WiFi access point that’s connected to your telescope. You can either choose to set it up a new WiFi network or join an existing local WiFi network. (Even better is that it will automatically try to connect to your home network when available but fall back and create its own network otherwise.) You then connect to the same network with your computing device (phone, tablet, laptop) running your astronomy software and voila, you now have remote wireless control of your telescope over your observing session.
Celestron also makes a WiFi module (Celestron SkyQ Link Wifi Adapter) but I read numerous poor reviews and complaints about its performance. This steered me to the Orion StarSeek – which works well!
Celestron Reducer Lens .7x for EdgeHD 800
 The Celestron Reducer Lens is a custom reducer lens for the eight inch EdgeHD scope. It lowers the f-stop from f/10 to f/7 (one stop brighter) and expands the field of view by 43%. It’s a custom lens (and thus a little expensive) because it has to take into account the unique design of the EdgeHD optics and specifically the eight inch version to maintain the flatness of the field (focus across the field of view). Anyway, it’s necessary if you want to do imaging of large deep space objects: gives you both a larger view and faster exposures… and don’t want to invest in the gear for Fastar/Hyperstar imaging which takes you even wider and all the way down to f/2.
Note that the Celestron T-adapter unscrews into two pieces so that you get the right amount of focal length when using it with this reducer lens, except, again… where are the filter threads? Where do you attach a filter?? You know, like the widely recommended DGM Optics NPB nebula filter.
Portable Power
Okay, be warned. Most of these 12V DC power packs (like the Celestron Power Tanks) are 12V lead acid batteries that require monthly maintenance to keep from deteriorating *and* there’s no over-charging protection – you can’t leave them plugged in too long. That’s lame given the various more modern battery chemistries in use from everything from cellphones and laptops to electric cars. I mistakenly bought one of these Celestron Power Tanks before discovering its limitations and monthly maintenance requirements
So, I did a bit of looking and settled on this one: Duracell Powerpack 600. It’s got 28 amp-hours of power, up to 600 combined watts for three 120V AC outlets, one 12V DC outlet, two 2.1 amp USB charge ports, jumper cables and an LED flashlight. It’s designed to be left plugged in until needed – it manages and maintains its charge automatically. Now that’s more like it!
Digital Imaging
Digital Imaging with a DSLR: Nikon D7000
I’ll be using my Nikon D7000 DSLR (which has an APS-C size sensor) with my telescope to explore astrophotography. This will mostly entail using Celestron’s T-adapters for this particular EdgeHD model, allowing me to do prime focus photography – essentially using the telescope as a huge 2032 mm telephoto lens (at its fixed aperture of f/10). And with the .7x reducer lens in place, that’ll change to a wider view and f/7 (more light and shorter exposures).
T-thread adapters and rings are the means for directly connecting a camera to your telescope. You get direct imaging without going through any eyepiece. You have to buy a specific T ring that’s appropriate for your camera’s lens mount or barrel. You may find the need to get extensions to get to the ideal focal length for your telescope. Celestron makes a specific t-thread adapter for the 8″ EdgeHD to give the proper focal length with or without a reducer lens (see below), as they do for their other telescopes. The T-thread adapter connects directly to the back of the SCT scope, replacing your visual back and diagonal.
What I don’t understand is why these adapters don’t include threading for lens filters. What’s with that? And of course if you add on a special t-threaded lens filter holder, you’ve now messed up the ideal focal length! So what I’m going to try next is this two inch barrel style adapter for a T ring (from Blue FireBall) which does accept lens filters just like any two inch eyepiece and mount my camera to that. I also had to get a two inch SCT visual back (also by Blue Fireball) to connect to the back of my scope. (My two inch eyepiece kit came with a diagonal that connects directly to the SCT thread, no separate two inch visual back.) I could also have done all this with 1.25 inch elements but I’d read that it was possible to get vignetting with DSLR APS-C sensors and 1.25 inch filters. Plus, all but one of my filters are two inch versions anyway!
However, I want to warn people off of the widely available Celestron T-ring for Nikon cameras. It’s cheap and fits really poorly, *very* tightly on the camera – and can be really difficult to get off again. You may also find that you’ll have to tighten the set screws to keep it from coming apart. Many others are mentioning these issues on Amazon and other sites. I’ve looked hard and come across only one Nikon T-ring that appears to be made by somebody else (Zhumell) – hopefully it will do better!
I’ve also got the necessary adapters to use my TeleView 2.5x Powermate directly with my camera and thus enlarge what would otherwise be too small of an image area for planetary images.
Digital Imaging with a DSLR: Sony A6000
I’ve switched to the highly-regarded Sony A6000 for both normal photography and for use with my telescope. Besides performing better under low light, this camera is much lighter and eliminates vibration by eliminating the mirror entirely. The fold-out display screen is also super-convenient when the camera is attached to the telescope.
Digital Imaging through the Eyepiece: Projection
It’s also possible to capture the image from the telescope through the visual eyepiece. There are adapters like this one, that hold the camera in front of the eyepiece and there are tele-extenders like this that fit over the eyepiece to mount the camera. Here’s a great walkthrough to doing eyepiece projection photography.
Digital Imaging with a Dedicated Imager
There are tons of digital imagers available now that are designed for astrophotography use but even a basic, low resolution webcam can be adapted to do a better job of imaging planets than an expensive DSLR. You only need a small sensor to cover the relatively small area of a planet as it appears in a ground-based telescope. And due to the brightness of planetary objects, it’s difficult to use extended time exposures to average out the atmospheric blurring effects. The best way to image planets is to take hundreds of very short exposures and use software to automatically select the brief moments when the atmosphere seeing conditions let the planetary details come through. These images are then “stacked” to create wonderful exposures of our planetary neighbors.
Stepping up from generic webcams, I decided to get a dedicated low resolution camera to explore planetary imaging. The big choice to make is between monochrome and color sensor cameras. The obvious advantage to one shot color cameras is getting immediate color but this comes at a serious hit to resolution since the array of pixels must be divided up into capturing either red, green or blue light. Sensor resolution suffers since each pixel on the array is only able to record signal in a narrow band of wavelength. Monochrome cameras can use the same number of pixels to capture much more detail since every pixel is sensitive to that whole portion of the spectrum. The trade-off is that you must insert your own color filters and image the object once each for red, green, blue and even also luminosity and then combine them all in software to create the full color image.
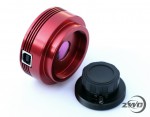 I decided to get a color imager and selected the often recommended ZWO’s ASI120MC but I’m not off to a good start with it. The camera arrived with something rattling around loose inside the camera housing. I tried hooking it up to my computer anyway to see if it was functioning. Unfortunately, ZWO does not provide any drivers for Mac OS so I was forced to use a Windows 8.1 installation running under Parallels Desktop 9. While fussing around with ZWO’s own software as well as their recommended third party software (FireCapture and SharpCap), all I ever got was a big black empty image (and frequent program hangs/lock-ups). Not impressed. When I reported this, I got a very quick email response back from ZWO with instructions on how to open up the camera to screw down what was a loose screw. (And it barely had anything to screw into – no wonder it came loose.) Unfortunately, their answer regarding software support was initially that “it won’t run well under Parallels on Mac. Please use native Windows.” Erg…
However, when I followed up to find out what the issue was (perhaps something Parallels could address), they offered a firmware update – the catch being that the firmware update needed to be executed on a native Windows machine. So I spent an afternoon to set up a Boot Camp partition on my Mac and reinstall Windows 8.1 but ran into additional errors regarding missing dlls. With more email help from ZWO, I was able to finally get the firmware update applied to the camera and… Woo-hoo! I now have a functioning ASI120MC running under a Windows installation via Parallels on my MacBook Pro. I’ll update this again after I get a chance to work with it.
If you’re looking for a camera with direct support on a Mac, there is the Starfish camera from Fishcamp Engineering and it seems to be well-liked and is directly supported on the Mac. Another is the Point Grey Flea 2 or 3. I don’t have any direct experience with these cameras though.
Autoguiding (Guide Scopes vs. Off-Axis Guiders)
Despite all your effort to get excellent polar alignment, calibrate your mount against several stars and maybe even take advantage of periodic error correction… long, multi-minute time exposures are still going to be very challenging due to non-periodic gear errors, weight shifting and changing atmospheric effects. Hence the invention of autoguiding. This is where a guiding program and a dedicated guiding camera is used to lock on to a selected guiding star and send corrections as needed to the telescope mount to keep the guide star in exactly the same position and thus keep your extended time exposure fixed on the target object.
Autoguiding is often done by piggy-backing an additional, smaller scope on to the main scope and fitting a small guiding camera to this dedicated guide scope. One downside with this approach is that this additional scope tends to be subject to very slight differences of flexure relative to the main scope and this is very difficult to eliminate completely. These slight differences introduce errors in tracking on the target object. In addition, the extra weight of the guide scope adds significantly to the overall weight of gear that your mount must manage.
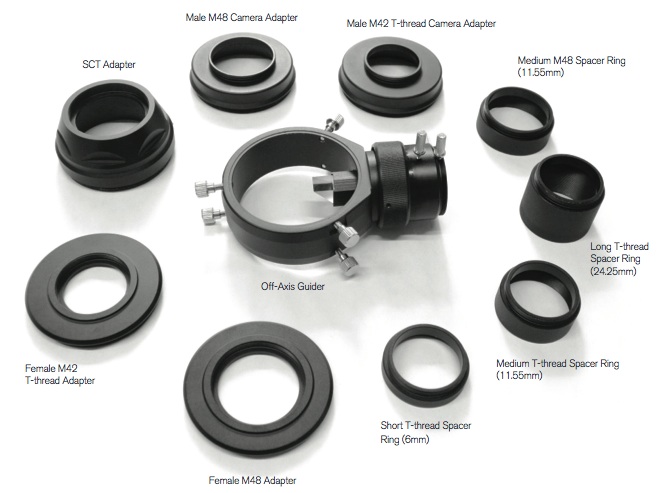
An alternate approach is to do off-axis guiding. This method forgoes the use of any additional scope and instead introduces a small prism in the optical path of the main scope to direct a tiny portion of the observing cone off-axis to a guide camera. This tiny portion of light should be outside the sensor area of your main imaging camera and thus have no effect on your result image. This method does not suffer from any differential flexure – your guide camera is looking through the same scope as your imaging camera – and thus you get the most accurate guiding possible. This also introduces much less additional weight: just the off-axis guider (OAG) piece and the guide camera. The challenges with this approach is just having to locate a suitable guide star along the periphery of whatever your target object is, to be able to fit the off-axis guider comfortably in your optical path (some telescopes do not have enough back focus) and get both the imaging camera and guiding camera in focus.
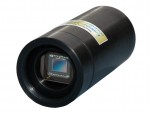
 After my research around the web across various astronomy community forums and reading various equipment reviews, I decided to go with the widely-admired Starlight Xpress Lodestar (Monochrome) as my auto-guider. It’s frequently noted as being a great, super-sensitive guider with very good signal-to-noise ratios, capable of always pulling out even very faint guide stars in any part of the sky. It’s not great as an imager since it produces interlaced images but it’s excellent as a guide camera. It’s also conveniently small – essentially the size of a small 1.25 inch eyepiece.
I also selected Celestron’s new off-axis guider (as of 2013). It comes with a whole bunch of thread adapters and spacers to be able to get the proper matching focal length and also has the convenience of an 8mm focuser. Unexpectedly, I was not able to use it with the Lodestar as is because I could not get it par focal with my Nikon D7000. Celestron says the optimum back focus on the EdgeHD 800 is 133 mm but even without any spacers, just the OAG body and SCT and T-thread adapters (adding up to 113.3 mm including the 46.5 mm to my Nikon’s image plane), the Lodestar would still be outside the grasp of the guider. So I had to order an extension tube for the Lodestar (1.25″ nose to C-thread) to position it in focus. Don’t forget to get a “par focal ring”. (A ring that slips around the tube and secures in place with set screws so that you can just quickly slide it into the guider at the proper position.)
I’ll be making use of Stark Labs’ PHD Guiding software for the Mac. (That’s “PHD” as in “Push Here Dummy” simple.) It’s also available for Windows. Stark Labs also produces the widely used and appreciated Nebulosity for post-processing of your digital images.
This review of OVL’s Slim Off Axis Guider offers some more detailed explanation of off-axis auto-guiding plus some great example images of the difference image quality:

Alternative Telescopes
 Update (February 2020):
Sorry I haven’t updated this page in quite a while, despite gaining a lot of new experience (and new equipment). However, I wanted to quickly add a note here to reference a new page I just created concerning a relatively new kind of telescope I bought.
It’s the Unistellar eVscope and it’s quite different than a traditional optical telescope:
Click here to read more about it and see a demo video I put together.
Astronomy Software
Astronomy / Sky Browser
- SkySafari
- Starry Night
- GoSkyWatch
Auto-Guiding
- PHD (Push Here Dummy) Autoguiding
Image Capture / Post-Processing
- Nebulosity
- FireCapture – Windows only
Didn’t get far with this one. They’ve got an issue with how their user interface is implemented so that on a high resolution (high DPI) device like my MacBook Pro Retina, everything is displayed super-small and text is mostly unreadable. The problem occurs even if you heavily downgrade the resolution of your device. I’ve written to the developer but he says he’s not likely to have time to address it.
- SharpCap
- Stacker
Here’s another guide on astrophotography software at the RASC Hamilton Centre Amateur Astronomy Club web page.
17 comments
Still contemplating to go with traditional 9.25” SCT or eVscope? Any suggestions.
My purpose is to lookout for exoplanets. Which will serve the purpose?
Hi Srini, that’s a tough call as they’re very different. Going with a traditional telescope like an SCT means adding lots of equipment and software and learning how to use it all together – which of course can be very fun but it is a steep learning curve versus the eVscope where everything is already integrated and it’s really a matter of just turning it on and choosing what you want to observe. Also, Unistellar often hosts “citizen science” campaigns to get eVscope owners to participate in observing and submitting data from various exoplanet or asteroid transits and the whole process is very straight-forward and mostly automatic. (You can read more about this on my dedicated eVscope page.) On the other hand, because everything is integrated already in the eVscope build, there’s no upgrading or swapping out components to try new and different equipment.
So yeah, very different and they both have their advantages and disadvantages. Depends on what you’d rather start with before eventually perhaps ending up with both kinds of setups! ;-)
Cheers!
If you think the evScope is cool, check out the Stellina. It has a better image chip and a much higher resolution. As well as outputting JPEG or Tiff (16bit) or FITS subs. And great software.
Chris: I just got an EdgeHD for my birthday. This blog helps a lot. I also have a Nikon as opposed to a Cannon.
So you equipment recommendations are EXCELLENT.
I was wondering where are your astrophotos?
Congratulations on your EdgeHD. As for where are my astrophotos… ha, you’ve caught me out! I do have some results that I’ve produced as I learn to use all this gear and try out various techniques on miscellaneous targets but I haven’t felt it was well done enough to share yet. On the other hand, I’ve considered posting some of it to just help show what you can expect from various combinations of gear and techniques and to illustrate the learning curve; perhaps I’ll still get around to that.
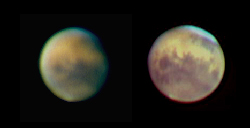
The ongoing issue is really that it’s pretty rare for me to get a clear sky on any night, let alone on a night where I can afford to stay up late. I live near Monterey Bay and we get a “marine layer” of fog that slides in most nights of the year. We did have a clear night a few days ago and I set up to take a look (and some video) of Mars in close approach but it’s been fogged in every night since. Sigh.
Anyway, good luck with your new gear and I hope you get access to many more clear skies than I do here!
Well you get an “A” for honesty! Yeah, I know as lovely as that area is it is not noted for its clear night skies. Thanks for your reply and keep up the good work!
This is awesome. What you have written has expanded on what took me a few days/weeks to put together on my own. I have been taking long exposures of the milky way, m42, etc using my Canon 6d and ioptron star tracker and am hooked on astrophotography and looking for my first scope. The celestron edgedHD will do what I want and allow me to “grow” with my hobby.
Is the cheaper celestron 8″ sct found in the advanced vx combo (item #12026) hyperstar/faster compatible? Can’t seem to find any info about it. Have you taken the fastar/hyperstar plunge?
Glad to hear that you’re getting something out of my little guide. But now you’ve gone and done it: you’ve inspired me to buy another toy! I’ve just ordered one of those portable star trackers. (Going to try the Vixen Optics’ Polarie.) It’ll be great to be able to do some imaging on trips where I can’t bring my telescope (which is most of the time).
Anyway, looking up your question about whether the cheaper, non-EdgeHD SCT is Hyperstar compatible, I think the answer is yes. You’ll see listings at optcorp.com and starizona.com that seem to confirm this. I haven’t actually taken the plunge on this expense (Hyperstar plus an appropriate imaging camera) but I am definitely looking forward to it at some point.
Jason
I have much of the same equipment however, I went with the EdgeHD 9.25 on the CGEM mount. As Chris pointed it is not as “portable as the EdgeHD 800 on the VX mount, so I got wheelie bars to make moving it easier. Here is the thing (as Chris mentioned) the edgehd 8oo has 133mm of backfocus so finding an OAG is going to be nearly impossible. The edgehd 925 has 155mm of backfocus which allows me to use the celestron OAG (with my lodestar X2 guider). The tradeoff is that celestron does not make an focal reducer for the edgehd925 (go figure), so I went to a great company called Optec and got one that is .62X specifically made for the hd925. The problem is that this focal reducer knocks your backfocus down to 100mm. Fortunately I got everything to fit by having some custom connectors made by precise parts. So the image train is Optec focal reducer, adapter, celestron OAG, adapter, T-ring, Nikon 5300.
Couple other things the QHY polemaster for polar alignment and Celestron star sense are well worth the investment. As for hyperstar, the idea of messing with the front of my hd925 scares the crap out of me.
Unfortunately I live in Del Mar CA and am plagued by the coastal June gloom, so no imaging until I get some clear skies.
Brilliant thank you. I have been considering diving in for a while and considered an Edge 11HD system for astrophotography which second hand would have cost over £6,500 or $10,000. But I was getting confused and suffering aperture fever. Your article has restored reality and answered many questions – it is the clearest I have found on the Web because it is newbie to even more newbie! I think the mount/weight/price comments are critical. Thank you so much. Bruce
Dear Chris,
Excellent site… so much good info here… thanks so much for taking the time and energy to post it!
-Keep up the good work and clear skies!
-Randy
Dear Chris,
What a great astronomy blog. The best I’ve read. I’ve had paralysis by analysis for 2-3 years now! And researched to death. I have finally decided on an 8″edge hd, and your blog has validated my decision.
My question was: have you any experience of the celestron star sense? If so would you recommend it?
Thanks in advance
Hemi
Hi Hemi,
This is the first I’ve heard of the “Star Sense” – had to look it up. Interesting! A little expensive but sounds cool. While it feels gratifying to know how to align it myself, it would be pretty sweet to let it do it automatically.
So no, I don’t have any experience with it, but here’s some reviews on Amazon:
http://www.amazon.com/Celestron-StarSense-Telescope-Alignment-94005/product-reviews/B00EZILDLS/
Anyway, congrats on your 8” EdgeHD purchase! And I’m glad to hear my notes helped you jump in!
Thanks for writing,
Chris
Dear Christopher,
First of all, thanks for this highly useful/helpful article for a beginner like me. I’ve learned a lot from it ( and my wish list also has increased, too ;) )
May I ask the equpiments configration for prime focuse imaging with filters? I have exactly same OTA (EdgeHD 8″), .7x reducer and T-Adapter for the OTA, and T-ring for my Sony a6000 camera. But when I consider adding fitler, I got confused. According to above article, maybe 2″ visual back with two inch barrel style adapter for a T ring (from Blue FireBall) would be solution: replacing origianl visual back with 2″ one, inserting the tube with filter(s) into new visual back and connecting T-ring to the tube. Then, where does .7x reduce goes? They might be connected altogther, but I’d like to make sure before spending more money (I already spent too much, lol).
Thanks again,
Jinyoung
Hi Jinyoung,
I can’t give you a complete answer yet because, even though I’m also now using the Sony a6000, I have yet to try out that barrel style adapter to use a filter. However, I can say that the .7x reducer attaches directly to the OTA, replacing the visual back. You’re then supposed to remove half of the Celestron SCT T-adaptor when connecting to the .7x reducer.
I’ve also been meaning to verify the correct prime focus distance when using the a6000, particularly since my Sony T-ring seems longer than I expected. Hopefully I’ll get to that soon and be able to add more info about it.
Thanks for writing. Best of luck!
Hello.I came across your web site and have enjoyed your content and advice.I am looking at buying on Televue eyepiece,Nagler 22mm.Also I am hoping to buy a ccd planetary camera sonn.Hopefully one that will not breat the bank.You put me onto the ZWO’s ASI120MC frpm Teleskop services.Sorry to hear that you experienced these software problems.I am now wondering if It would work for me.It does sound like a reasonably able camera.I will be using it on my netbook with usb 2 conector.
All the best,
Martin.
Hi Martin,
Thanks for your note and I’m glad you’ve been able to make use of my content. I think you should go ahead and give the ASI120MC a try. I did have some issues with it but I was able to overcome them – should not have had to of course. Good luck!