I’m maintaining this page to share information about the various upgrades and customizations I made over the years to my 2016 Leisure Travel Vans “Unity” RV to hopefully help others wanting to do similar things. Another great source of information for all sorts of Sprinter-based camper vans is the Sprinter-Source forum and specifically for Leisure Travel Vans and the Unity, see the Sprinter-Source Unity subforum.
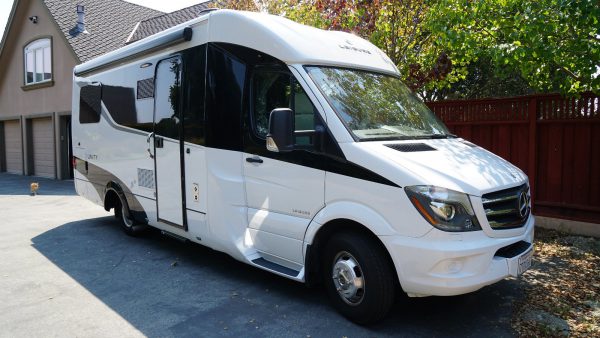
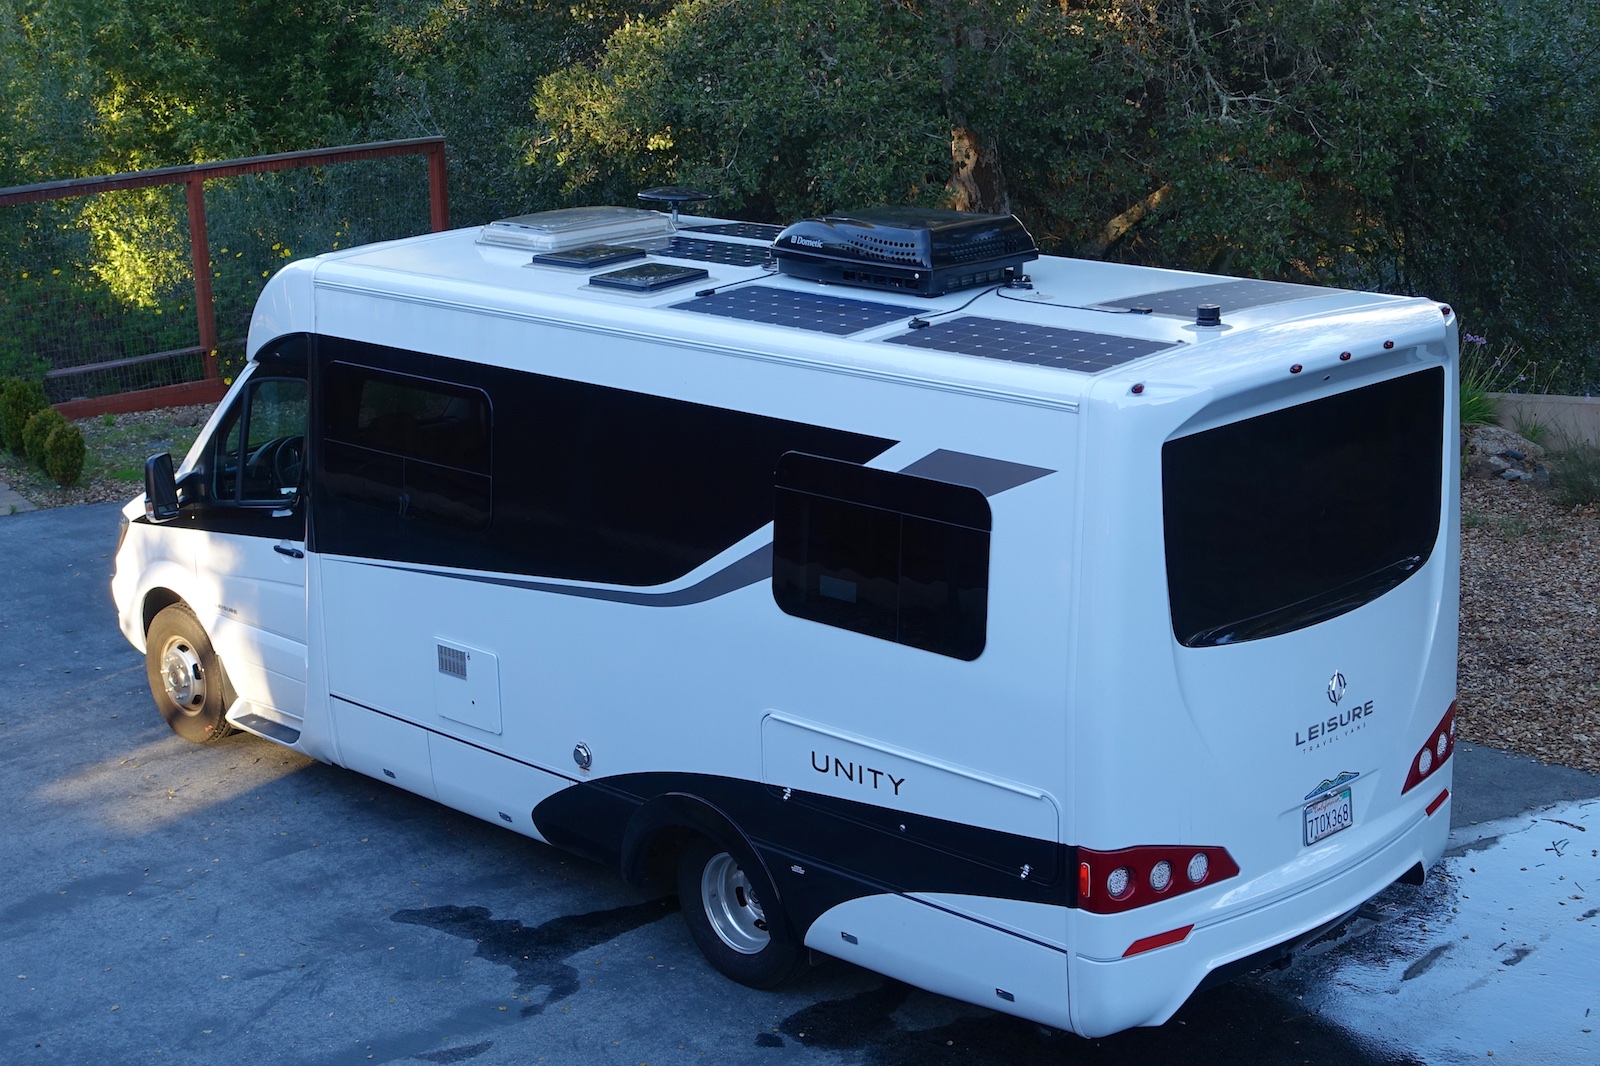
This model is a 2016 LTV Unity 24TB (Twin Bed) 25 ft. campervan/RV, built on a 2015 Mercedes Sprinter diesel-powered chassis. (Here’s more on how I came to buy this unit and here’s a page of my shopping/comparison notes from 2016.)
I should clarify that Darlene and I used this RV almost always “dry camping” (or “boondocking”) without hookups for water or electricity. While this sometimes involves staying in state or national park campgrounds, we much prefer camping out on open land in national park, forest or BLM lands. (Here’s a tag to all my posts on our RV travels.)
I ended up selling our Unity in 2020. We had a good time with the Unity, but our two biggest wishes were to 1) have internal storage for our mountain bikes and 2) downsize to a smaller, more off-road-capable camper van, which would also allow us to park a little more easily in busy metro areas. We did take the Unity out on dirt roads a lot but we were often of course constrained on just how rugged the road could actually get with a vehicle of this size and length. I bought a 2019 Ford Transit van, had it converted to four wheel drive and built out as a campervan.
Alright, on to the tips, fixes, upgrades and customizations for the Leisure Travel Vans Unity (and similar RV models):
(Please note: As an Amazon Associate I earn from qualifying purchases via my links to Amazon.)
Relocate table storage
Having to stow the table and table leg in the intended compartment back under one of the twin beds is super-inconvenient, particularly when the beds are configured together as a king. There has to be a better place to put the table and its leg.
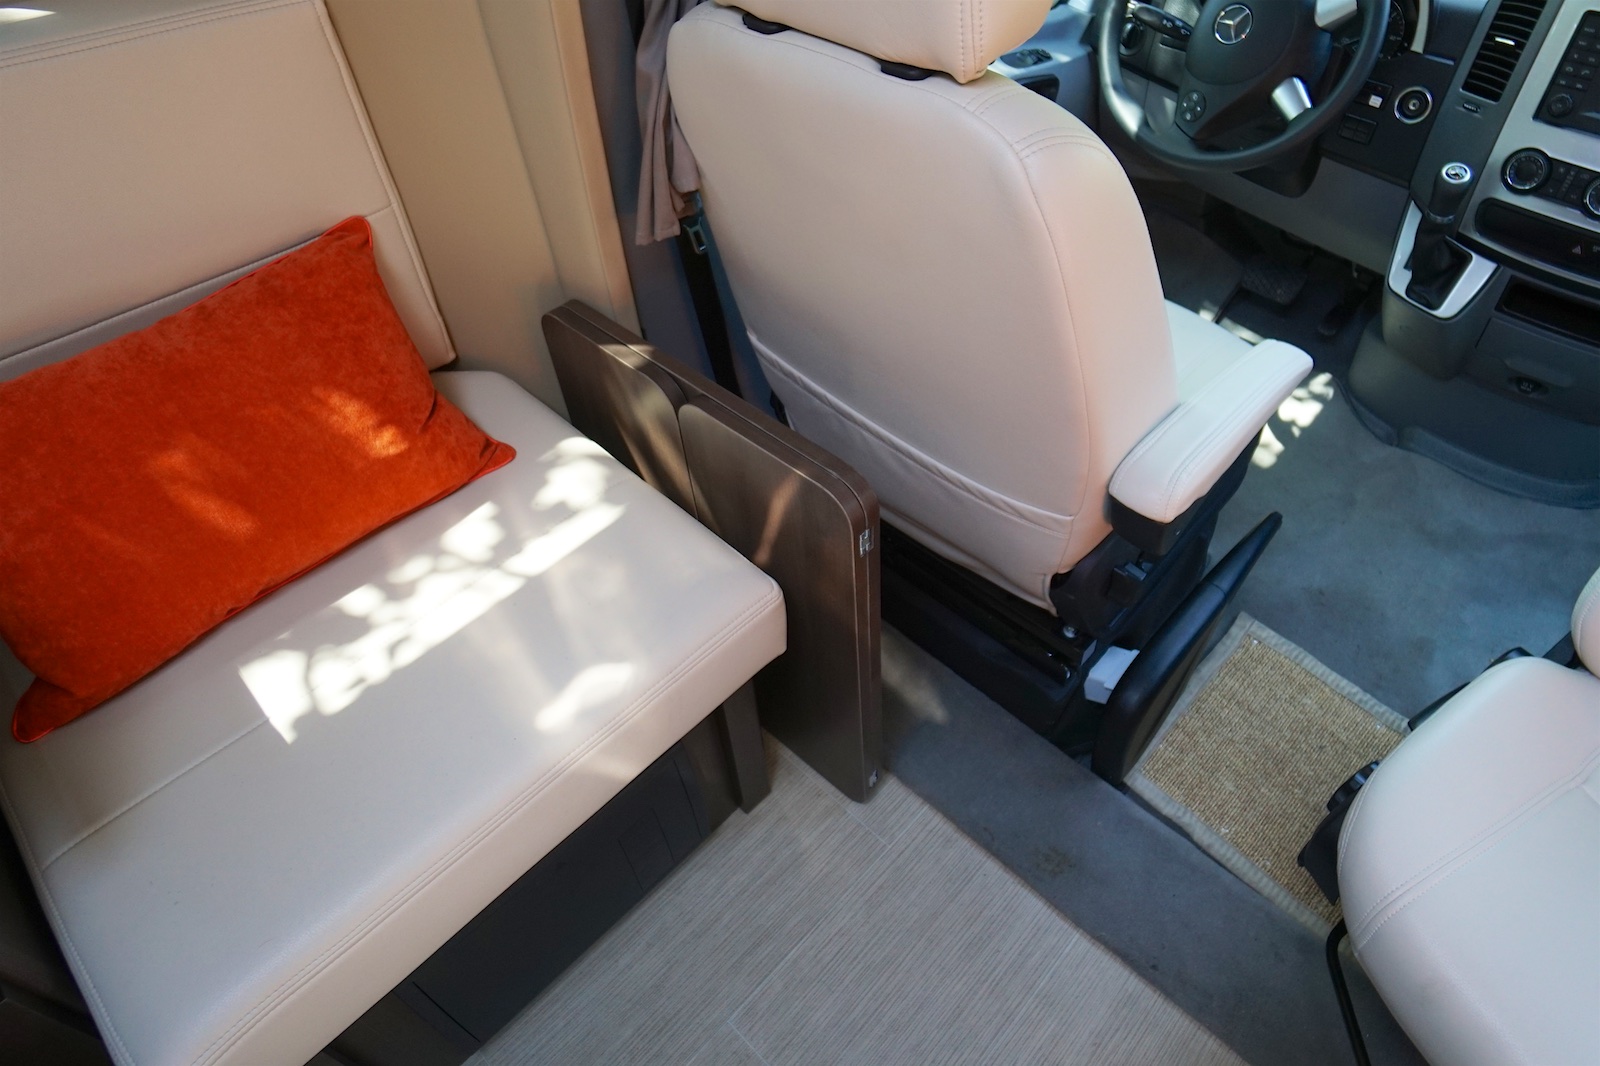
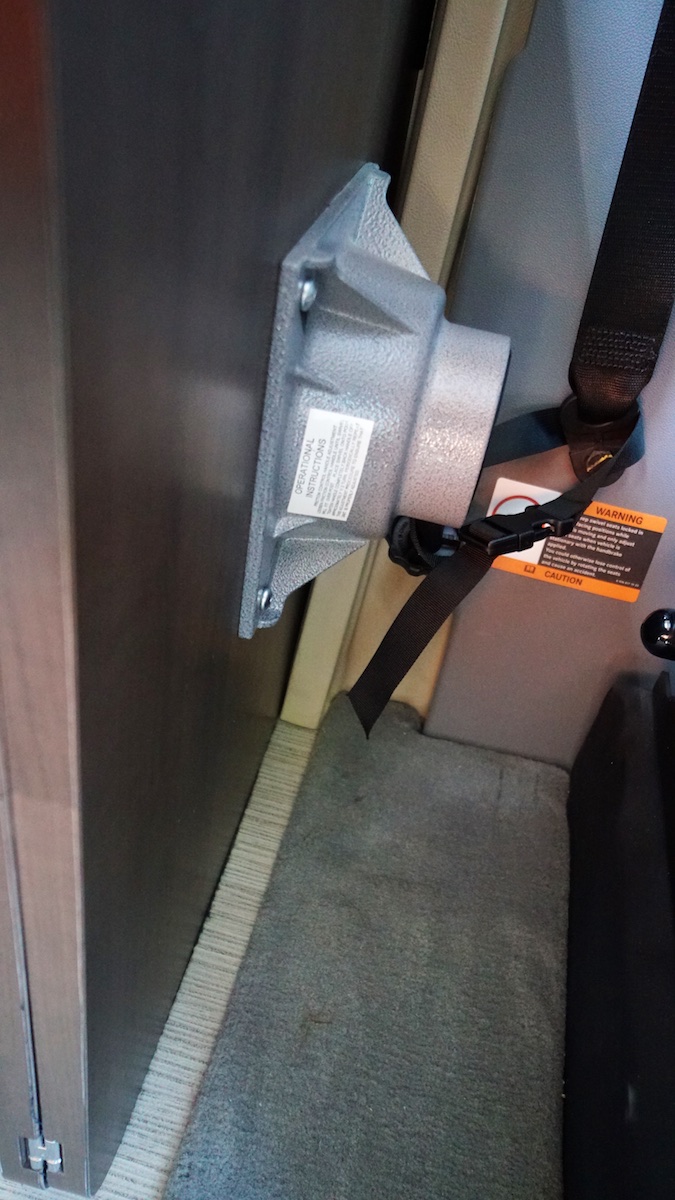
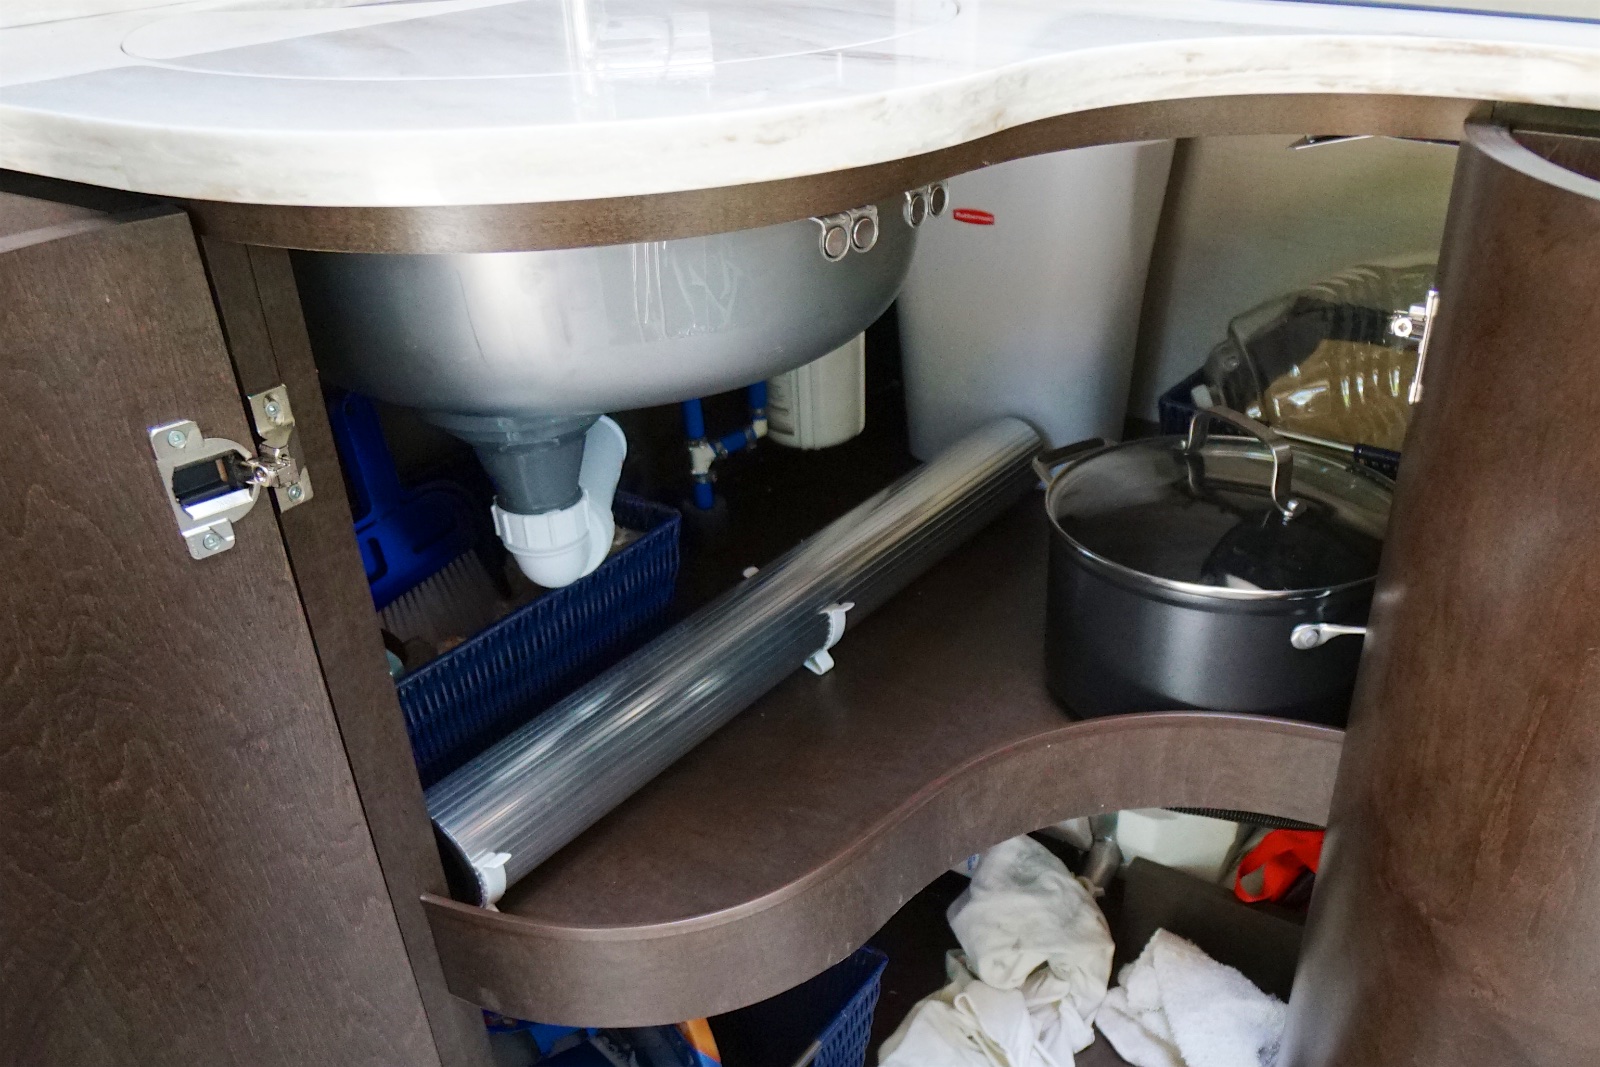
The table is now stowed next to the rear lounge seat behind the driver’s seat. It’s secured with velcro on the floor and, for extra safety, with a quick-release strap from the driver’s seatbelt hook to the table mount. I moved the table leg storage brackets to under the galley sink, screwed into the support piece under the shelf. The only small downside is that when the table is stowed behind the driver’s seat, you can’t completely rotate the seat all the way around – you have to pull the table out first. Still a big improvement over digging the table and leg out from under the bed!
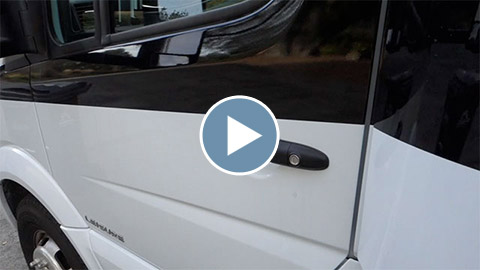
Fix coach door squeak
This is a little one but I guess a somewhat common and difficult one to figure out. There was a crazy-annoying squeak on rough roads coming from somewhere around the house side door. We had yet to narrow it down until I stumbled on this forum thread. That was it!

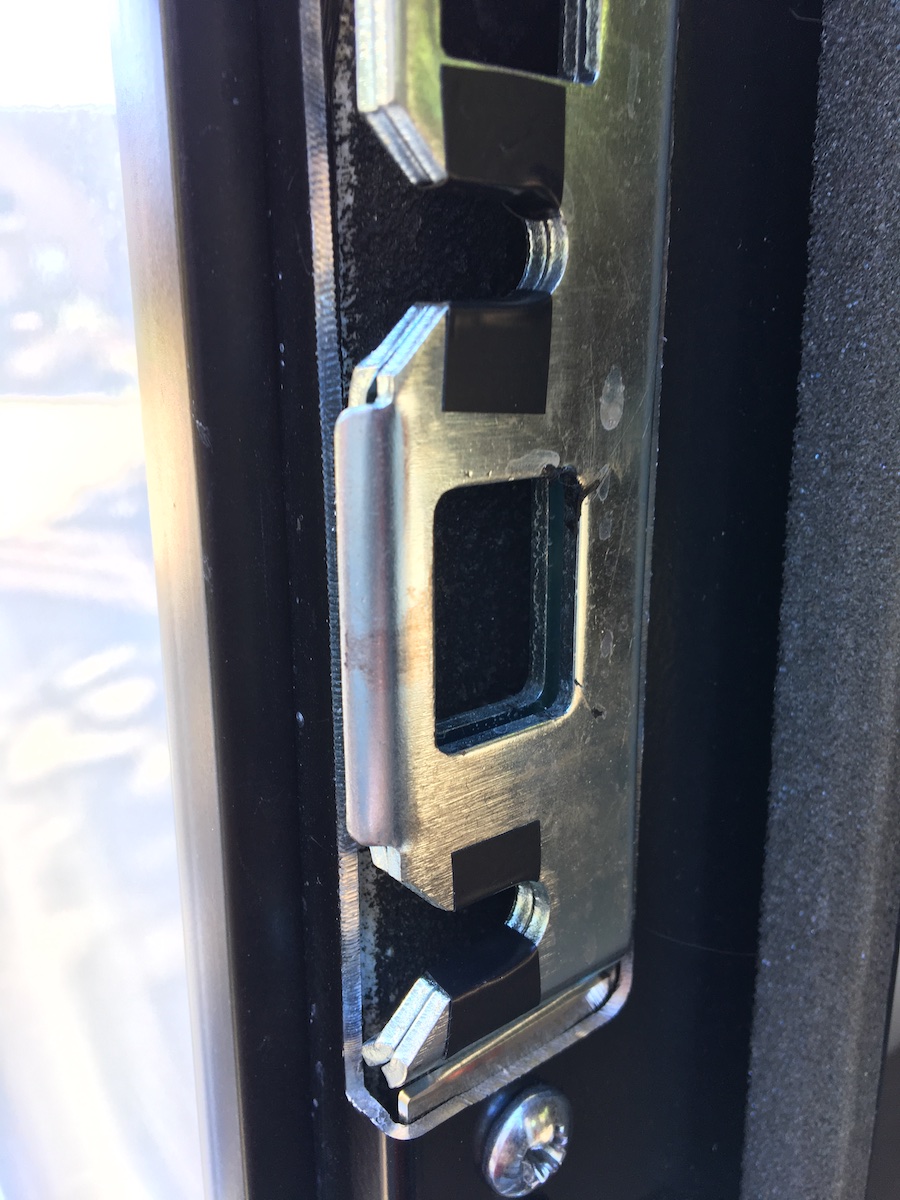
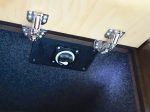
It’s the two guide bolts of the side door rubbing against the striker plate. If you look closely, you’ll see the marks made from the rubbing. Pressing on the middle of the door from the outside will confirm that this is indeed that annoying squeak. I tried loosening, shifting and re-tightening the striker plate but that didn’t get rid of it entirely. However, a couple of small strips of electrical tape at the contact points of the striker plate did the trick. What a relief!!
Update: Okay, that electrical tape proved to be a temporary solution as the squeak would still return sometimes. However, while trying unsuccessfully to adjust the striker plate to fix the squeak I found that leaving off the outermost screws above and below the plate seemed to help. I don’t know why and I don’t understand what purpose these additional screws served but the door still opens and latches properly, only now without that incredibly irritating squeaking as we drive down the road!
Update #2: Well, the squeak still comes back eventually. Back to a little bit of electrical tape.
Add grab handle for coach door
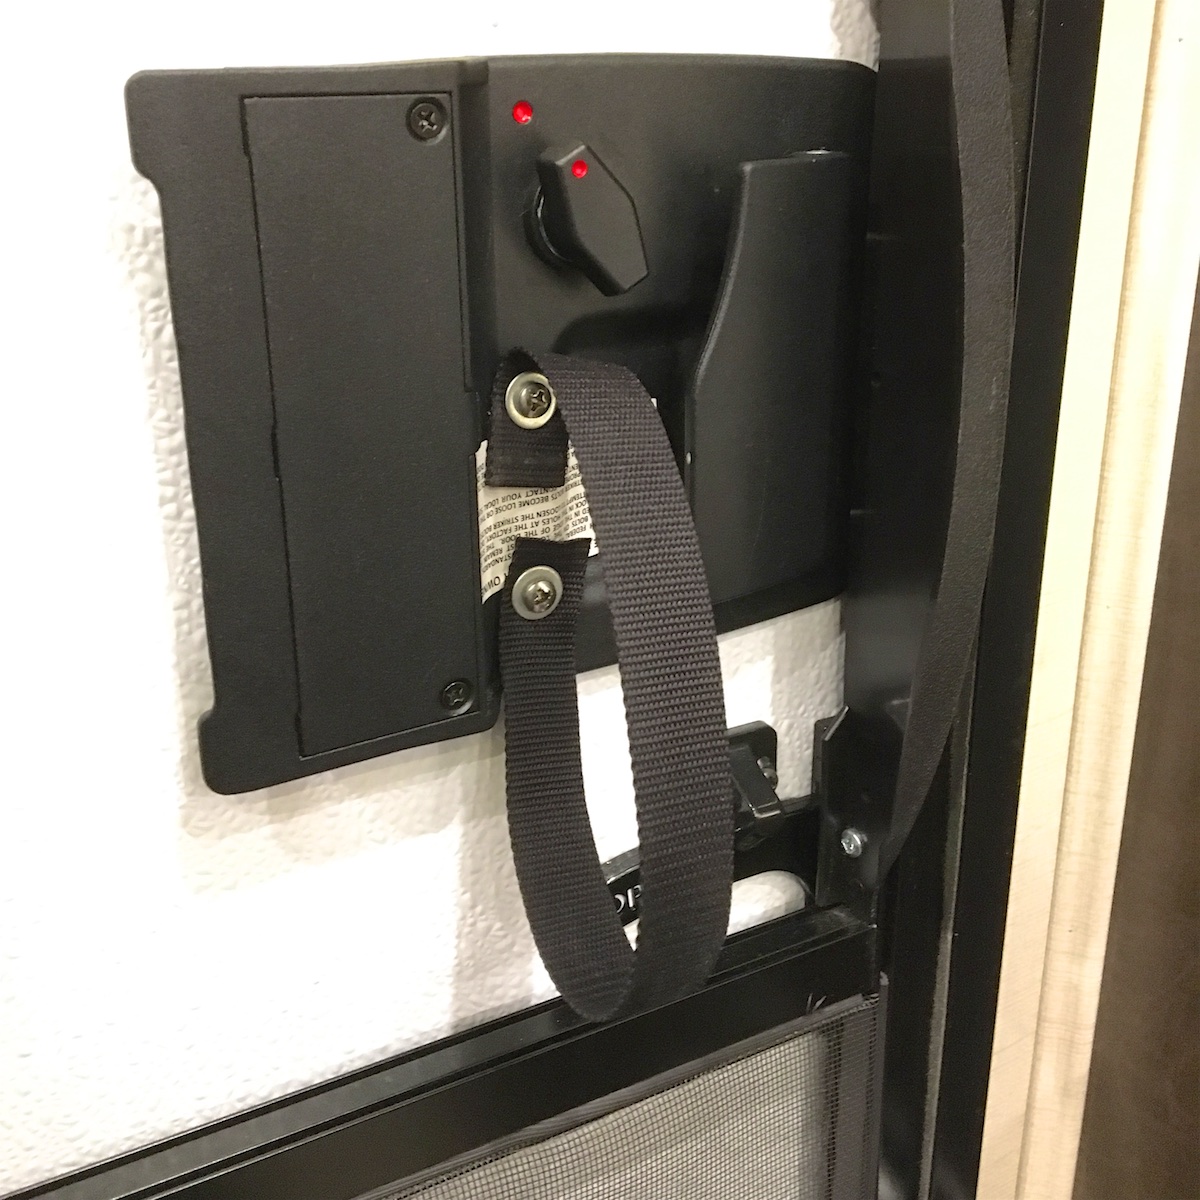
This was a great find on this forum thread. Like many, I’ve found it’s difficult to easily grab and close the coach door from the inside. It’s natural to grab on to the release handle, but you can’t actually close and latch the door with this mechanism. You’re supposed to grab on the small left edge of the mechanism instead but it’s not a natural or easy-to-make grip. Hence this super easy grab loop! It’s also really simple to do: just a length of nylon strap, poke a couple of holes, add a couple of washers to the existing screws and voila!
Insulate skylight in shower stall

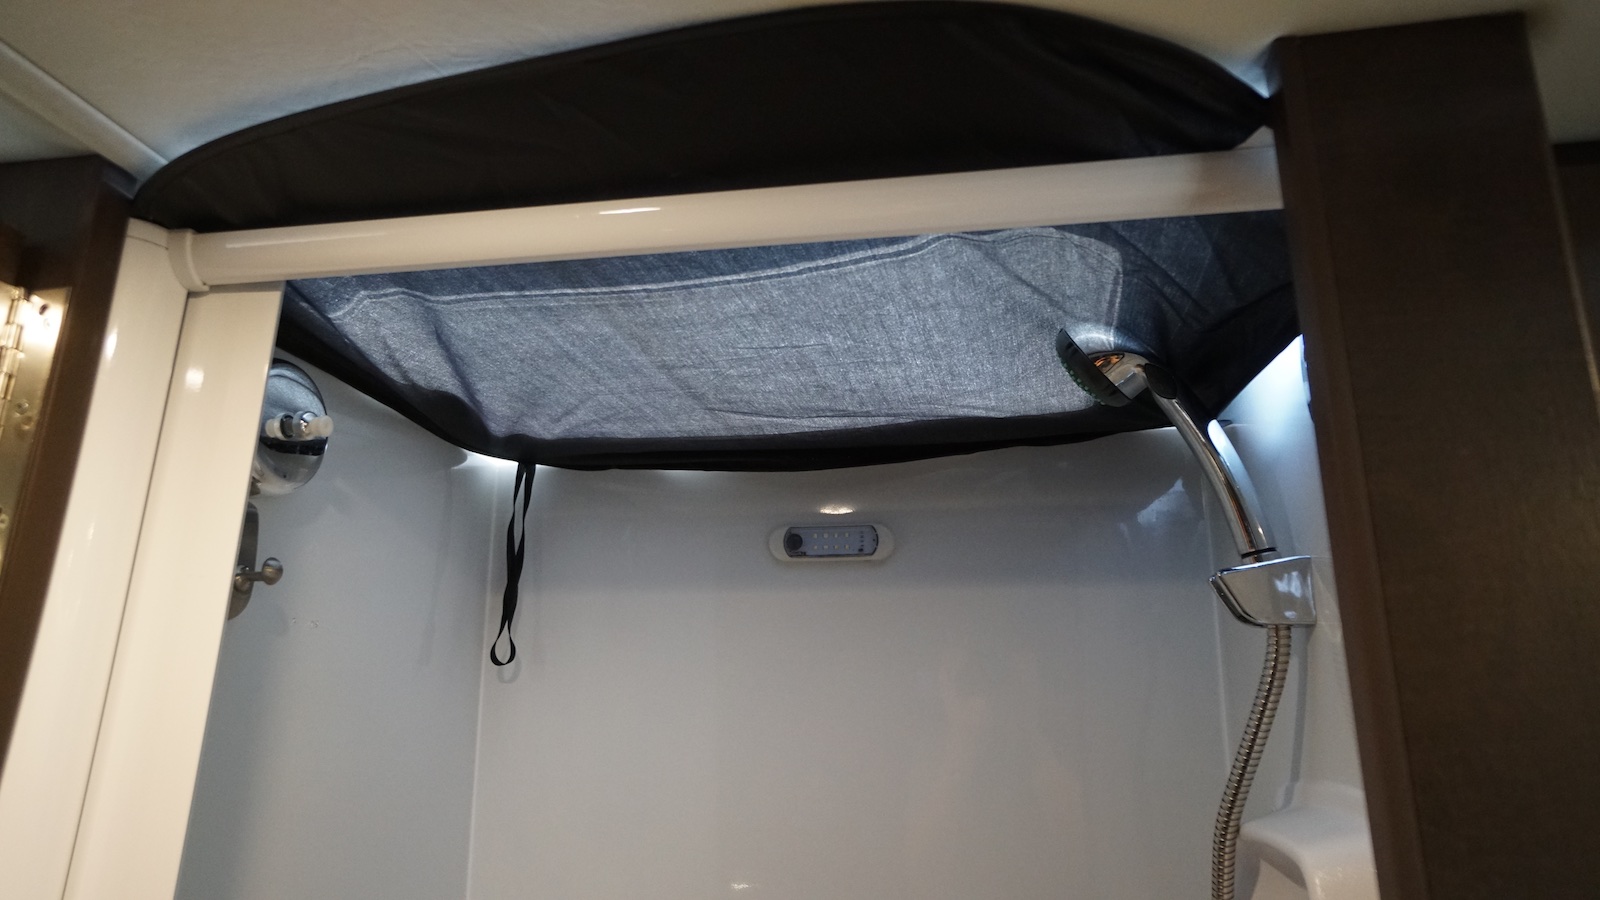
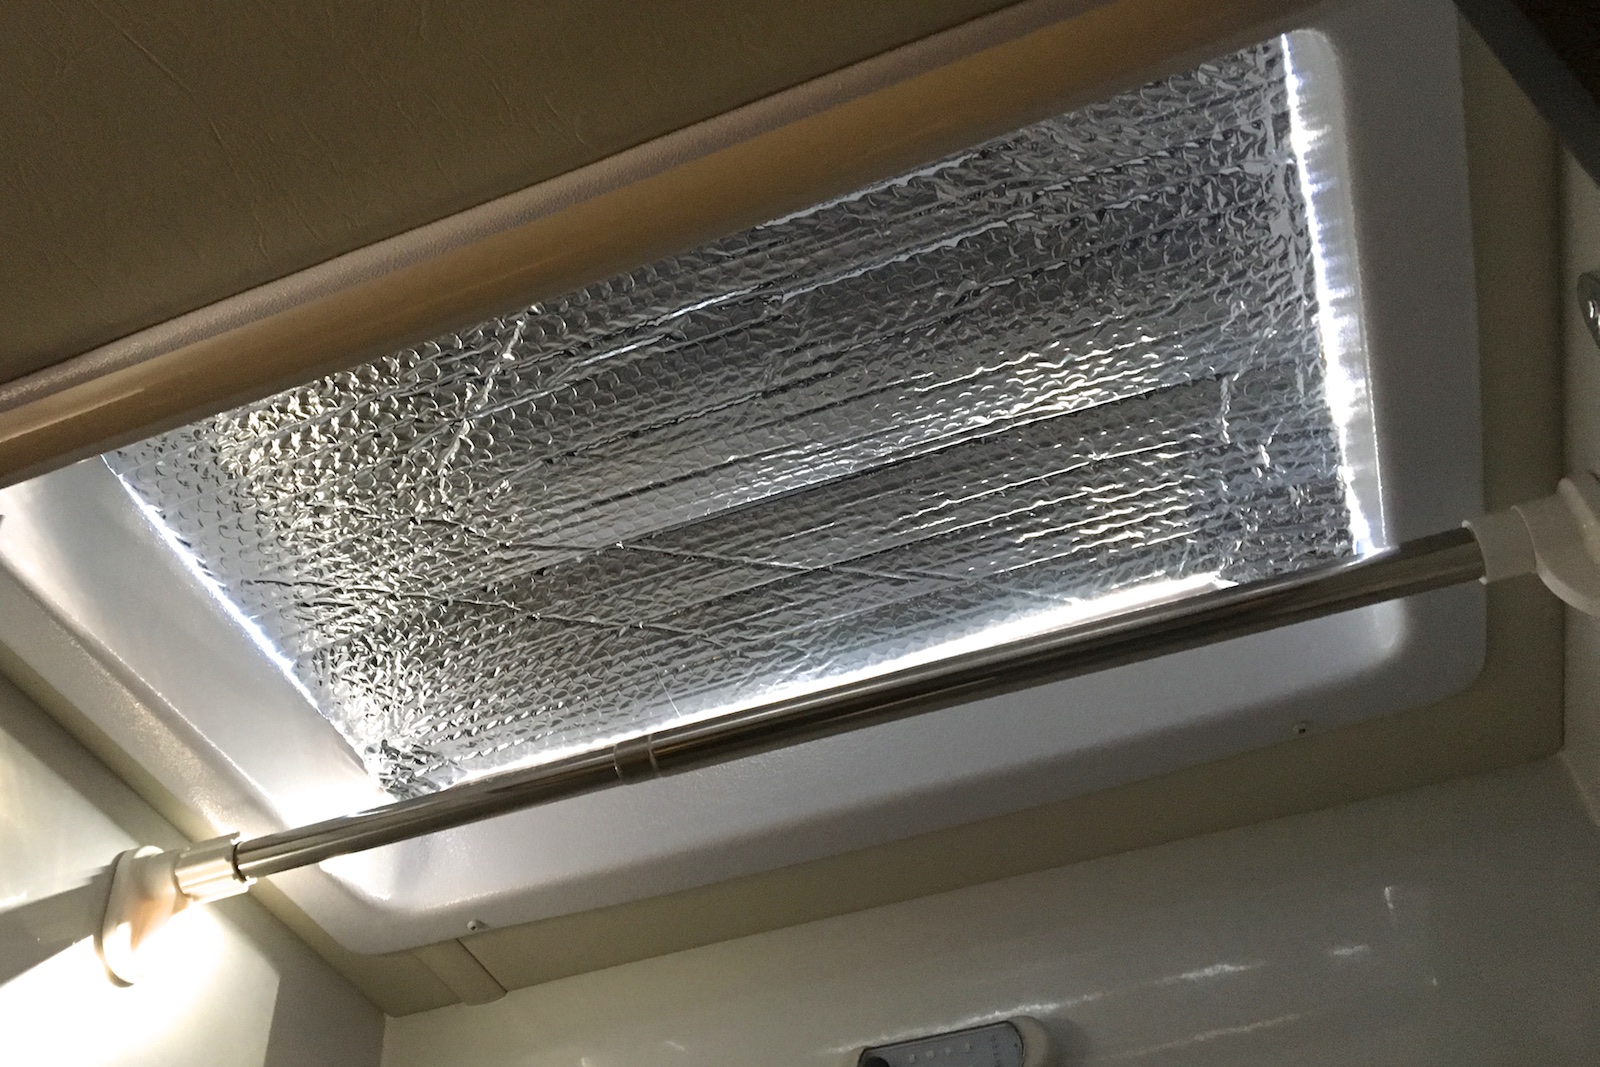
I love the skylight in the shower as it allows me room to stand up, but it does let in a lot of heat from the sun. So I bought a pair of reflective, collapsible, auto windshield shades and slipped one in the top of the shower for when it’s not in use.
Updated: Thinking of cold weather now, I cut some much more insulating material (Reflectix) to fit in the top of the shower instead of this lightweight shade. This is part of an overall effort to set the Unity up for overnighting in freezing weather.
Removable clothes-hanging bar in shower stall
The previous owners of my Unity installed one of those retractable string clothes hangers in the shower for hanging wet stuff but you know, they don’t really work that well. They’re pretty flimsy and tend to sag a lot and can’t handle much weight. So I got the idea to find a good, strong and lightweight, telescoping closet pole.
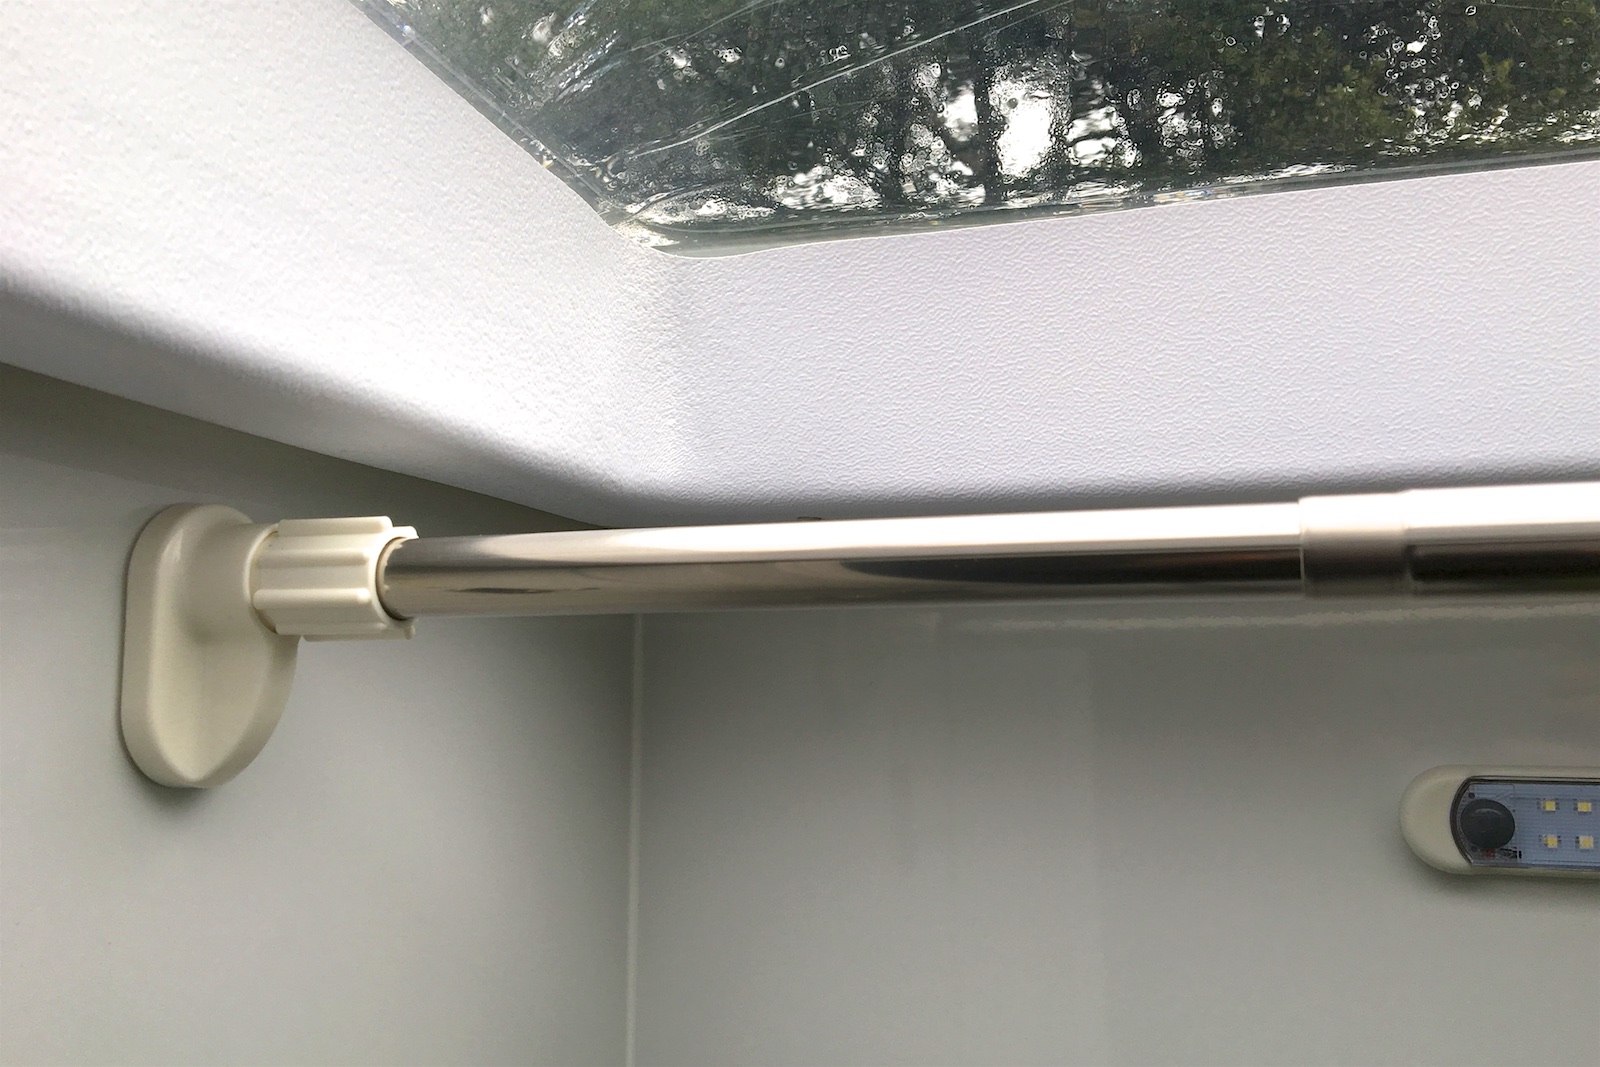
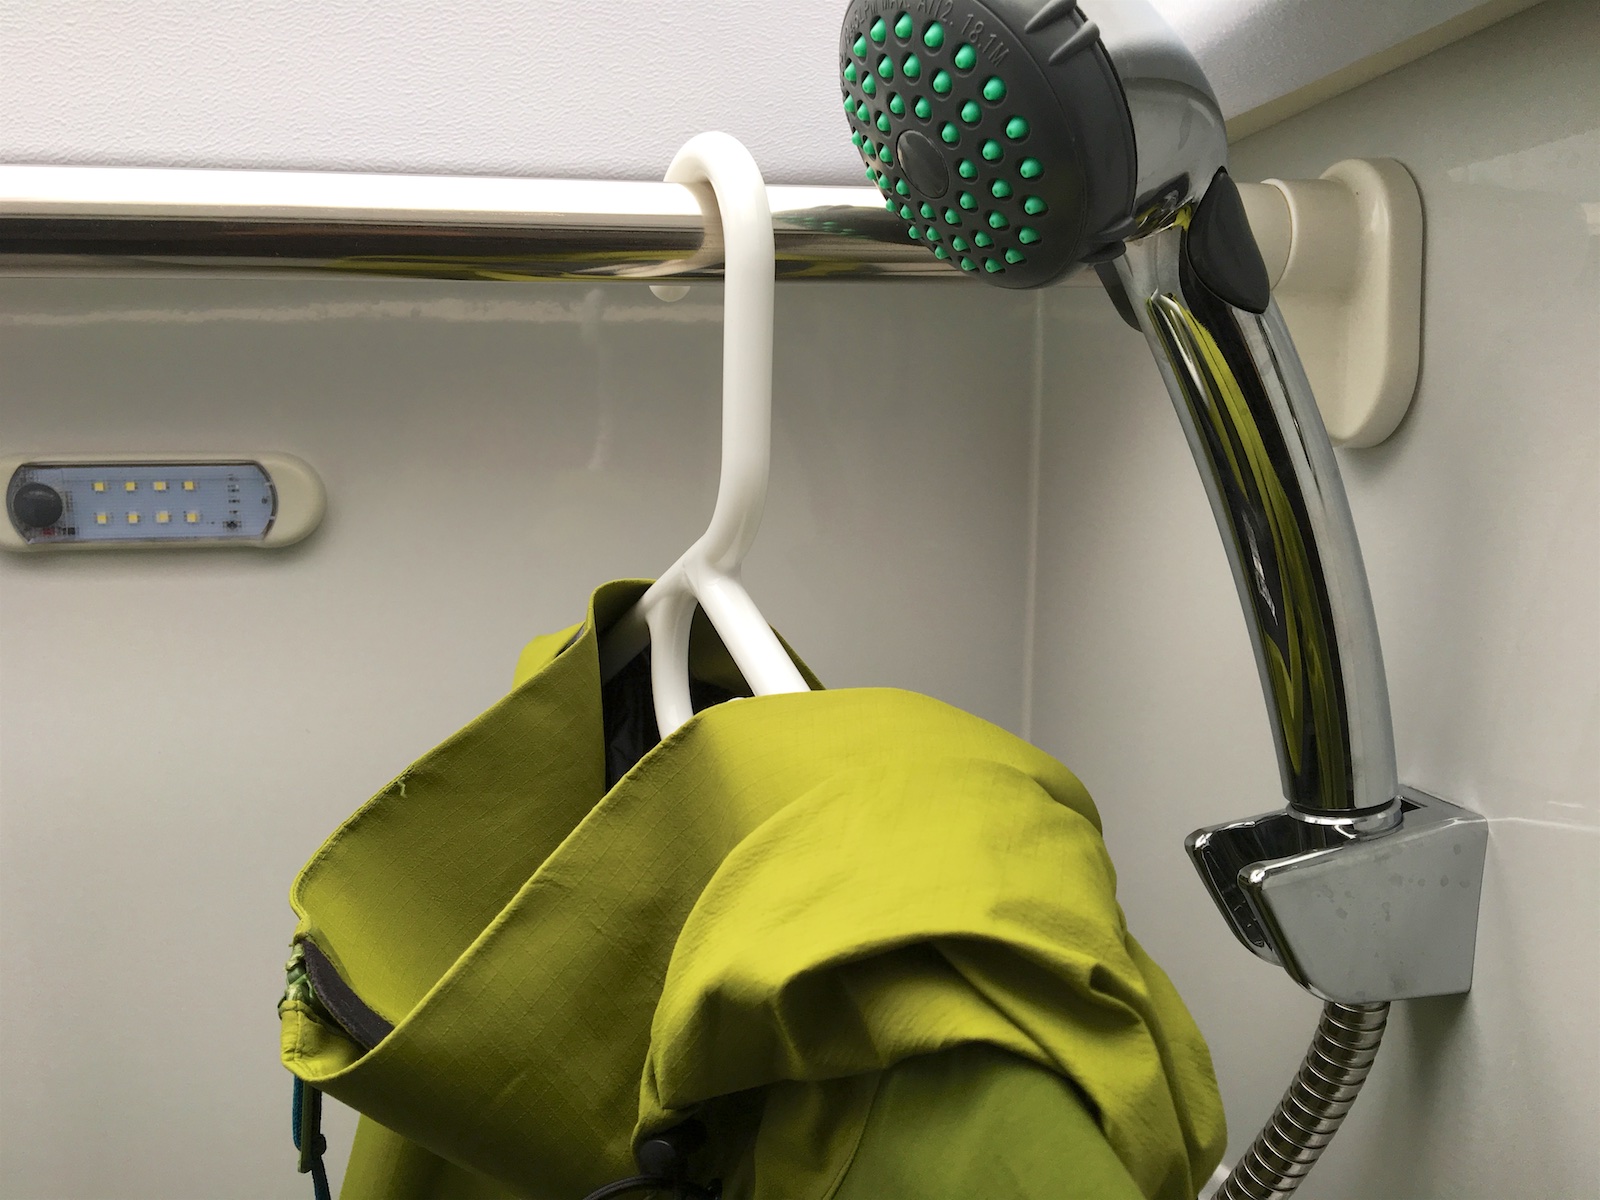
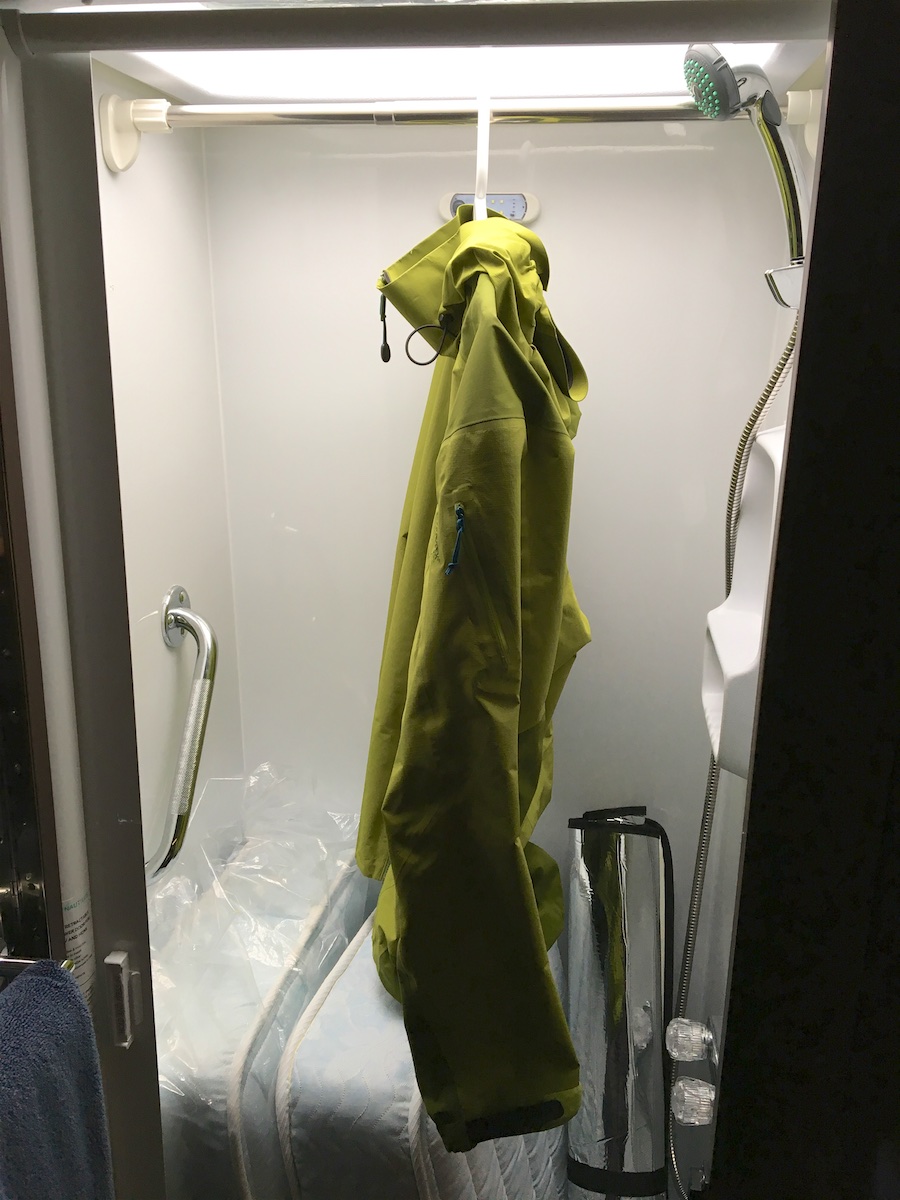
This one is perfect (paid link) – it’s a great size for many RV showers (18.9″= 31.5″), it’s easy to adjust, it’s easy to add or remove, and it holds its position well. You twist the pole halves to loosen/tighten to roughly the length you want, then you rotate the large adjustment collar to expand it slightly to fit your space tightly. It also has nice wide rubber grip pads on either end. If you’re not too tall you could likely leave it installed even when you’re showering.
Replace bathroom towel hanger
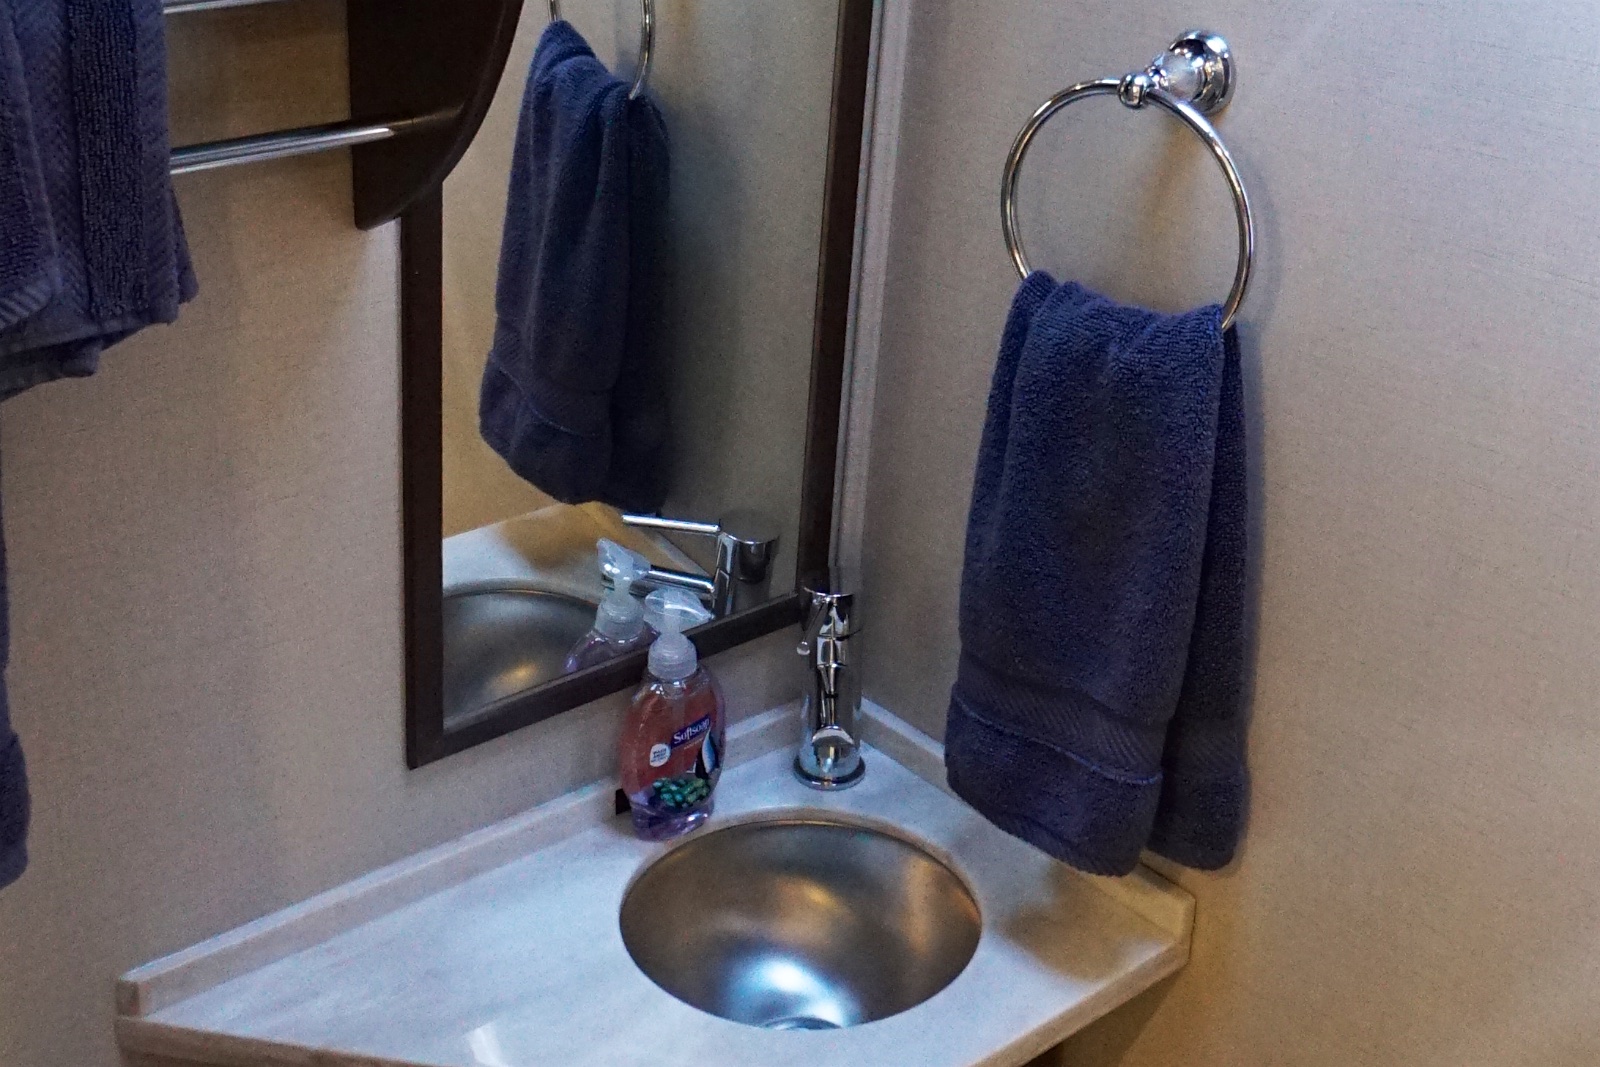
Well, that was a poor choice of towel hangers by Leisure Travel Van – the original hanger hung so low that any towel was basically lying in the sink. (I wish I had taken a picture before replacing it.) I found a replacement at Home Depot that fits in with the decor. It took a bit of tweaking the mount with a Dremel tool to be able to install it with the original bracket but it’s done. And Darlene particularly likes the clear crystal accent. ;-)
☞ This is one of those things that Leisure Travel Vans should do differently at the factory!
Add handle to bathroom door for easier latching
 This was an easy fix for a daily annoyance. It’s quite difficult to latch the sliding bathroom door as is because you have to position it just right (inwards/outwards) in order for the latch to find the slot and this is very hard to do with one hand and that tiny little rotating lever. Darlene had a good notion of installing a cabinet knob to grab onto. This sounded great until I realized it would require a screw through the door to secure it. So instead I got a small one of those nice-looking hooks (paid link) that you attach with just a provided adhesive strip. Problem solved, now you can guide the door in place with one hand while you turn the latch to secure it!
Add floor mat to entry step
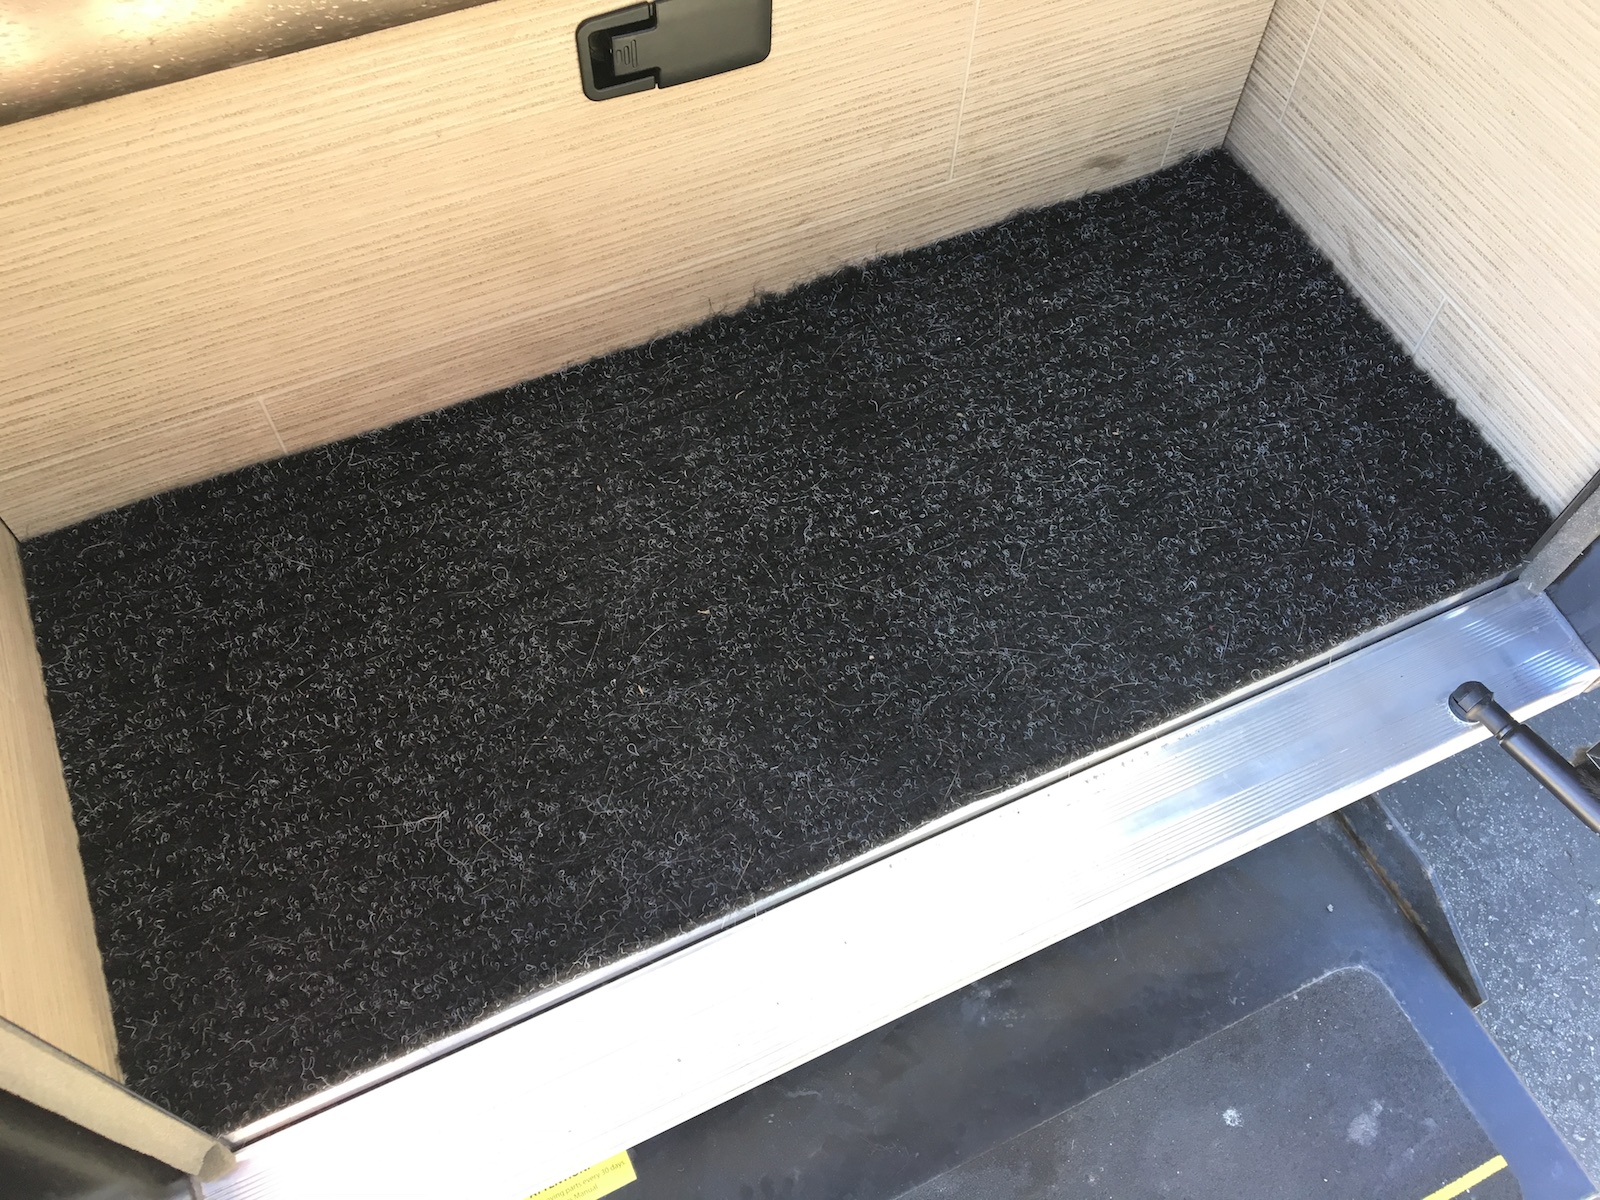 I bought and cut some rubber-backed, indoor/outdoor mat to fit the bottom entry step for wiping off shoes.
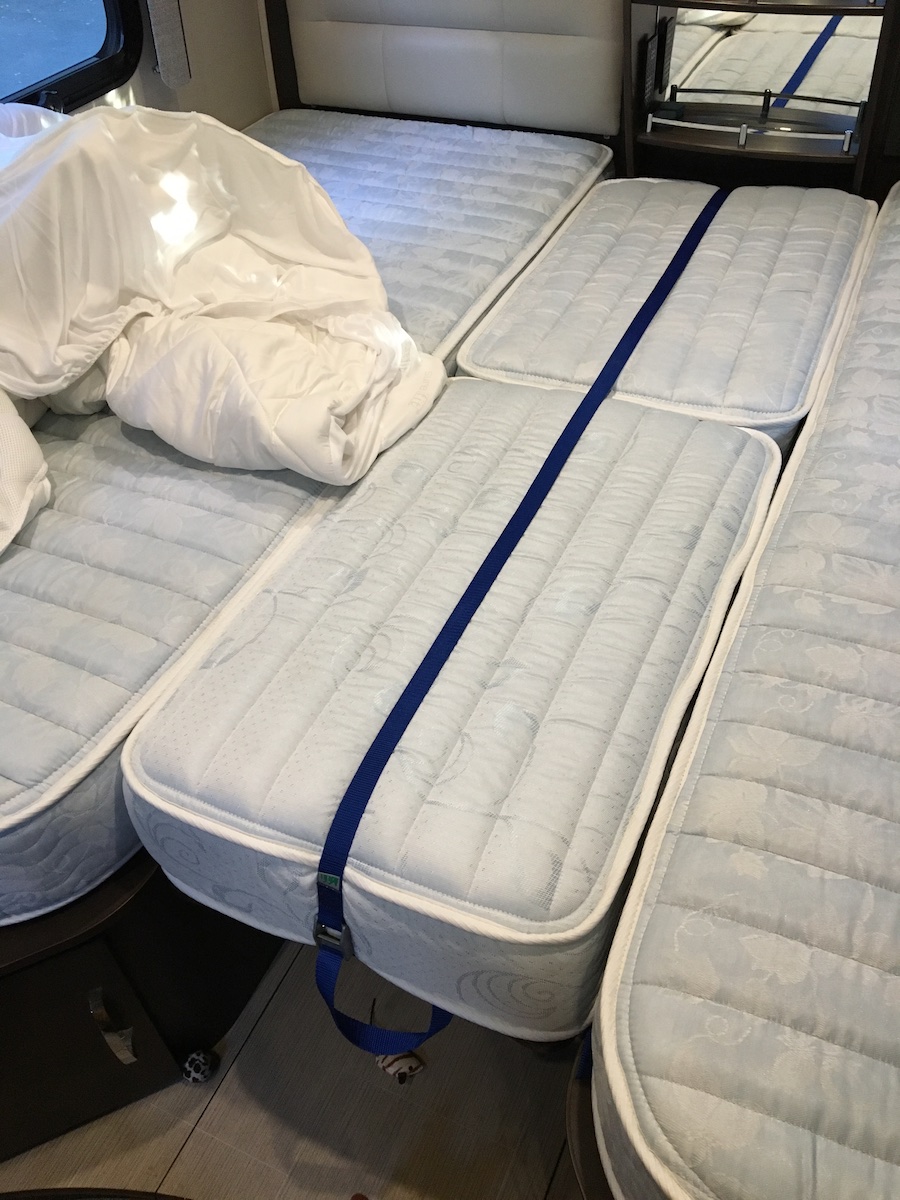
Fix mattress configuration
It’s cool how the twin beds can be made into a bigger-than-cal-king size bed but the middle mattresses just do not stay put. They quickly slide apart and you inevitably sink into a hole in the middle.
I tried some velcro underneath the mattresses but that didn’t work. A long, strong strap around the two fill-in mattresses seems to do the trick of keeping them in place but the position of the cracks was still bothersome when laying cross-wise (using it as a cal king bed). I bought a cal king sized mattress pad to smooth out the cracks, but it adds a bit of hassle in converting the bed, creates a slippery gap where the edge of the apparent bed isn’t supported underneath and it wasn’t sufficient to really eliminate the cracks.
I know some people have added a 1- or 2-inch thick mattress topper and are very happy with that. I considered doing the same but I’d like to avoid carrying and/or stowing a bulky layer like that.
I tried just omitting the fill-in mattress pieces and rotating the two twin mattresses to lay them side-by-side cross-wise. This creates a 70-inch wide bed. (A queen is 60″ wide by 80″ long.) It’s only 75 inches long this way but extra pillows can be used to fill in the gap at our feet (well, my feet). However, it turns out that rotating the mattresses in this confined space is quite the hassle and then the crack runs the length between us and separates easily.
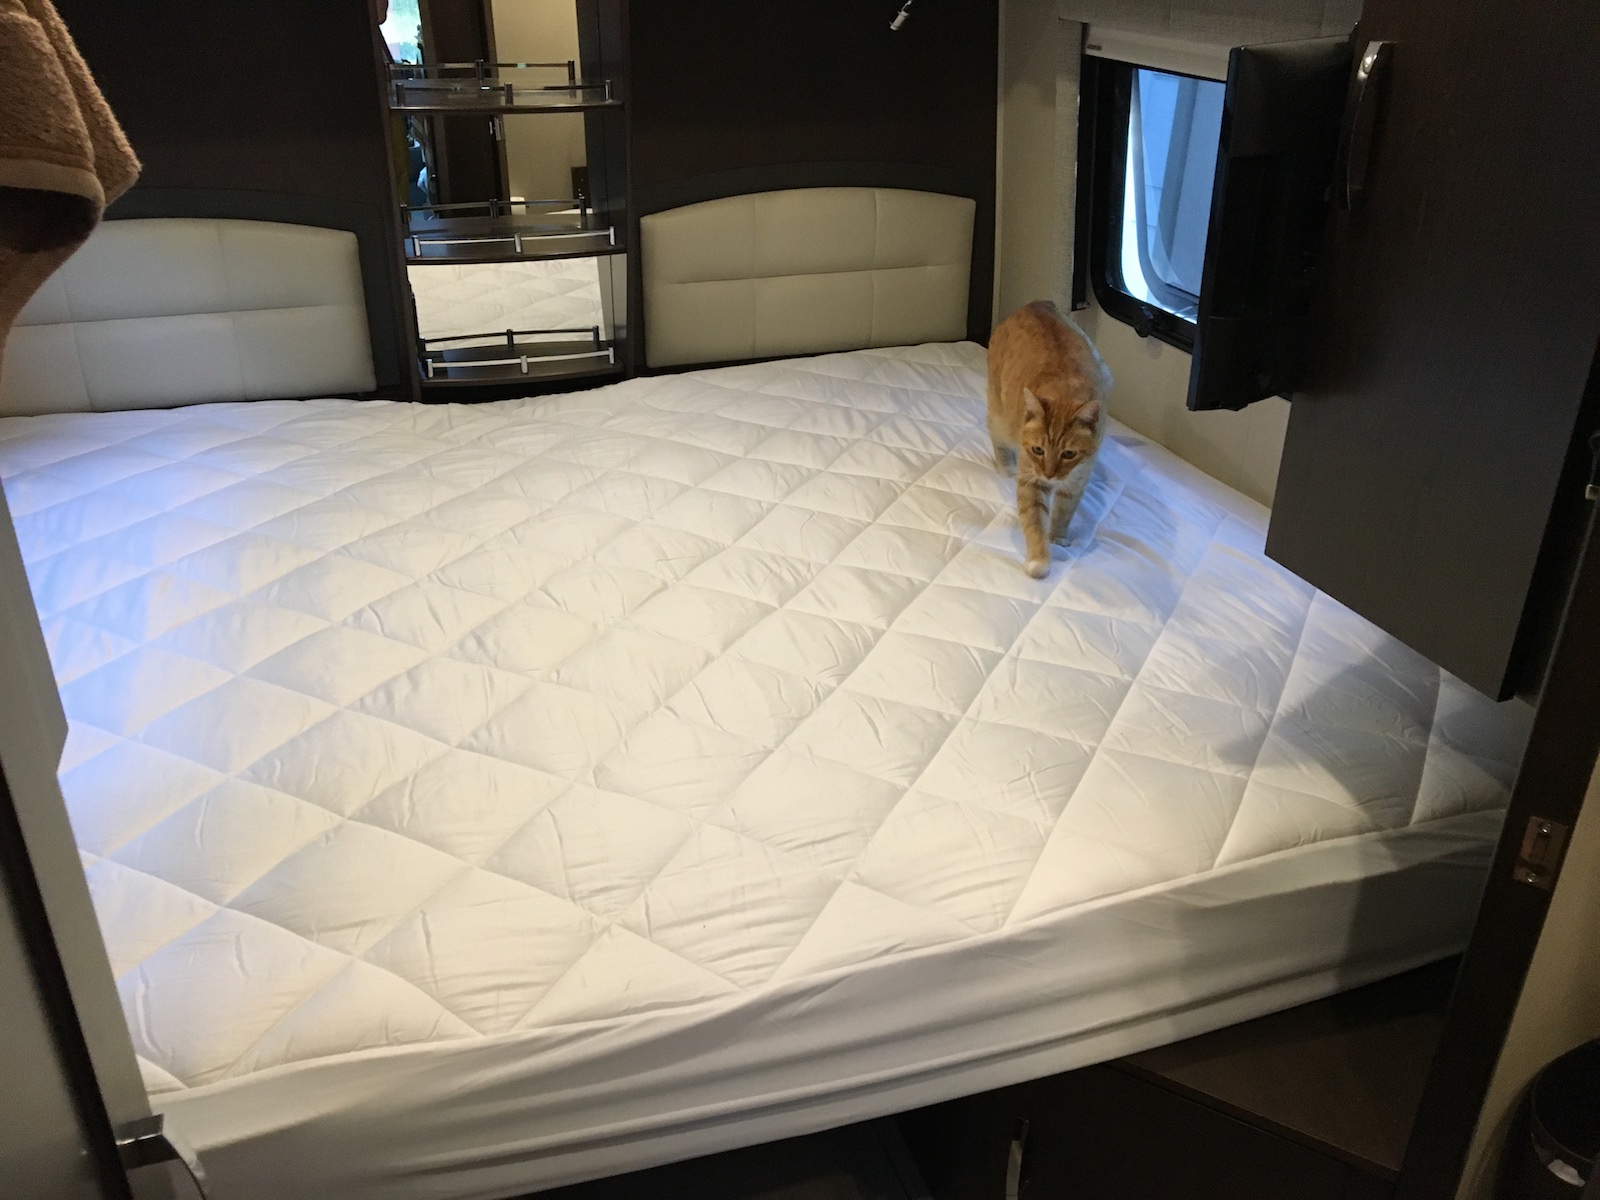
The system we ended up adopting is to slide one twin mattress next to the other and use the two fill-in mattresses against the wall rather than between the two twin mattresses. This places the mattress cracks behind our shoulders and under our legs and it’s working well for sleeping comfort:
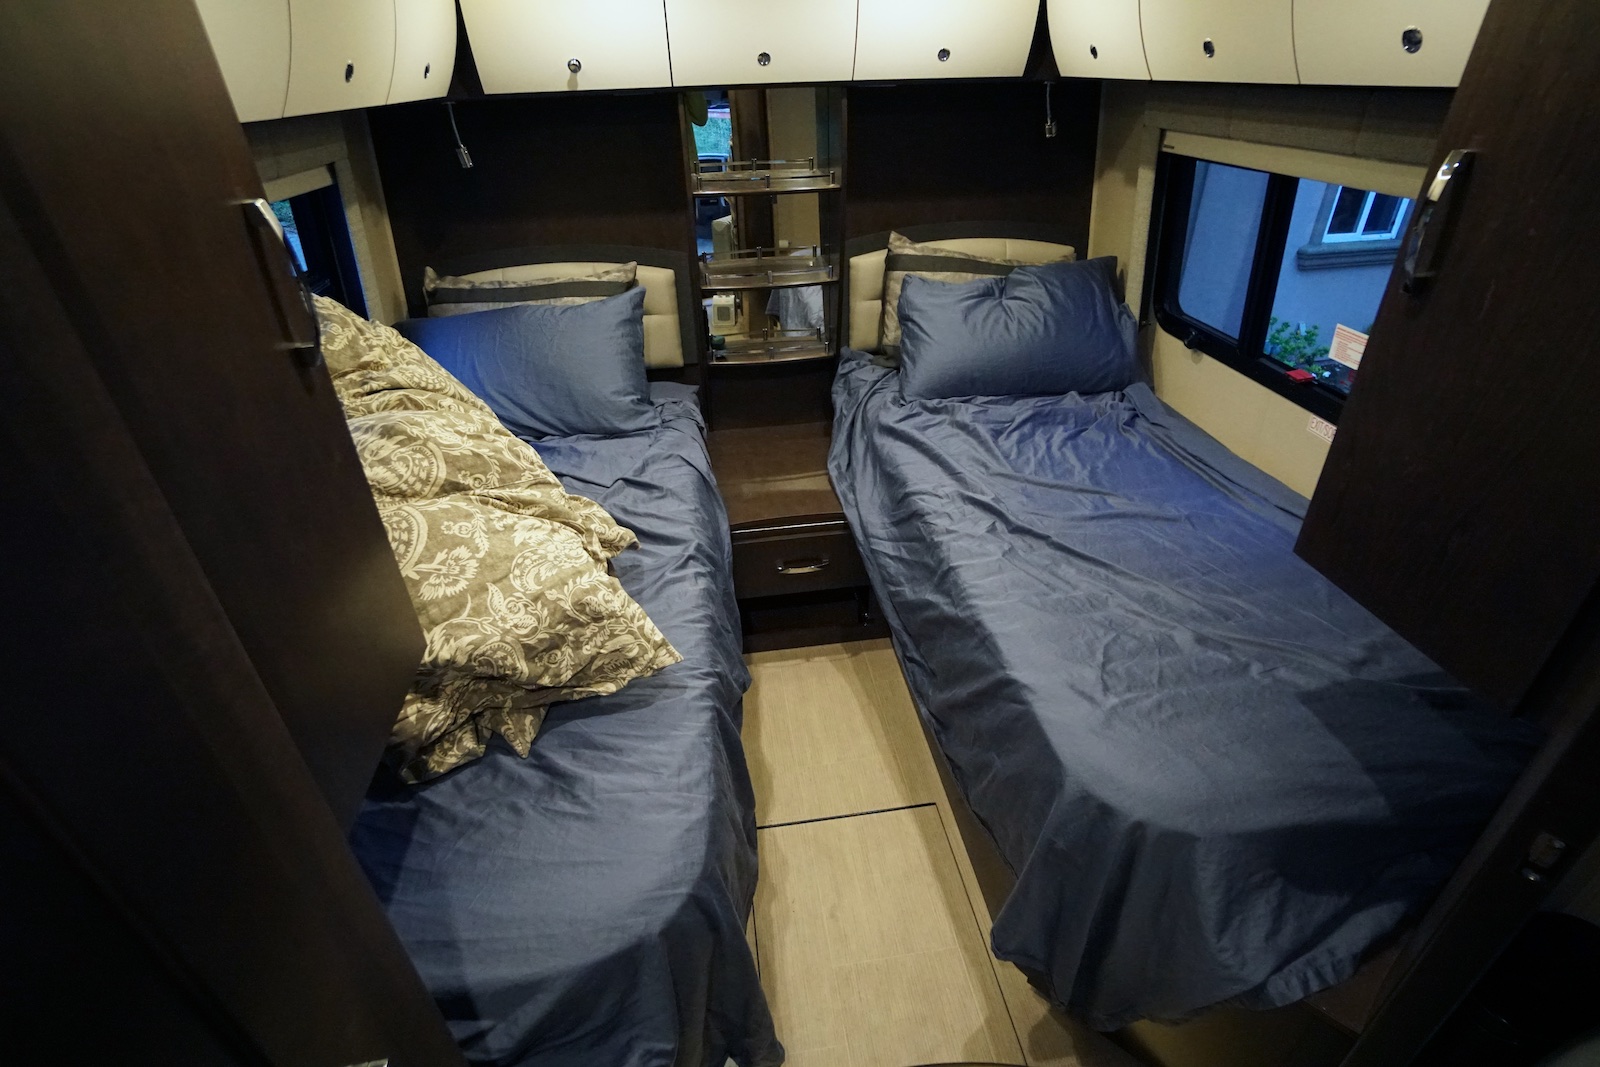
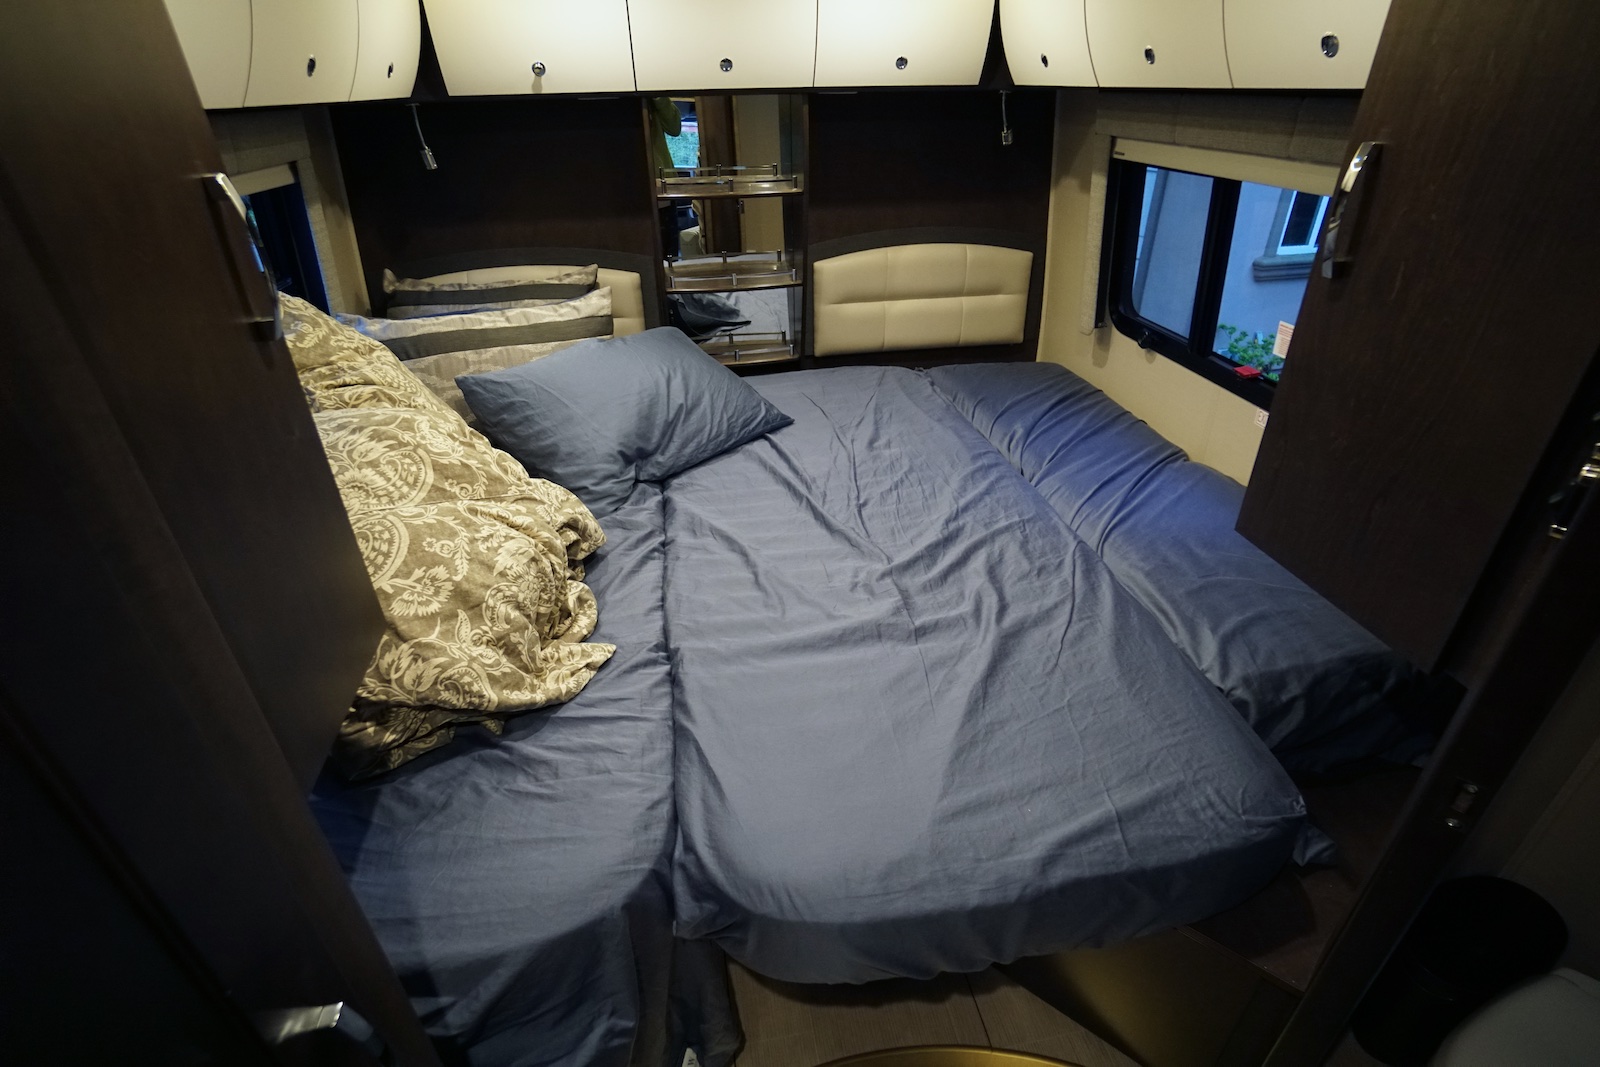

Having the mattress cracks behind our shoulders instead of under our backs makes all the difference. We hardly notice it now. Stuffing the throw pillows on either side of the fill-in mattresses keeps them from wandering. And of course we can configure it with heads to the left or to the right if there’s a bit of a slope where we’re parked. One downside is that this does mean that the middle mattress hangs over the edge of the support by a about a foot. It’s not terrible when getting in/out of bed, but not ideal.
In terms of bedding, I’m using a set of twin sheets (fitted and flat) for the twin mattresses. When converting to cal king size, I use one of the two flat sheets to tuck over and around the mattress inserts beneath our heads and we use a matching flat cal king sheet to sleep under. On top of that is a heavy, down duvet and cover in queen size. As you can see from the last photo, a king or cal king duvet is unnecessary as there’s no need or desire to have it drape over the sides of the bed in this space.
☞ This is one of those things that Leisure Travel Vans needs to do differently. While the concept of being able to convert the twin beds into a king/cal king bed sounds and looks great, the reality of it is that it needs a little help. I should note here that I specifically chose this floor plan in order to get a bed with decent width and height for two people, one of whom (me!) is tall. I didn’t like the island bed version because of how the bed is five inches shorter than a normal queen bed and how all that space is wasted to allow walking around the bed. What I’d really like is a wall-to-wall, full length queen bed back here on a raised platform, allowing plenty of room for external bike storage underneath, as you often see in European campervan designs.
Expand trash can and fix cubbyhole lid
Several of the Unity models have this nice little space cut into the galley countertop to hang a little trash can, but it needs two little fixes: the provided trash can is very small and the little finger lift cavity in the cover is difficult to use.
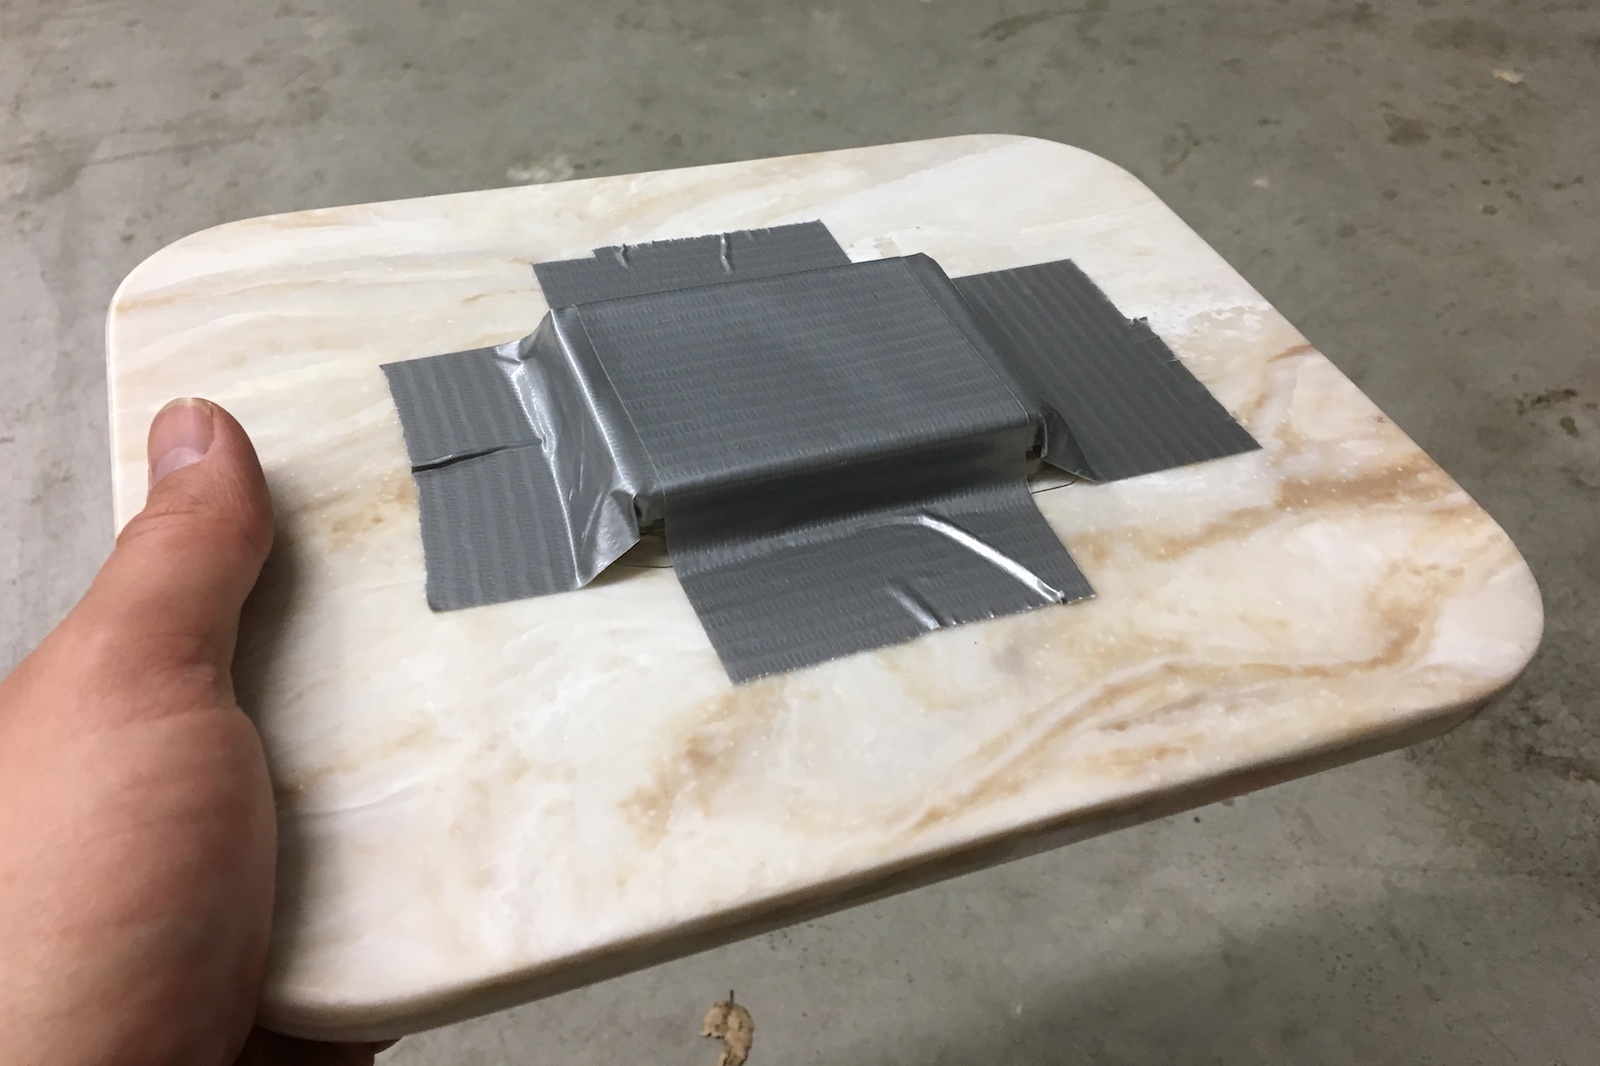

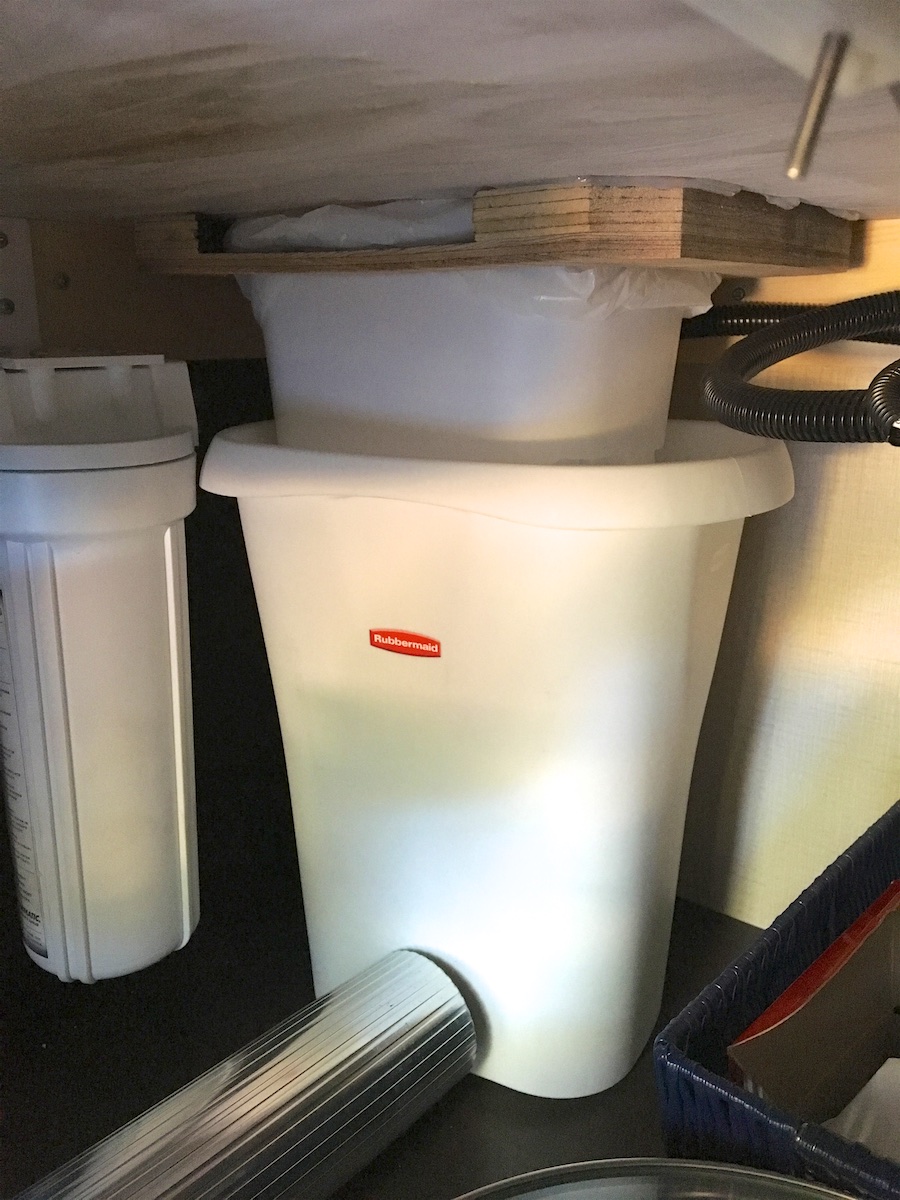
There’s a lot of space under the provided cover but only very small trash cans fit the hangar. So we decided to cut off the plastic trash can below the lip and place a larger can below in the cabinet, using the lip to hold a kitchen trash bag in place over the can below. Works okay.
I fixed the finger hole by using a dremel tool to cut out the plastic base of the finger cup and then, until I find something nicer, taped a little plastic container under the finger hole. Voila! Now you can easily insert your finger to lift up the trash can lid!
☞ This is one of those things that Leisure Travel Vans should do differently at the factory!
Replace cab navigation/audio and house audio systems
The existing Mercedes cab audio system isn’t great: it has a pretty small screen for navigation and for the backup camera and the audio quality is poor and confined to a set of cheap front speakers. I wanted to replace this audio head unit with something better – something with a larger screen and better audio, perhaps with CarPlay integration. I also thought it would help to hook up the ceiling speakers in the coach to act as rear speakers for the cab to fill out the sound environment.
There’s also a second audio/entertainment system in the campervan (a 12V Jensen AM/FM DVD Bluetooth system) that’s wired to four overhead speakers. It doesn’t actually sound very good and it seems a shame to have two separate audio systems on board. It’s connected to the two(!) TV’s that are installed (front and back) via an HDMI switch box but it only supports playing DVD’s (not Blu-Ray’s). Now I rarely watch TV even at home but when I do I use Blu-Ray’s or I stream NetFlix/AppleTV/etc so this a/v system doesn’t seem very useful to me. And yes, it does seem silly to have two TV’s in such a small space.
Several different changes here:
1) I replaced the Mercedes nav/audio system in the cab with a Pioneer 8100 NEX. (paid link) It provides a much larger 7″ screen for viewing the backup camera and navigation maps and includes Apple CarPlay integration. If you go with this model, be sure you get the capacitive version of the touchscreen. (Update: I don’t recommend the 8100 model now – see my notes below.)
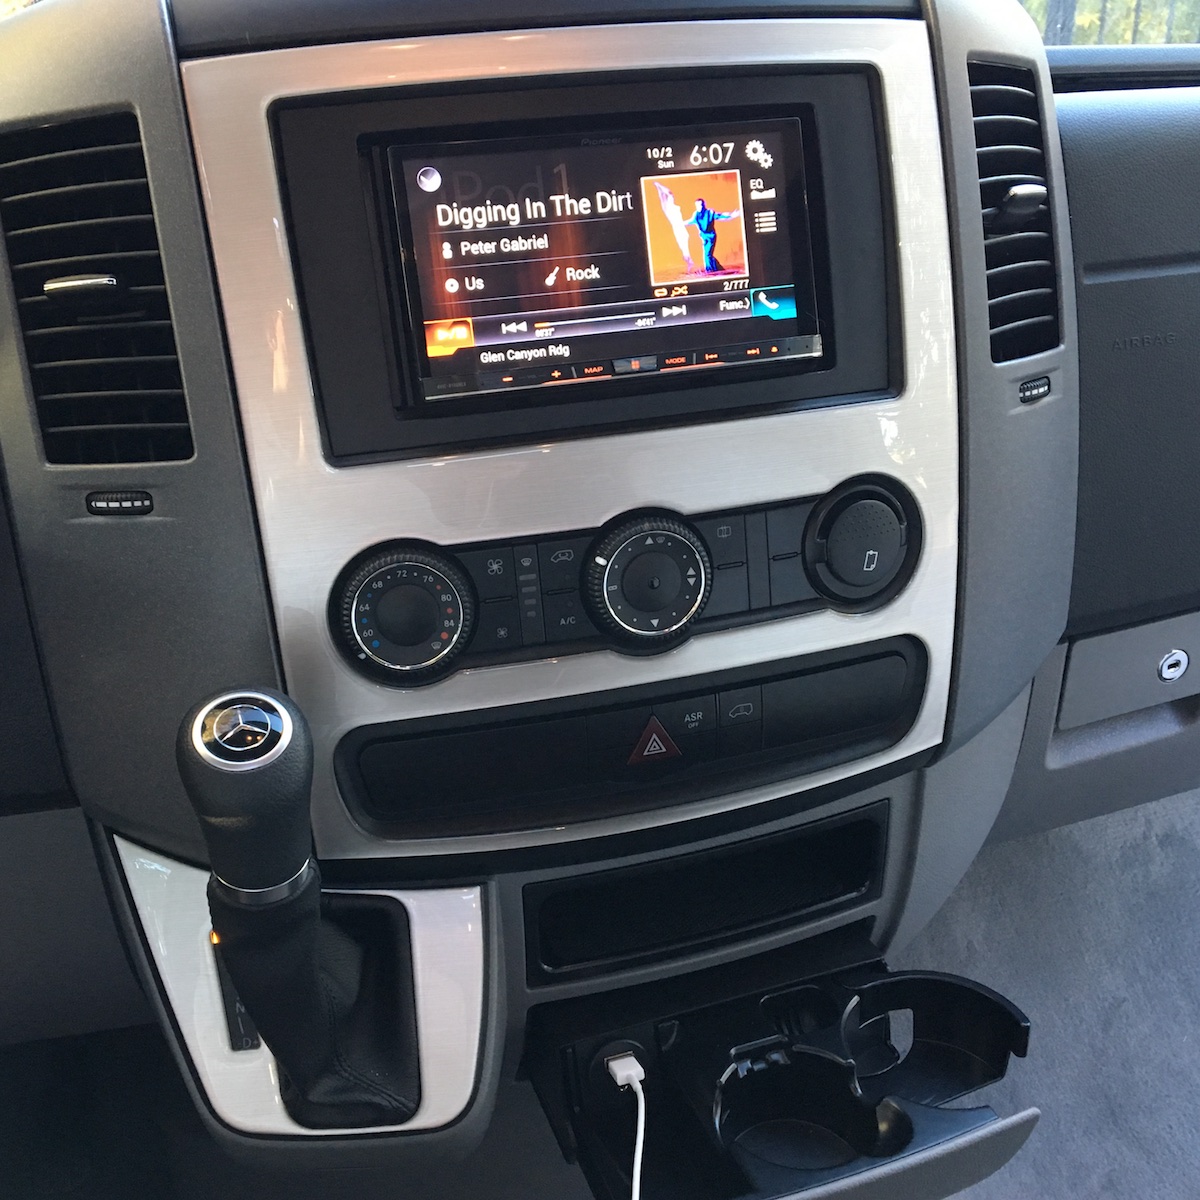


Swapping out the factory head unit is pretty straight-forward. Here are some written instructions for removing the factory head unit, Mercedes-Benz Sprinter 2007+ Radio Removal and a video tutorial, Radio Removal Mercedes Sprinter 1995+.
Things did sound better after replacing the stock radio/head unit and it wasn’t bad at low volumes, but at moderate volumes it turned harsh and messy due to the poor quality stock speakers. Even the stock speakers in my RAV4 and previous vehicles sound better than these with similar sources. I therefore decided to replace the speakers in the cab and while I was at it, I put in some sound and heat insulation in the doors. (See details below.)
| The installation bits you’ll need are: (paid links) |
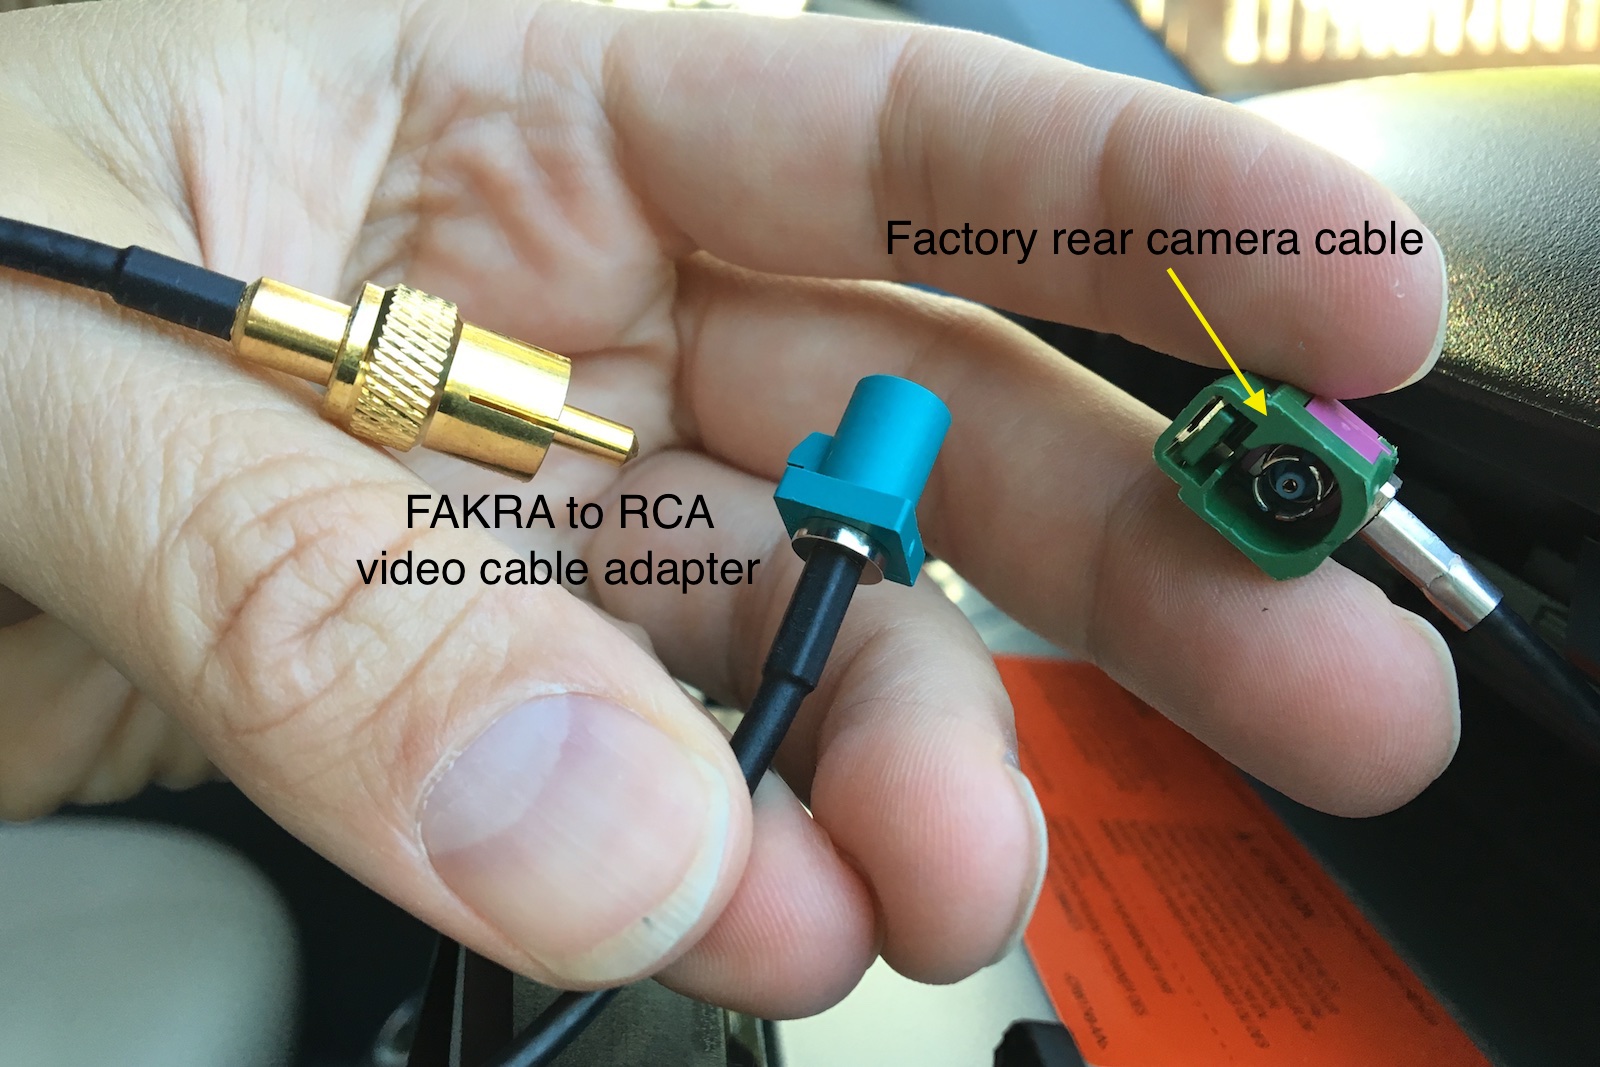
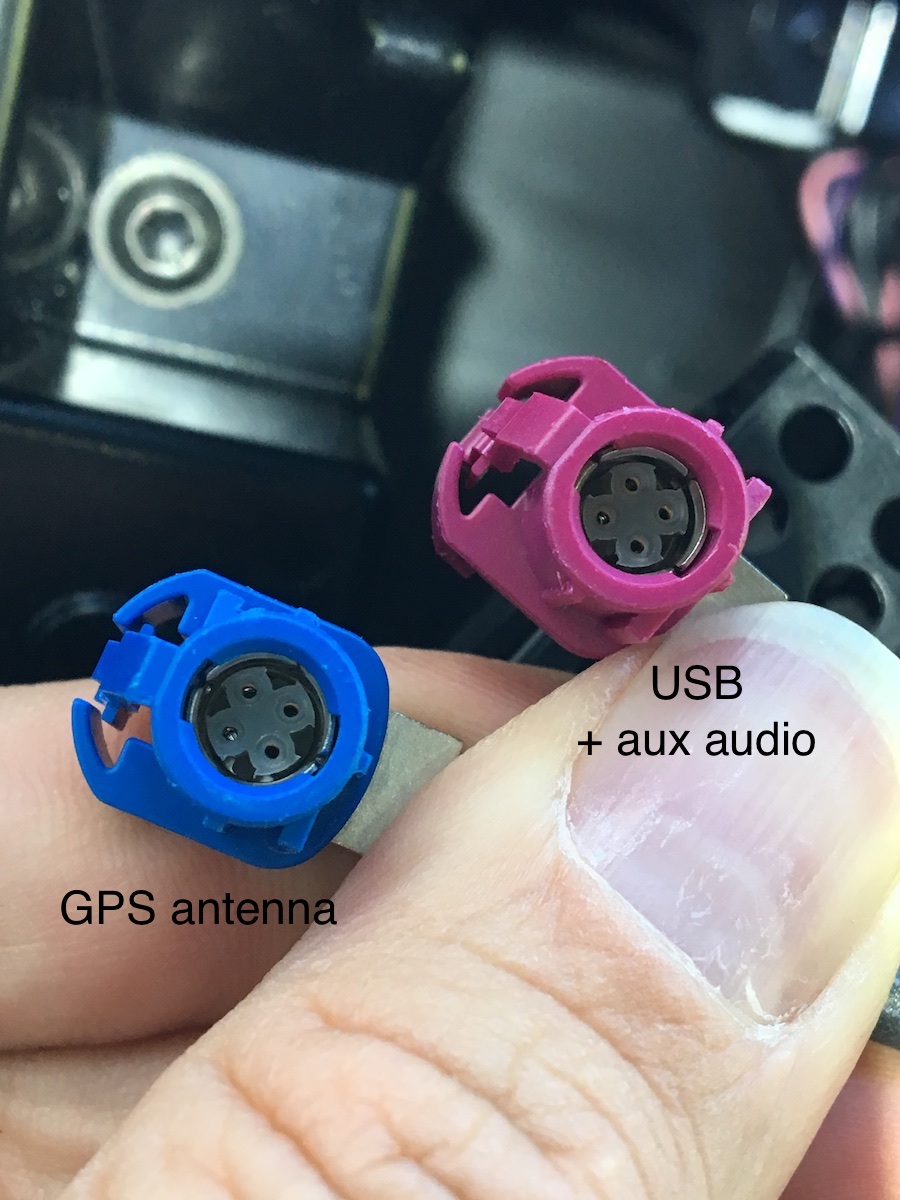
There is some helpful information in this forum thread to identify the different colored FAKRA connectors: black is radio antenna, green is rear camera, blue is GPS antenna, violet is USB/aux-audio ports on driver’s dash.
It’s easy to find the radio antenna cable adapter (see above) and I managed to find a source for the connection to the factory backup camera. I couldn’t find an adapter for the factory GPS antenna and I’m not really sure it would be compatible anyway but it’s also just super easy to slip the GPS antenna that comes with any new navigation unit up inside the dashboard. (It’s not necessary to mount it above the dash as you’ll see some folk do. It works fine right through the plastic dashboard.)
The Metra Axxess ASWC-1 (paid link) steering wheel control interface works fine with the Mercedes Sprinter and it’s programmable so you’re free to set up the four buttons on the right to do whatever you want as well as control the up/down buttons on the left, but those two buttons on the left only function when the Mercedes dash display is in the “Audio” mode. I set those two up/down buttons to change tracks/channels and I set the four on the right to volume up/down, mute and input selection.
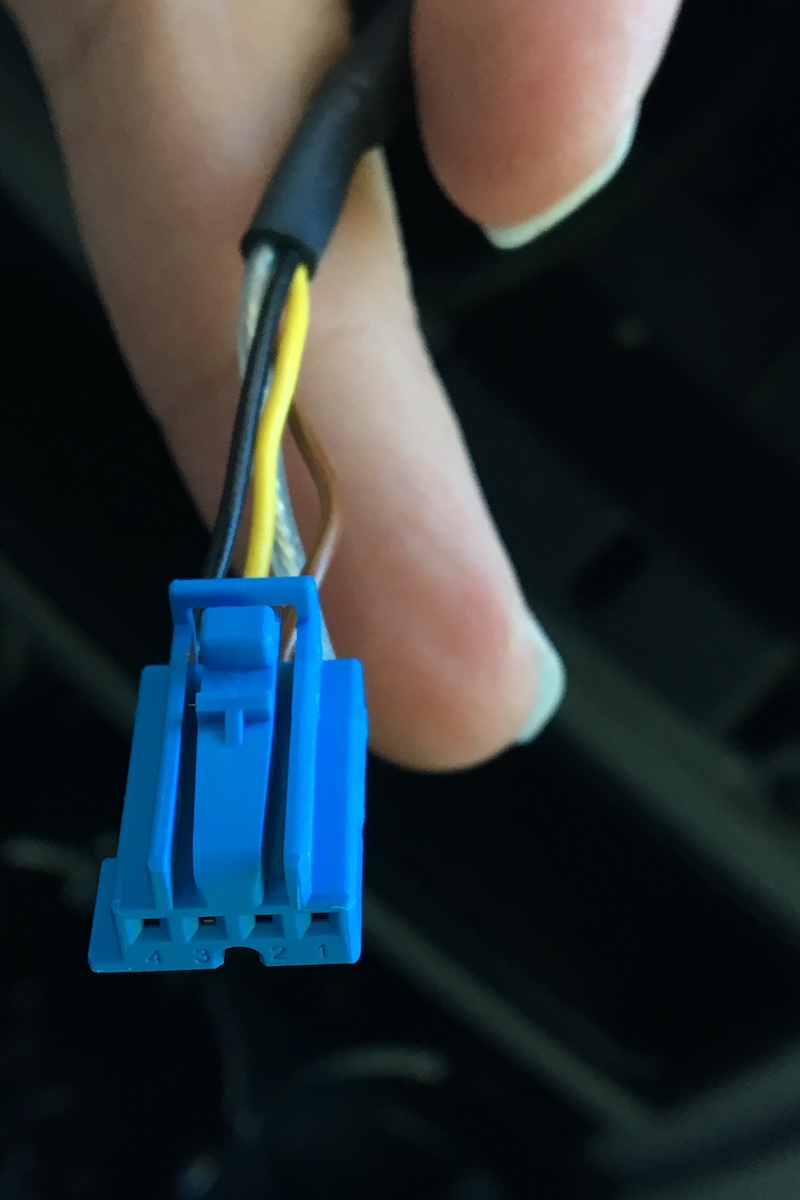 I found this Mercedes microphone cable adapter but it didn’t look like a match for the cable in my Sprinter so I isolated the wires coming from the overhead microphone in the factory wiring harness (part of blue 4-pin harness). After lots of trying online and various electronic stores and Mercedes mechanics, I gave up on trying to find compatible wire harness pins and just pulled the two wires and pins out and spliced in a 3.5 mm audio jack so I could plug the factory microphone into the back of the Pioneer. You could also just install the microphone that comes with your new nav/audio unit but I’ve previously had disappointing experiences with Pioneer’s aftermarket microphones.
I originally couldn’t find an adapter to hook up to the stock USB port in the upper dash on the driver’s side without splicing wires but someone wrote in and pointed me to an Volkswagen USB adapter that is compatible. Unfortunately, this is a eBay listing so this link may eventually expire: USB Male to 4-pin Wire Harness AUX Adapter for VW
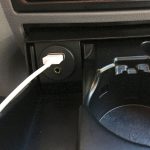 I also added a flush-mount, combination USB/audio jack (paid link) in place of the cigarette lighter in the ashtray. (The Pioneer 8100 supports two USB inputs.) I should warn though that it was quite the pain to disassemble that cigarette lighter holder. Note there’s another 12V port below the dash that’s still available for whatever you need.
Update: I’ve repeatedly had trouble with four different USB port and cables that I’ve connected to my Pioneer 8100 unit. After some minutes of use (sometimes close to an hour), the Pioneer will report that the USB is disconnected and refuse to use it again until you power off the thing entirely for a moment. I’ve sent it in for repair.
Update: After spending some time with the Pioneer 8100 NEX, I can no longer recommend this model. The sound quality is great and most of the functionality is fine, but there’s one odd limitation with the navigation which is particularly troublesome for me. Unlike any other navigation system (including prior Pioneer products I’ve owned), you are not allowed to set the zoom level of the map while it tracks your current position. This means it’s not possible to have the map track your position while showing some useful miles of distance on the map. All it allows you to do is set a minor variation of near/far (which seems to be only useful while navigating a very small area of a few city blocks). Any attempt to zoom the map, takes you out of tracking your current position into a static view of the map. This is extremely frustrating because now you can’t glance down at the map and get any sort of useful information about where you are or where you’re going to make decisions about upcoming highways, etc. All you can do is see your immediate position, even on the “farthest” setting. This view seems only useful when you’re in a metropolitan location and almost on top of your destination. Sometimes you can’t even see the street names that you’re approaching.
I contacted Pioneer and all I got from them is: “This is the way it was designed and not defective.” They suggest that the Pioneer 8200 NEX does have this feature and decline to comment on the fact that their earlier models also had this basic functionality. After asking some 8200 owners on Amazon, it looks like the 8200 also lacks the ability to adjust how much of the map you see while navigating. So… I’m definitely going to replace this unit but I haven’t decided on what yet.
 2) I replaced the stock speakers in the cab using these door speaker adapters (from Hein on the Sprinter-Source forum) which allow you to accommodate larger door speakers in the Sprinter doors. I chose these mid-range, MTX Audio Terminator65 component speakers (paid link)(separate tweeters and woofers) since they can be installed without having to wire up a crossover. Please note that you really should disconnect (or just remove) the stock center speaker in the back of the dash or it’ll overwhelm any decent sound you’ll get from your upgraded speakers.
Here’s the speaker wire colors for the Sprinter:
Left: Positive (+) = Brown/Violet, Negative (-) = Brown/Dark Green
Right: Positive (+)= Brown/Orange, Negative (-) = Brown/Dark Blue
3) I initially removed the Jensen house audio system entirely and wired the house ceiling speakers to the Pioneer’s rear output with an A/B speaker switch. However, I eventually decided to put the Jensen system back in because it turned out that it was less convenient to have to use the front dash unit to send audio to the coach speakers. Also, having the overhead speakers turned up loud enough to act as rear speakers balanced with the front speakers meant I was making the ride-along experience for the cats much less tolerable.
I put the Jensen back, but I’ll keep my old notes here for anyone considering removal of the unit:
I made a little blank panel out of MDF to cover the space occupied by the Jensen. You could also route an audio out cable from the Pioneer to the Jensen’s alt audio in jack if you wanted to.
While it’s really nice to hear things rounded out more with sound coming from both front and back while in the cab, the LTV-installed overhead speakers aren’t very good so I had to use the front/back fader controls to balance the output from the overhead speakers. It’s nice to have just one audio system for the whole vehicle (including Bluetooth). If you were so inclined, you could also use the Pioneer’s DVD player for the coach TV by running A/V cables through but I didn’t bother.
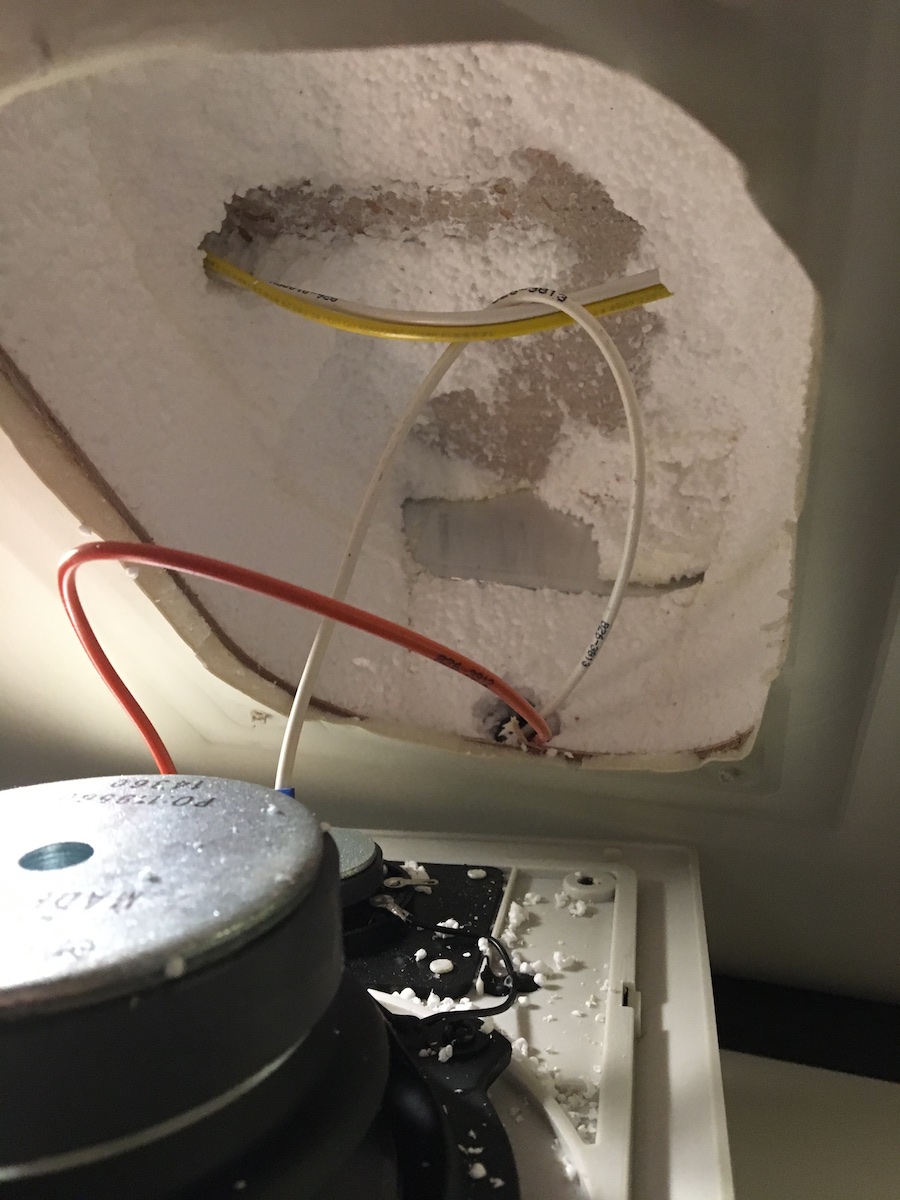
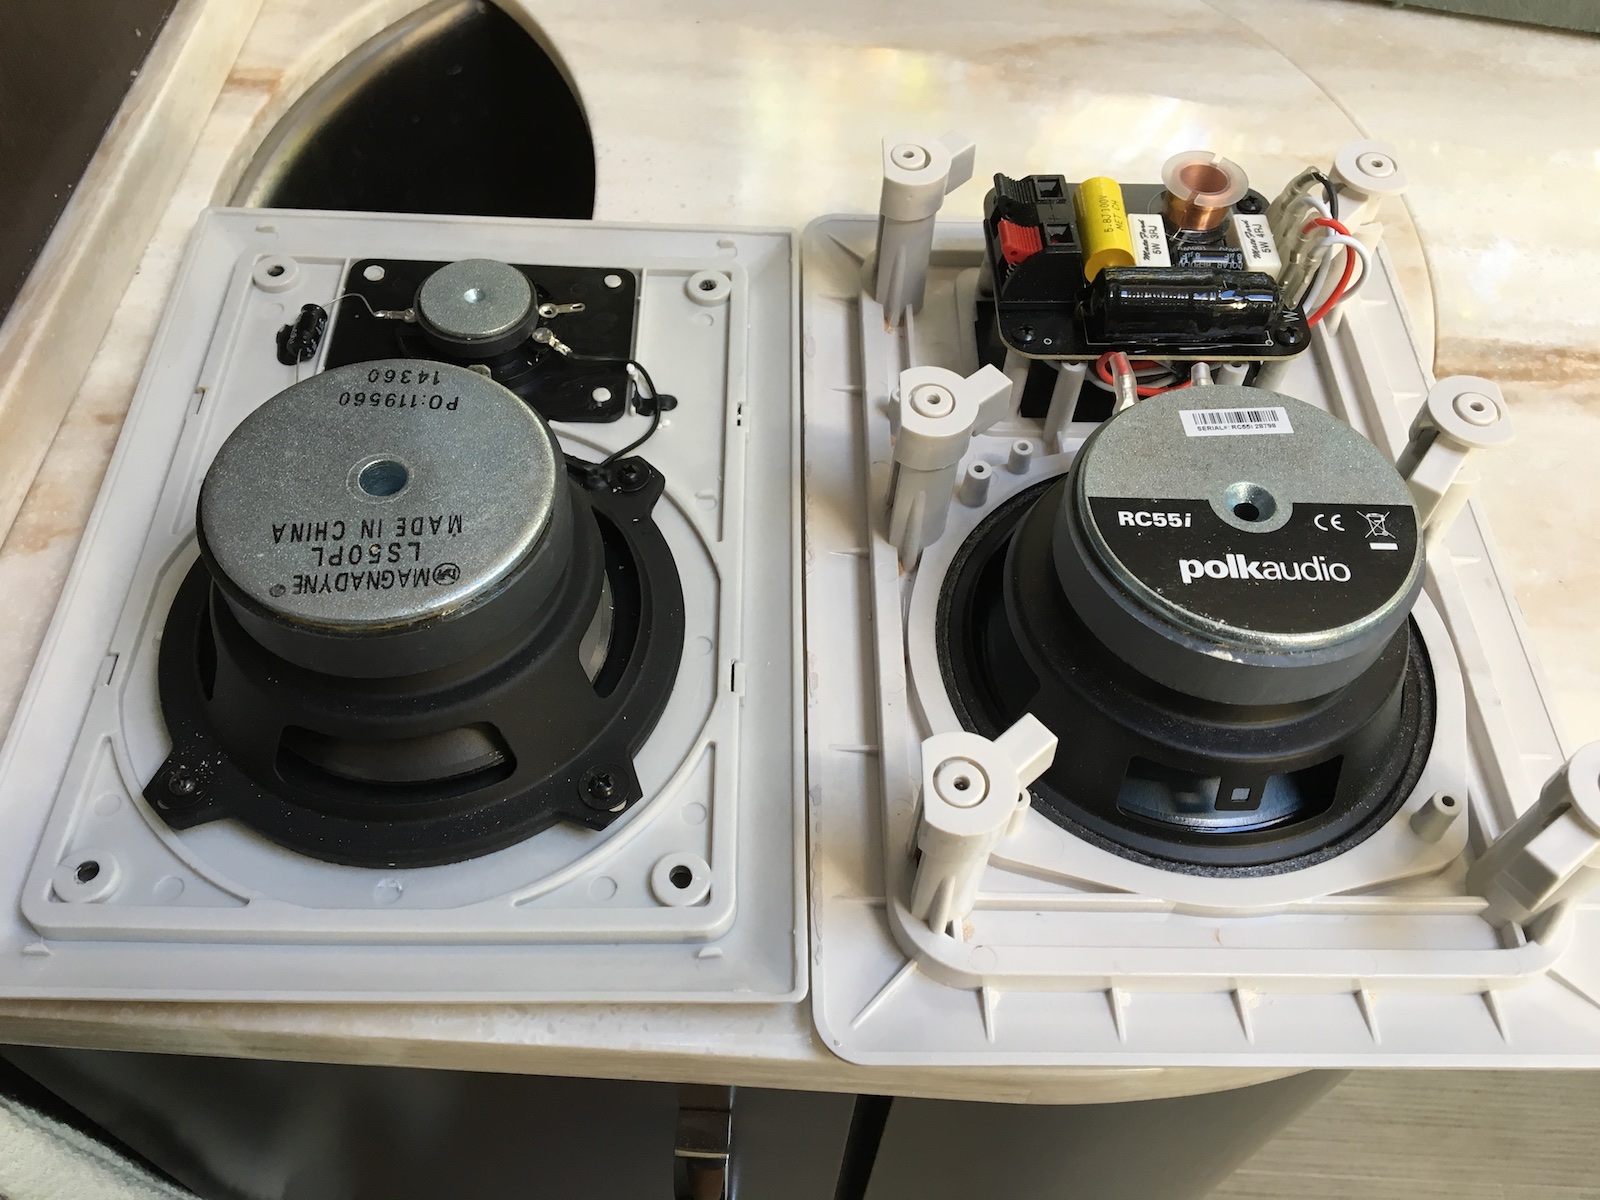
While upgrading the speakers in the cab is straight-forward because there are tons of options, it’ll be more of a challenge to deal with the overhead speakers in the coach. Unfortunately, I see that common Polk wall speakers can’t be easily swapped in:

Add sound deadening and insulation to cab doors
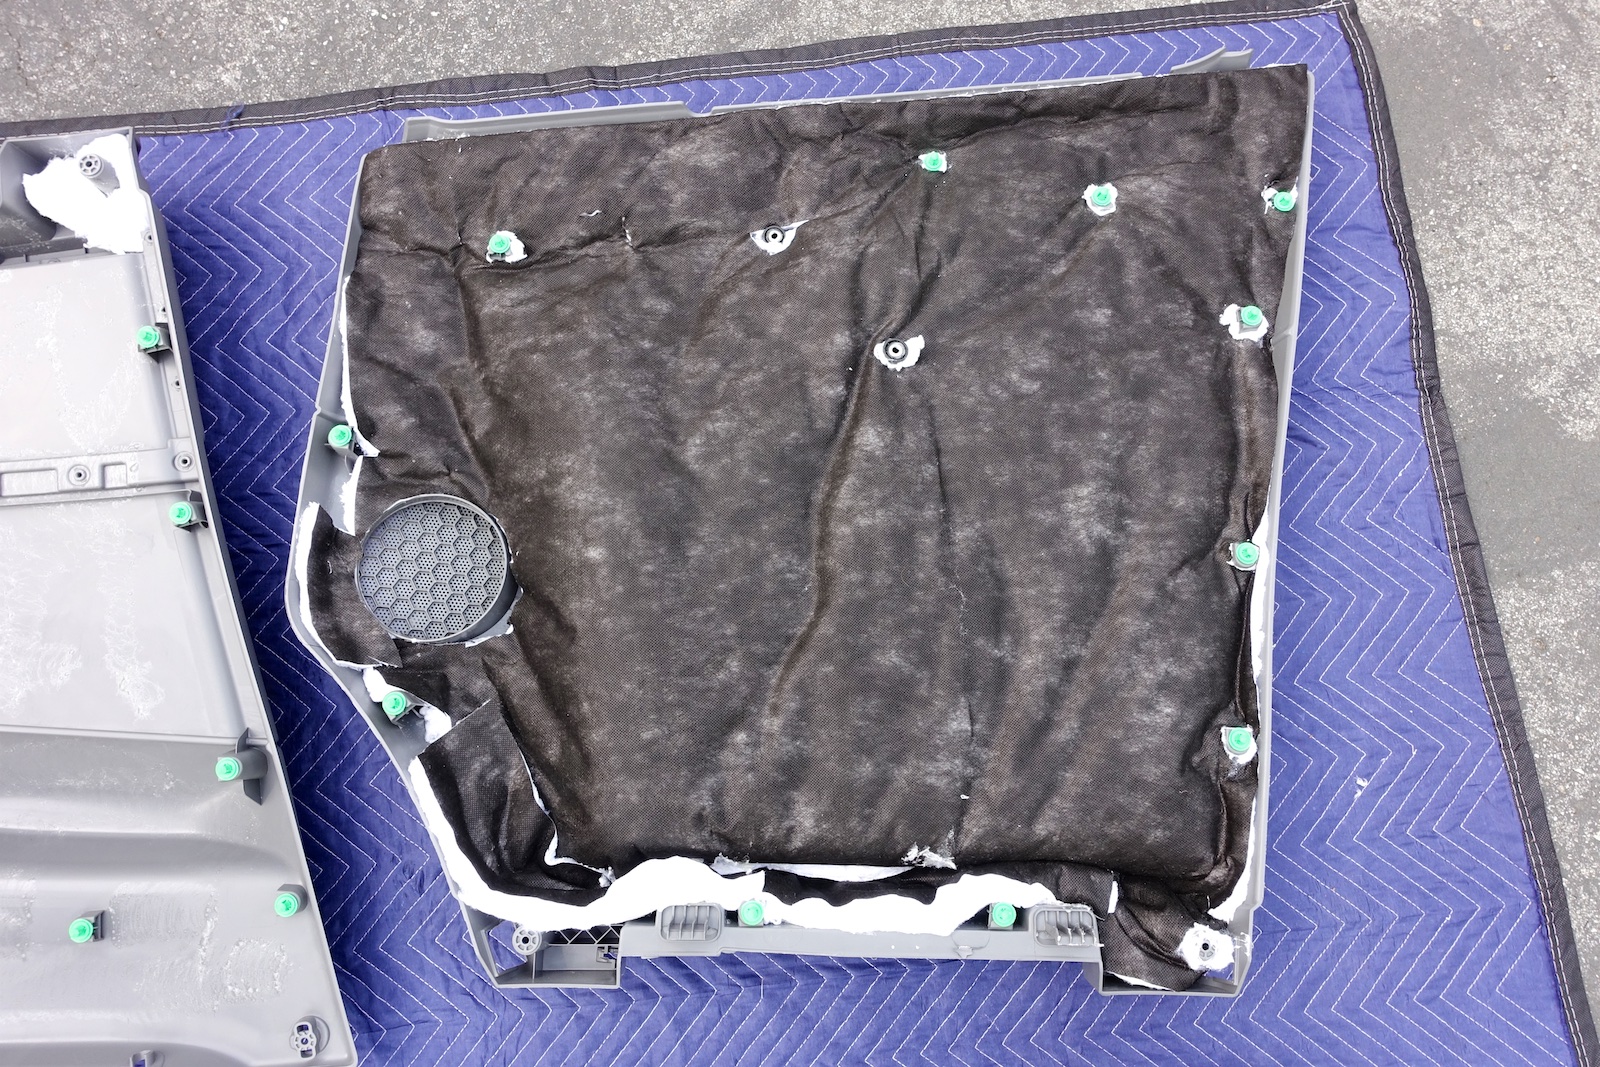
While I was going to the trouble of removing the door panel covers to upgrade the speakers, it made sense to go ahead and add noise and vibration-deadening material to the doors. I added Noico 80 mil automotive butyl and foil (paid link) sound deadening material to the inside of the exterior panels and 3M Thinsulate SM400L automotive insulation to the inside of the plastic door panel covers. This is not something I’ve ever done before but it wasn’t difficult at all. The hardest part is getting the plastic door panels off. The results are impressive. Mercedes only applies two narrow strips of sound deadening to each door (as you can see in the photo below), but you can easily hear the difference just from rapping on the outside of the door before and after (see video below).
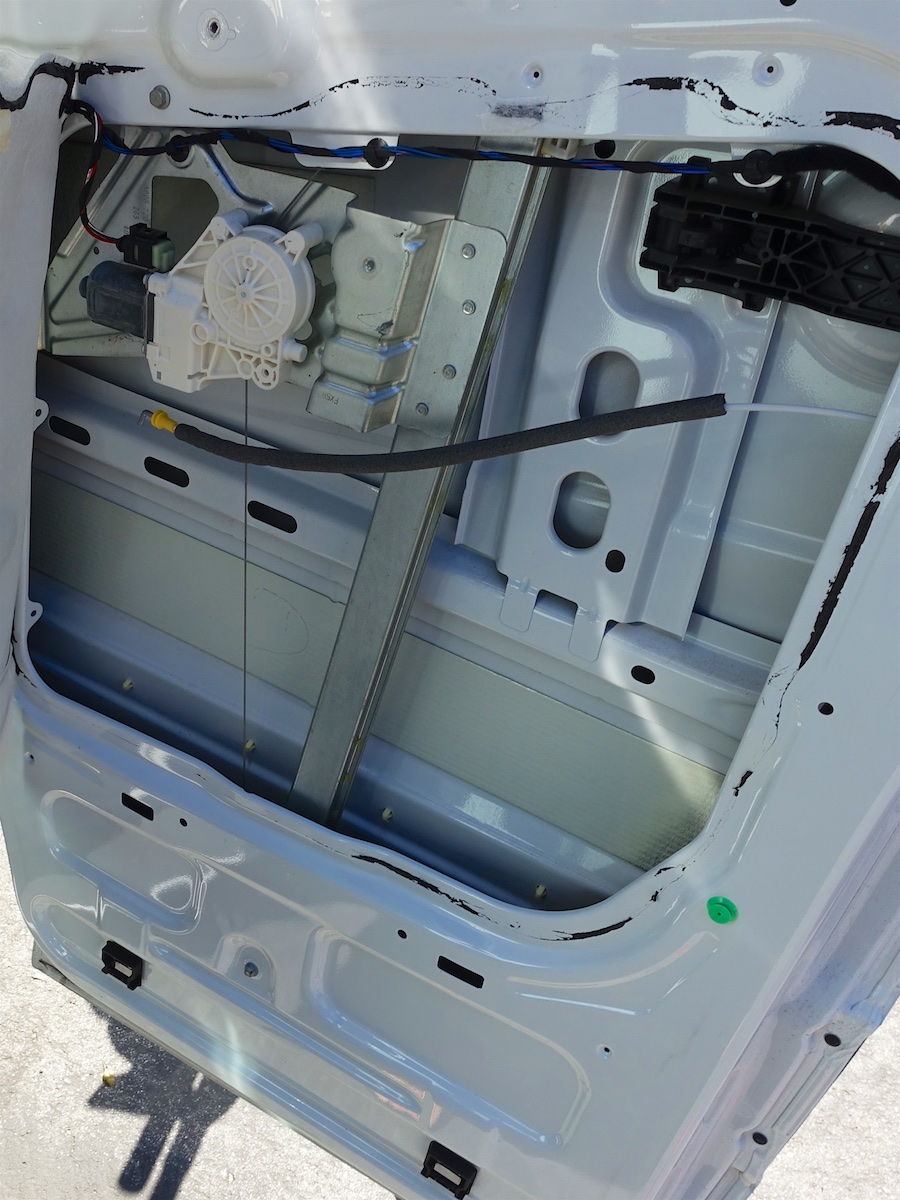
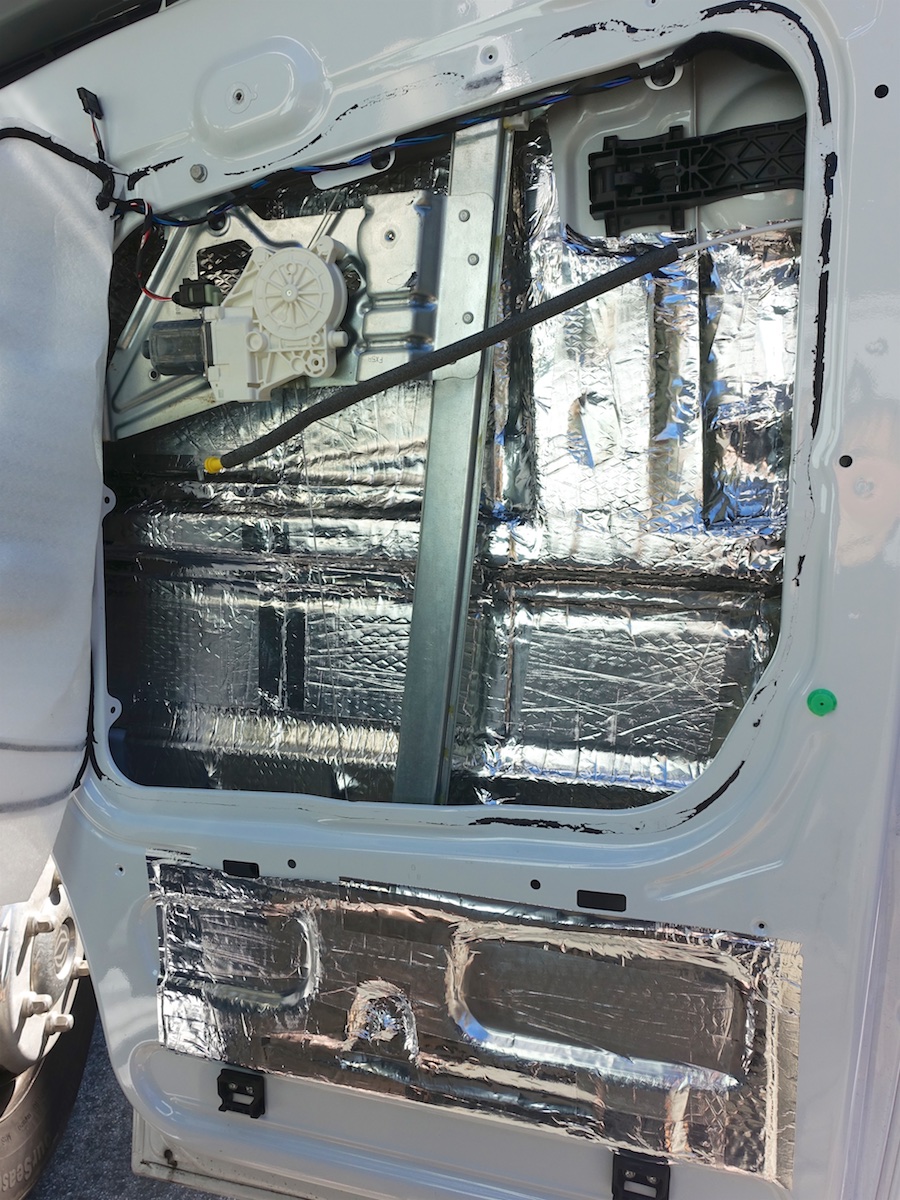
I wasn’t able to easily access the inside, lowest portion of the exterior door shell so I put some of the deadening material on the inside shell instead. This portion of the door is down in the step well anyway.
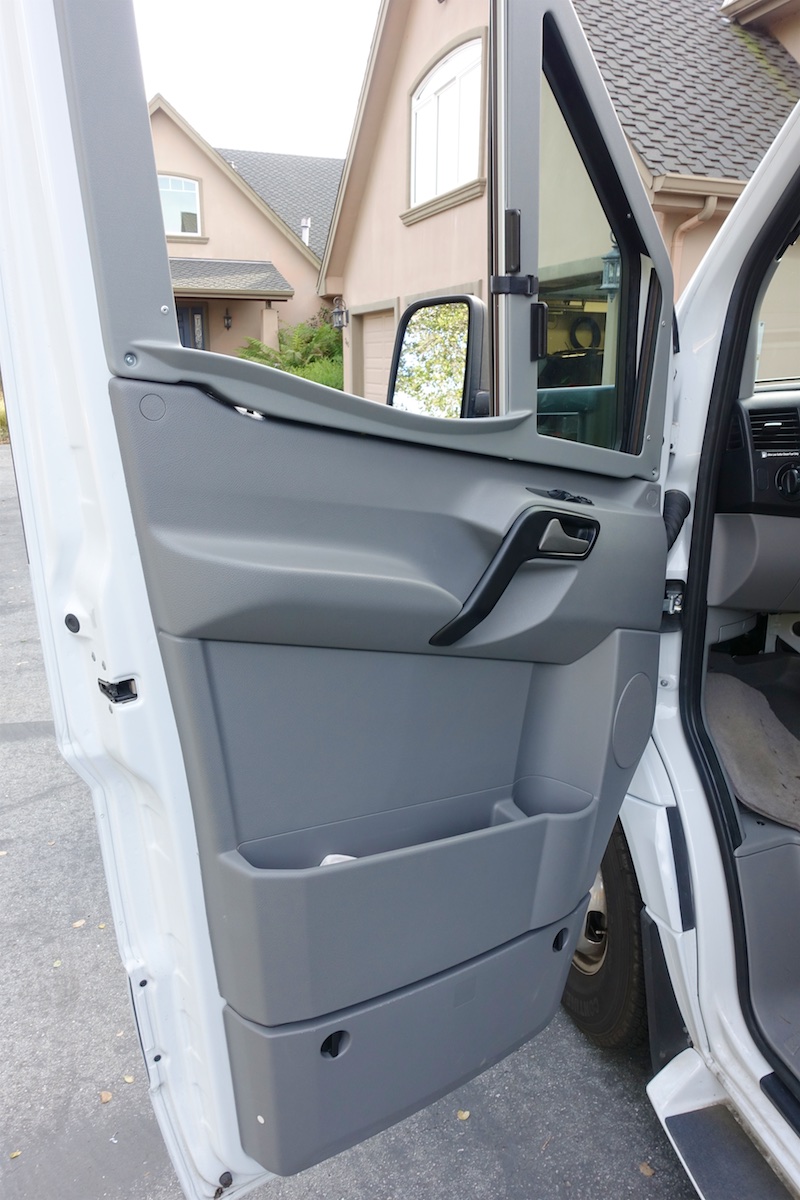
On the subsequent test drive, it seemed like road and tire noise coming through the doors is now virtually eliminated. This should make extended drives more pleasant and perhaps Pan and Hera (my cats) will appreciate the lowered noise floor. It actually makes the air noise coming from the vents back behind the refrigerator more noticeable now though – I’ll have to see if I can do something about that – and of course you can still very much hear the engine noise through the front and floor of the cab.
The added door insulation might also help keep in (and out) the heat.
Some needed accessories for installation: (paid links)
- Noico heavy barrel roller (for the sound deadener material)
- 3M Hi-Strength 90 spray adhesive (for the insulation), this stuff is great!
- 3M foil tape (for covering cracks, edges and seams of the deadener material)
- an automotive panel removal tool (plastic/nylon tool with a thin leading edge to pry off panels)
- work gloves (the aluminum edges of the deadener material are sharp)
As for help on getting the door panel off:
There are screws in each of the four corners of the panel, two bolts hidden under the black handle cover and eleven plastic snaps all the way around. The first trouble spot is the two plastic covers over the top corner screws. I have a bunch of automotive panel removal tools but none of these helped with these annoying little pieces. In the end I was forced to use a miniature flathead screwdriver to pry these off but it was impossible to avoid mildly marring the edges of the plastic a little bit here. The black handle cover just pries off starting from the handle side. Once the four corner screws and two handle bolts are free, it’s a matter of carefully but forcefully pulling the panel and its eleven plastic snaps free from the door by working slowly around the edges.
With the panel loose, you’ll need to reach in and disconnect the wires to the window controls: one set on the passenger side, three on the driver’s side. Lastly, you need to disconnect the door latch cable. To do this, first pry the cable guide out of its snapped in position. Then you can pry open the little nylon clip at the end of the cable where it hooks to the handle. With that clip open, the cable just slips out and the door panel is now fully detached and you can set it down.
Putting it back on is just reversing these steps but the trickiest part now is getting each of the eleven snaps to seat. You’ll want to guide them into their appropriate holes starting with the ones on the bottom and push that portion of the panel in place until it snaps in. You may need to smack the door panel near each snap to get it to seat but be very careful that the nearby snaps are actually aligned with the holes before you do because these are easily broken.
Add iPad, Blu-Ray and streaming video sources
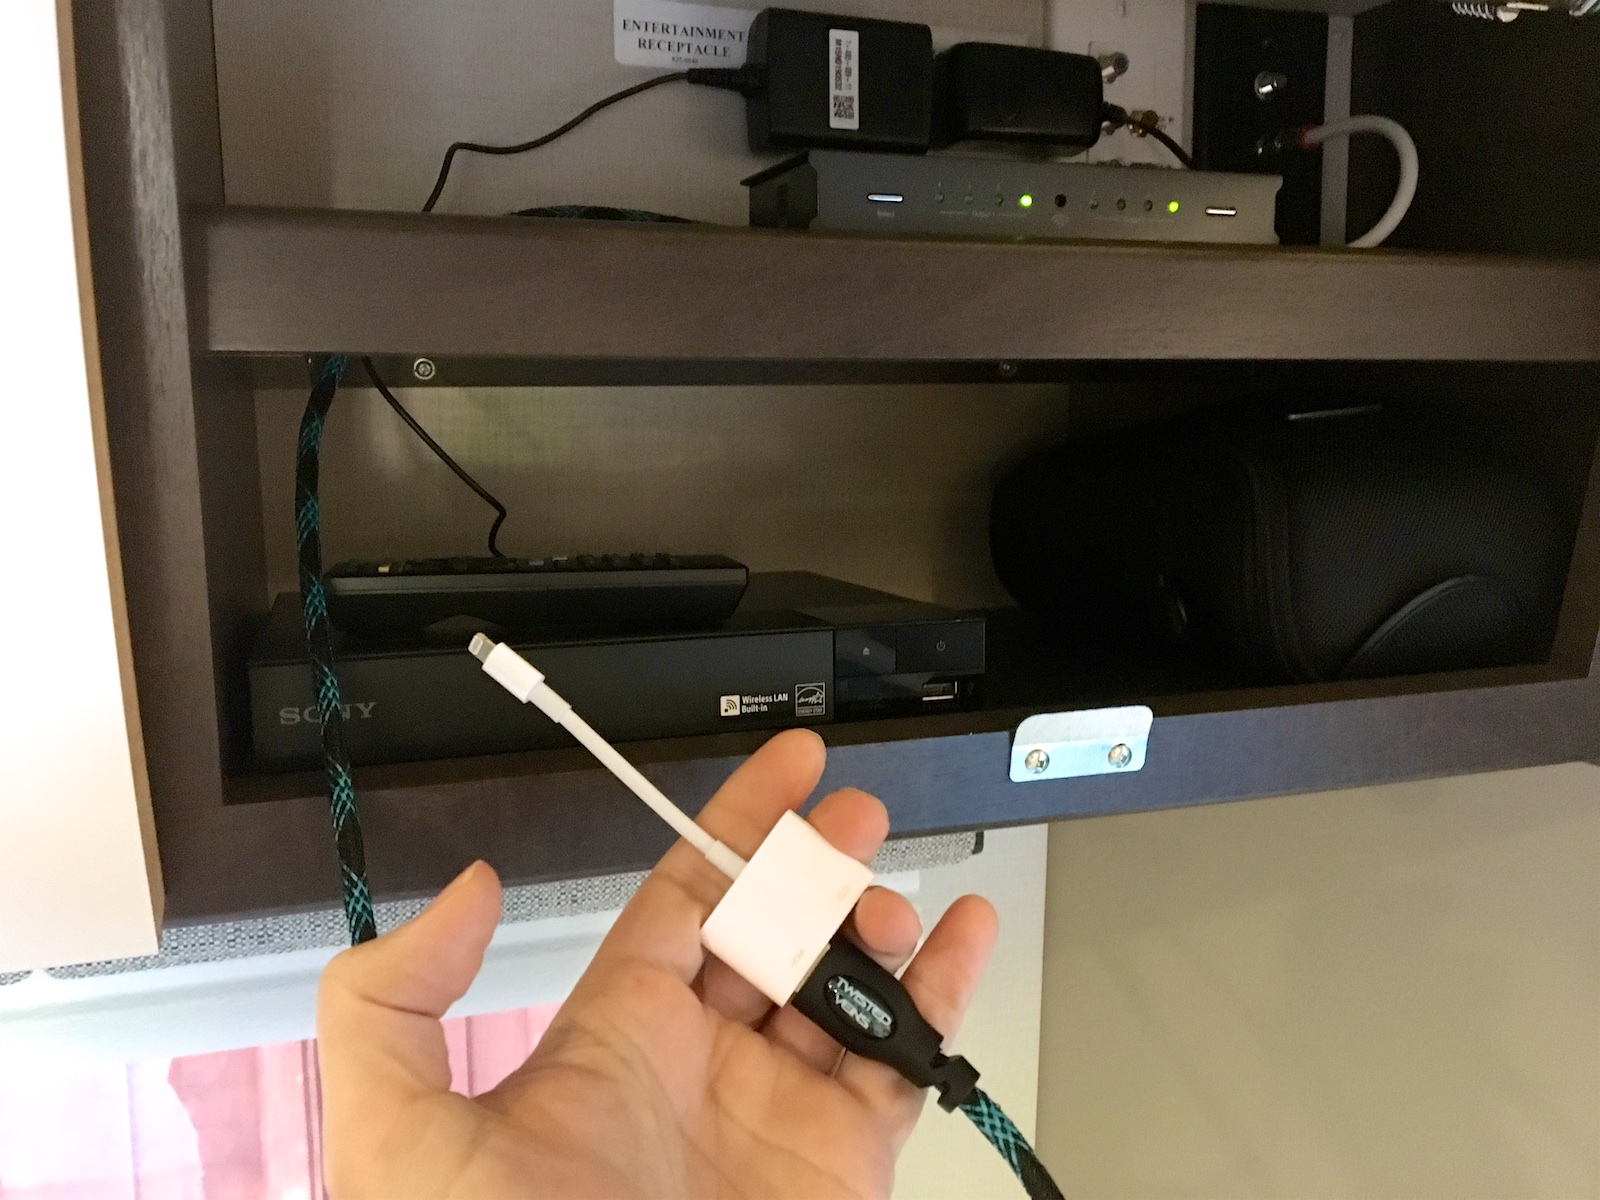

I picked up an HDMI adapter for my iPad to plug into the coach’s HDMI switch box which will allow streaming via Netflix/Amazon/Apple/etc. and I dropped in a tiny little inexpensive Sony Blu-Ray/DVD player that also streams content via WiFi. I’m not sure how likely I’ll be to bring along any discs as I’d much prefer watching movies on my home system, but it’s nice to have the option. I also removed the rear bedroom TV as having two TV’s seemed unnecessary and it was sometimes in the way. If we’re going to snuggle up to watch something in bed, I would just as soon use the iPad on a pillow in front of us. (The newer iPad’s have surprisingly decent stereo sound.)
But then I had an idea for a much more engrossing movie-watching experience… (see below).
Set up a mobile movie theater
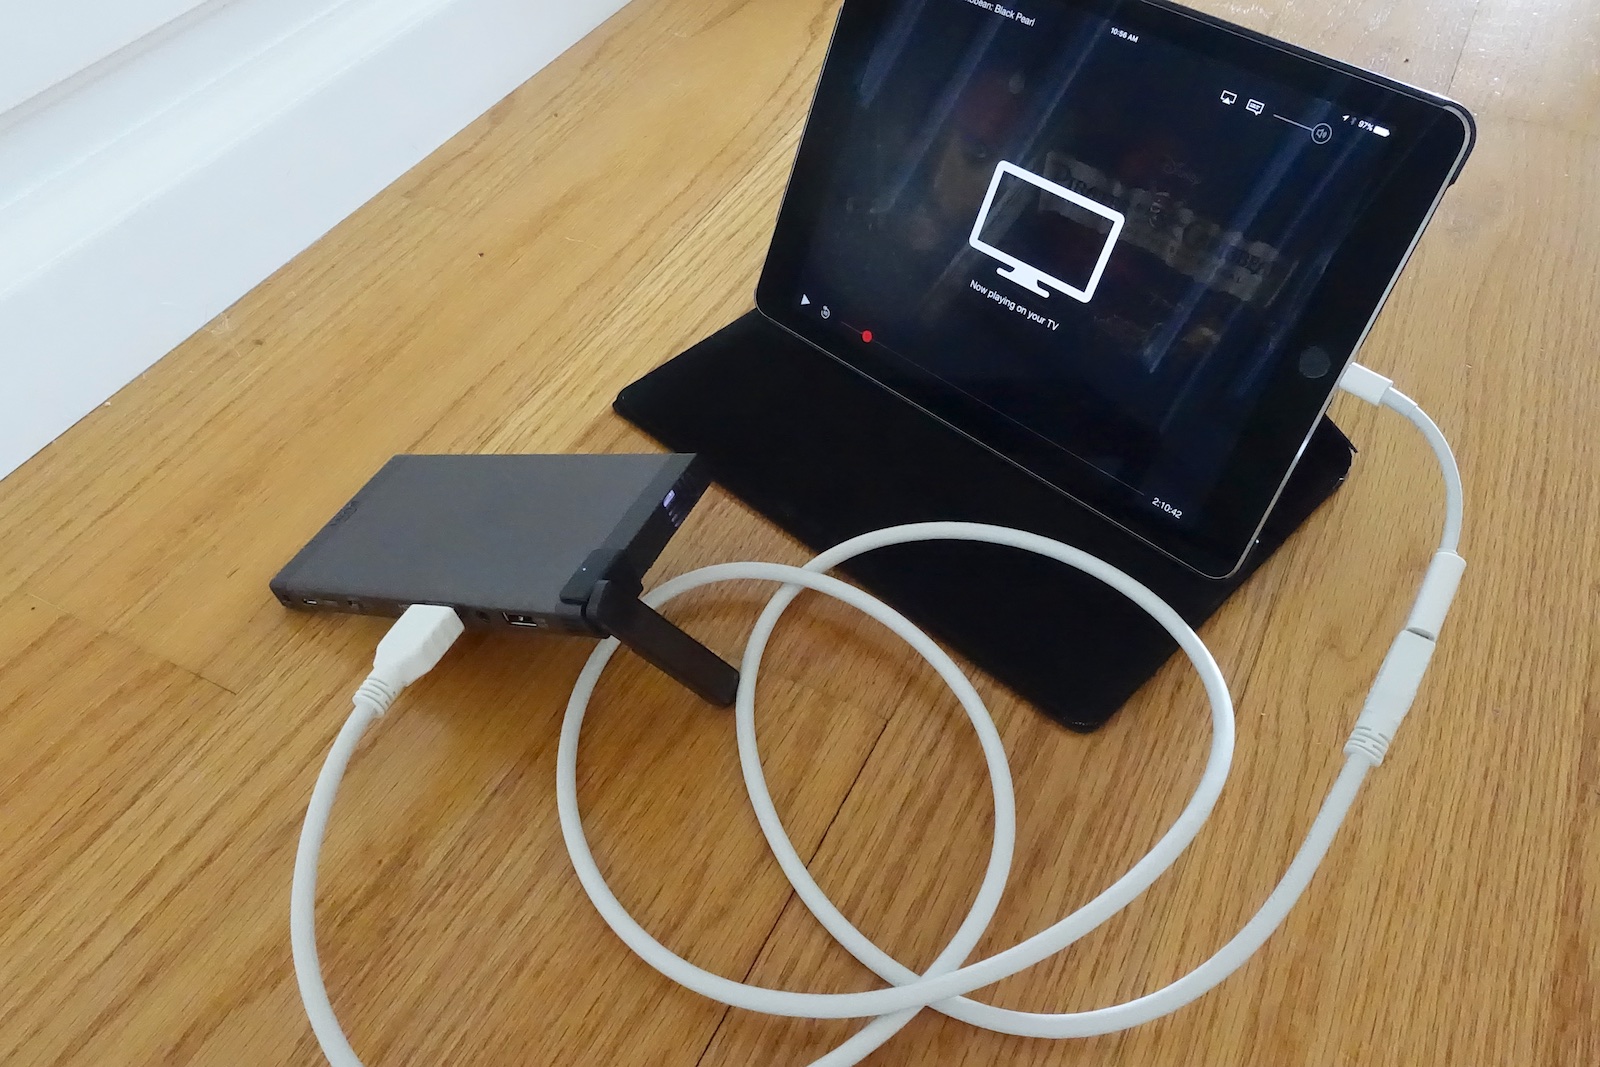
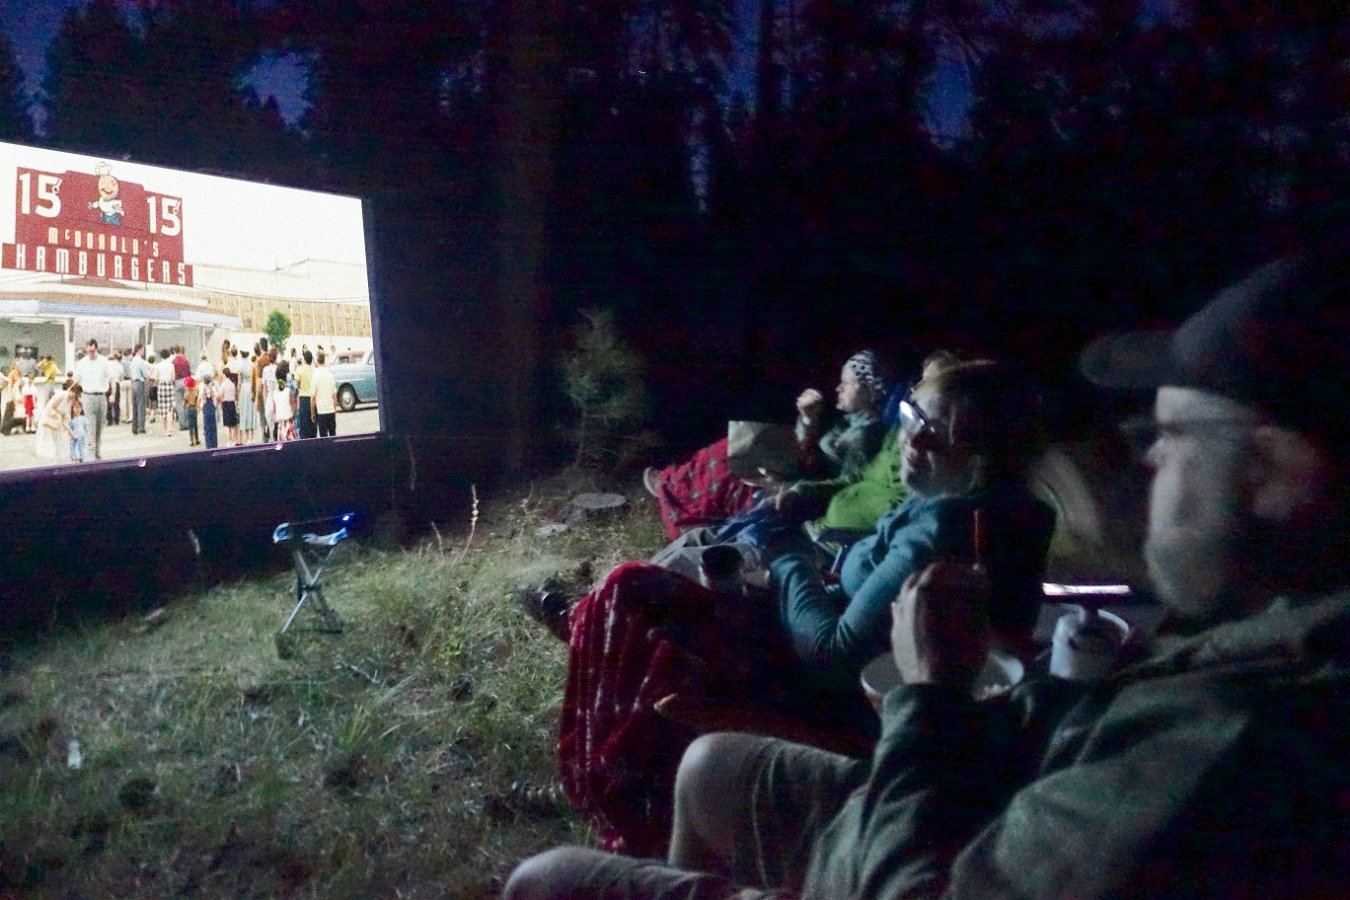
This is a fun little customization. We’ve found that the galley/lounge area isn’t very conducive to snuggling up for a movie because you’re sitting far apart in the swiveled cab seats. This led me to buy this cool new mini laser projector (paid link) from Sony. (Sony MP-CL1A) It has a built-in battery that’s good for about two hours, it charges off of a standard USB port (even while in use), it supports HDMI for video input and Bluetooth or a headphone jack for audio out. It produces a basic high def image (1920 x 720p) and because it uses a laser for projection, you never have to focus. Since it takes HDMI input, you can plug in the output from a Blu-Ray/DVD player or use an HDMI adapter to output from an iPhone/iPad or other device. Pretty slick!! Paired with a blank wall or projection screen, you’ve got a very portable little movie theater!
It has only a very simple lens and there’s no zooming in or out. If you want a bigger picture, you just move the projector farther away. It does have a handy keystone adjustment feature for straightening out the image horizontally or vertically if you’re projecting at an angle. Also, I should note that it does produce a potentially annoying little whine from its cooling fan but placing it in an open overhead cabinet effectively muffles the noise from our ears below. Since the battery’s only rated for about two hours, you’ll need to keep it plugged into a USB port for a typical long-ish movie, but that’s easy enough to do.
For audio, you can connect wirelessly over Bluetooth to a battery-powered stereo speaker (like this one (paid link)) or, with the Unity, set it to connect to the built-in Jensen audio system.
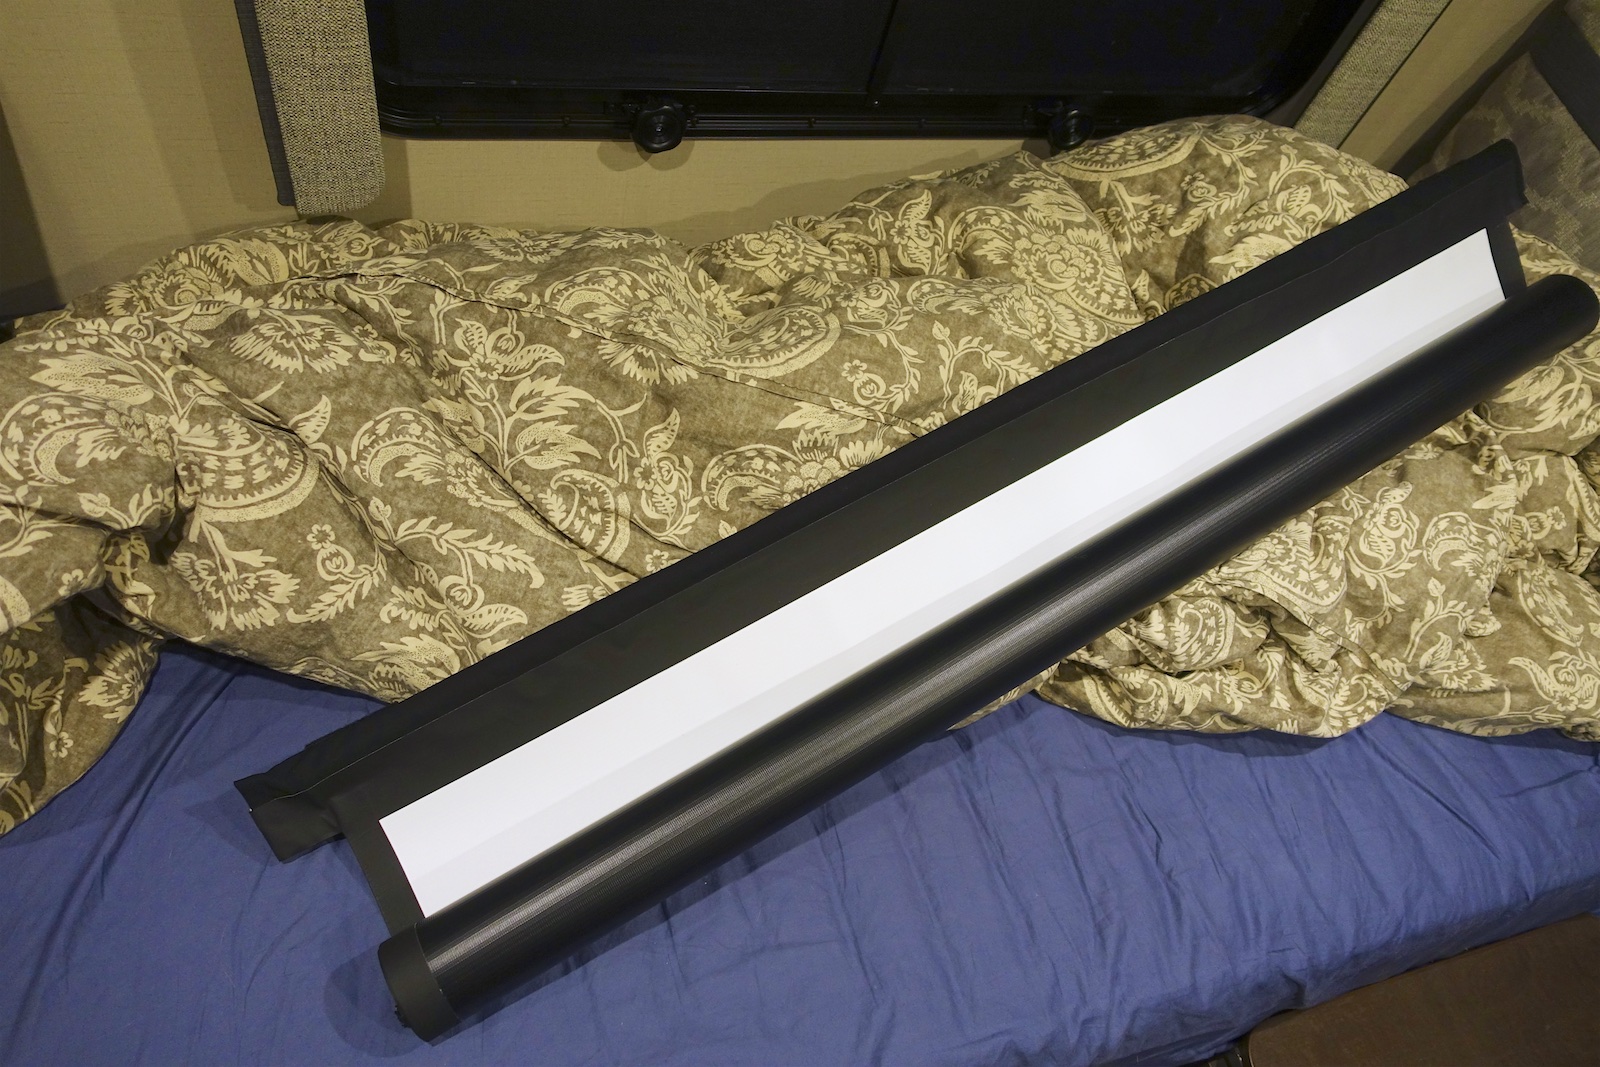
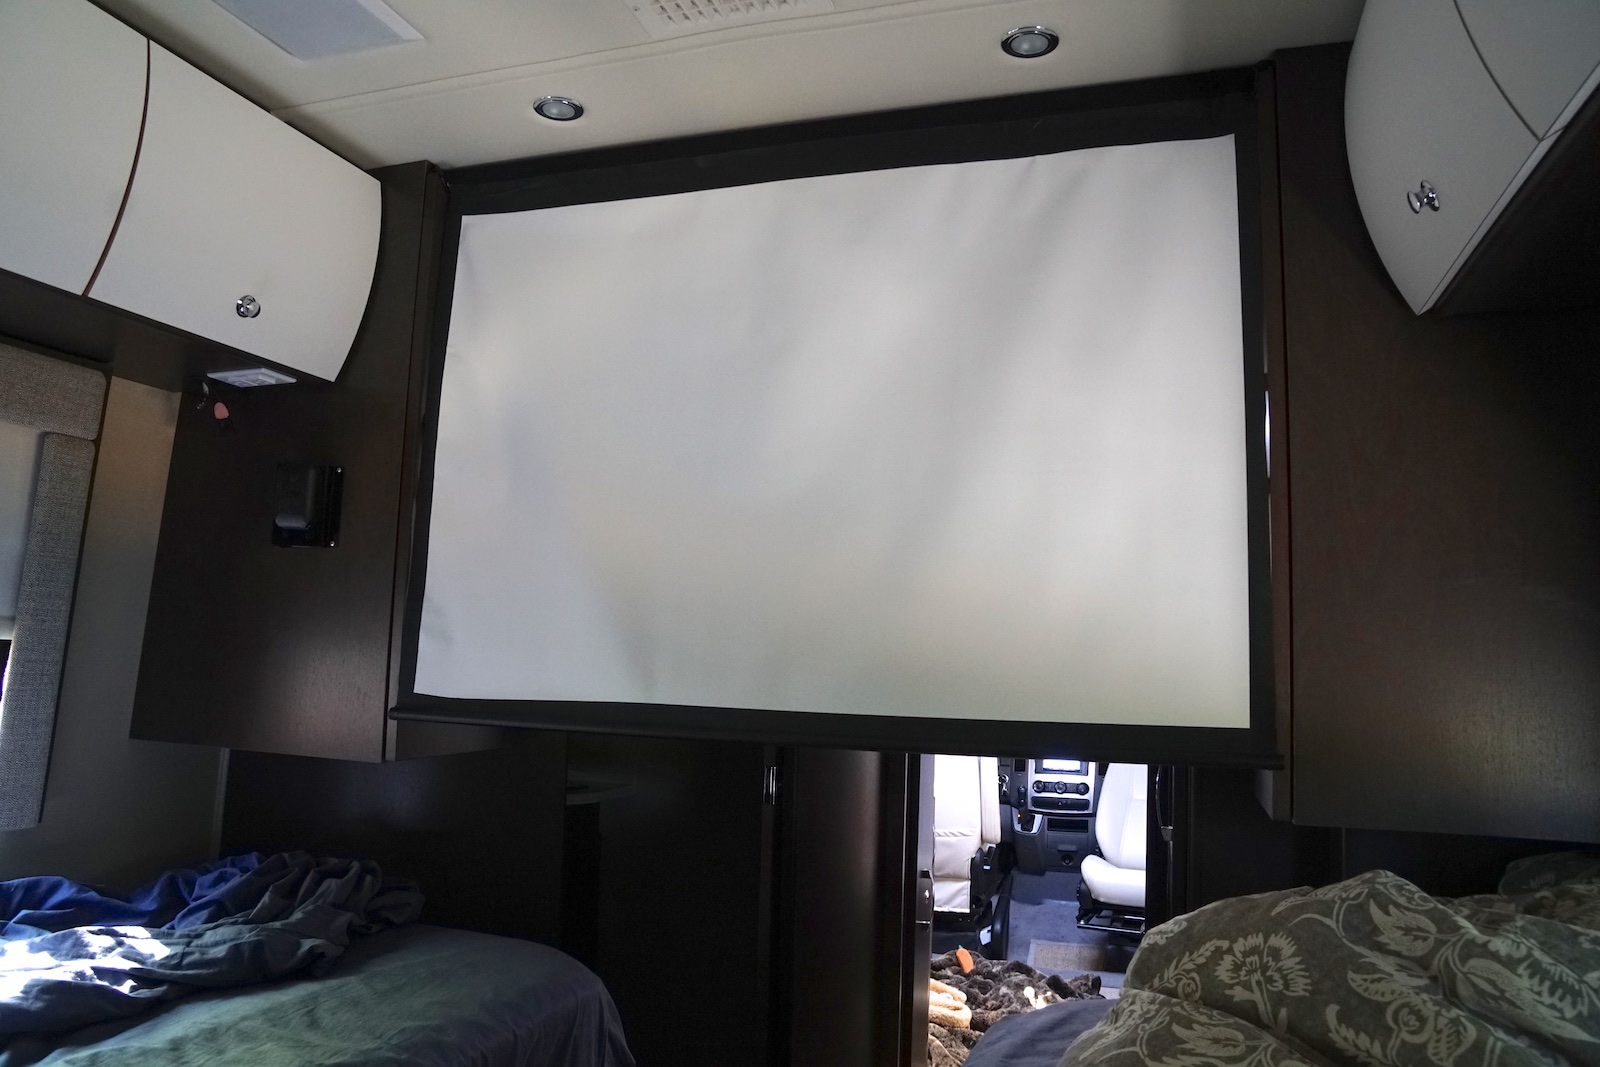
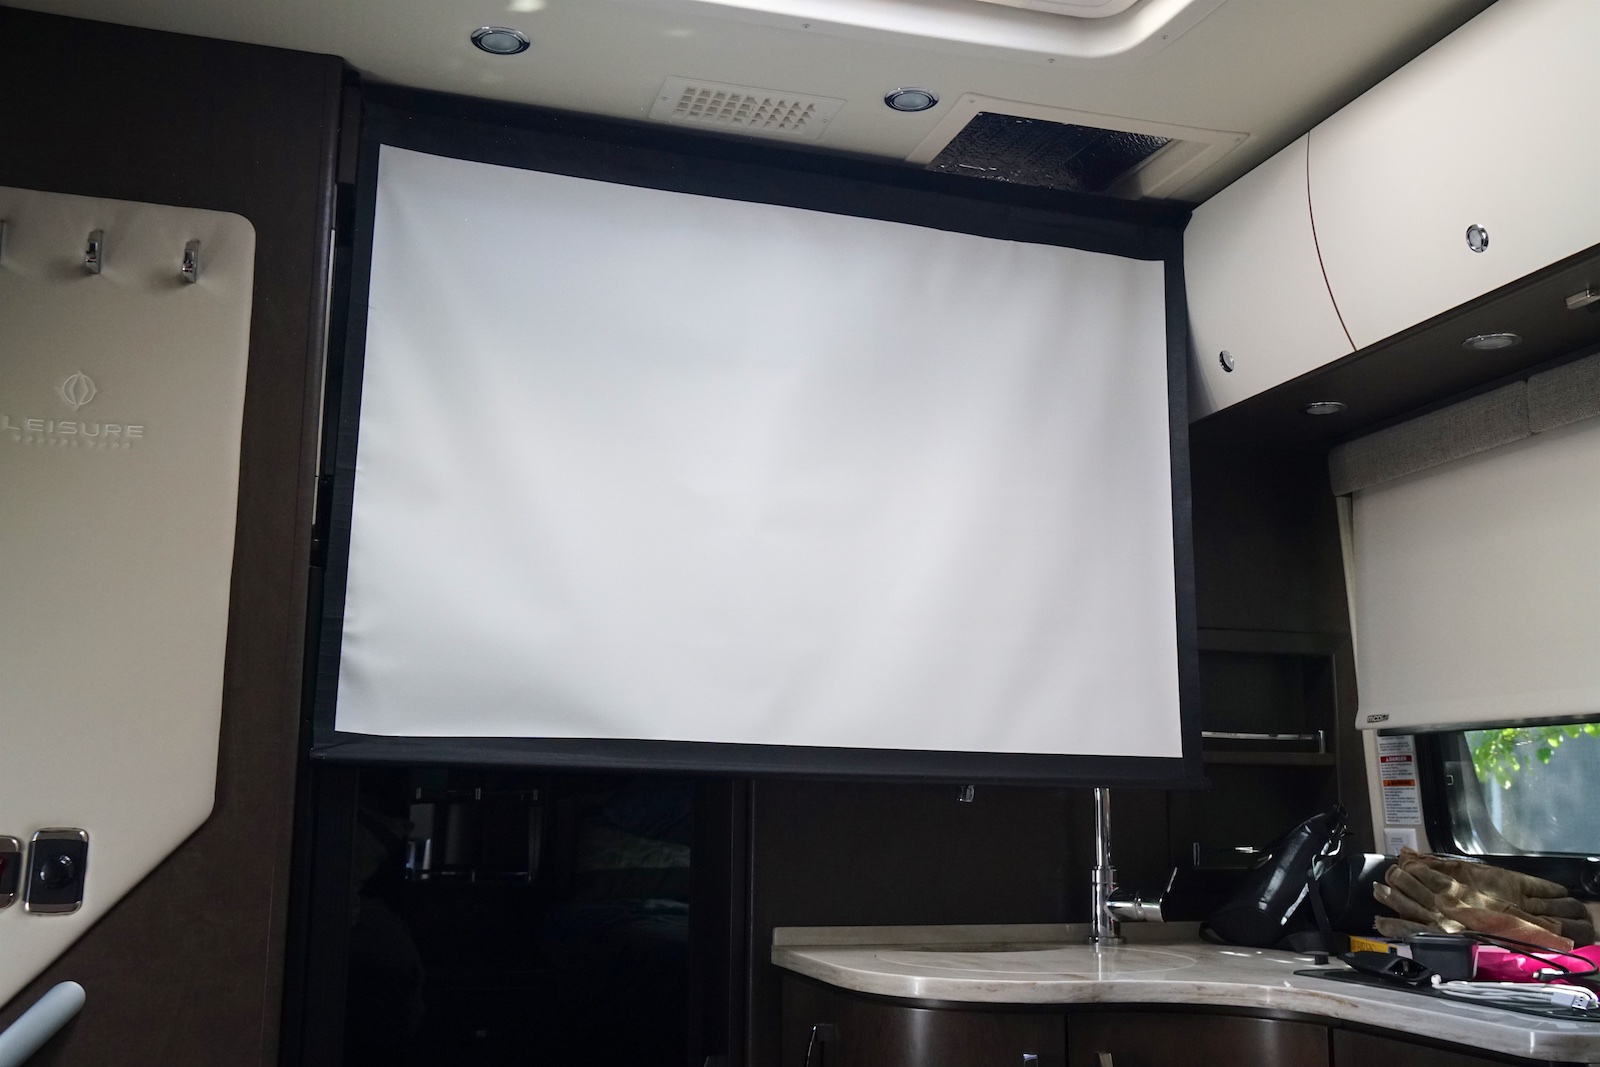
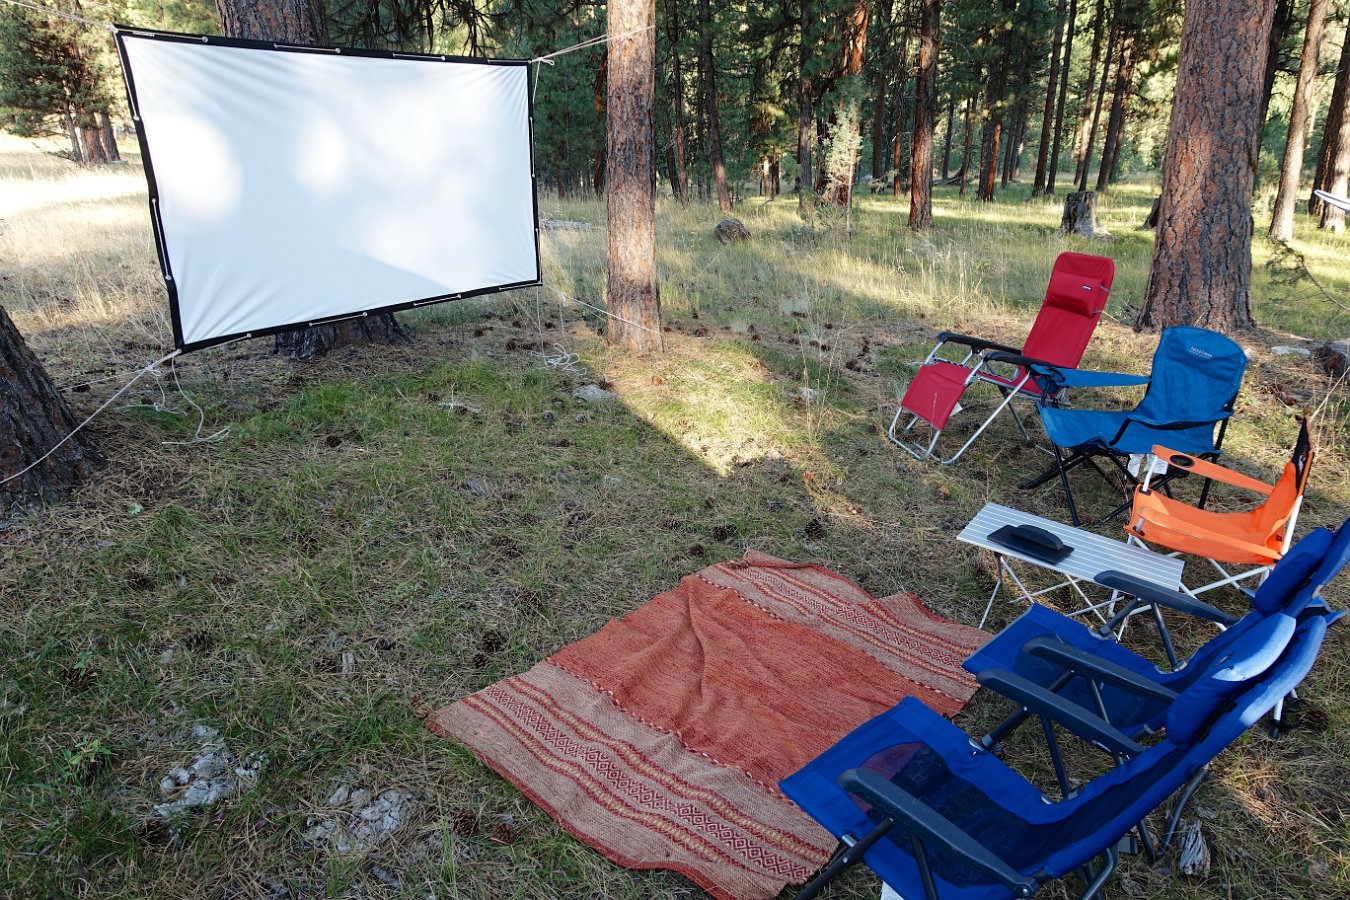
You could just project on to one of the white window shades but these have a bit of a textured pattern that’s a little distracting. So we made a little projection screen cut down from a larger roll of material (paid link), some matte black tape for borders and a couple of wooden dowels for support. We’ve found that we can hang it by propping it up on the two opposing cabinets in the bedroom or across the galley and this way we can use the built-in overhead speakers via Bluetooth:
Either way, in the bedroom area or in the galley, with the projector sitting in an open, overhead cabinet, you get about a 48-50″ diagonal image! Prop up some pillows and pass the popcorn! In warmer months, you could also set up some camp chairs and project a movie onto the outside of the RV.
Since it runs on its own battery and a 5V USB charge cord, it doesn’t use a lot of power like a full size projector or even as much as a normal LED flat panel display. It doesn’t compare with my dedicated home theater system, but it’s a fun improvement over the little 24″ panel that came mounted in the Unity bedroom (and that I removed). I may now also remove the larger TV in the galley to make more pantry space.
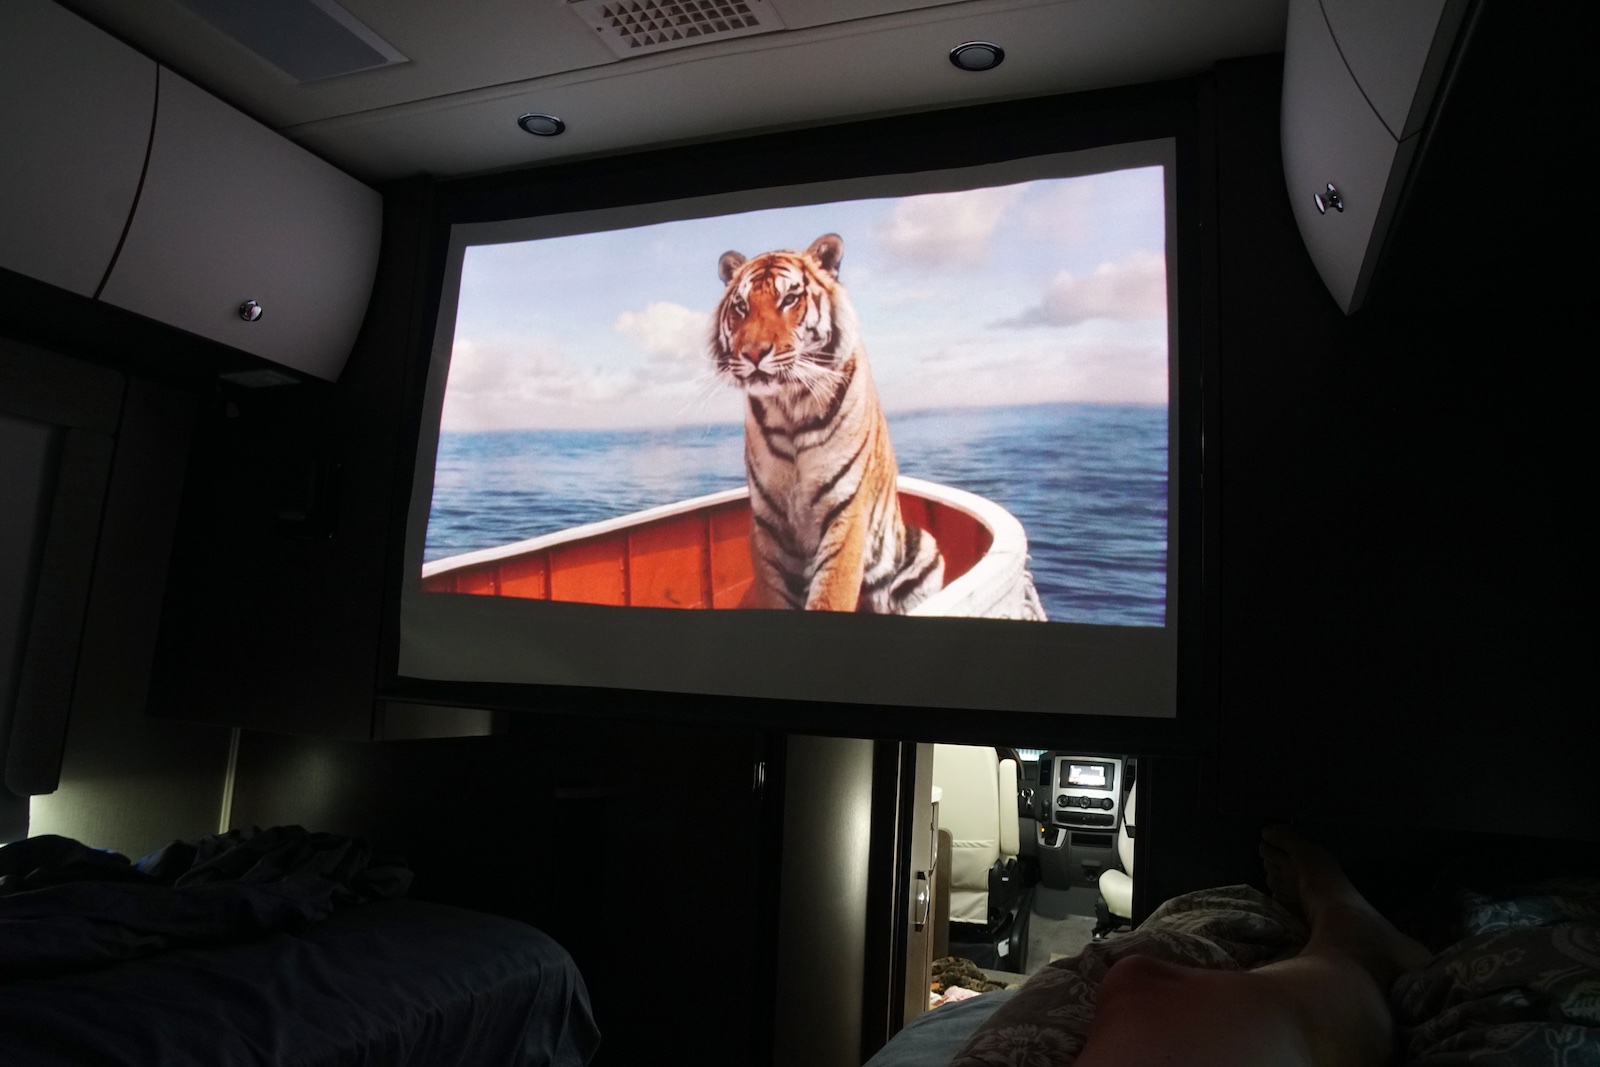
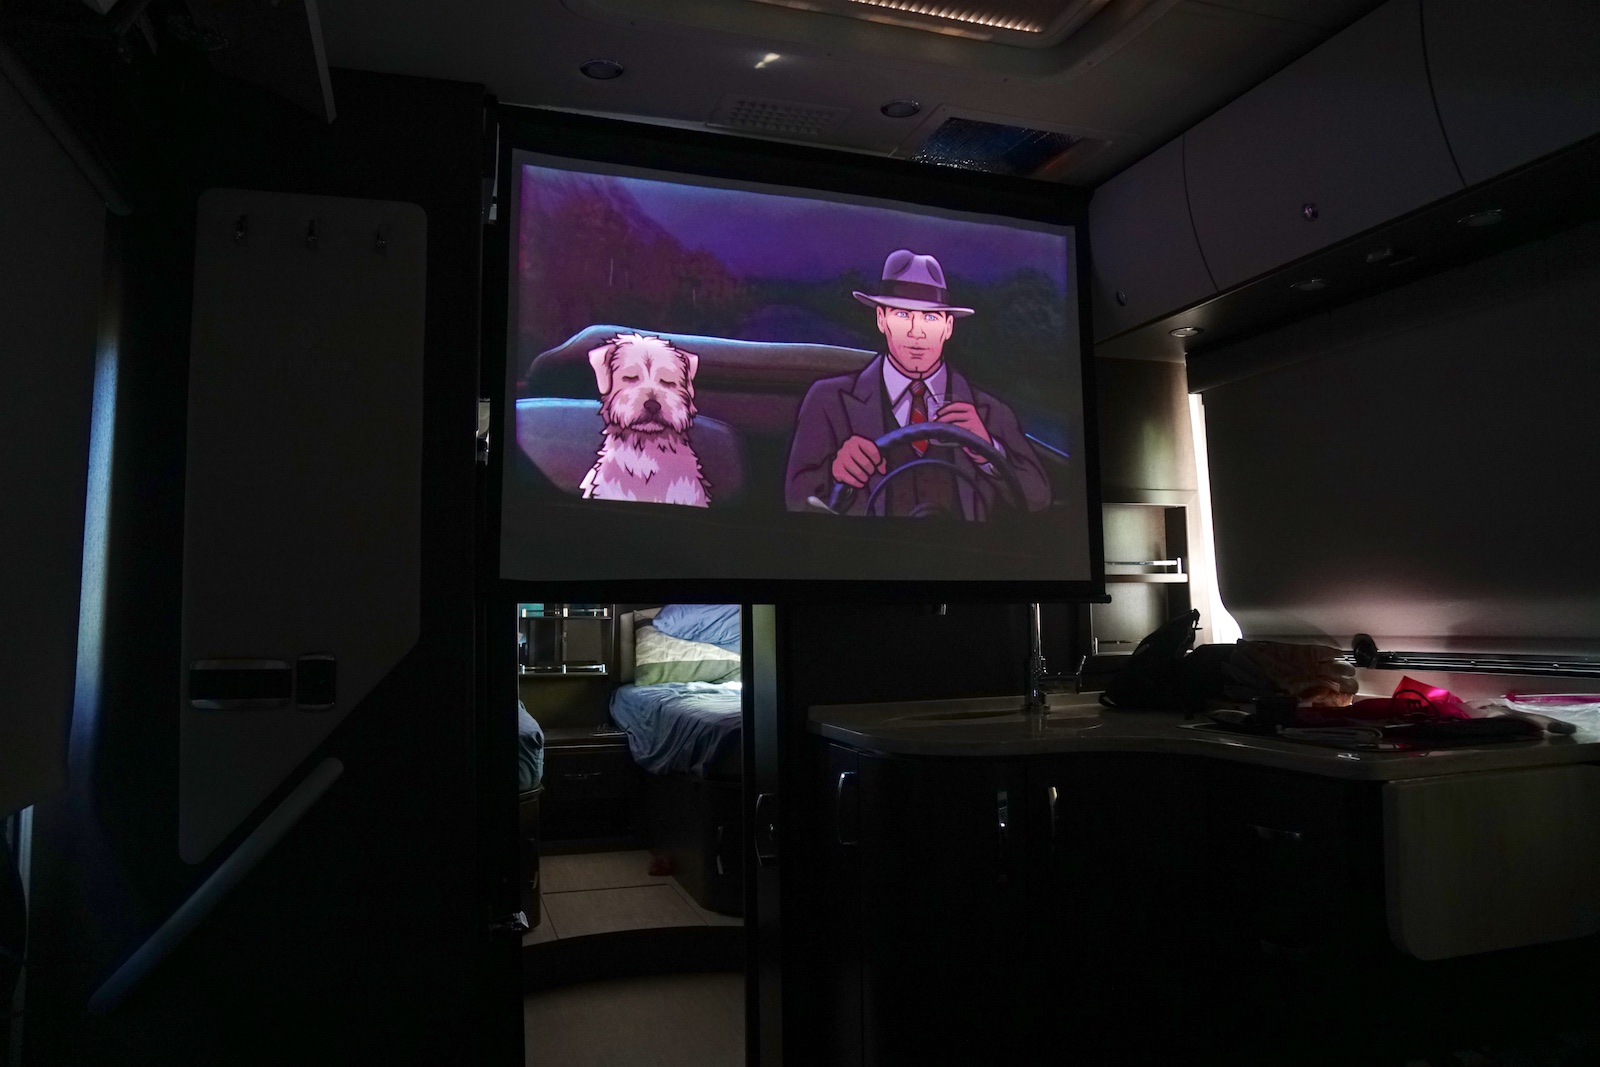
Video quality-wise, it does alright. The biggest issue with it is how poorly it renders *very* dark scenes. It’s barely watchable in such extreme dark scenes but it does well showing bright or normally lit scenes.
 This one limitation was annoying enough that I decided to get a different projector for the RV: the LG Electronics PH550 Minibeam Projector. (paid link) While the LG is much larger than the Sony, and it uses a standard bulb, panel and lens (requiring focusing), it’s not terribly large, it has a built-in battery good for 2.5 hours and, like the Sony, can transmit the audio via Bluetooth. However, it can’t be recharged via USB like the tiny little Sony. The big advantage the LG has over the Sony is that it performs well even in very dark scenes and also has a bit more control over picture settings. Unfortunately, the LG does cast a lot of extra light around as a halo around the image and you can’t adjust the contrast or gamma enough to get really dark blacks, but it is still a more enjoyable image for dark scenes as compared to the Sony. I hope Sony is able to improve on the Sony MP-CL1A and address this one limitation having to do with dark scenes.
I also picked up an inexpensive outdoor screen (paid link) for enjoying a movie with others, outside the RV. I should clarify though this is only when we’re out by ourselves somewhere – never in a campground:
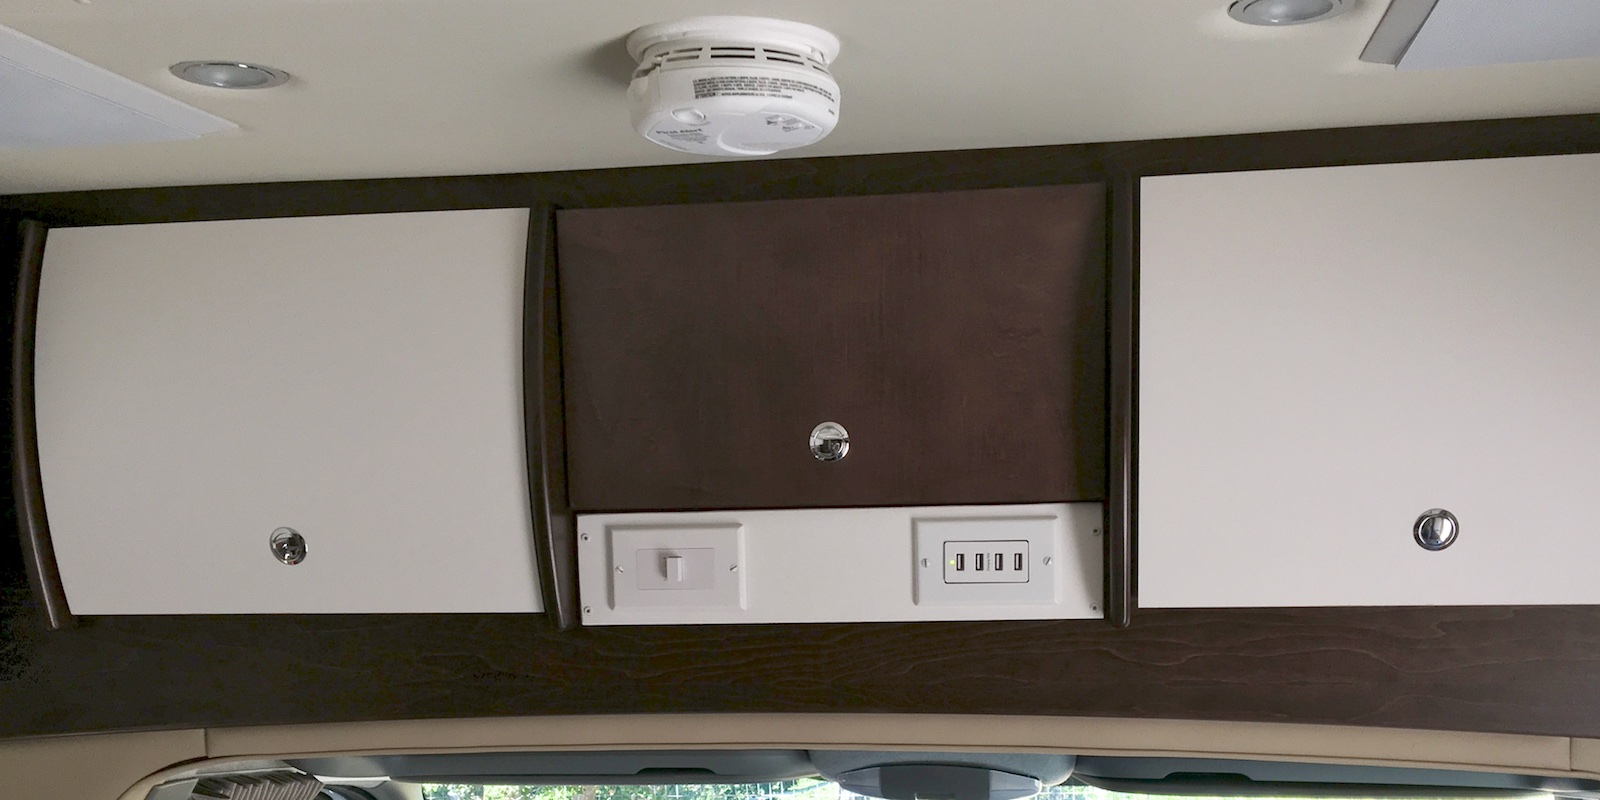
Add/upgrade USB ports and 12V socket
The Unity Twin Bed model has a pair of 120V inverted outlets over the beds, but only a combo 2.1A/1A USB socket in an overhead bin back there. It’s obviously more efficient to charge devices directly off of 12V rather than running the inverter to convert to AC and then using an AC adapter to get back to DC, but this 2.1A/1A USB socket means you can only charge one USB device (phone, tablet, digital camera, etc) at full power.
 There’s a four port 2A USB port unit available (in black or white), but I went with the combined dual 2A USB and 12V port in the bedroom so that Darlene can plug in a 12V electric blanket. (All without having to run the inverter overnight.) I was thinking to add this down closer to the bed, but I decided it wasn’t worth the trouble and so just ended up swapping out the existing 2.1A/1A outlet in the overhead cabinet.
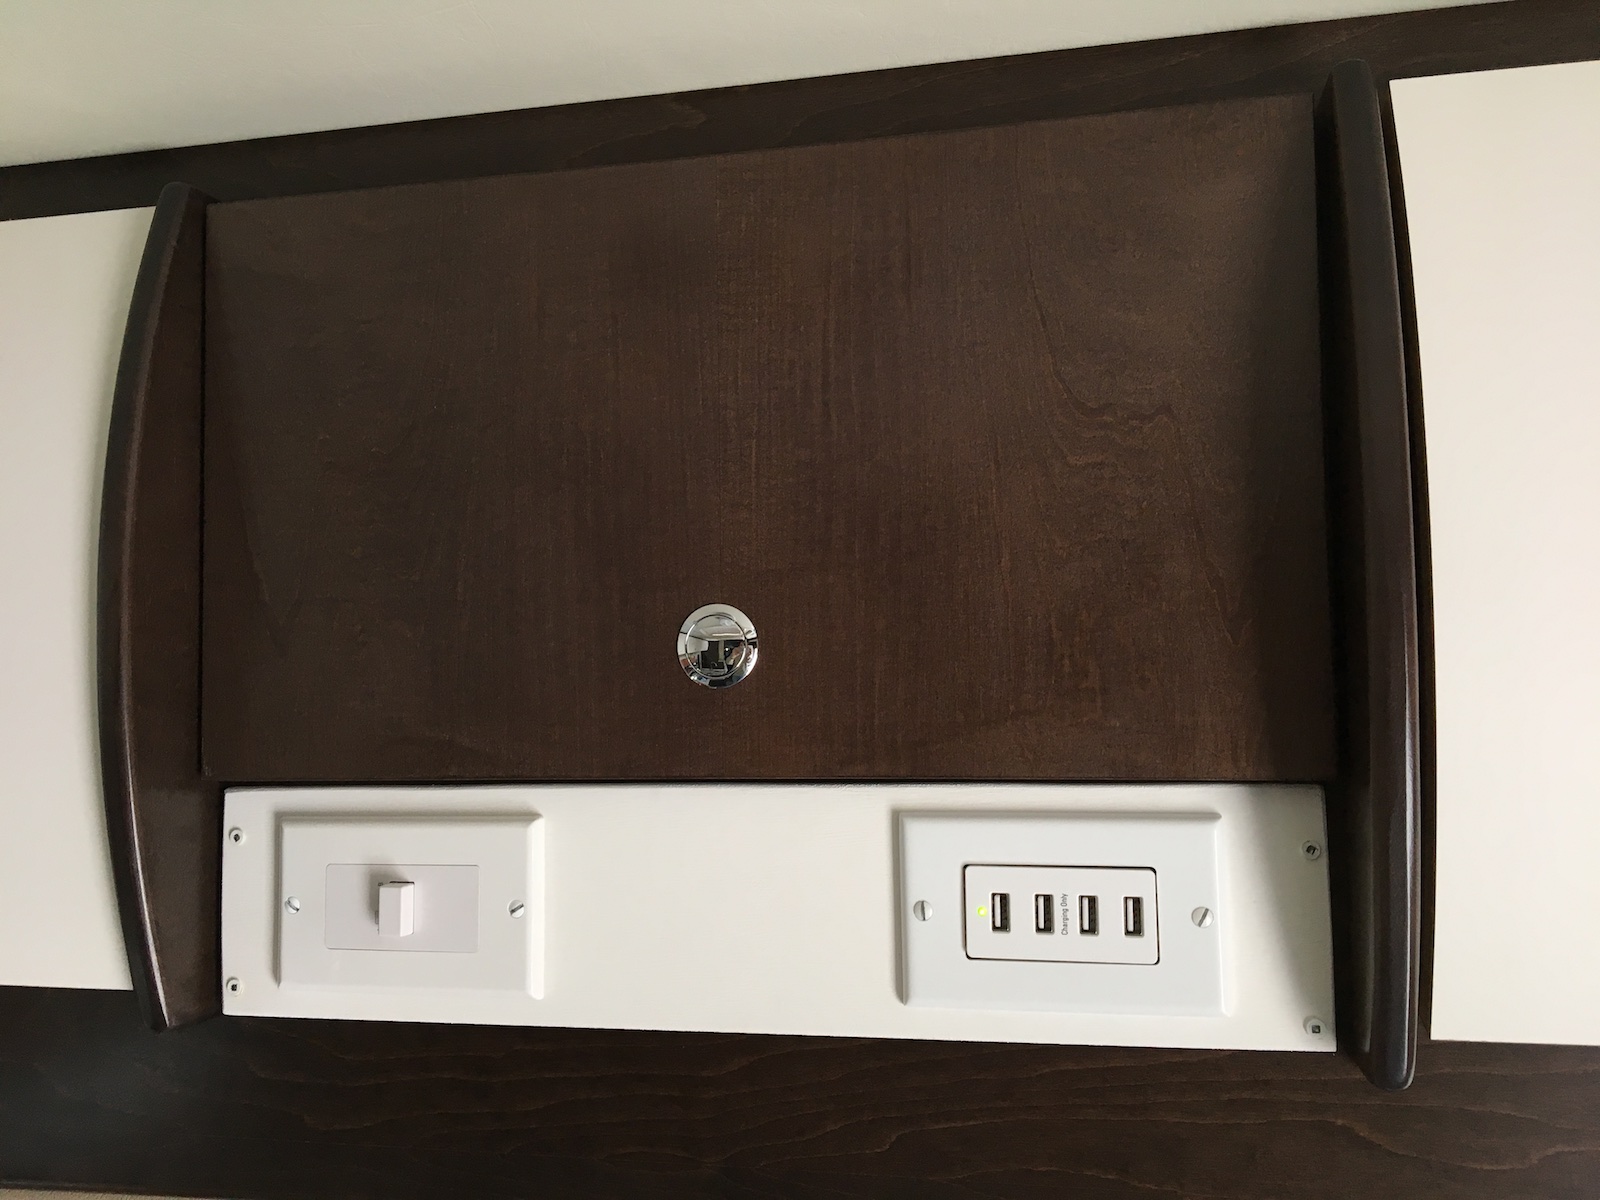
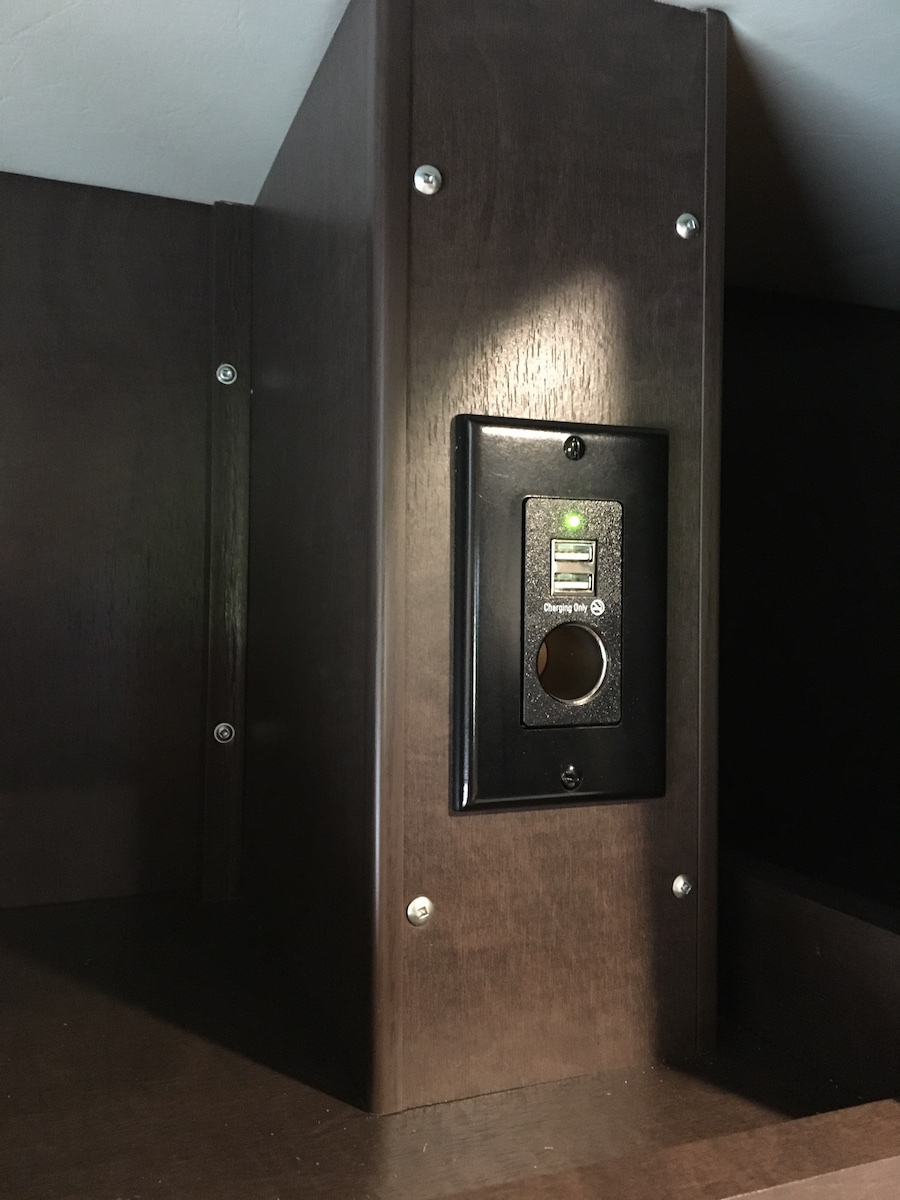
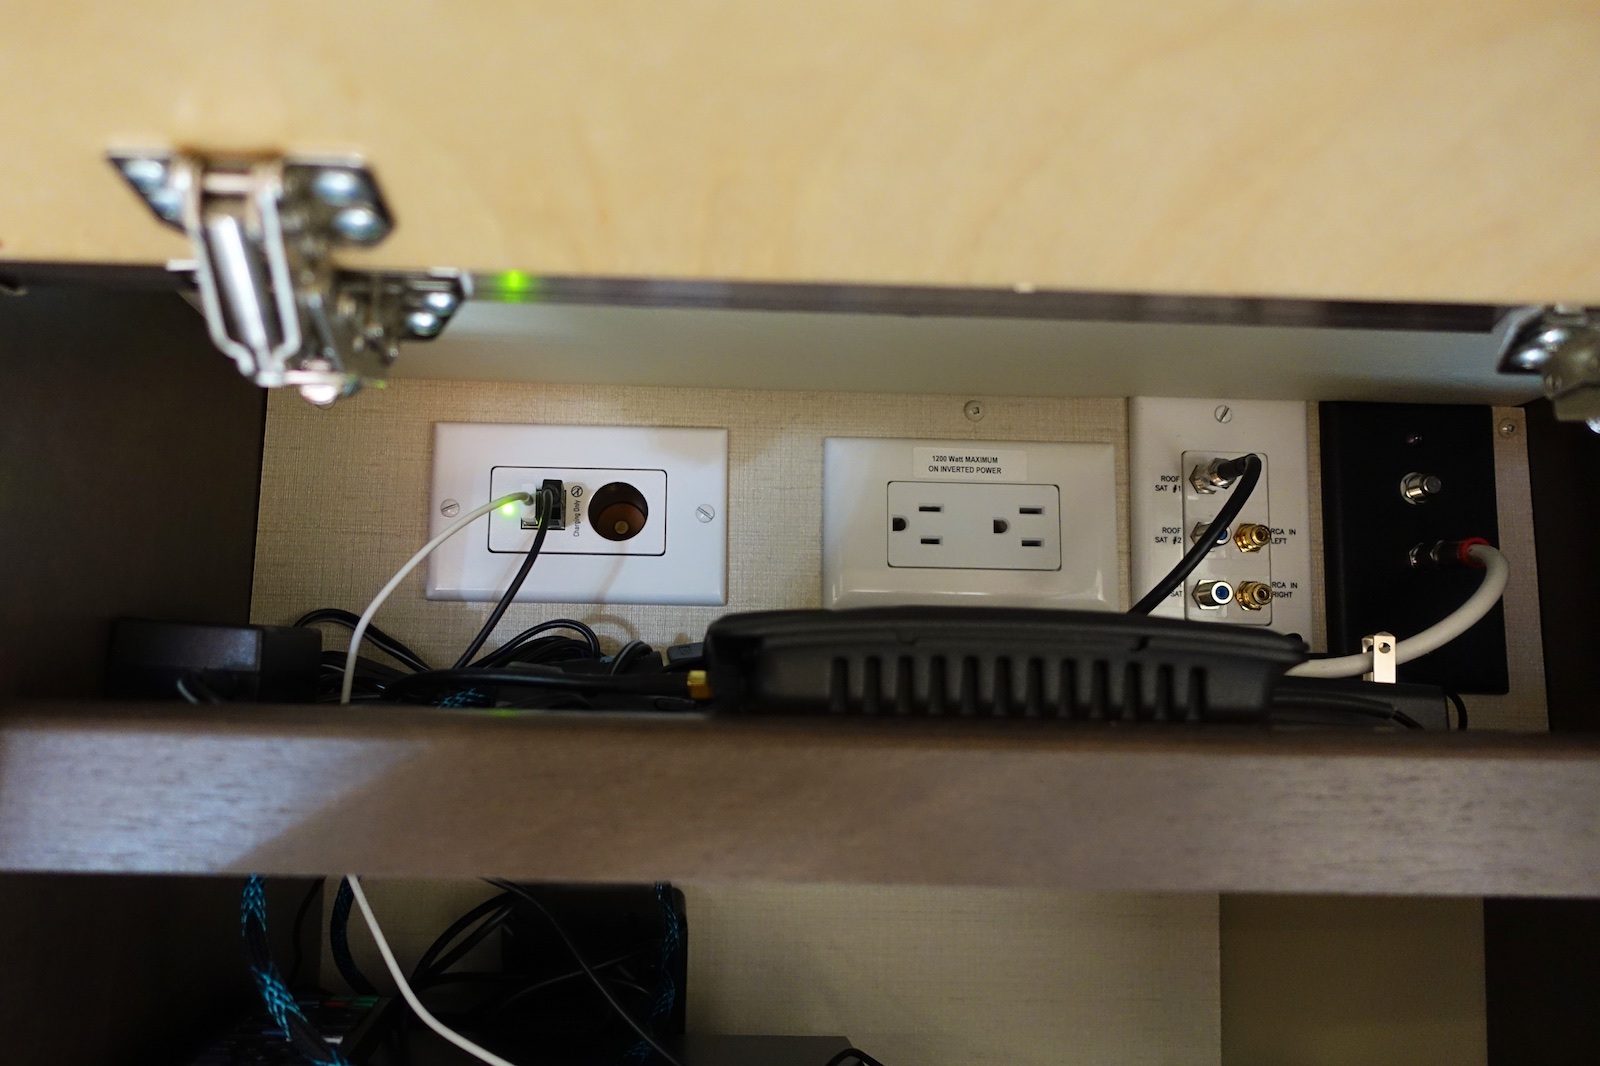 When I originally removed the Jensen radio unit, I added a four-port USB outlet to the blank panel I made using the 12V supply for the old Jensen radio. However, I since decided to put the Jensen radio back and so I put a dual USB and 12V port into the entertainment cabinet. This turns out to not only be a convenient place to plug in devices for charging, but the 12V port allowed me to install a cellular booster in the cabinet and connect its antenna via the factory coaxial prewire to the roof.
Unfortunately, I accidentally deleted the pictures I took during the installation process. It’s not too hard to figure it out though: there’s three screws along the top and three screws along the bottom that hold that back panel in place. In addition, you’ll have to remove the AC outlet, the coax/satellite panel and the TV antenna panel in order to maneuver the panel out of the cabinet and then go cut a hole for the USB outlet panel. As for power, I saw that the TV antenna gets a double set of wires and, if I’m remembering right, has a 15 amp fuse. I don’t even use the TV antenna so that was an obvious place to tap into for the added USB/12V outlet. I’m not sure what the wire gauge was (argh, my lost pictures!) but I think it was 12 or 14 gauge and, like I said, doubled-up – so if you consult a wire gauge table, I suspect you’ll find you could support more than 15 amps on that run.
I also added an additional USB port in the cab in the process of replacing the in-dash audio/navigation system and added an external 12V port to the utility bay outside the RV.
Someone raised a concern about standby amperage draw on these USB ports but, at least with these models, it’s tiny. The 4-port one over the lounge area draws 40 mA on standby (that’s .04 amps or about a half watt at 12V) and the replacement 2-port one in the bedroom draws 20 mA. (I didn’t check what the original one used to draw.) Anyway that’s a total of 60 mA draw. (The ones in the front dash don’t draw anything when not in use because they’re connected to the Pioneer stereo which doesn’t get any power when it’s not in use.) So over 24 hours, that comes to 1440 mAh or 1.4 Ah total – not zero, but it’s tiny! The stock batteries are 232 Ah. Since I pulled out the Jensen radio which had a small standby draw, I’m probably saving a tiny bit of amperage overall. But, you could certainly go even more conservative and put in 12V ports that draw nothing until you plug in a USB adapter when needed.
Add external 12V power port
I’ve been wanting to put in an externally accessible 12V power port for some time – most particularly for my telescope mount and associated electronics. Using one of the 12V ports inside would mean having to leave a window or door cracked which is not ideal for keeping the bugs out!
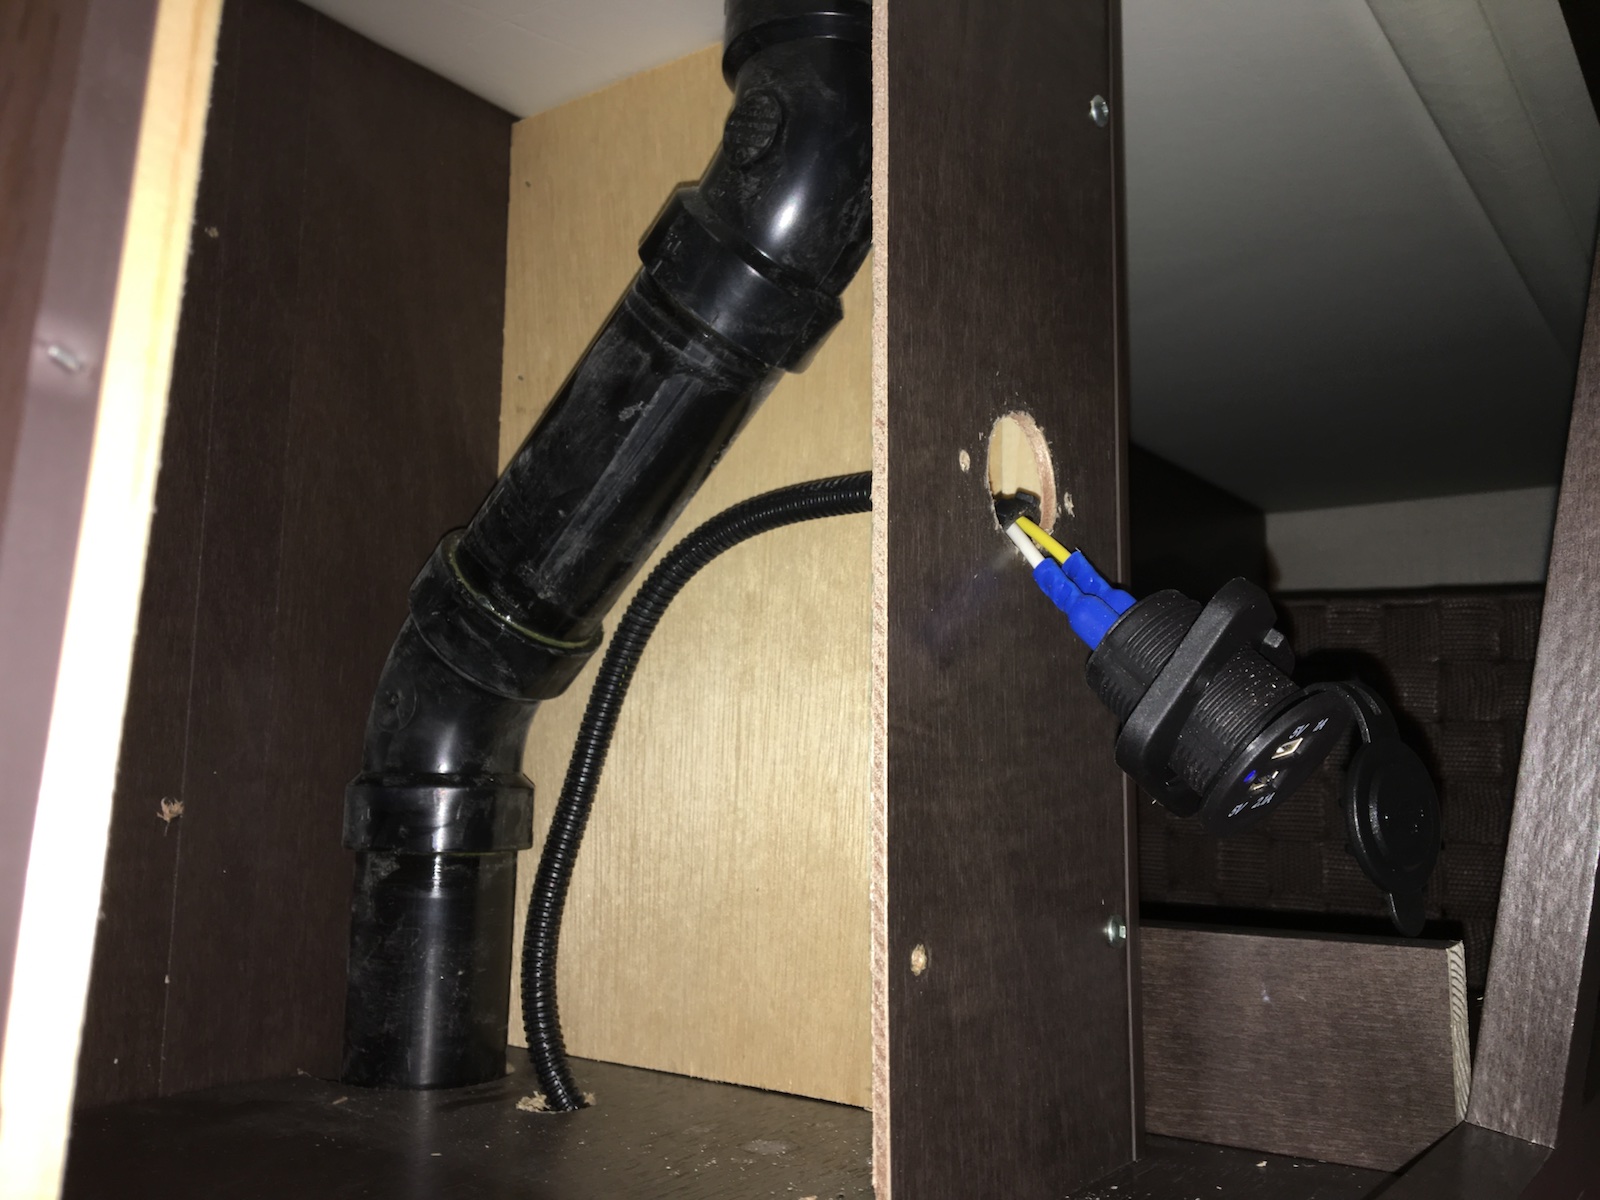
I contemplated hooking into the 12V lighting that’s in some of the external storage compartments but I don’t really want to have to leave any of those open either, plus I’d need to make the lights switchable then. I kept thinking about doing something in the inverter’s bay but then I had another look at the 12V wiring diagram for the coach and I noticed something: there’s a 12V line shown in the wiring diagram leading to the external utility bay for the optional macerator (which I don’t have)!
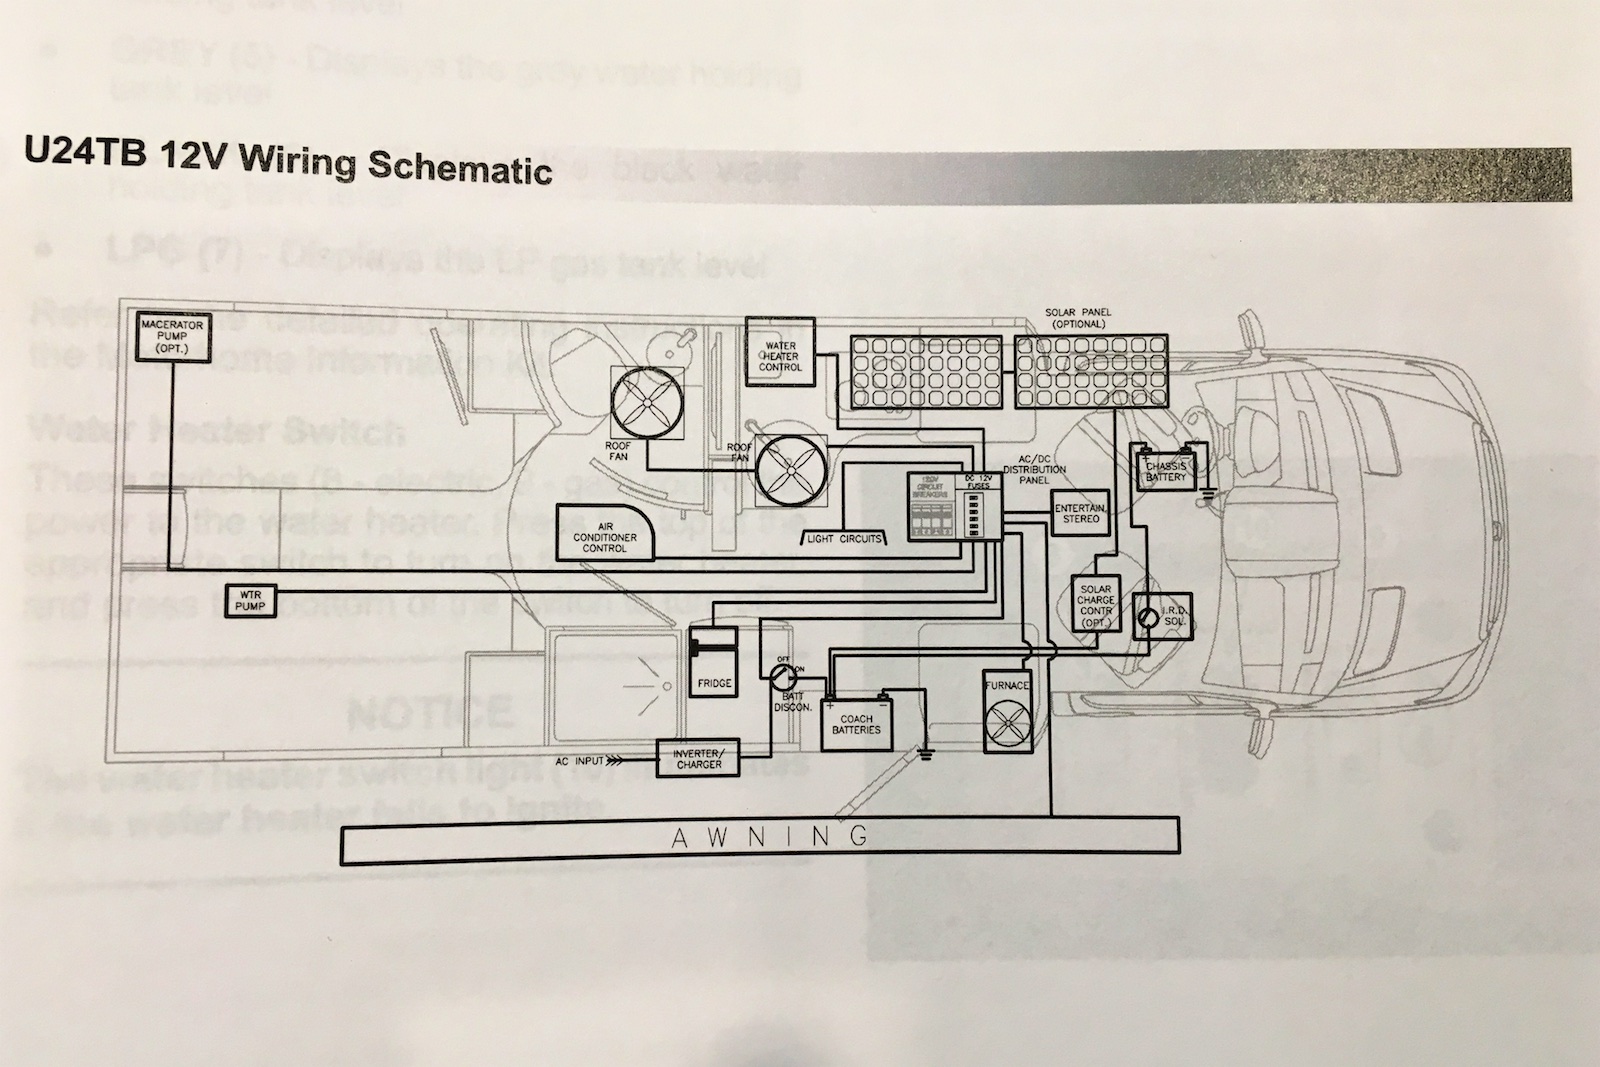
I went to take a look and sure enough, the unused wires are capped off behind the panel in the utility bay. I immediately thought this would work well as there is a porthole in this compartment for threading the water hose out so you can close the compartment even when you’re hooked up. Perfect!
(If you do have the optional macerator, I think it would still be reasonable to tap into its power anyway since you’d only be using the macerator when you’re dumping and thus not using the 12V power port at the same time.)
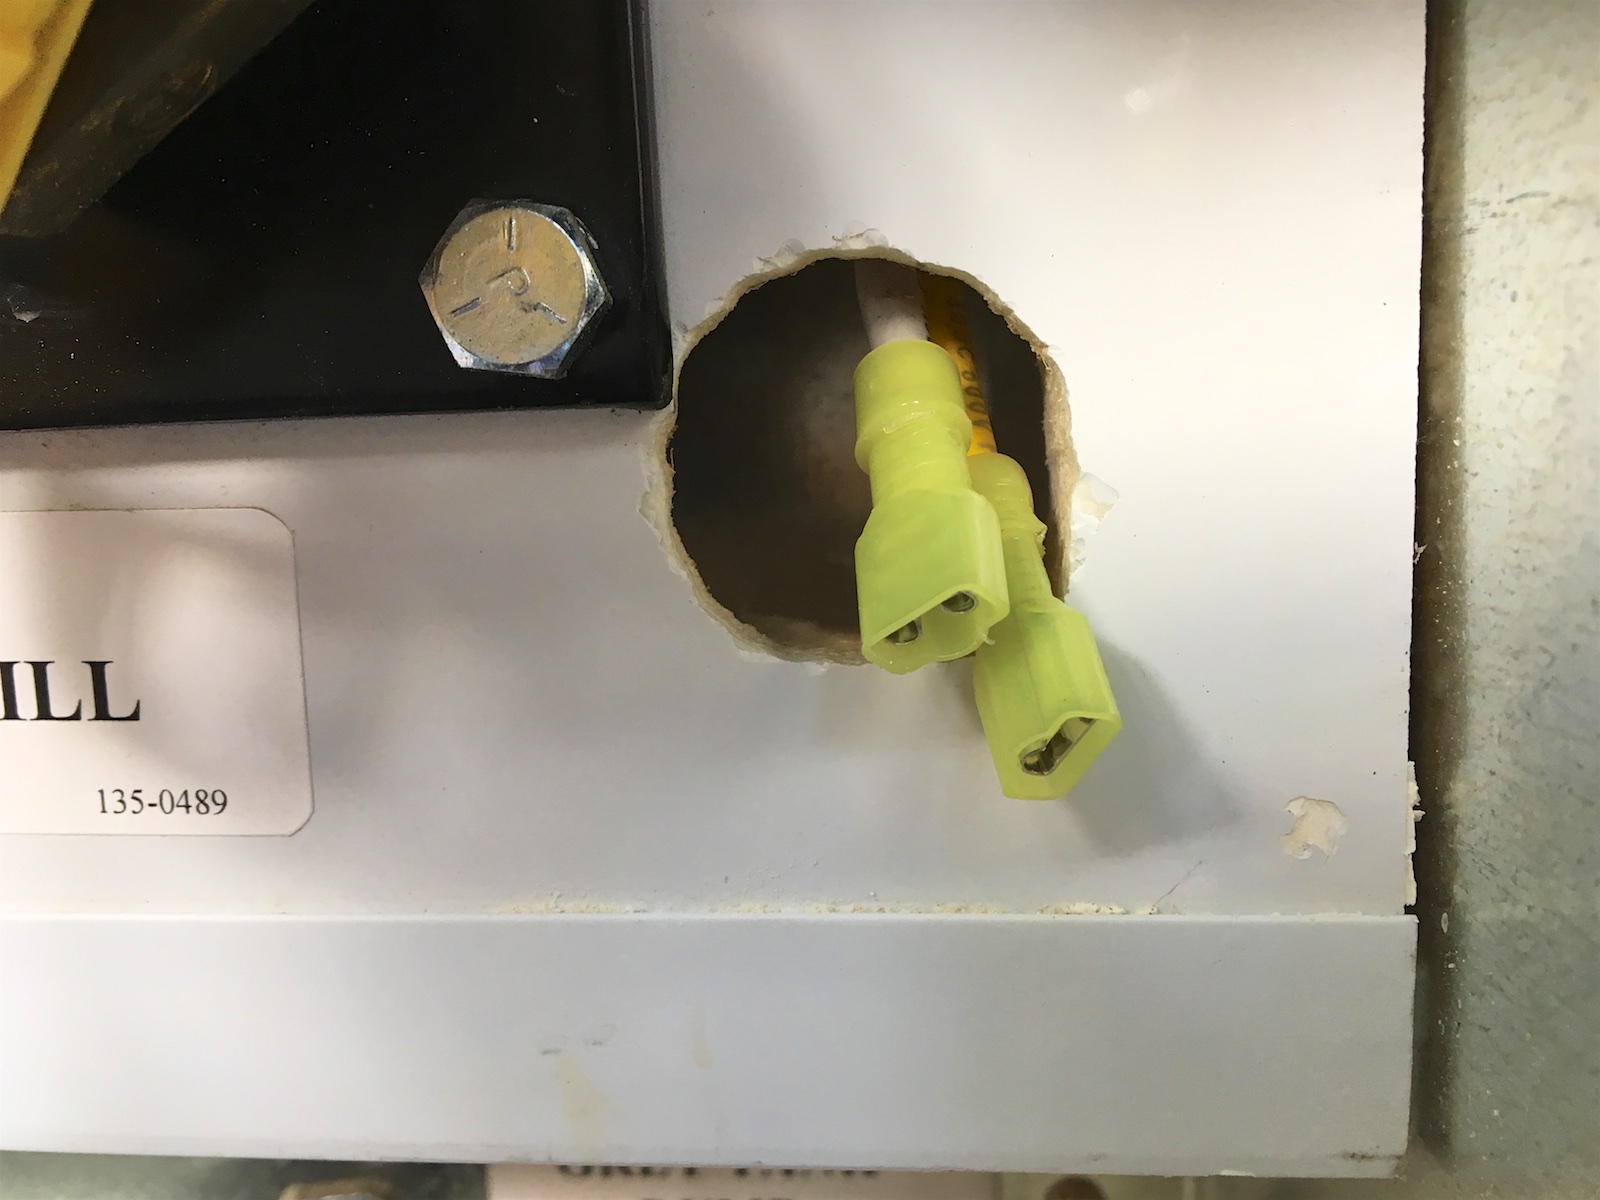
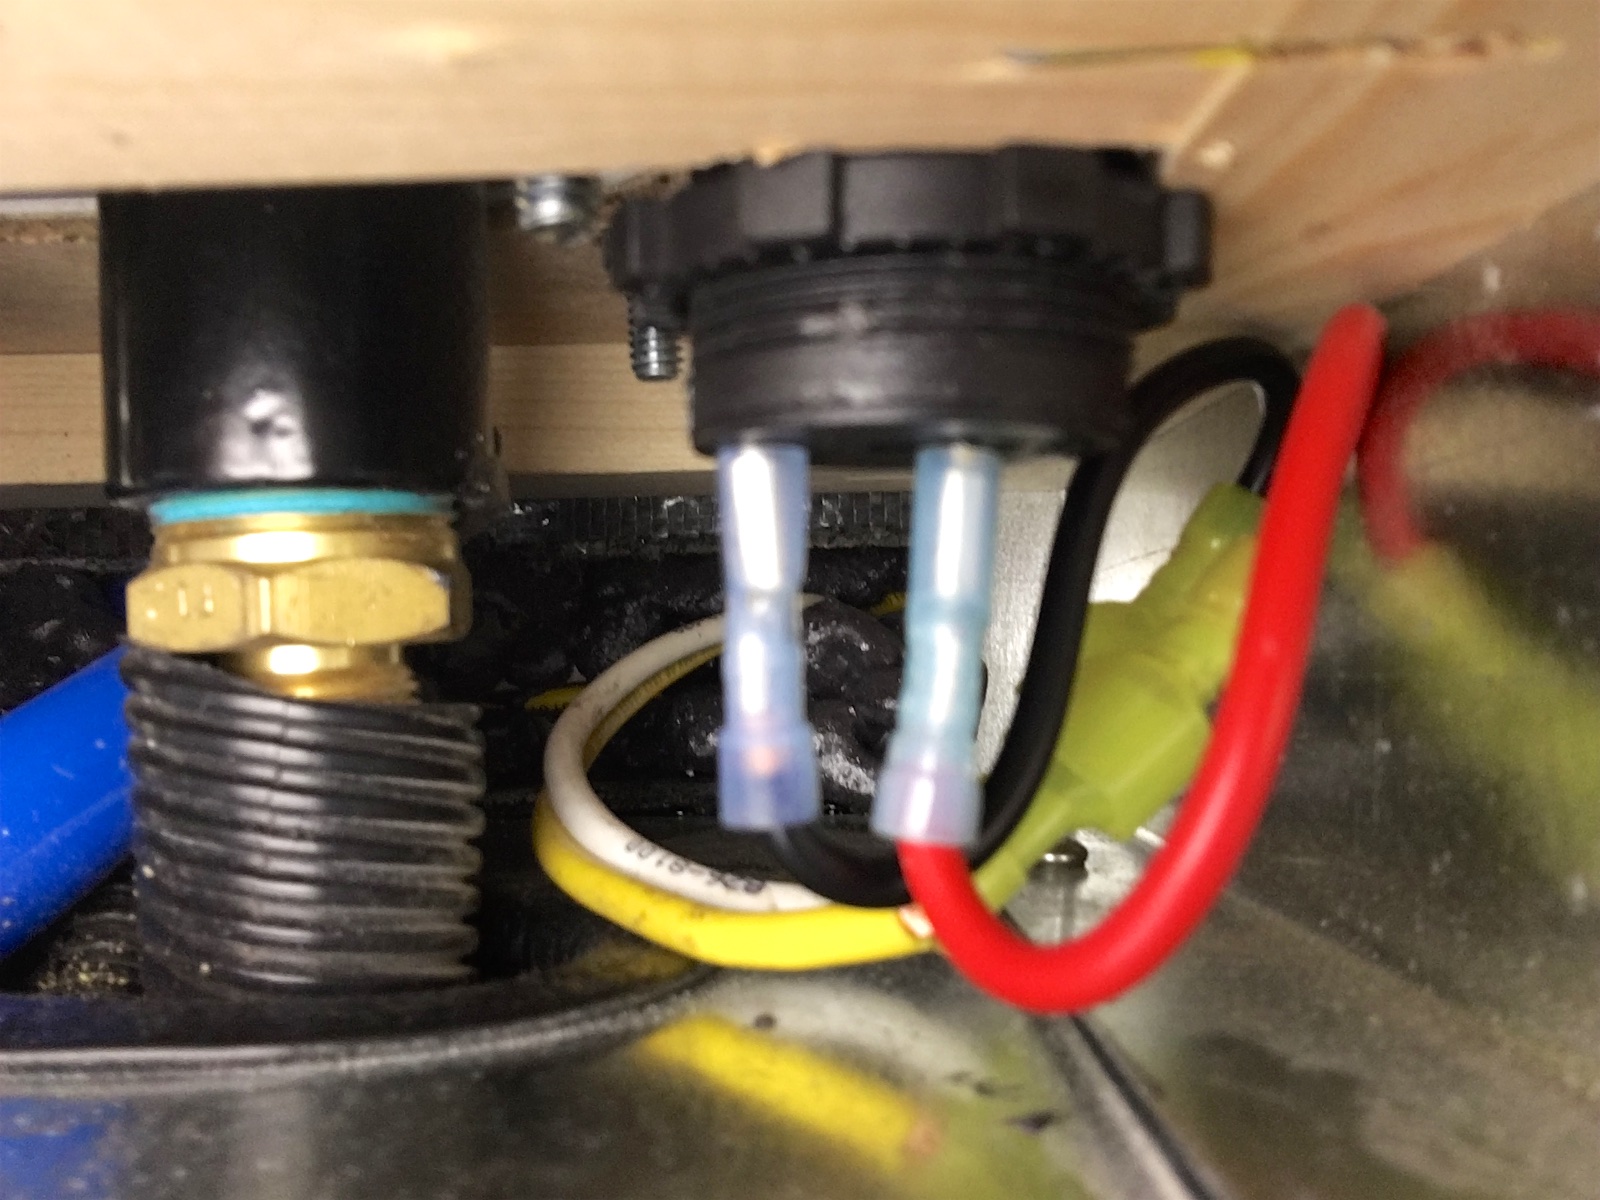
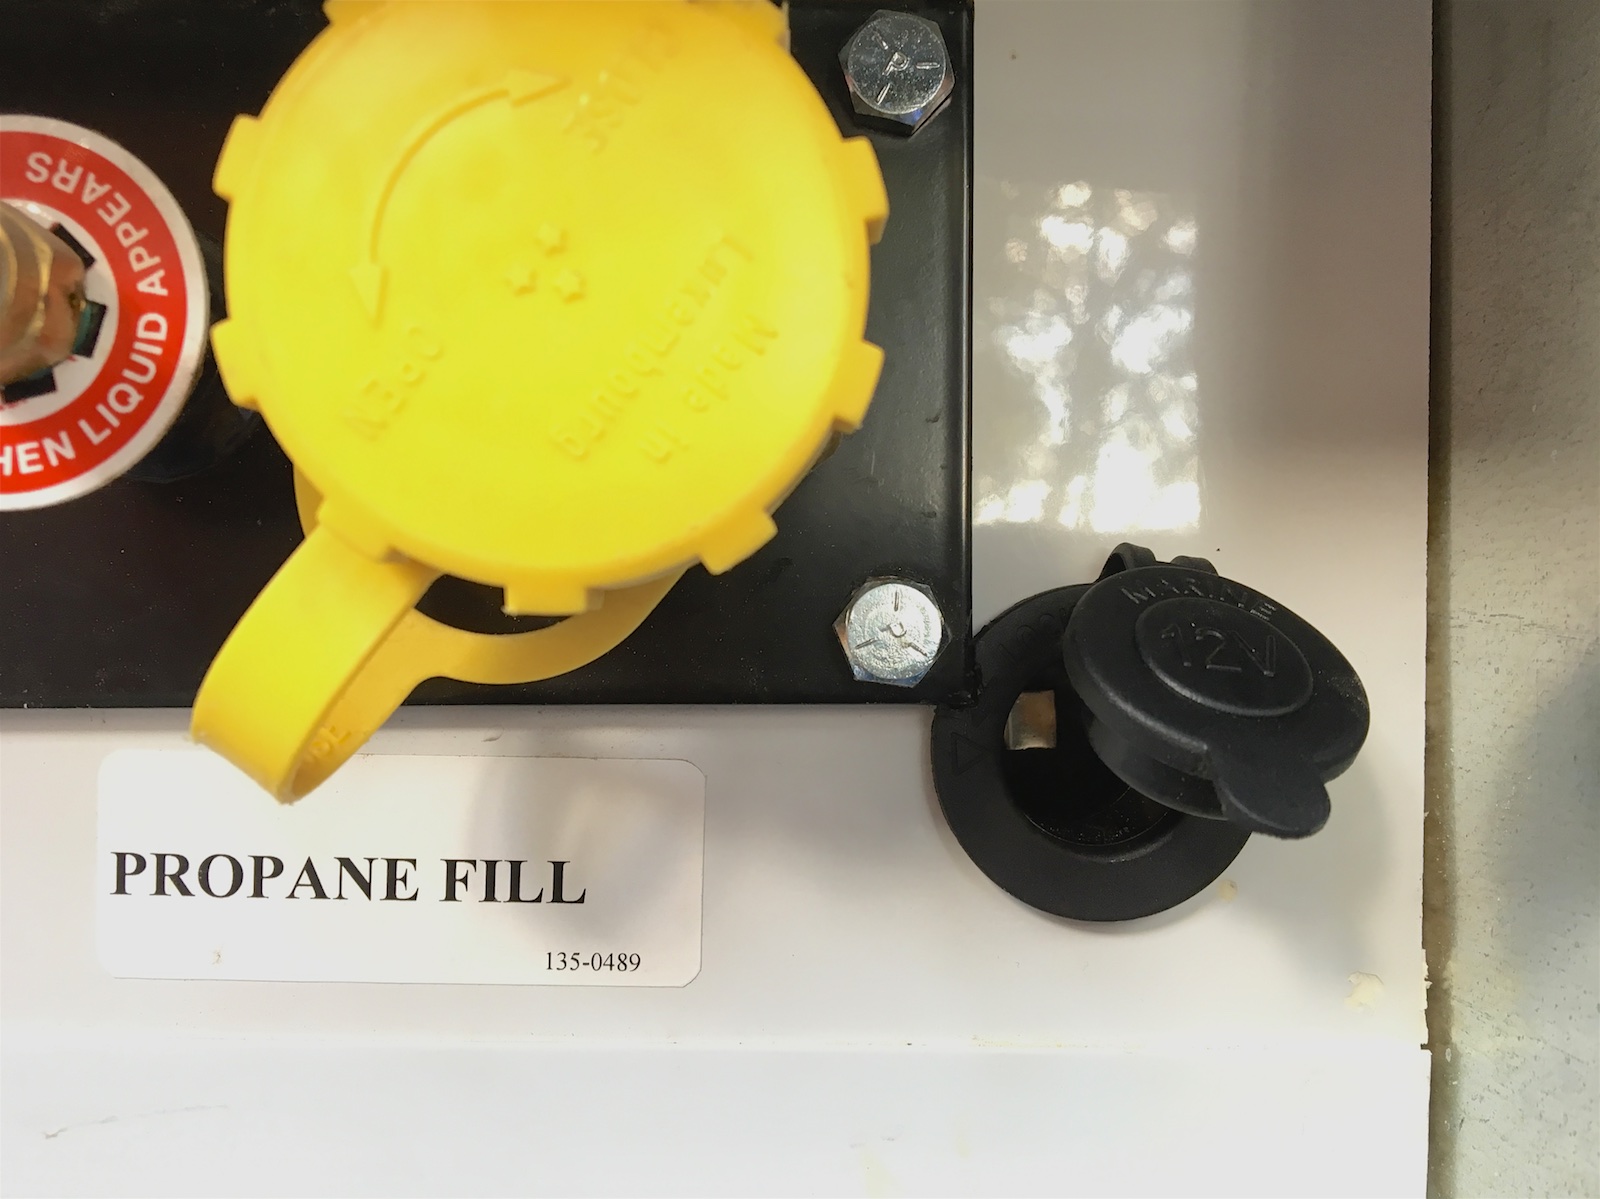
The unused, 12-gauge wires hang behind the panel just to the right of the propane port. Turned out there was just barely enough space for a standard marine 12V port between the propane port panel and the frame of the panel. I was able to drill a few pilot holes to make a bigger hole and then use a round file to open up the hole to 1.25″ round. I had to cut a tiny corner out of the plastic lip of the 12V port but otherwise it fit in just fine. The most difficult part was just crimping some connectors on to the end of the existing wires in this tight space. (They were unfortunately just barely too short to reach where the port had to go in.)
Anyway, the last step was to put in the missing 20A fuse in the macerator’s spot in the fuse box and voila: a working, external 12V port! Excellent.
As for parts, you just need a 12V power port like this one, which has a nice rubber cover and you can discard the extra frame which there isn’t room for here. And you’ll need a bit of 12 ga. wire and some spade wire crimp connectors like these. (And yeah, a wire stripper and crimp tool. Oh, and a drill and a round file. ;-)
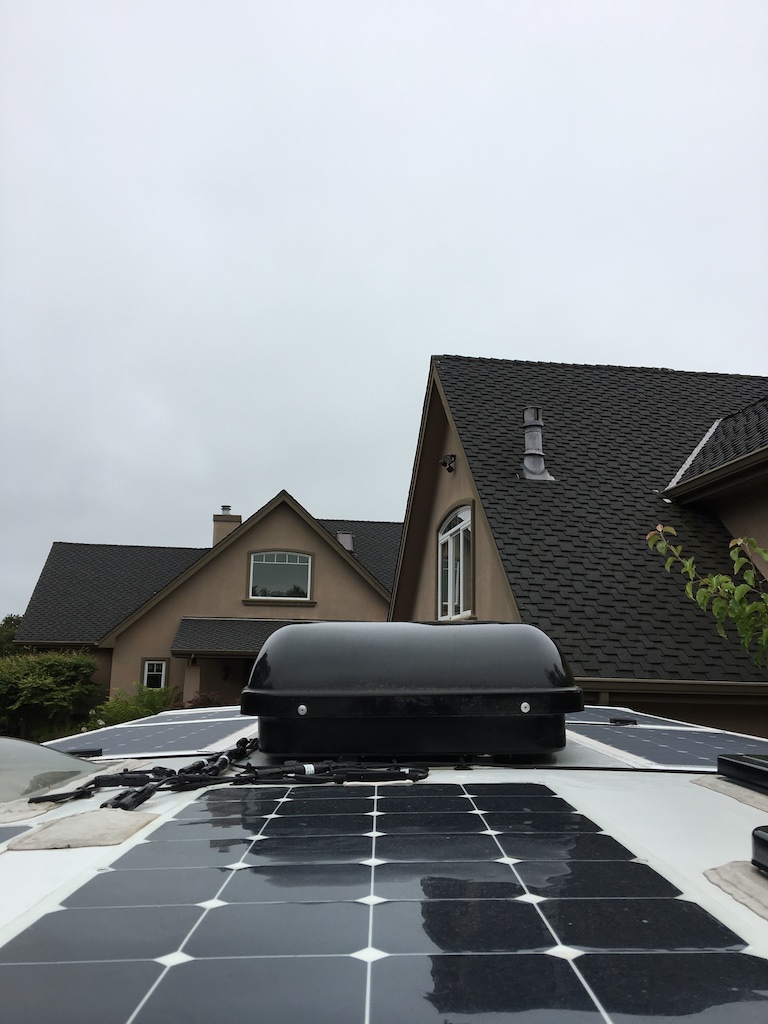
Install more solar panels
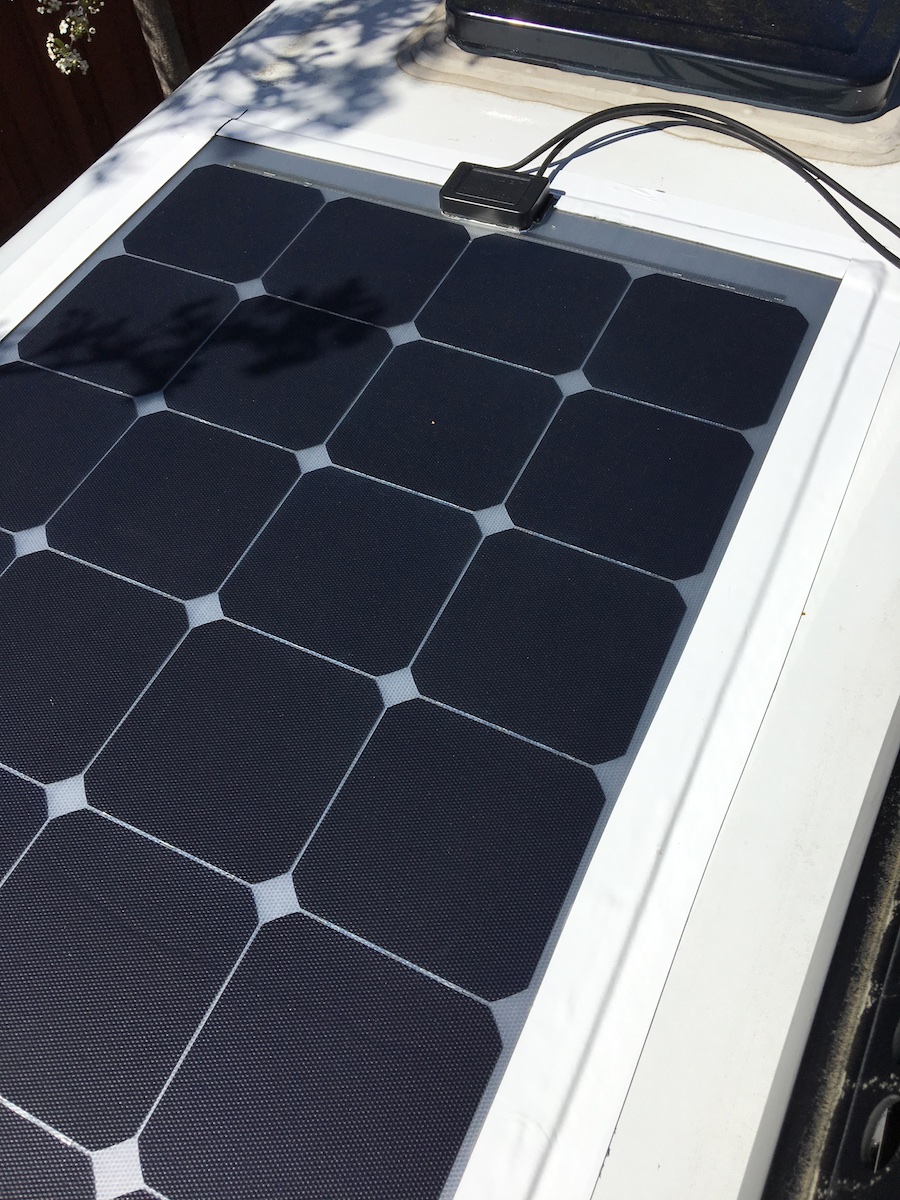
The 2016 Unity comes with 200W of thin, lightweight, flexible solar panels on the roof and easy, inexpensive expansion to 500W with the existing wiring and charge controller. I considered adding bulkier, heavier rigid panels on tiltable frames to maximize the angle to the sun throughout the year and at various latitudes but then I decided I probably wouldn’t really want or need to go to the trouble of positioning the vehicle and raising and lowering the panels all the time to try so hard to maximize solar gain. I decided to stick with lightweight flexible panels, saving on weight as well (3 lbs per panel vs. 20 lbs).

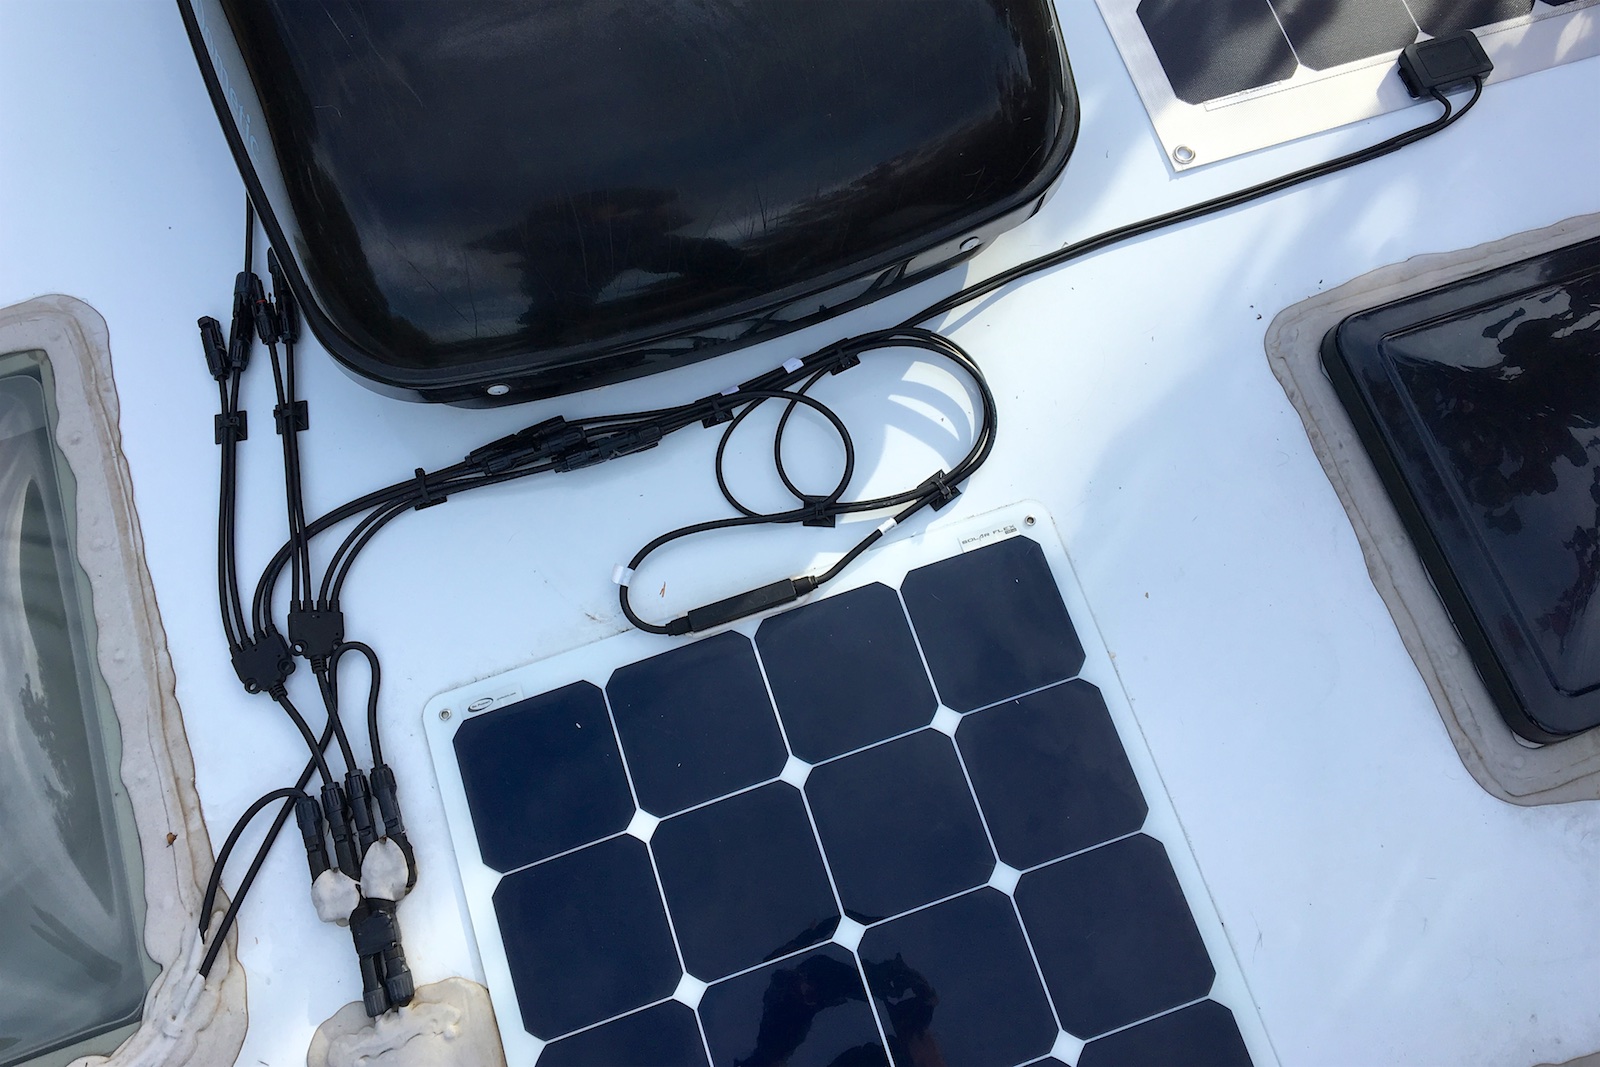
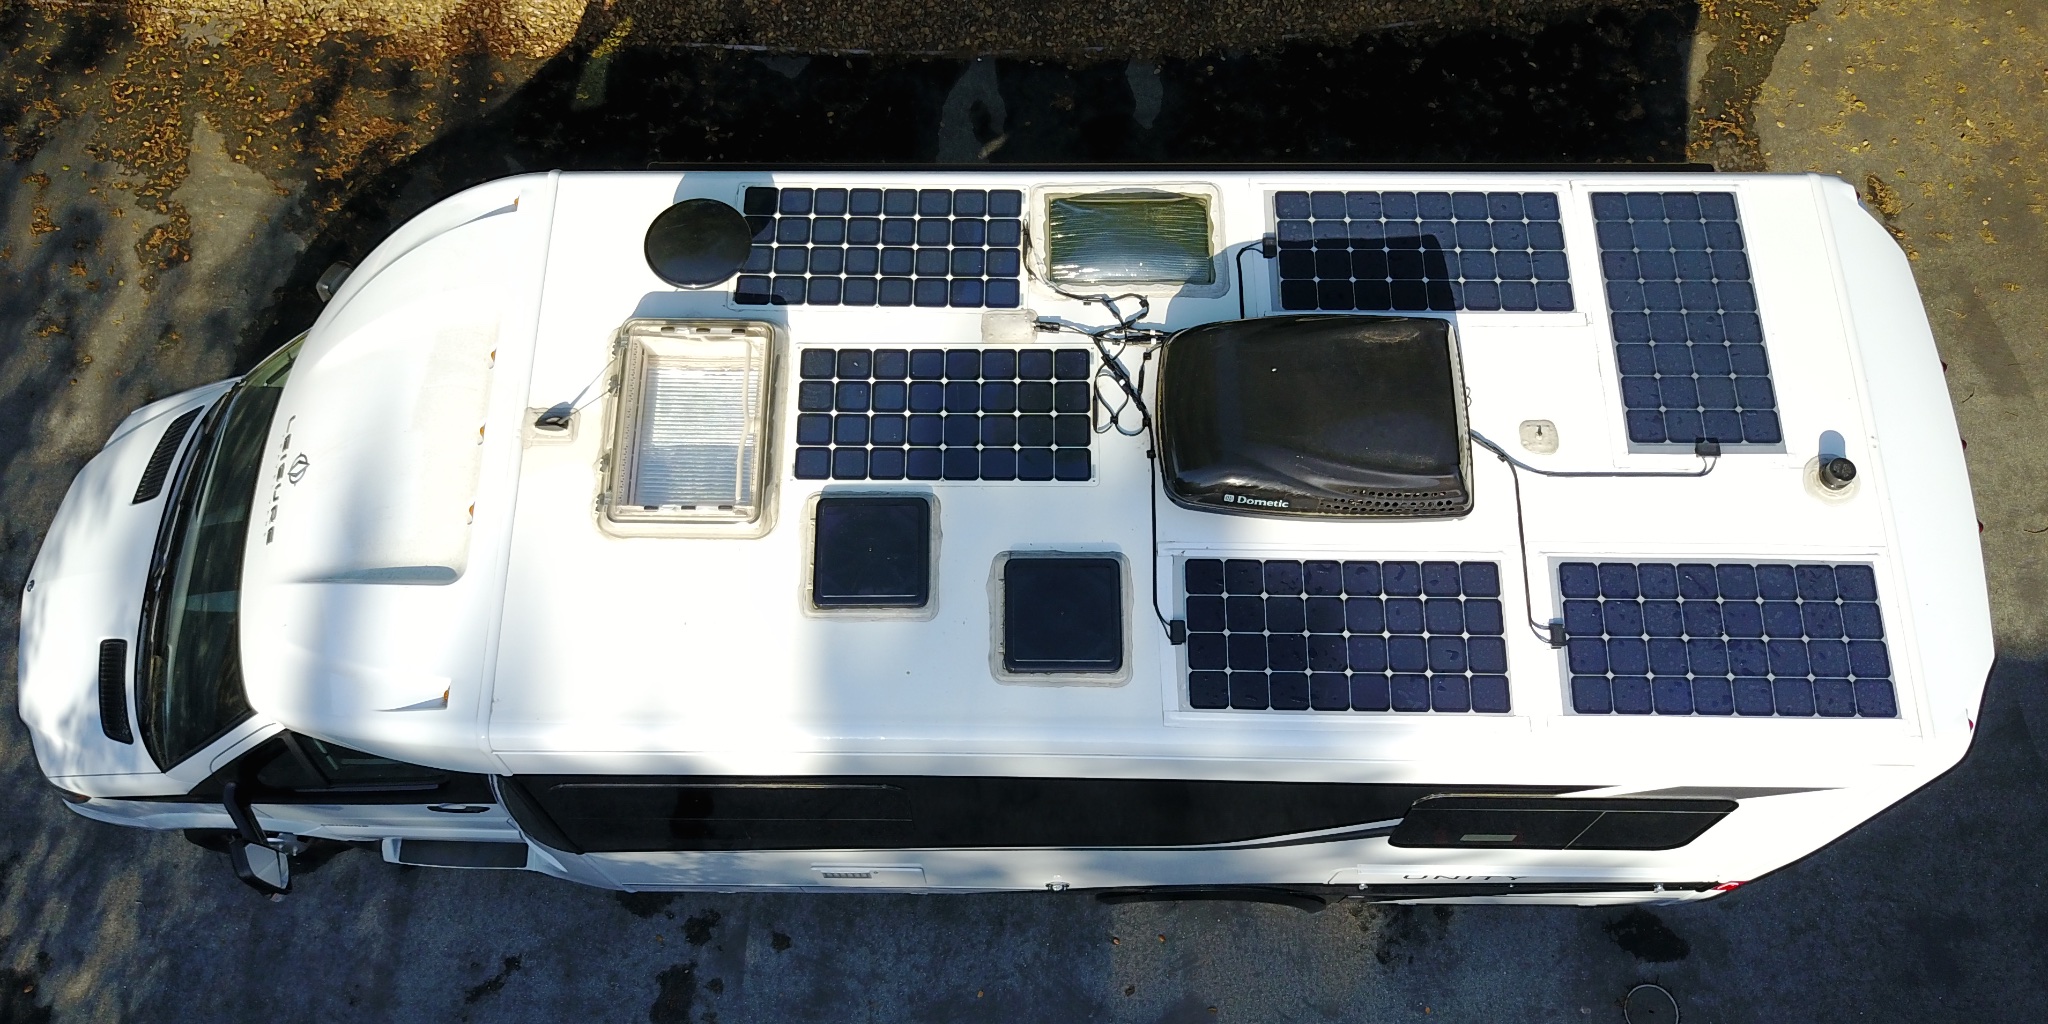
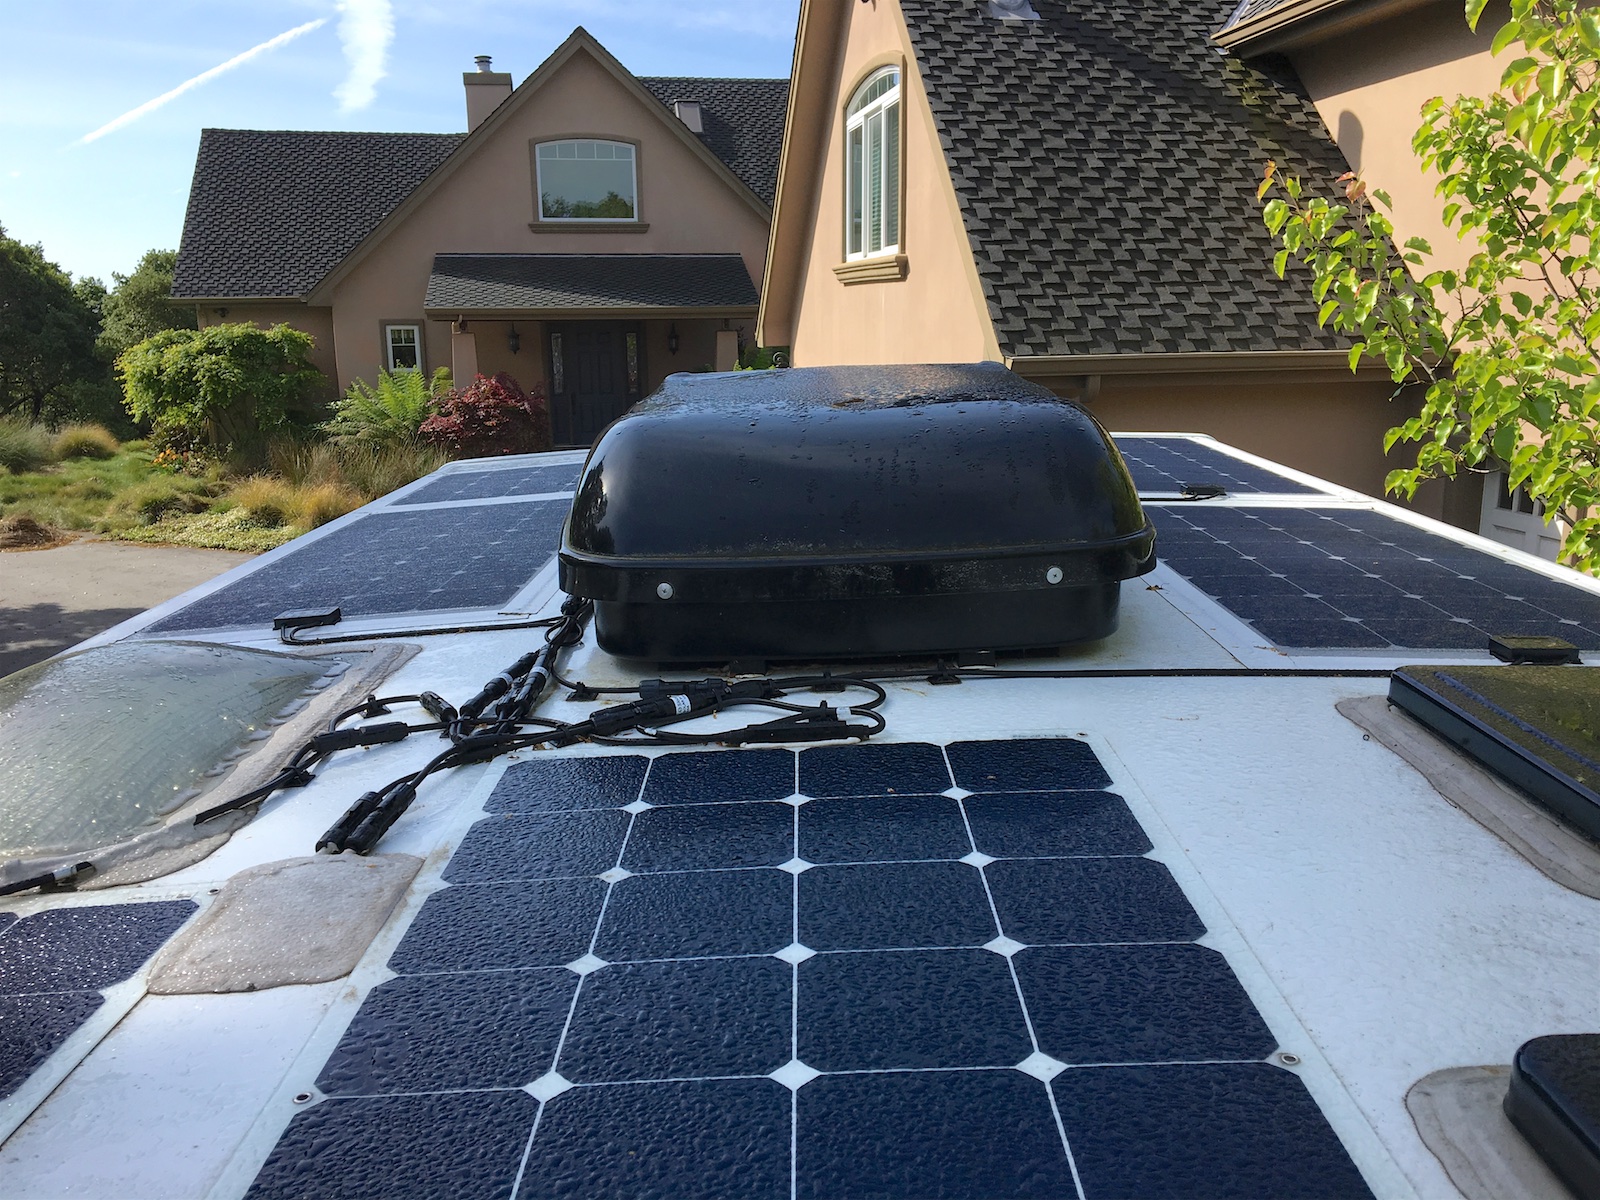
I was leaning towards adding two 150W flexible panels rather than three 100W panels to reach the 500W/30A max of my existing Go Power! charge controller. However, from reading tutorials online, it’s apparently important to choose panels with matched specs for best performance. I’m not sure how closely the voltage specs must match but I ordered three 100W flexible panels from GreeSonic which use SunPower cells and have nearly identical voltage/current specs as the original two 100W Go Power panels. However, they also use a supposedly better-performing top surface material (EFTE rather than PET) and cost half as much. (Extra resilience, some self-healing capacity, non-viscous, dirt resistant, self-cleaning, and less reflective thus potentially better performing.) It sounds like this top layer might address some of the surface degradation issues I’ve read about with some flexible panels. There’s some more info here and from here from other suppliers using ETFE. They’re a little larger than the Go Power panels, but they still fit fine with room for a potential sixth panel.
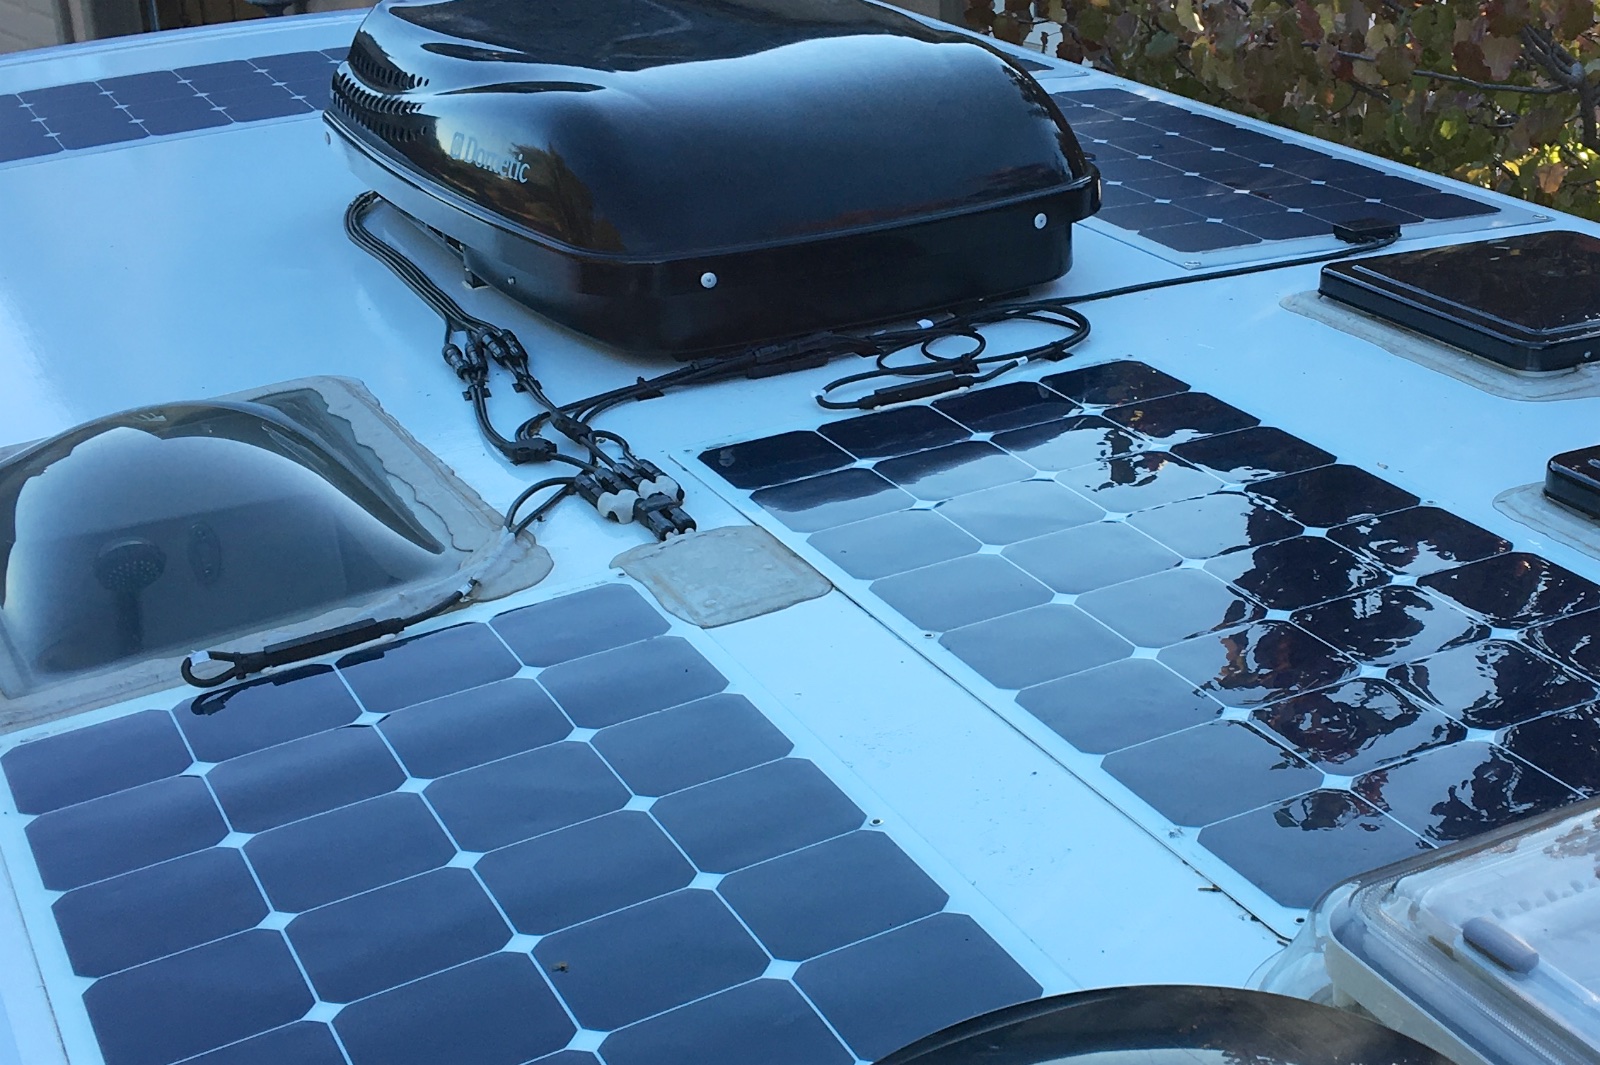
(The shiny/smooth panels are from GoPower. The matte/textured panels are from GreeSonic.)
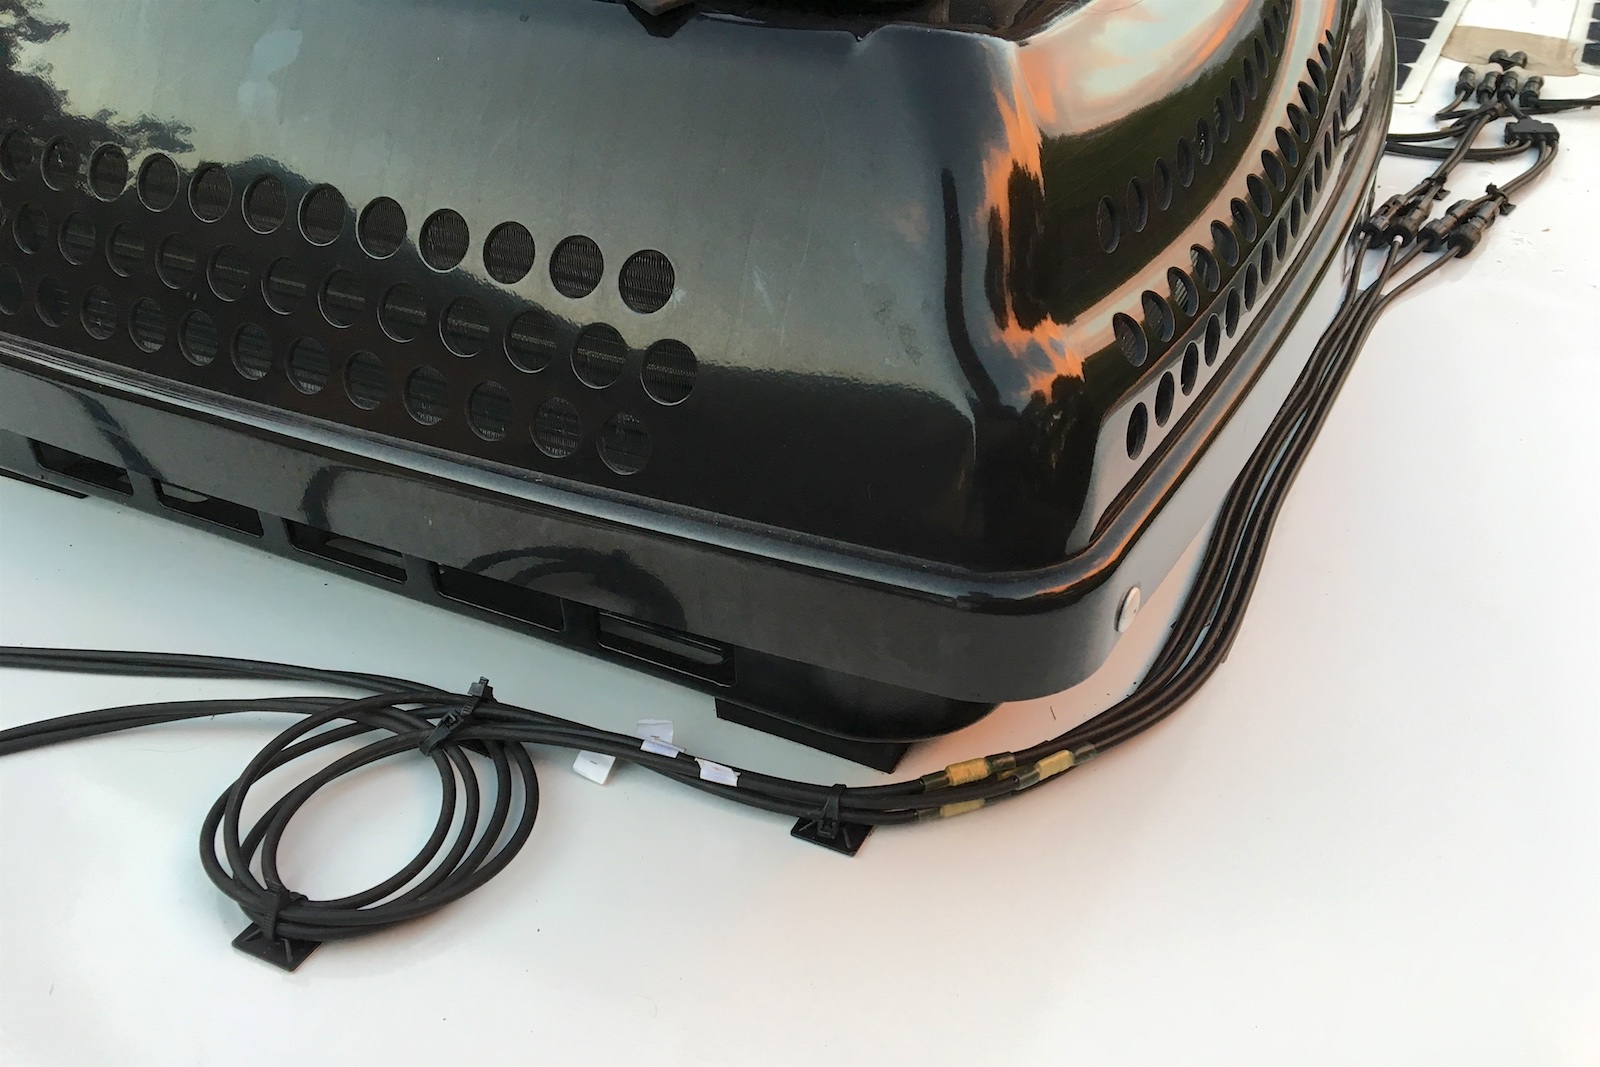
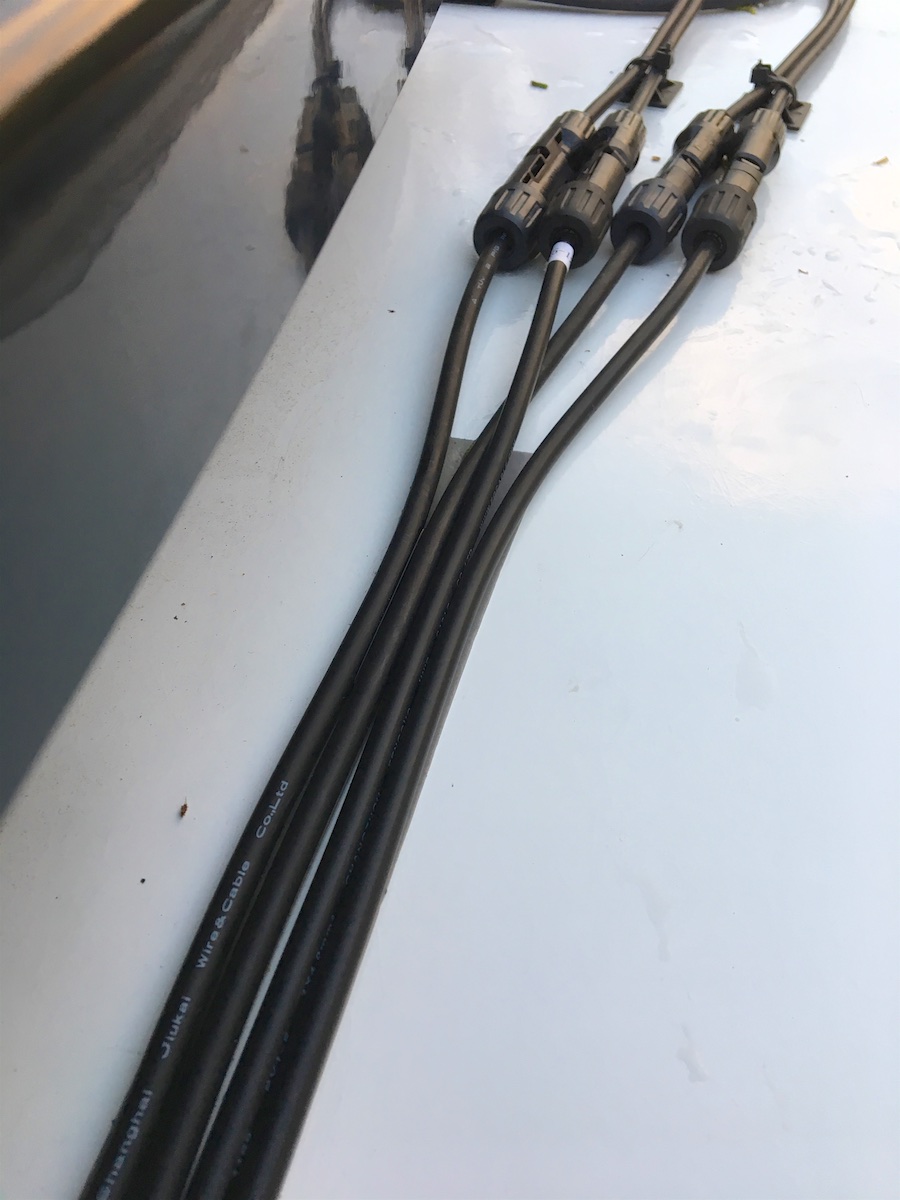
Rather than using multiples of 1-to-2 branch MC4 connectors (as provided with the Go Power expansion kits), I ordered a single set of 1-to-4 branch connectors that I’ll insert in place of one of the existing panel connections, thus allowing all five panels to be connected in parallel. This 1-to-4 branch connector supports up to 30A which will be fine with the max 24A from the four <6A panels and the 8AWG factory-installed wiring will carry the total 30A of current to the charge controller. I’ll just need to make sure the remaining factory-installed 1-to-2 branch connectors are good with 30A.
By the way, if you find your existing MC4 branch connectors glued to the roof and too close together to squeeze in a tool to unsnap them, I discovered you can slip a zip tie around the catches, tighten and voila, they release!
Each GreeSonic panel comes with a pair of 4-ft long MC4 cables. While it was possible to place all of them in such a way as to reach the junction point with the provided wiring, I decided I wanted to position them in such a way as to maximize the available space, leaving room for a sixth 100W panel someday but taking the prime unshaded spots now. This means two panels were about 18 inches out-of-reach using the supplied cables. So, I bought two 5-ft long MC4 extension cables, cut them each in half and spliced them into the original cables with marine-grade heat shrink butt connectors, extending them by a couple of feet. You could also find or make a pair of short MC4 extension cables and just connect them that way. Or I could have joined these two distant panels with a 1-to-2 18″ long branch connector and then connected that to the other panels with a set of 1-to-3 branch connectors. I might have done the latter if I had not changed my mind about my panel placement part way through the project.

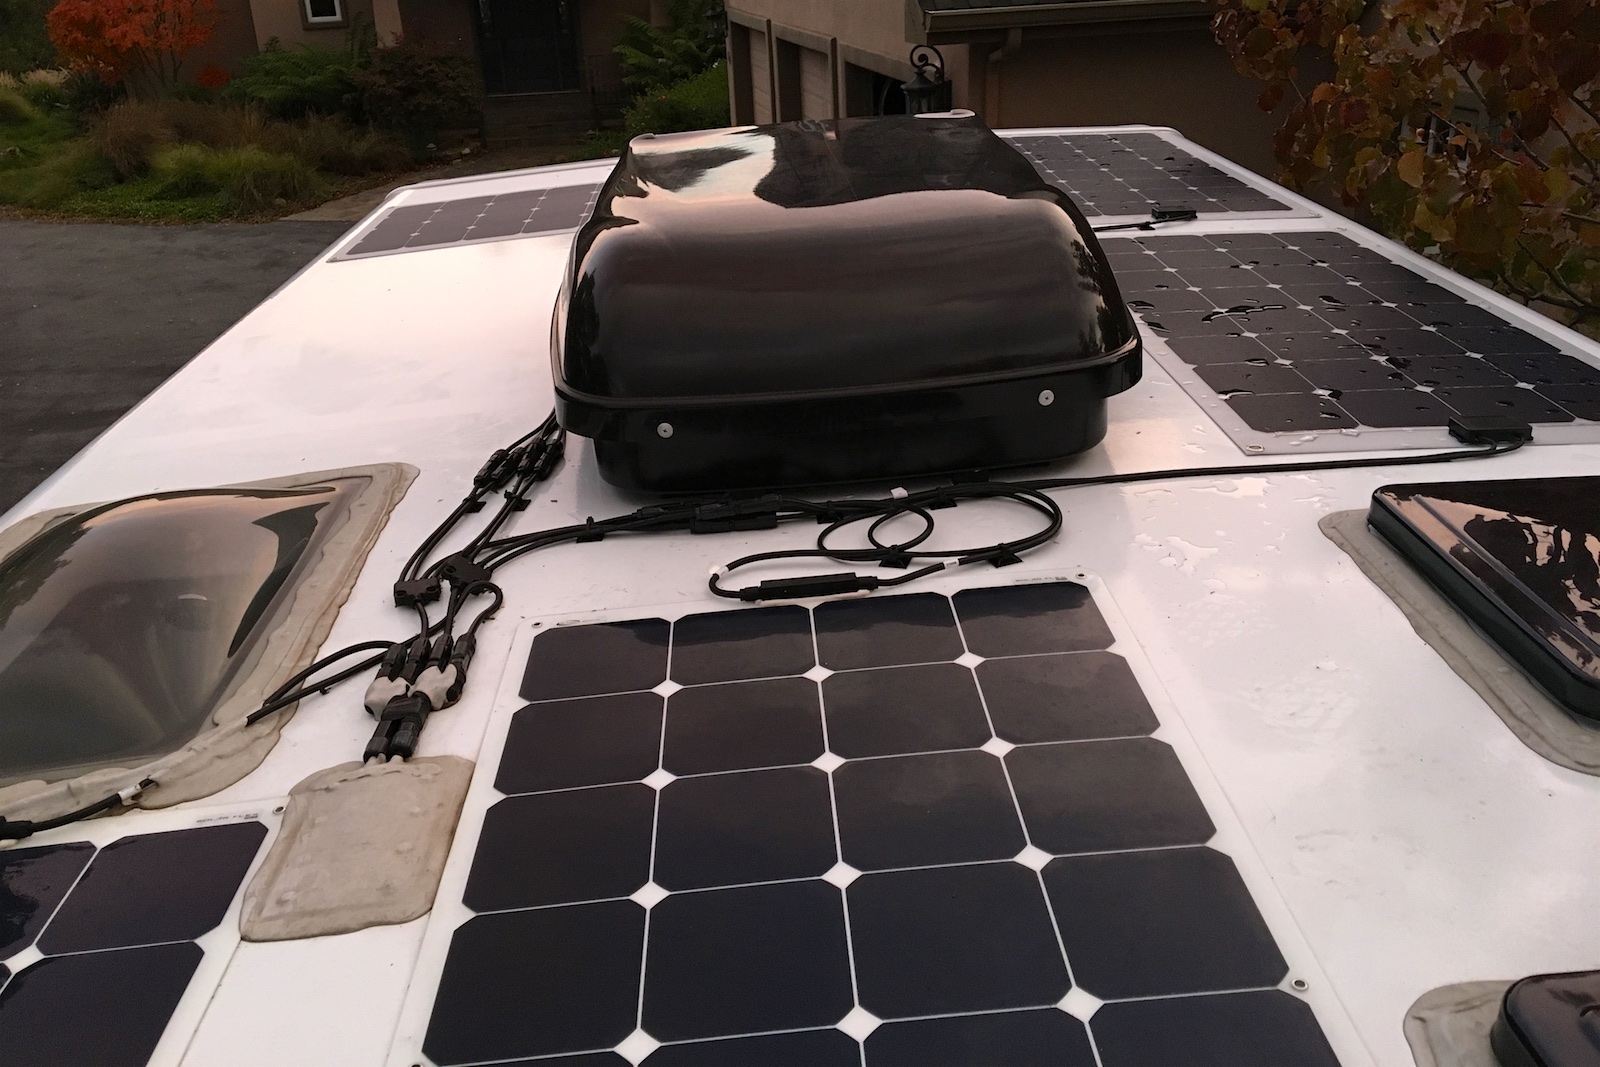
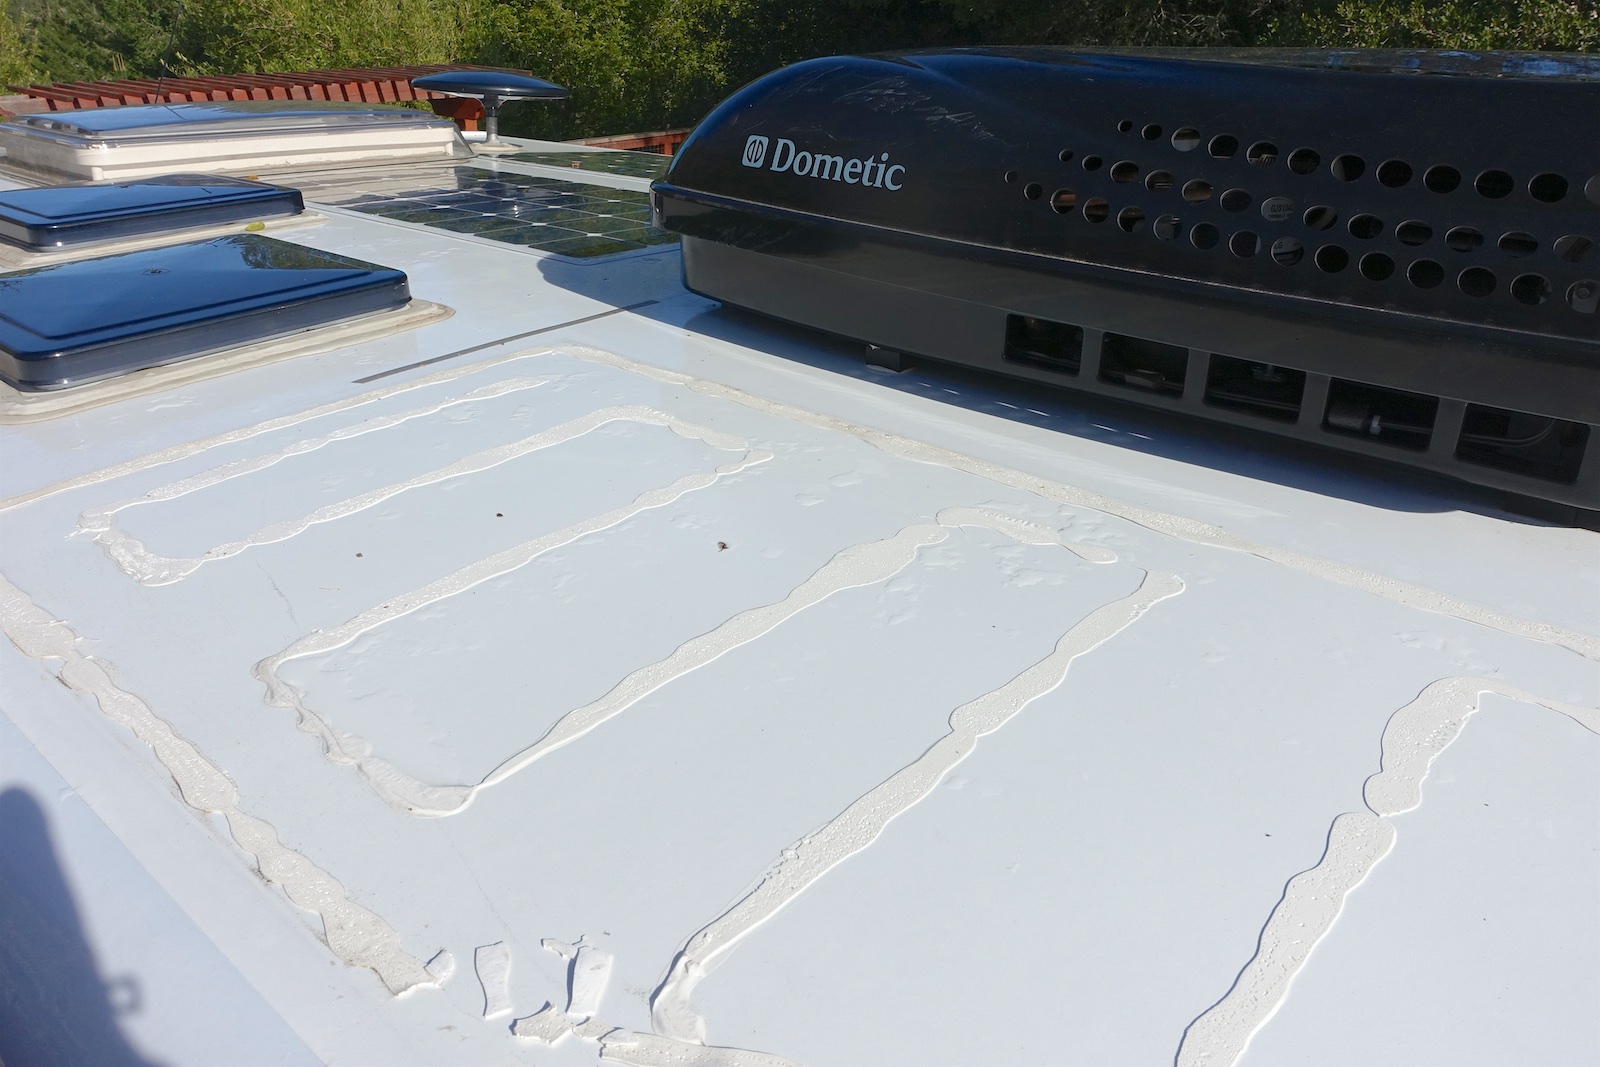
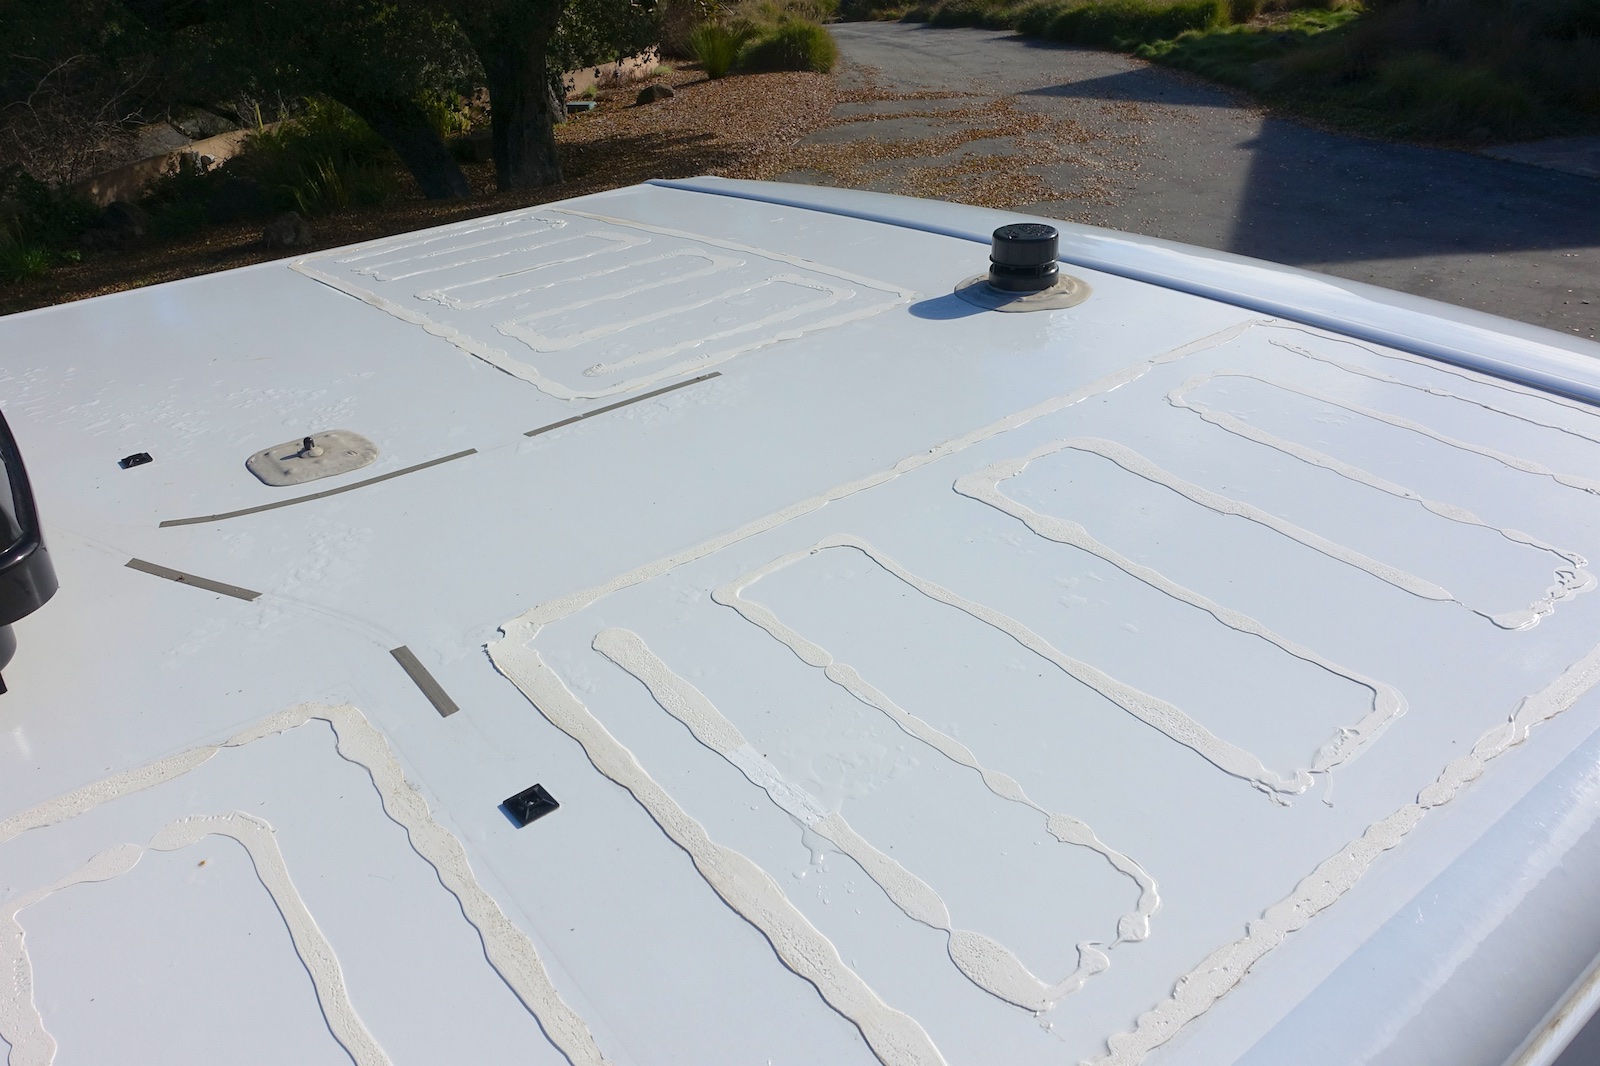
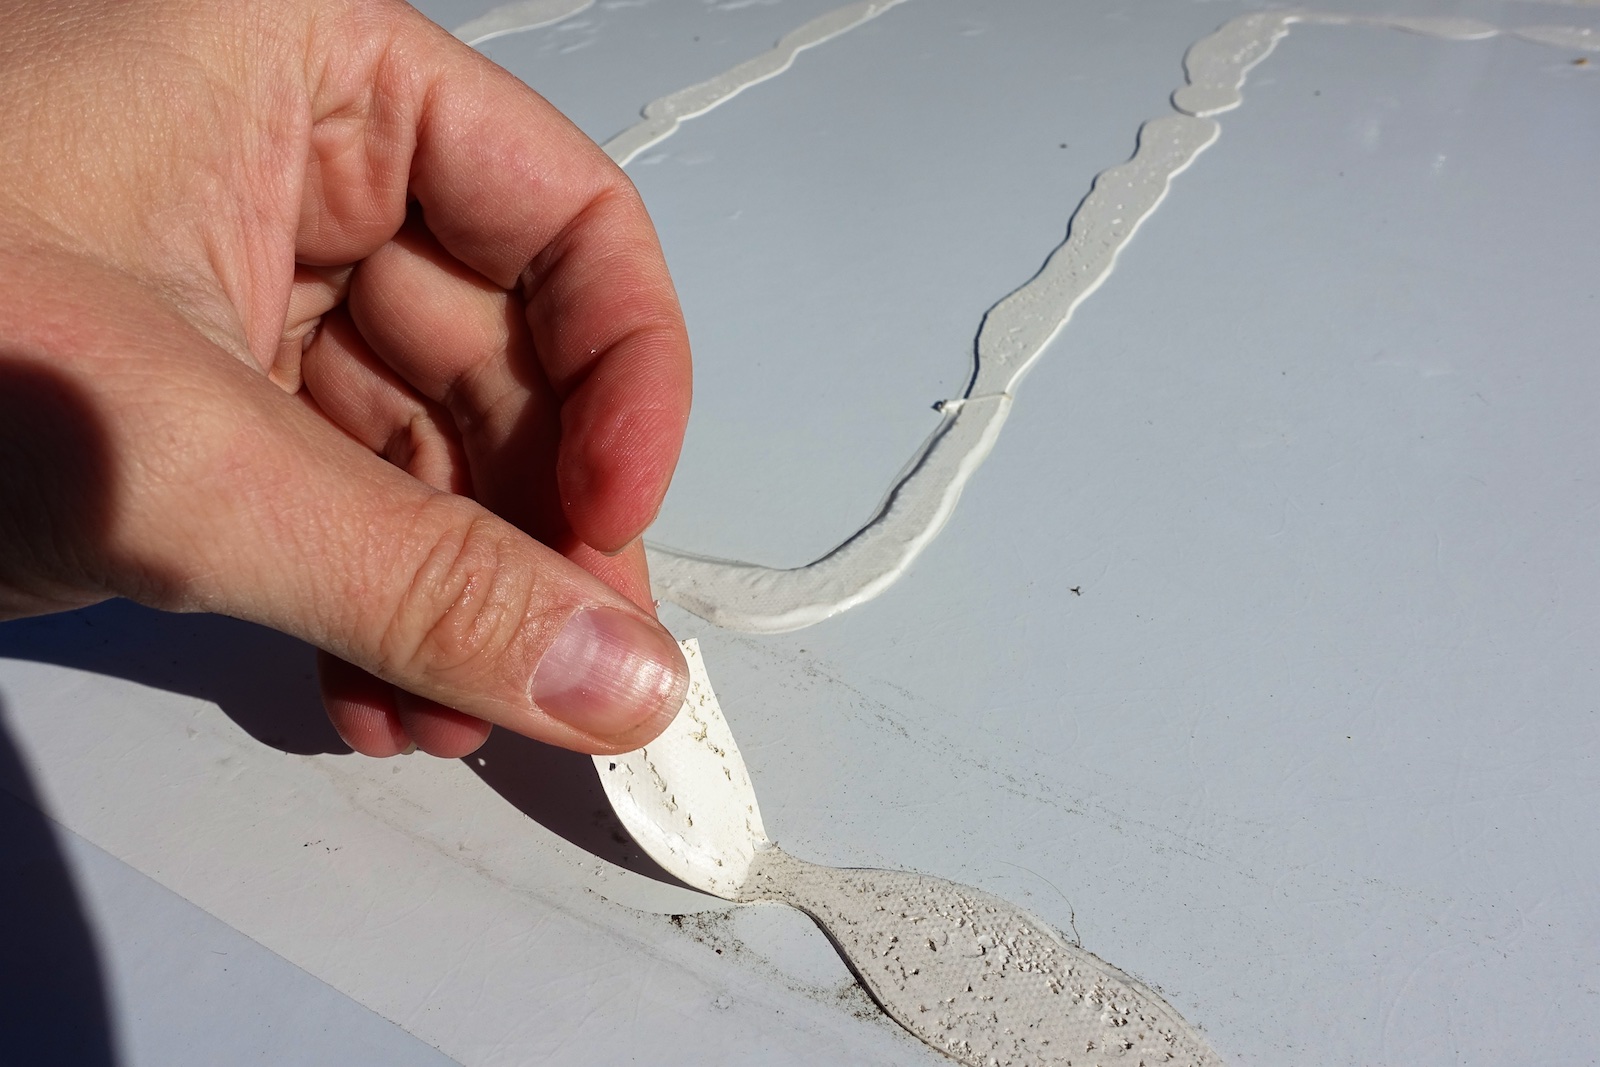
I’ve seen that the most common way to install flexible panels on a motorhome roof is with adhesive and in fact, that is how my original two GoPower flex panels were installed by the LTV factory. I didn’t know what adhesive they used but I ended up following the lead of a couple of folks on the Sprinter forum where they used and recommended Sikaflex-221 as an adhesive to secure their flexible solar panels to their fiberglass roofs. (Do NOT do this!) This appeared to work well and the installation went fairly easily. However, I then found out the hard way that Sikaflex-221 is not actually an adhesive, it’s a sealant, as per the manufacturer. In addition, to properly cure Sikaflex, it needs to be exposed to atmospheric humidity – not applied beneath a panel to form an airtight space.
DO NOT USE Sikaflex as an adhesive – despite what you might read of others doing. After a month and a few multi-day excursions, one of my panels tore itself loose on the freeway. (I’m just glad it didn’t cause an accident.) I really should have researched its appropriate use instead of relying on what others had done with it and if I had actually tested whether the panels were secure, I would have found that they could be peeled right off. As you can see in these photos, Sikaflex-221 only partially bonded to the fiberglass roof but it most definitely did not bond at all to the back of these panels:
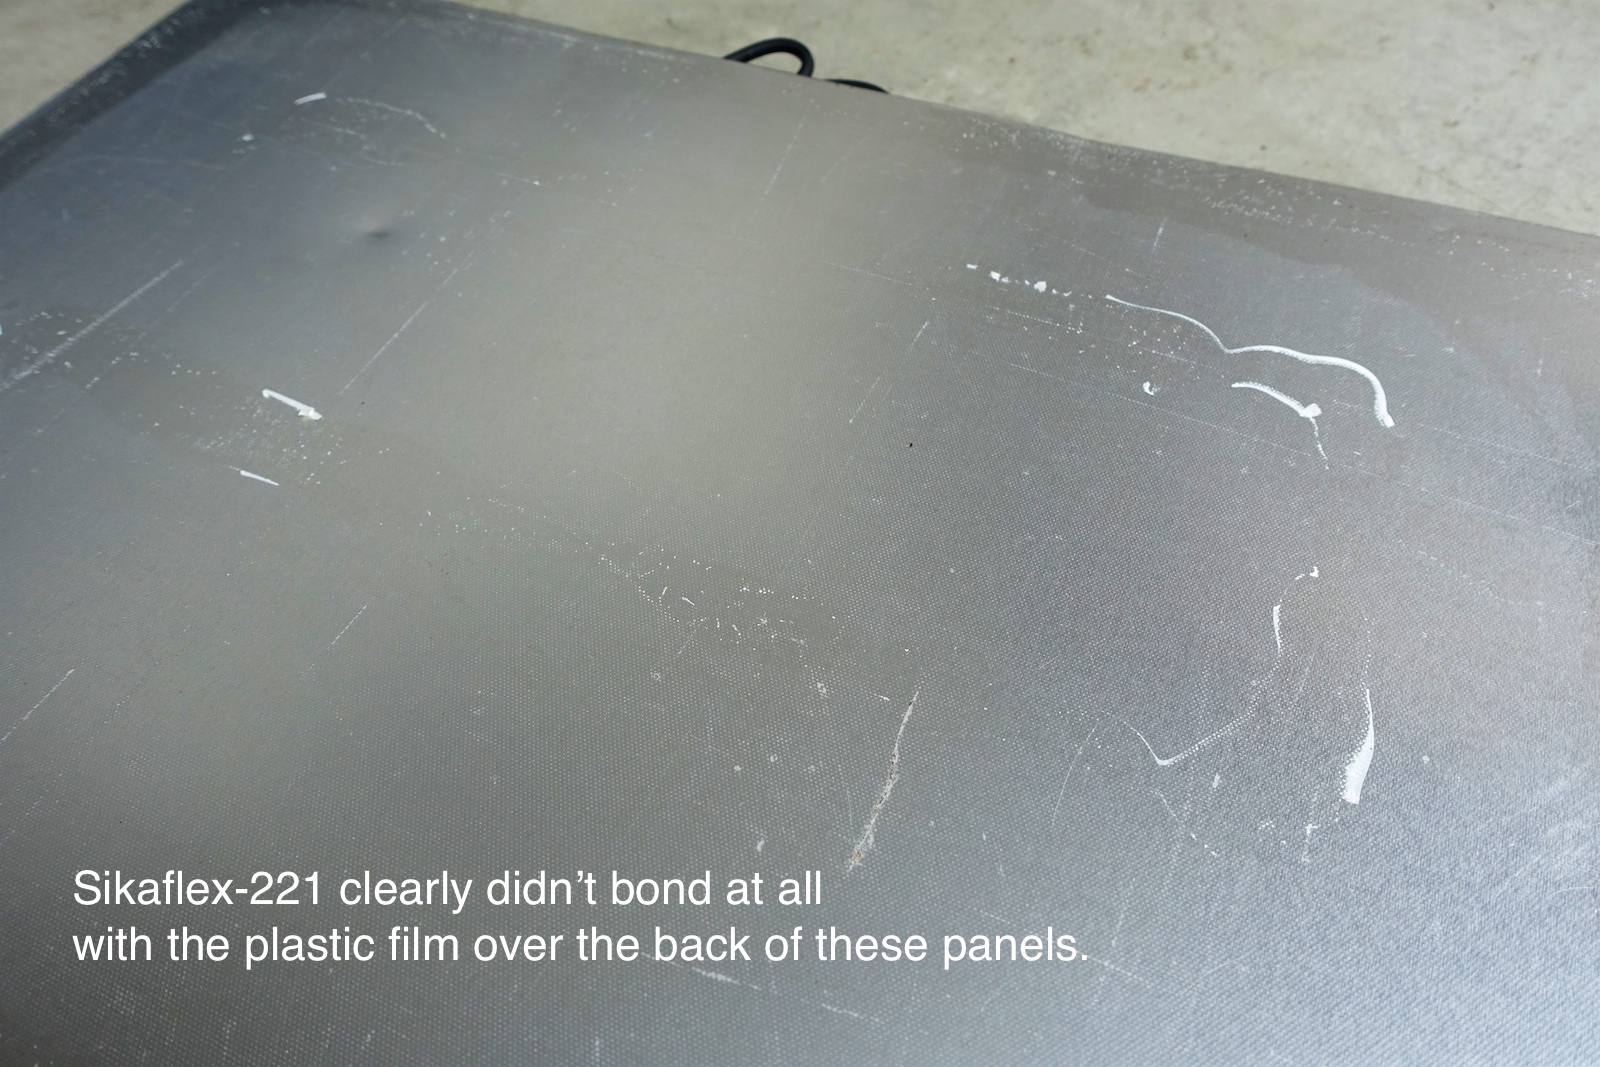

Different flexible panels use various materials for their construction. These GreeSonic panels are backed with aluminum but covered in a protective polyethylene film – a material which happens to be particularly difficult to bond with. This film is intended to prevent oxidation and is supposed to remain in place. After my mishap, I exchanged several emails with GreeSonic, trying to determine what adhesive they recommend. Unfortunately, they were unable to make specific recommendations beyond suggesting generic 3M VHB tape. They also recommend making use of the grommets to secure the panels mechanically. To be fair, other flexible panel manufacturers like GoPower insist that you contact your RV manufacturer to determine an appropriate adhesive. This is not very helpful since you also need to know what will bond with their panels.
I opened a discussion on the Unity sprinter-source forum to solicit advice on mounting options (before I had even learned that Sikaflex is not an adhesive) and I did some follow up investigation and thinking on various techniques:
|
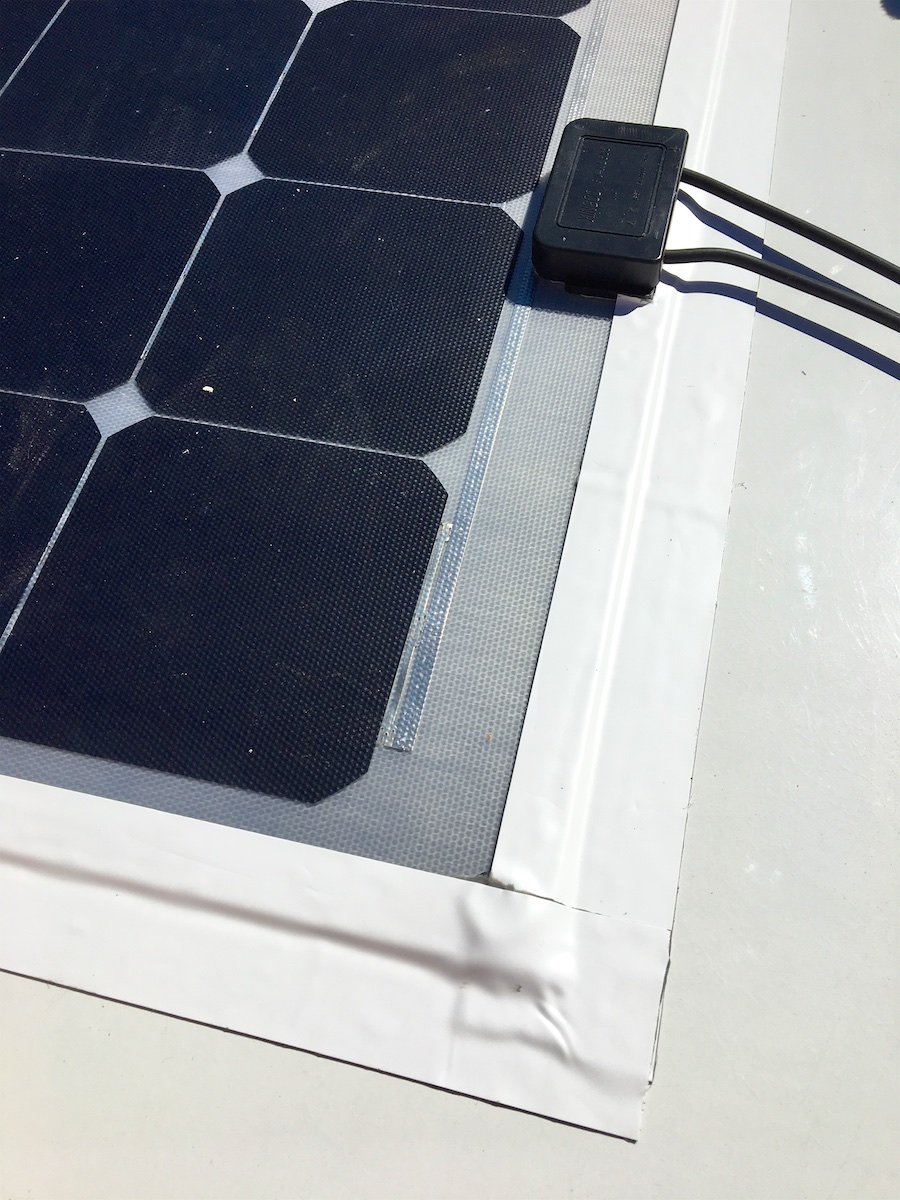
Well, I was leaning towards either option #2 (VHB adhesive tape underneath) or #6 (Eternabond sealant tape overlaid). Even though I already bought the VHB tape, I had to wait many weeks for a warm dry spell in my area and I ended up trying Eternabond to repair a four foot crack in a rain gutter. I was so impressed with how easy it was to apply that I decided to go with Eternabond on my solar panel reinstallation.
As I mentioned earlier, I don’t think it looks as neat and trim as using adhesive under the panels, but it was very easy and it takes care of sealing out any possible air lift (or moisture) all in one step. I can imagine dirt collecting on the gray edges, much as dirt collects around the various other fixtures sealed with the usual lap sealant. Hopefully the white vinyl/plastic tape won’t peel away though. At least others have not reported this happening.
To keep the MC4 connectors and cables from slapping around in the wind, I used zip ties and mounting pads at a few key locations and this wonderful 3M Scotch VHB adhesive tape to hold down pairs of cables elsewhere. (See pictures above.) This stuff is great! I don’t yet know how well it will hold up over the years but it was recommended by others and seems nicely secure now.
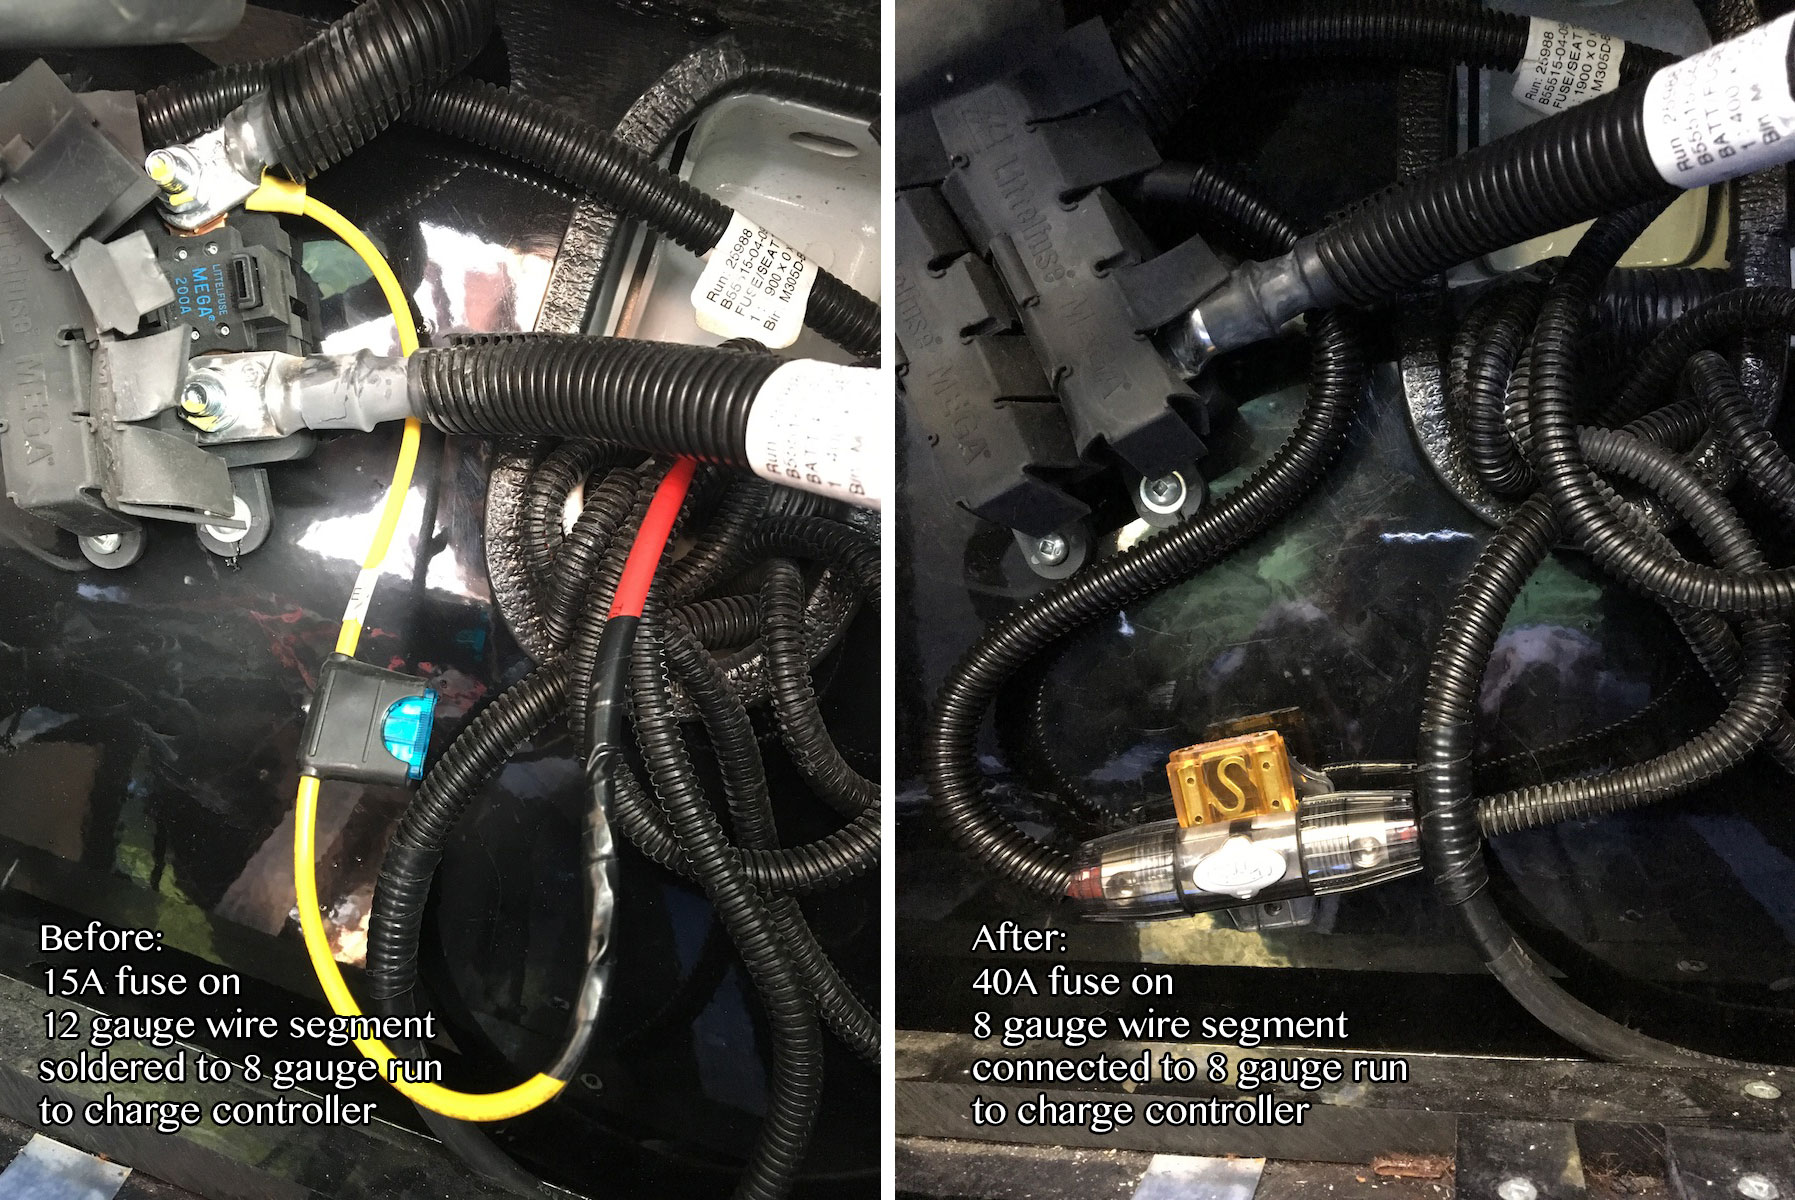
Something to watch out for (and that someone else discovered and shared, thank you!) is that LTV installs a 15 amp inline fuse (on a 12 gauge piece of wire) between the charge controller and the battery when they put in the original 200 watts of panels. This fuse will definitely blow if you add more panels. Some have opted to swap this inline fuse with a circuit breaker, but I decided to swap it out with an inline 40A fuse and replace the 12 gauge segment with continued 8 gauge wire.
So that did it for my original installation of three additional panels to bring me to five 100W panels – the max that the original wiring and the Go Power charge controller can handle. On December 1st at 12 pm in Santa Cruz, California (or 37 degrees N latitude), putting the sun at about 31 degrees elevation, I was getting around 11 amps reported (outside temp = 58 degrees). (For comparison, on June 1st at noon the sun will be at 75 degrees elevation here, while in Anchorage it’ll be at 49 degrees.)
One additional question is whether to add in-line fuses for each panel at its parallel connection. I saw a number of folk saying that it’s necessary when wiring more than two panels in parallel to protect from short circuits, others saying it’s not necessary and still others not mentioning it as part of their wiring instructions. Here are two examples:
WindyNation: “When you have panels connected in parallel […] a short in one panel can draw all 60 amps towards that short-circuited panel. This will cause the wires leading to that panel to far exceed 30 amps causing that wire-pair to potentially catch fire. In the case of panels in parallel, a 30-amp fuse is required for each panel.”
AMSolar: “You aren’t going to get a surge from solar panels (unless maybe there was a very unusual solar flare, in which case you have bigger issues to worry about.) Because of that, our kits do not use fuses between the panels and the charge controller.”
I posed the question to the Unity forum and received a similar range of answers, including the suggestion that a short would be pretty unlikely at one of the panels. In the end, I went ahead and added in-line fuses when I did the reinstall of my panels in a series-parallel configuration and added a sixth panel. See below for details on my further upgrade to six panels and a more efficient MPPT charge controller.
Here’s what I bought to do this upgrade:
To replace the fuse between the charge controller and the battery:
|
To extend the reach of two panels:
Please note that the above was for wiring the five panels in parallel. I added a sixth panel, switched to series-parallel wiring and an MPPT charge controller for much better performance. See details below.
|
| Here’s also a few useful discussion threads on the topic of adding solar panels to the Unity: | |
Upgrade solar charge controller
In the process of learning about charging batteries from solar panels, I’ve learned about the advantages of MPPT solar charge controllers over simpler PWM controllers like the factory-installed one from Go Power. These simpler controllers are often unable to take advantage of all the available energy from your solar panels. As explained very clearly here, your 100W panel might be capable of putting out (under ideal conditions) something like, for example, 5.88 amps at 17 volts (5.88A x 17V = 100 watts), but connecting to your partially depleted batteries at 12 volts pulls down the voltage of the entire circuit and you end up getting only 71 watts (5.88A x 12V). An MPPT controller, on the other hand, takes that full 100W of energy at the higher voltage of the panel, converts it down to the battery’s charge voltage but at higher amperage so that you end up with something closer to the original 100 watts. There’s some losses due to the DC-to-DC conversion and of course temperatures and the angle of incidence all matter as well, but the upshot is you often get to use much more of the available energy from your panels with an MPPT solar charge controller. Again, I recommend this write-up that clearly explains how MPPT controllers work compared to the simpler PWM controllers. If you prefer a more detailed and technical explanation, here is a thorough explanation from Victron Energy of the performance benefit of MPPT over PWM controllers and wiring your panels in series-parallel.
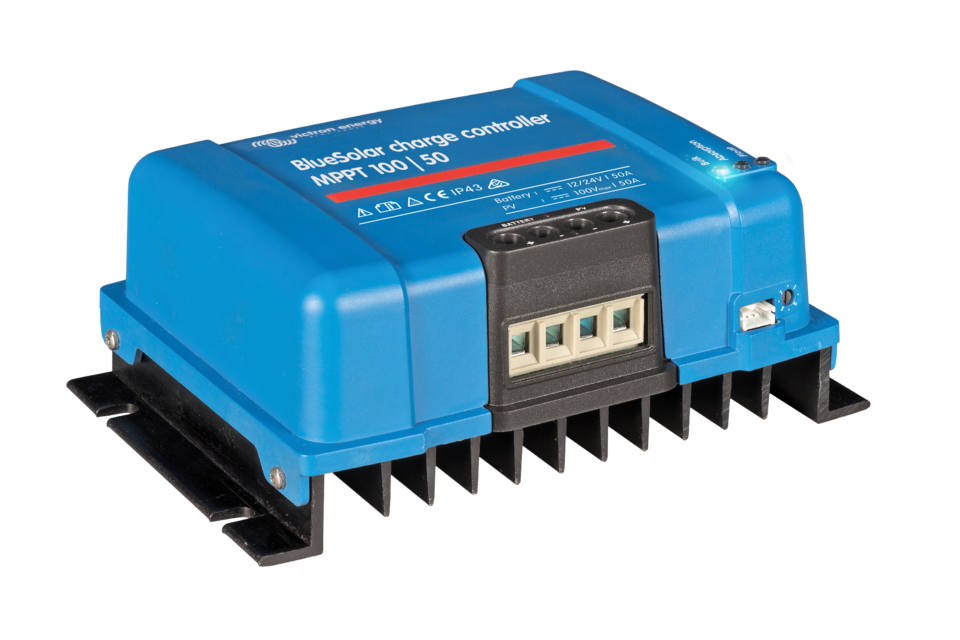 I decided to buy and install a Victron BlueSolar MPPT 100/50 charge controller. I really like the Bluetooth control/display via a smartphone instead of having another dedicated display panel, I’ve read good things about the Victron’s reliability and performance and I liked the form factor of this unit.
To fully take advantage of the MPPT charge controller, I added a sixth solar photovoltaic panel and wired my panels together in series-parallel to double the voltage: three pairs of panels wired in series, and the three pairs wired together in parallel. The higher voltage will allow the MPPT controller to be more efficient at “finding the maximum power point” (getting the most amps out, particularly at higher temperatures) and the higher voltage to the controller will mean a lower amperage to the controller and less voltage drop and be safe with the existing, factory 8AWG wiring and distance to the controller. For the short distance from the controller to the battery (about four feet), I used 6AWG.
Wiring some panels in series can mean that if one is in shade it will pull down the other so I paired up neighboring panels with the assumption that a tree or object would likely be shading both in the pair anyway. This leaves the potential for the other pairs to work at full capacity in parallel. However, the Greesonic panels have bypass diodes so my understanding is that this helps reduce voltage loss from partial shading.
The factory-installed PWM charge controller was mounted in the enclosed cabinet over the cab but this would probably not be a good location for something that puts out much more heat. It’s also better to put any charge controller closer to the battery. I took apart this cabinet to see what was going on with the wiring. Here’s a video for those curious to see behind this cabinet as well. One unexplained oddity is that there is a single additional, unconnected 10 AWG wire bundled with the pair of 8 AWG wire that runs from the controller to the battery. I was also surprised how much extra wire length there was in there given that shorter is always better to avoid losses due to voltage drop.
 After removing the old charge controller, I used a butt connector to join the negative wires and a Blue Sea Systems battery switch mounted on a bit of painted MDF board to connect the positive wires here and thus provide the means to disconnect the solar panels if I ever need to mess with the wiring. (The other way is to just cover them with blankets or cardboard.)
I mounted the new Victron BlueSolar charge controller in with the inverter since it requires ventilation and a specific, vertical mounting orientation for its heat sink and this is close to the existing battery compartment. (I may end up having to move things if I get a larger inverter.) I had to extend the existing 8 AWG wire from the battery compartment to the inverter compartment to get to the controller. That’s a pretty roundabout path – from the entry point on the roof (near the microwave oven) forward to the cabinet over the passenger seat, then down to the battery compartment, over to the inverter compartment and back to the battery compartment again – but it didn’t seem like it was possible to get at the wires to re-route them more directly. Still the distance is not a problem with the lower amperage by wiring the six panels in series-parallel.
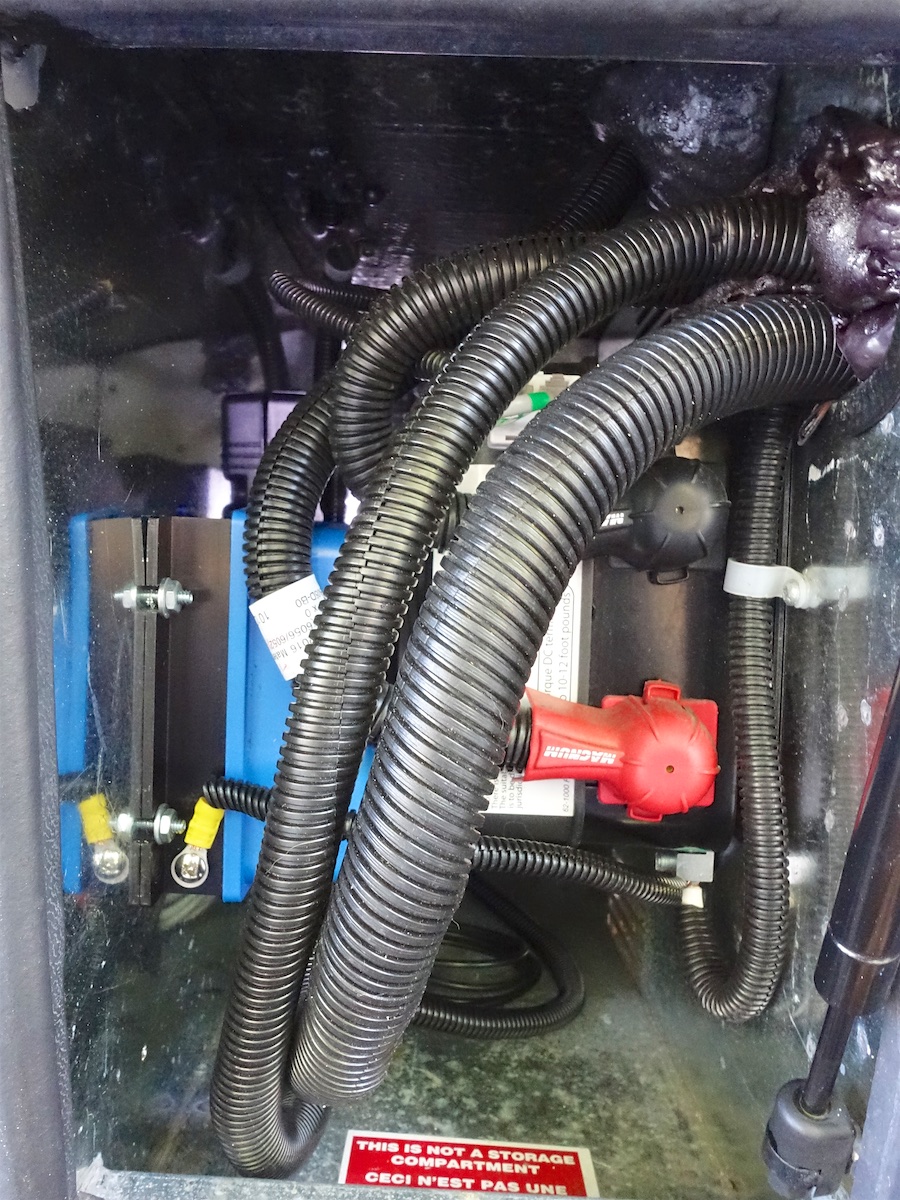
 I replaced the old smaller fuse between the charge controller and the battery connection with a 50 amp fuse.
I installed Victron’s VE.Direct Bluetooth Dongle in the inverter compartment so that I can see and manipulate the status of the solar charge controller via my smartphone or tablet wirelessly– rather than needing a dedicated, wired panel somewhere.
After installing everything, I turned on the refrigerator and let it run overnight to drain the batteries a bit. When I came out in the morning (about 9 am on an April morning), I was impressed to see that the new controller was pulling over 5 amps with the six 100W panels almost completely in the shade! (See images below.) That’s definitely much better than the old PWM controller could do in such shade. I’ll collect more performance numbers here over the coming months – but for now, we’re looking good!

Update: This MPPT charge controller is fantastic. It’s quite the upgrade over the original PWM controller. I see that I’m getting over 7 amps already by 7:30 in the morning (in May at about 37.4 degrees north latitude, in mid-California), over 9 amps by 8 am and 28 amps by 10 am! I find that I’ve easily fully recharged the batteries by late morning from our typical usage overnight (including running the compressor-based refrigerator). This is a great, worthwhile upgrade that I highly recommend!
Here is 9.8 amps at 10:40 am on a completely overcast day (heavy marine layer) in May, followed a couple hours later when the marine layer clears with 32.5 amps at 1 pm and an outside temperature of 60 degrees F:

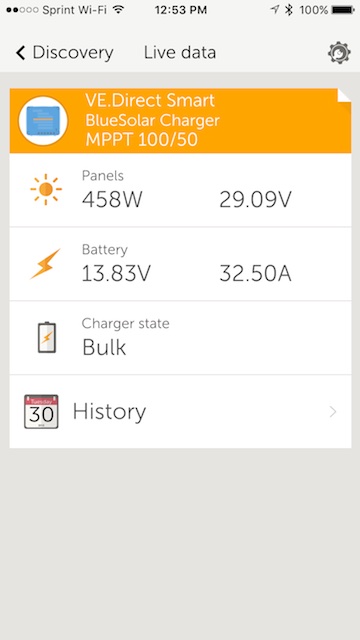
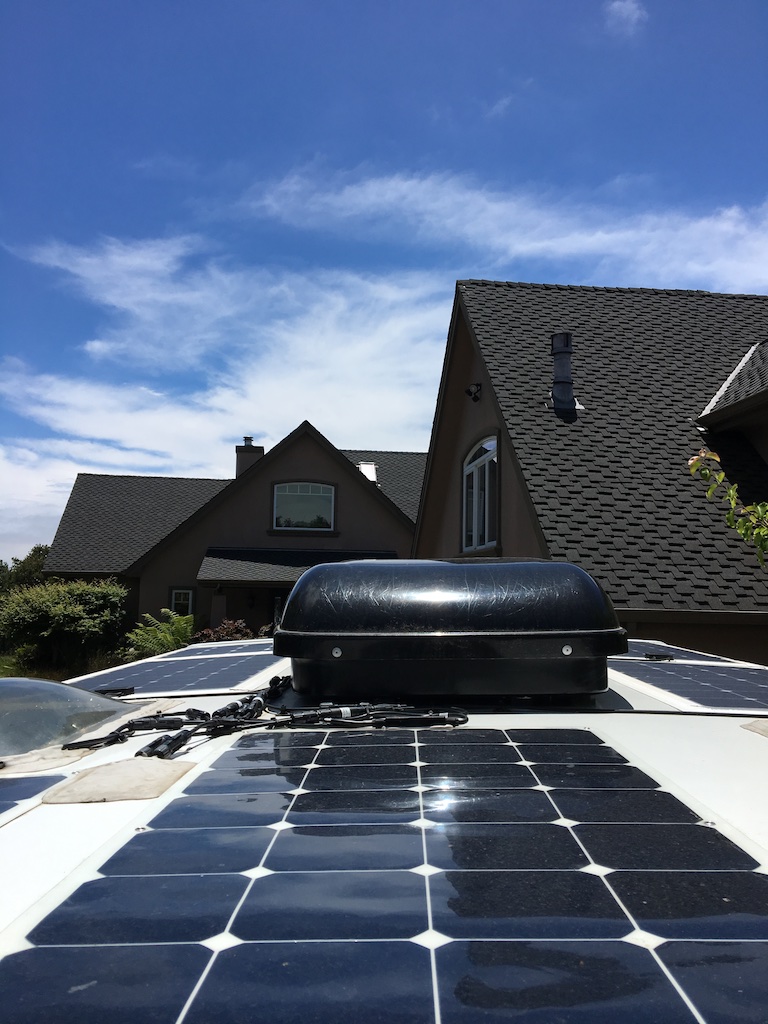
This is in Santa Cruz at about 37 degrees N latitude and on May 24th, which puts the sun at an angle of 73.9 degrees. With my panels on the roof pointed up at 90 degrees, that means the sun is hitting them at 16 degrees off of the perpendicular – so, not surprising that I’m not seeing a full 600W but over 30 amps is great!
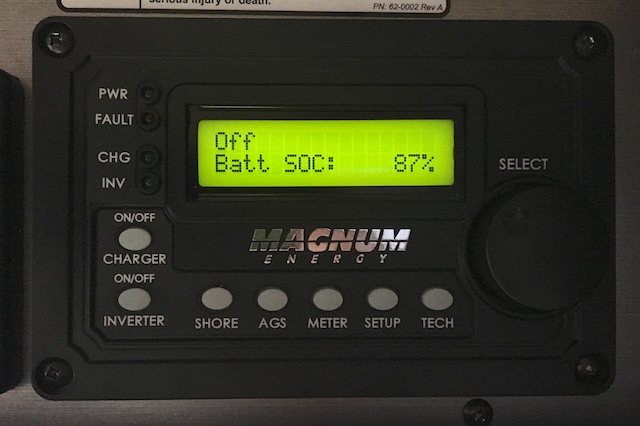
Install battery monitor
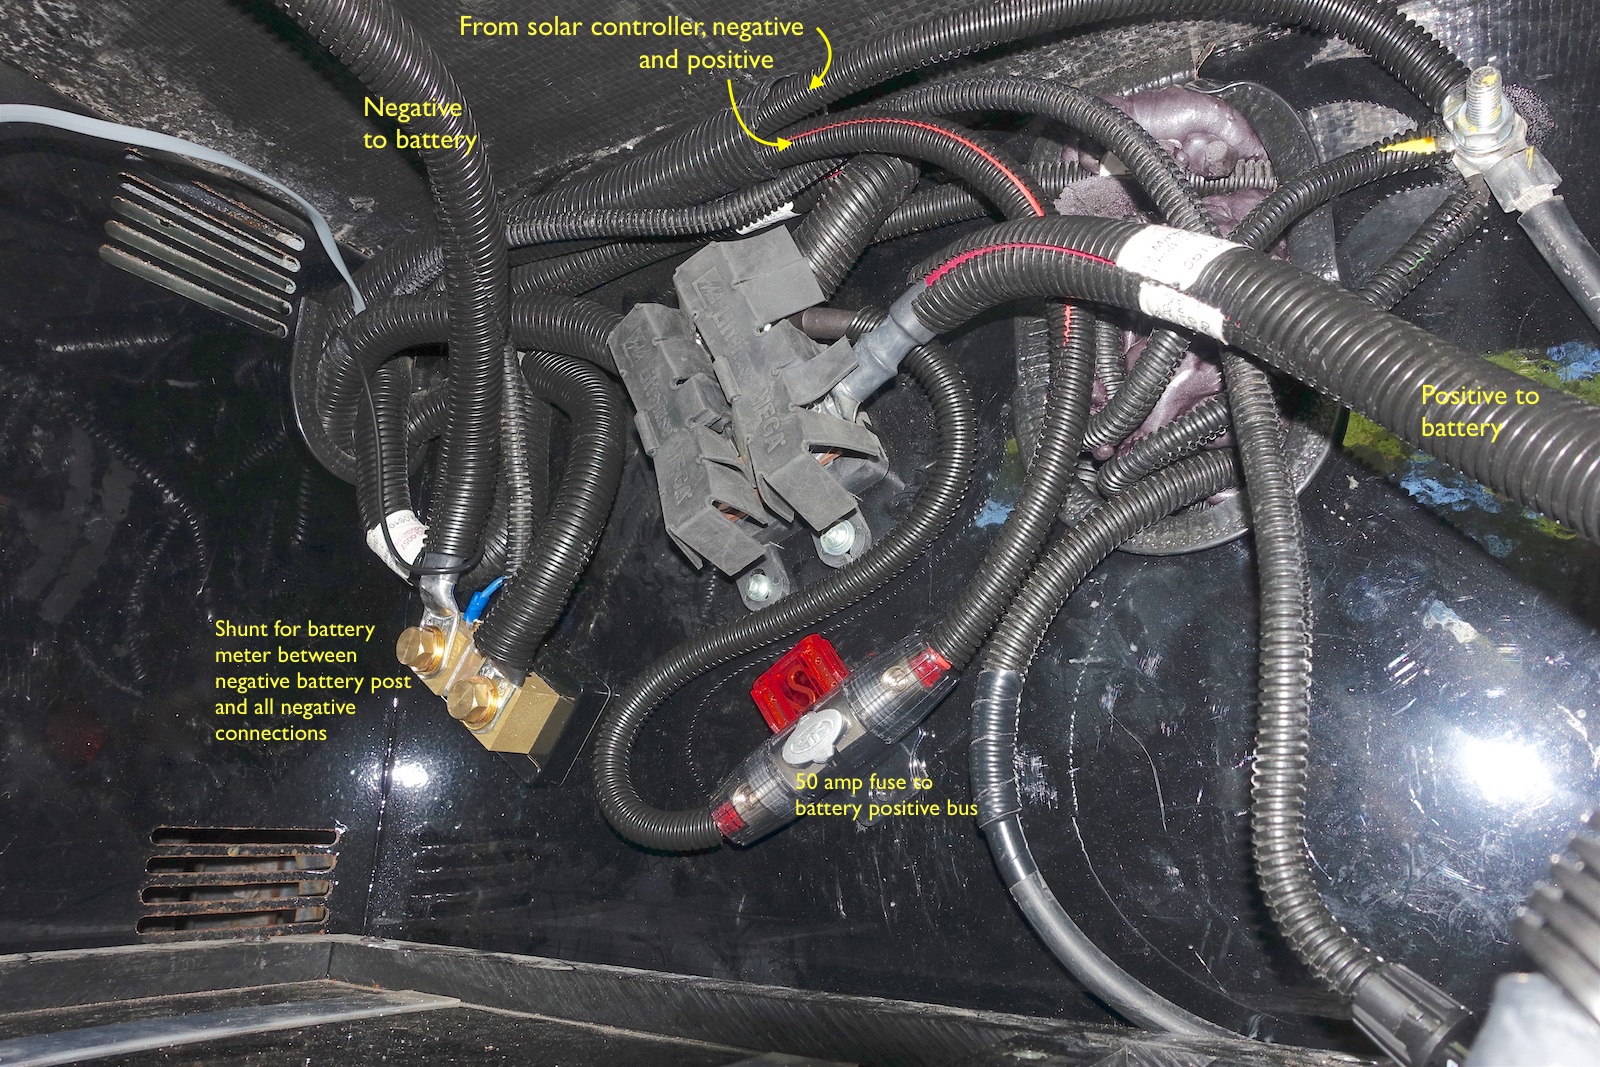
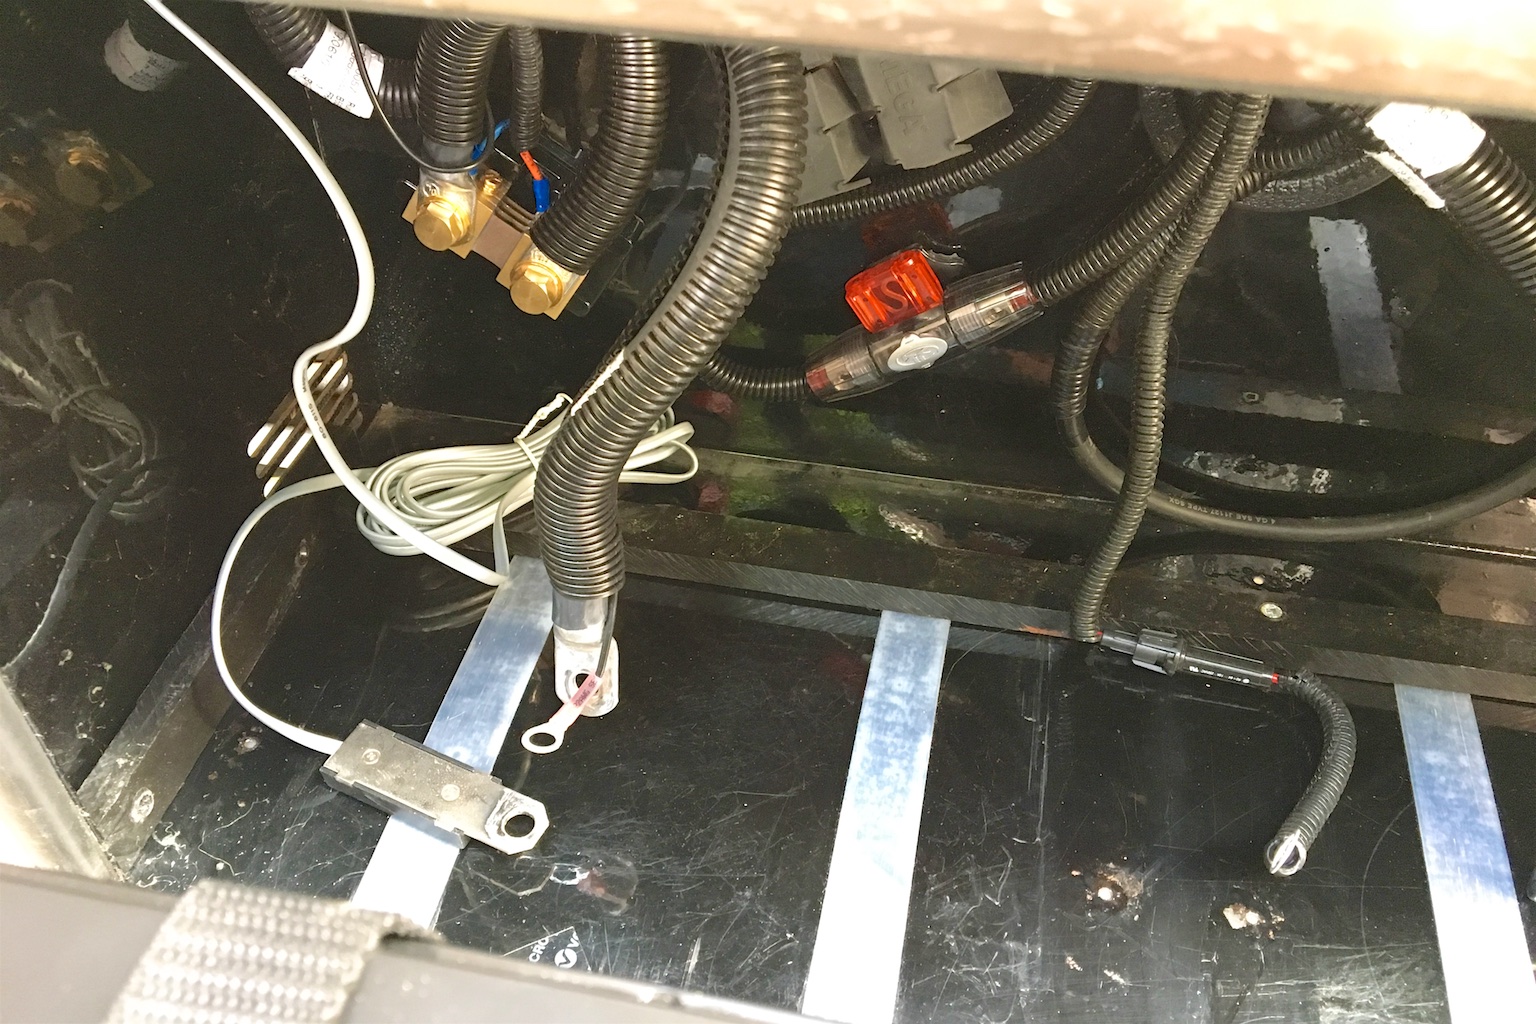
While upgrading my solar charge controller (above), I also installed the Magnum ME-BMK battery monitor kit that works with my existing Magnum ME-RC50 remote panel. This involves installing a “battery shunt” between the battery bank’s negative post and all other connections to monitor all energy going into and out of your battery bank – providing a much more useful estimate of your available state of charge than you can get from a voltage reading. It’s really tough to know how much charge you have from just a voltage reading since it varies so much between when something is drawing charge to when it’s being charged or when it’s been at rest a while. With the battery monitor kit installed, the remote panel can now give a percentage estimate of charge remaining. Yay!
You’ll need to obtain an additional length of very heavy gauge wire to mount the battery shunt between the battery post and the negative bus. I found that my local West Marine store had what I needed and was willing to cut and crimp the needed connectors for me. You’ll also need a paired length of wires and inline 2 amp fuse to supply power to the module which I was surprised was not included with the wiring and harness for the leads to the shunt. I used 18 AWG. These power wires will need to be connectedly directly to the battery bank (according to the instructions) unlike everything else which will need to go on the other side of the shunt so that they’re included in the measurement of amps in/out.
As a reminder here: always fully disconnect the grounded/negative terminal first — and reconnect it last! That way if you should happen to inadvertently make contact with some part of the chassis while acting on the positive terminal, you won’t be completing a circuit and sending all that current through. Also, of course be careful not to let your tools make contact directly between the opposite terminals either.
Here’s some photos of my completed installation:
I installed the battery monitor module in the inverter compartment back behind my new Victron solar charge controller. I installed the shunt on the back wall of the battery compartment but I was a little concerned about whether it’s okay for it to touch the side of the battery since it’s my understanding that this shunt will get warm (or even hot?). I don’t see where else you can put it though as it needs to be very close to the battery. I’ve since installed a pair of smaller batteries (lithium-based) in place of these flooded lead acid batteries so this concern has disappeared.
Upgrade house batteries
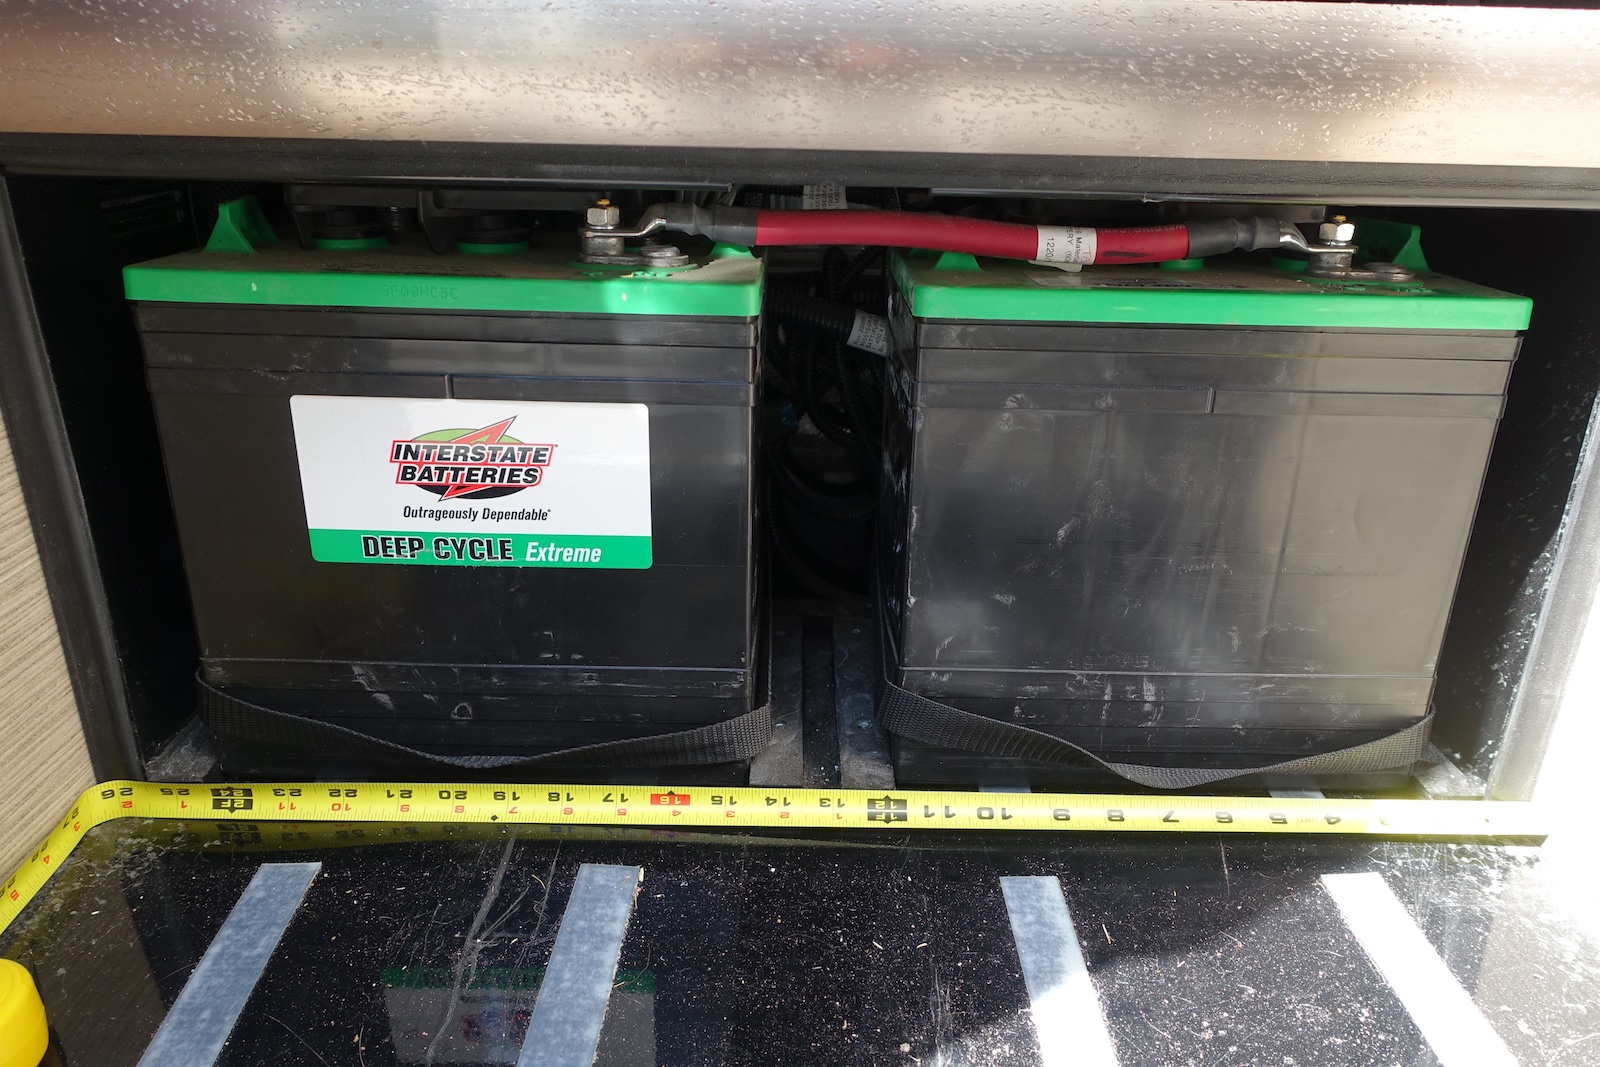 The two existing “group 31” size Interstate 6V flooded lead acid batteries should allow using about 115 Ah (half their rated 232 Ah), but that’s not a lot given my desire to not need to use the generator or have to plug in. I want to switch to a lithium-based bank: much more usable amp hours for much less weight, faster charging, no maintenance, and longer life than flooded or AGM cells. (Here’s a convenient web search on the topic and a nice summary by PrecisionRV here.) Now 250 Ah would be easy to swap into place in the existing battery compartment but perhaps more would be worthwhile… 400 Ah?
Here’s a couple of great discussion threads on this topic on the Sprinter-Source Unity forum: Replacing OEM batteries with LiFePO4’s and AM Solar lithium battery system install. Here’s another helpful thread: Where does one put lithium batteries if they won’t fit under the stairs?
One issue of concern with lithium batteries though is that many (some? most? all?) can’t be charged in freezing temperatures and so it’s necessary that they have some means of keeping warm enough when needed. When converting to lithium-based batteries, I see that some folks move their battery bank into the heated interior or add some mechanism to warm the batteries and I see that AM Solar adds a “cold charge disconnect” to their systems. Without a safety disconnect, my concern would be that, when the RV is parked and unoccupied for a while, the battery could become cold-soaked and end up getting charged via the alternator or the solar charge controller in below-freezing temperatures. (It also might get pretty cold in an outside compartment even while the vehicle is under way.) I’ve contacted a couple of drop-in lithium battery vendors to find out if they offer low temperature battery charging protection and here’s the discussion thread I created to present the answers I received: Investigating drop-in replacement Lithium batteries. Interestingly, StarkPower claims that their batteries can handle charging well below freezing temperatures.
There are a multitude of lithium battery systems for sale that are intended for RV/campervan usage. Custom battery systems: Victron Energy, Elite Power Solutions, Starlight Solar Power Systems. Drop-in replacement batteries: SmartBattery, StarkPower, Lithionics, Relion, NexGen.
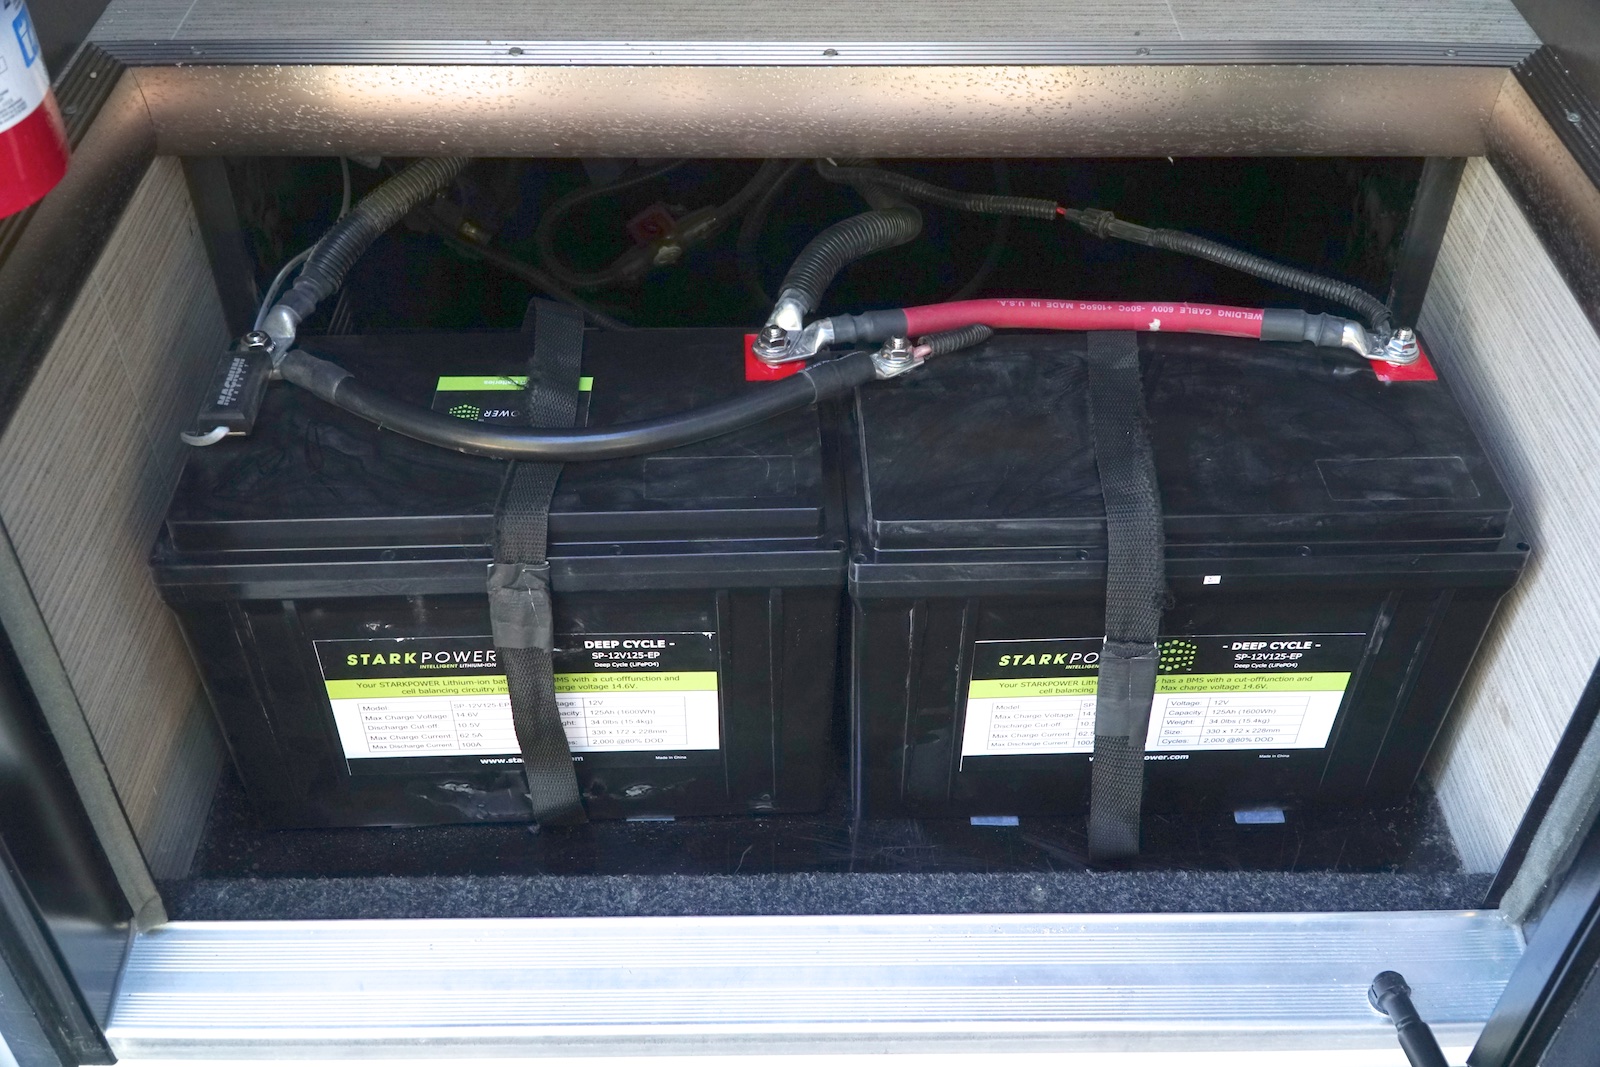
Update: Well, I did it! I ordered and installed a pair of StarkPower 125Ah batteries. These things weigh almost half as much as my original flooded lead acid batteries (70 lbs total vs. 130 lbs), they provide twice as much usable capacity (90% of 250Ah = 225Ah vs. 50% of 232Ah = 116Ah), they hold their voltage all the way down (unlike lead acid), they don’t lose their charge so easily and can be safely left partially charged, they charge back up much faster, they don’t need maintenance (watching water levels or worrying about sulfation), they don’t give off dangerous gases and they have much longer usable life (80% capacity after 2000 cycles).
I had to get an additional length of heavy gauge wire so that I could connect the two 12V batteries in parallel. (The original 6V batteries were of course wired in series to produce 12V.) As with the earlier battery monitor installation, I found the requisite wire and connectors at my local West Marine store.
As a reminder here: always fully disconnect the grounded/negative terminal first — and reconnect it last! That way if you should happen to inadvertently make contact with some part of the chassis while acting on the positive terminal, you won’t be completing a circuit and sending all that current through. Also, of course be careful not to let your tools make contact directly between the opposite terminals either.
The StarkPower 125Ah batteries are smaller depth-wise but longer length-wise than the original Interstate batteries so I had to move the little blocks that are supposed to keep the batteries from sliding around in the compartment. I first removed them all and then reinstalled the back bar forward an inch or so. I then mounted one bar on the wall of either side of the compartment. (See photo below.) Together, the batteries are too long to slide in past the opening so I had to file the opening to the compartment to make it a little wider. I don’t have an exact measurement, but you need to shave off a millimeter or two around where the top edges meet the frame of the opening. (The StarkPower batteries are wider at the top versus the bottom.) I reused the straps from the original batteries to give me something to pull on. Lastly I slipped one of the two remaining bars on the side to get rid of any play.


When I was making the battery terminal connections, I mistakenly tried to tighten them to a similar degree that the original battery terminals seems to be tightened to – as well as using the lock washers from the original battery terminals. This proved to be too much for the StarkPower terminals and one of them broke off on me. When I contacted them, they told me that they were looking into getting better terminals. To fix this though, they offered to just sent me a new top since that would be quicker and easier than sending back the whole battery. As a result, I’ve included a picture (on the right) of the interior packaging of the StarkPower batteries.
We’ve since taken the RV (aka, the Traveling Cat Adventure Vehicle) out for a nine-day trip to the Eastern Sierra and found that we tend to use about 15-20% of the 250 Ah capacity of the batteries overnight. That’s mostly consumed by maintaining the compressor driven refrigerator. And the batteries tend to be recharged again by late morning on the 600 watts of solar – mostly thanks to that wonderful MPPT charge controller upgrade.
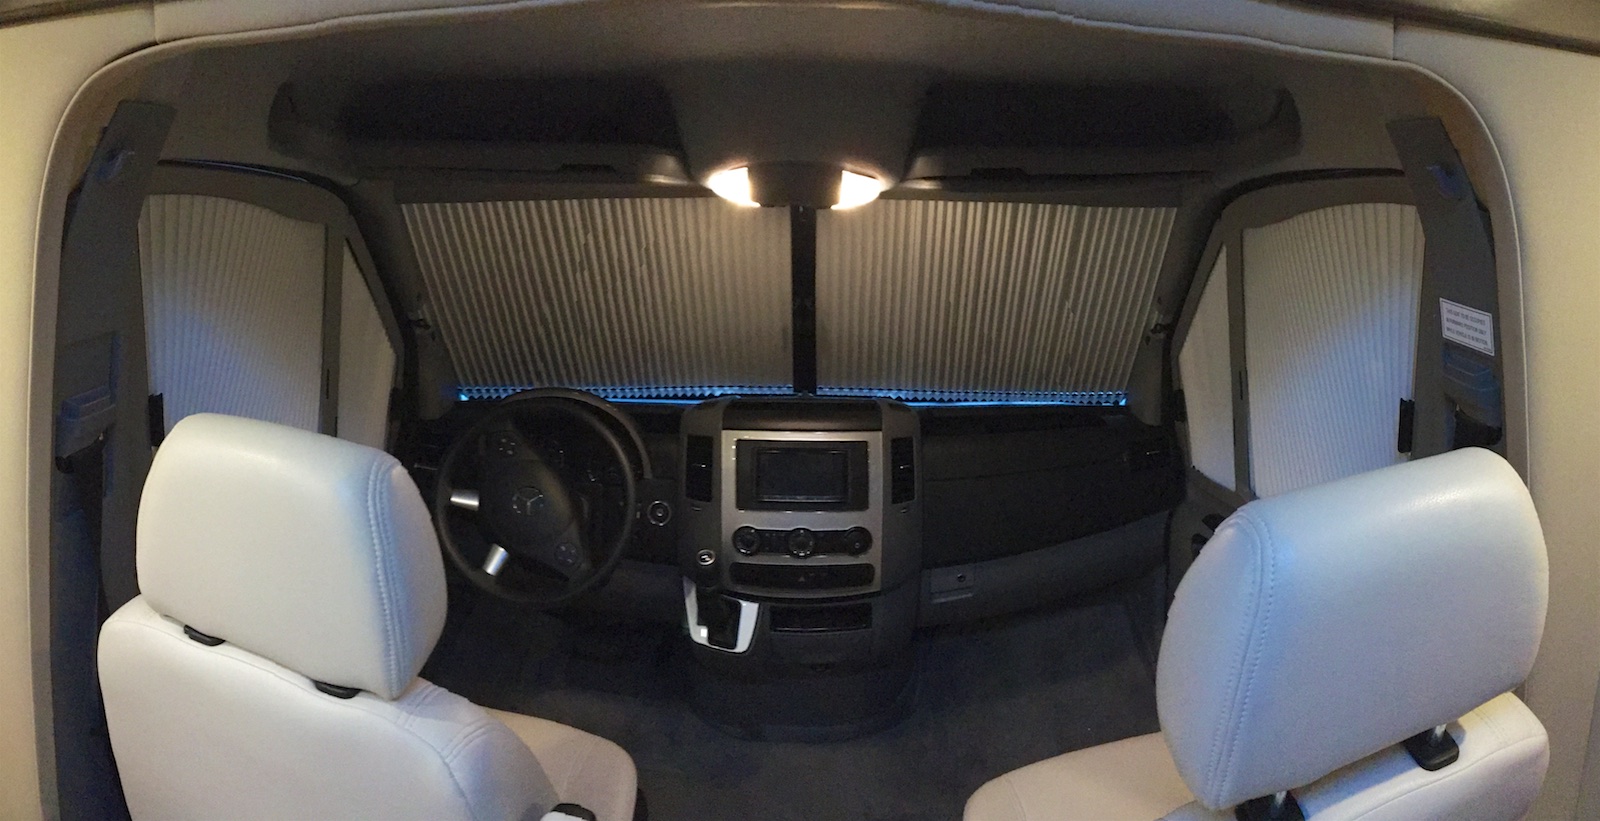
Install sliding shades in cab
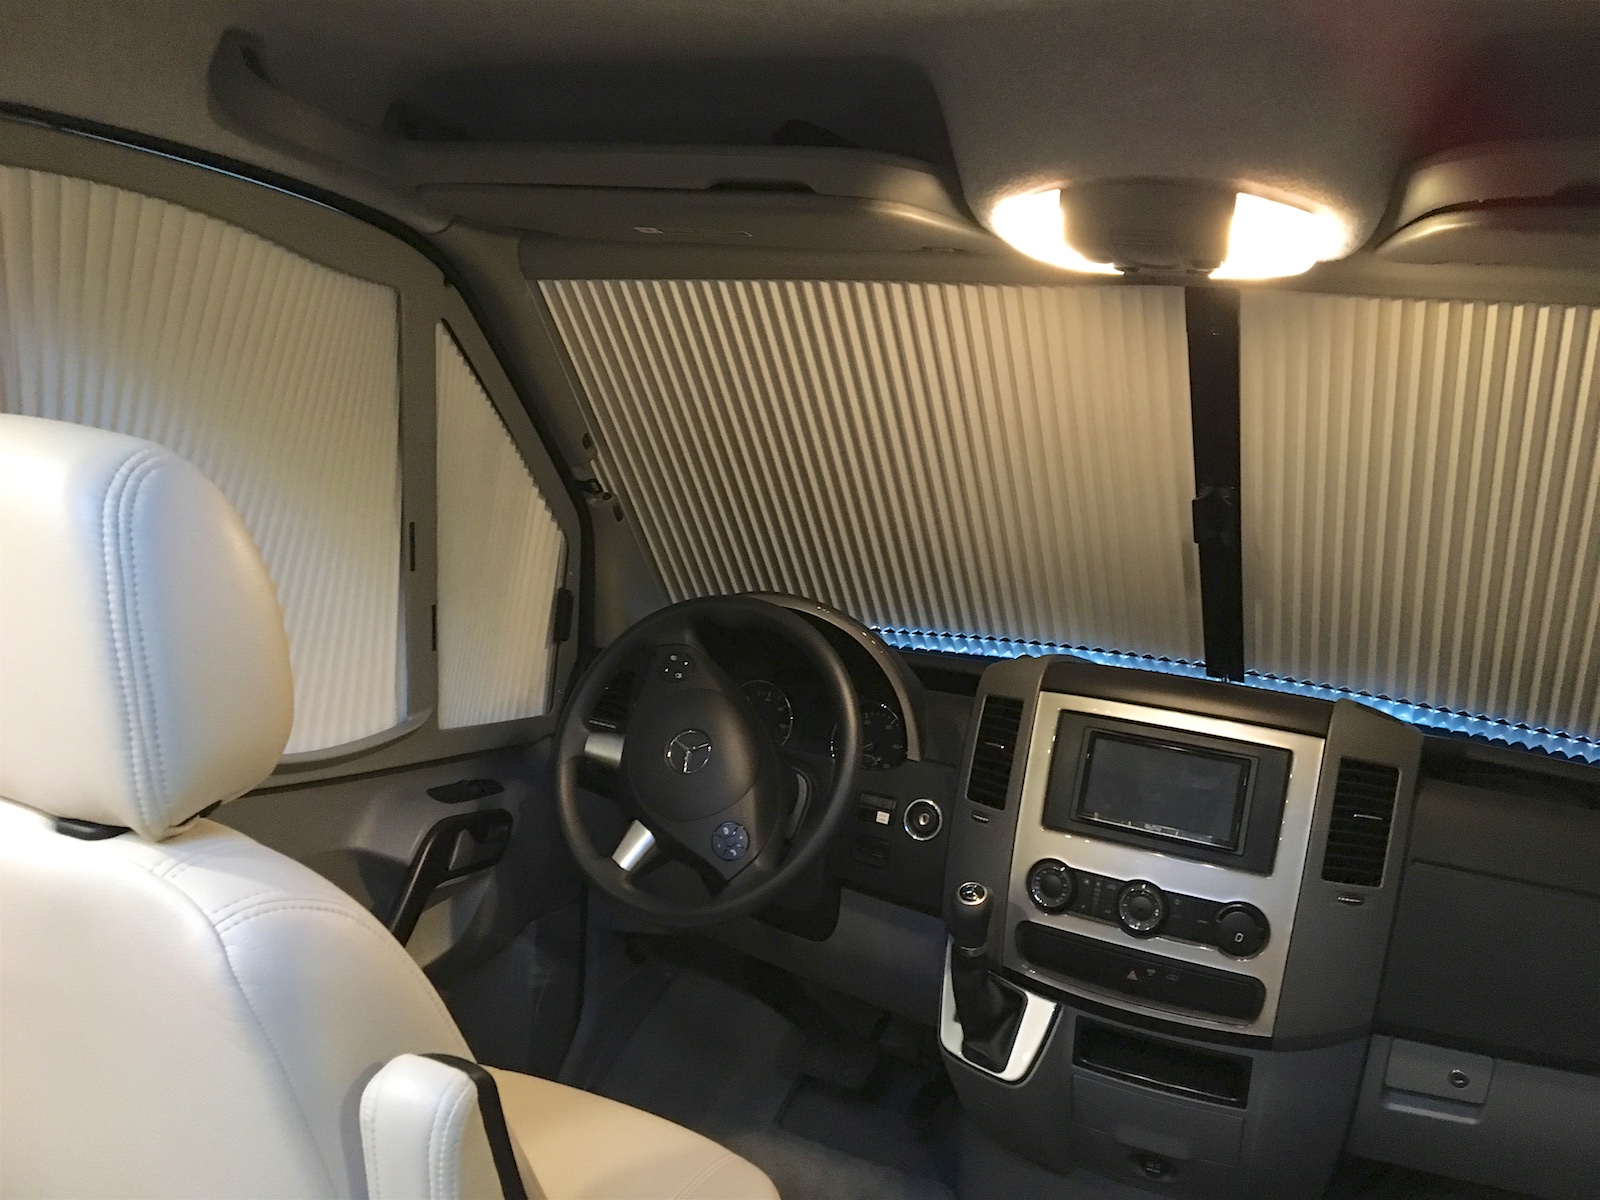
The factory-provided curtains are fine for privacy but they don’t help to keep out the heat of the sun in the summer or keep in the warmth in the winter. I initially bought a roll up, reflective sunshade designed for Mercedes Sprinter cab windows and that’s fine for the summer heat. (I kept it in the shower when it’s not needed.) However, there’s a much more slick upgrade possible: to install the Remis RemiFront blinds across the cab windows. Winnebago offers these on some of their models (like the View/Navion) and they’re really great and quick to open/close. Here’s a quick demo of them. You can order them from some European outlets or from Winnebago parts suppliers, like Lichtsinn RV, but I ordered mine from a supplier that lists them on Amazon. They’re not cheap though: the full set will run over $800 after shipping costs.
These are supposed to fit Mercedes Sprinter chassis 2008 and up (Remis part #’s 10021161/162/163), but I guess with 2016 and newer models there is a camera providing driver assistance features that requires a newer version. There’s a forum thread on this topic here. I have a 2015 model without that camera, so here goes….

Completed: Well, that was quite a hassle of an installation, but it’s done and the blinds work well. There were numerous steps that were quite a pain to accomplish and it’s a bit of a commitment to have to drill in to the steel frame of your doors to attach them, but the blinds are pretty slick and convenient in use. Much of the installation trouble spawned from the included instructions. The images (very small photographs) were often too small to see important detail and the terse, written captions left out important or clarifying details.
First off, be sure to identify the correct ends of the guide rods/tubes to glue together: look closely to identify which end of the rod is threaded on the inside and don’t glue that one on to the other! I unfortunately didn’t know better and spent a lot of time trying to fix my mistake later. (In the end, we had to find another bolt that would fit in the now ruined threads of one end of the guide tubes.)
Secondly, you may well find that the salvaged plastic clips for the replacement A-pillar pieces don’t quite line up with the holes in your A-pillars. As a result, when you go to snap the pieces in place you might yourself hearing them pop free and go tumbling inside the dash assembly. After several attempts (and having to take apart part of the dash to retrieve the clips), I wised up and used some duct tape to secure the clips in their flimsy holders. The passenger side eventually went in fine but I spent a lot of time trying to get the driver’s side to snap in properly and it’s still only half-secured because of the misalignment.
Thirdly, the instructions don’t make clear which guide rod (long vs. short) and which guide rod holding arm (short vs. extended) is supposed to go along the roofline or the dashboard. We eventually determined that the short guide rod had to go along the roof and the longer one below. As for the support arms/brackets for the rods, we put the extended one below and the shorter arm above as this kept the guide bar out-of-sight behind the provided roof trim piece. We also placed the bottom guide bracket in front of the speaker grille (not on top of it).
Fourth, in case this was not clear, you need to attach the rods on the passenger side by driving screws into the ends of the rods through the passenger piece. Also double-check that the bolts you’ll be screwing the rods to on the driver’s side are secure with the nut inside and triple-check that all the blinds are actually threaded through the bolt.
Fifth, be careful with how far you drive some of the screws on the driver/passenger side blinds (particularly the top screw) – parts of the plastic frame don’t actually make good contact with the door frame and if you try to tighten it until it does, you’ll likely warp and/or break through the plastic. Also, I recommend getting some small washers for most of the six screws that fasten the side blinds to each door frame to keep the screw head from breaking the plastic.
Lastly, given the trouble we had, Darlene thought it might help to not glue the two parts of the guide rods together at the beginning as directed but instead to wait until have you’ve got everything else positioned and fastened and then glue them together at the end.
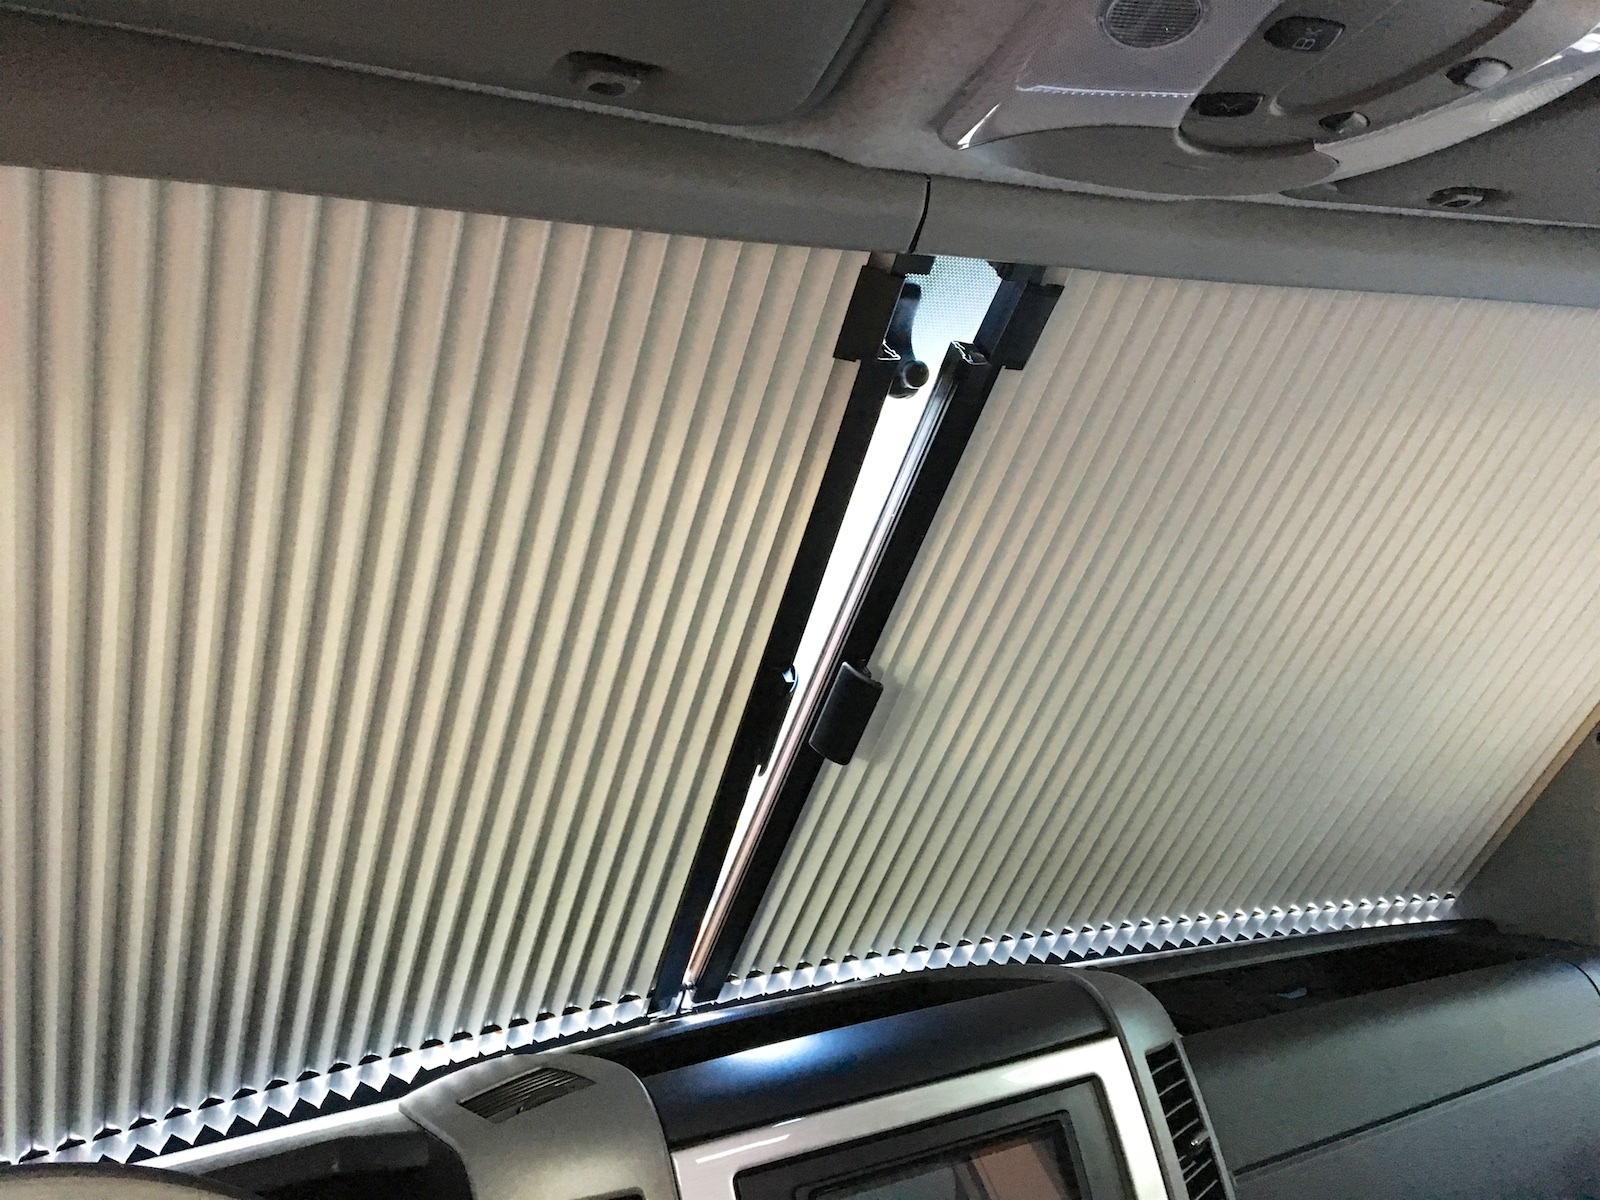
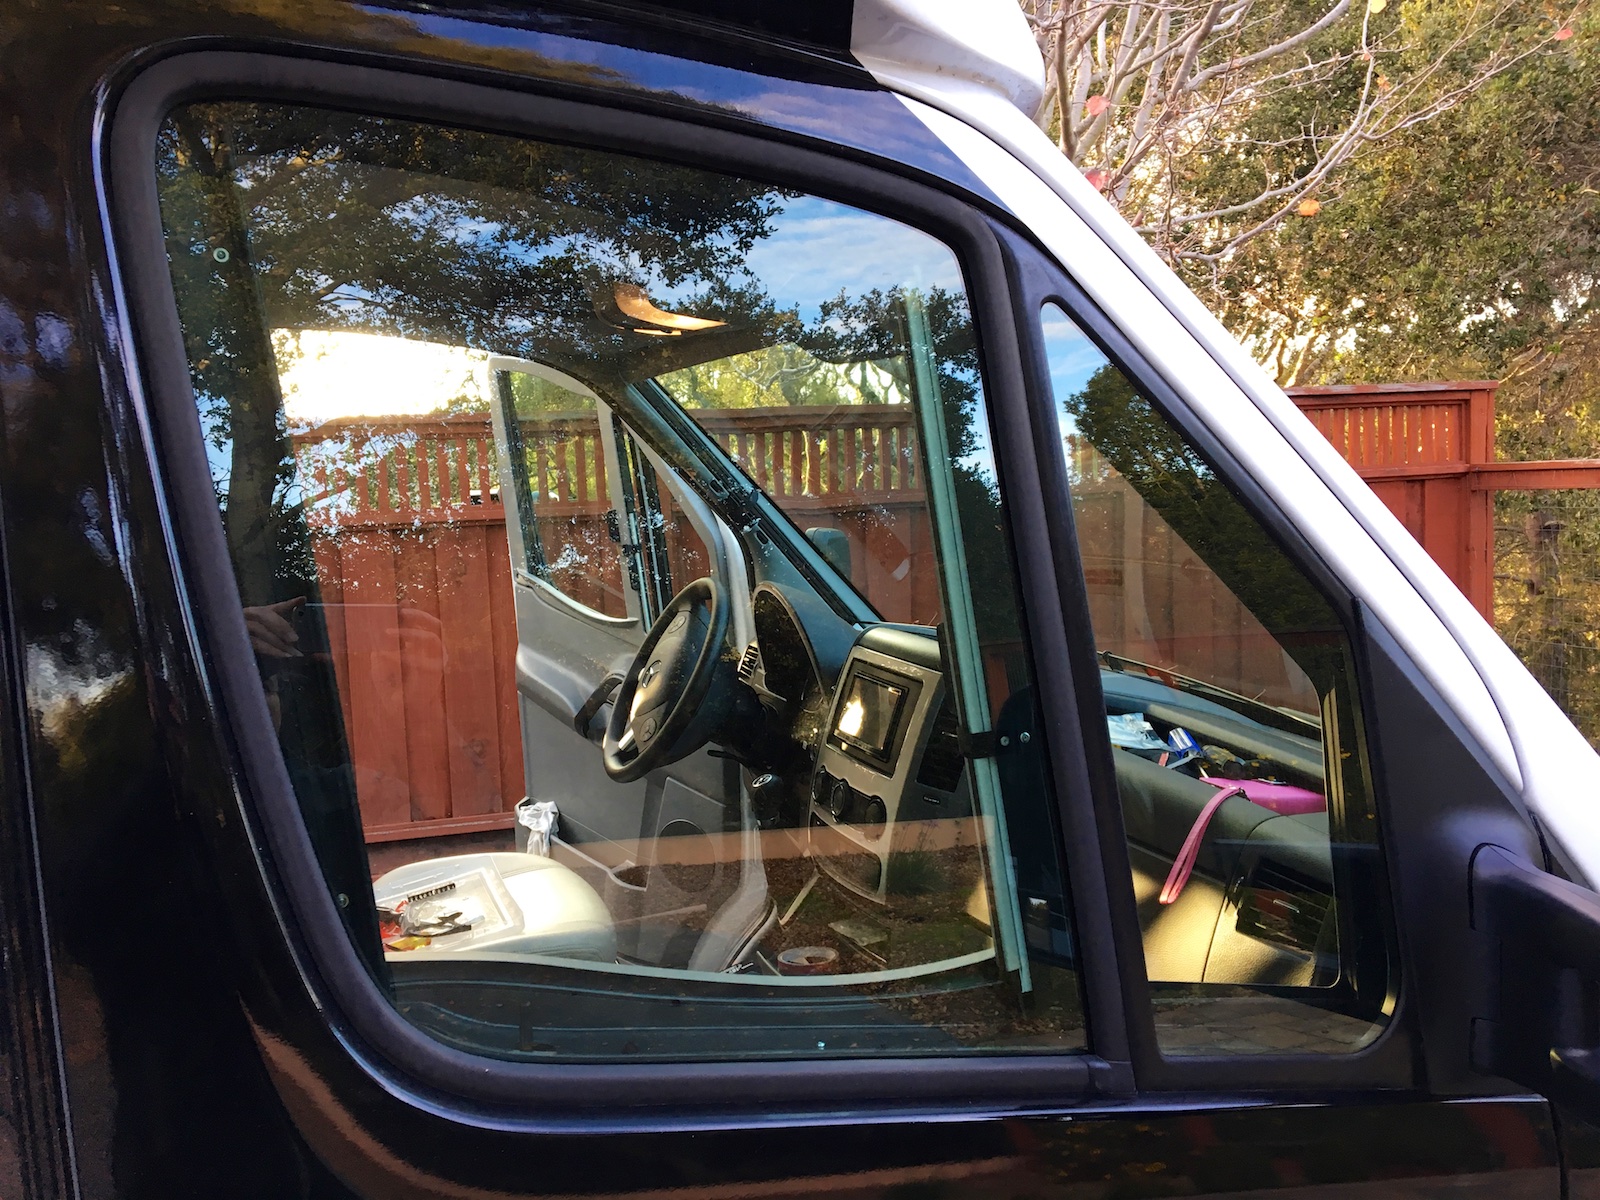
Curiously, the part of the blinds that give way for the rearview mirror holder don’t meet at the mirror holder as they should. (See picture below.) It doesn’t happen to be a problem for us since I was removing the mirror anyway, but it certainly isn’t right. We couldn’t see how this could be corrected because if you lowered the guide rod far enough, it would be visible below the roof trim piece. Are there differences in the mirror placement over the years? (This is a 2015 Sprinter chassis.) You can also see in these pictures what the blinds look like both inside and out when open:

For additional winter insulation, we also cut some Reflectix insulating material to fit the cab windows and tuck in between the blinds and the glass. I had already bought a nice, Reflectix-like insulated windshield shade that still fits in nicely behind the blinds when necessary.
There are a few things about the construction of the blinds I think could be done better, like how well several different portions of the blind frames meet up with the original cab frames – particularly given how expensive they are. And like the original curtains, they do add a bit of clutter to the cab area. Also, if you like to rest an arm in an open window, it’s not as comfortable with these installed. However, they are pretty slick and convenient to use. It’s very quick to slide them open and closed. It’s a mixed bag though, so I don’t whole-heartedly recommend them for everyone.
☞ This is one of those things that I think Leisure Travel Vans should offer as an optional extra, as Winnebago does, although perhaps it’s some of the issues I encountered that keep them from doing so. Apparently they used to and then stopped offering them.
Replace propane refrigerator
The existing fridge (Dometic RMD 8555) is a common motorhome “three-way” (AC/DC/LP) that uses an ammonia absorption process and a heat source (like burning propane) to provide the cooling mechanism. Unfortunately, to avoid clogging or even damaging the system, this design requires that the fridge (and thus the RV) be kept level when in use, which is an extra hassle when wild camping or just parking on a slope. Their advantage is needing very little battery power when operating on propane to generate the heat but they don’t work well and are very inefficient when running on battery power alone, requiring something like 267 Ah over 24 hours.
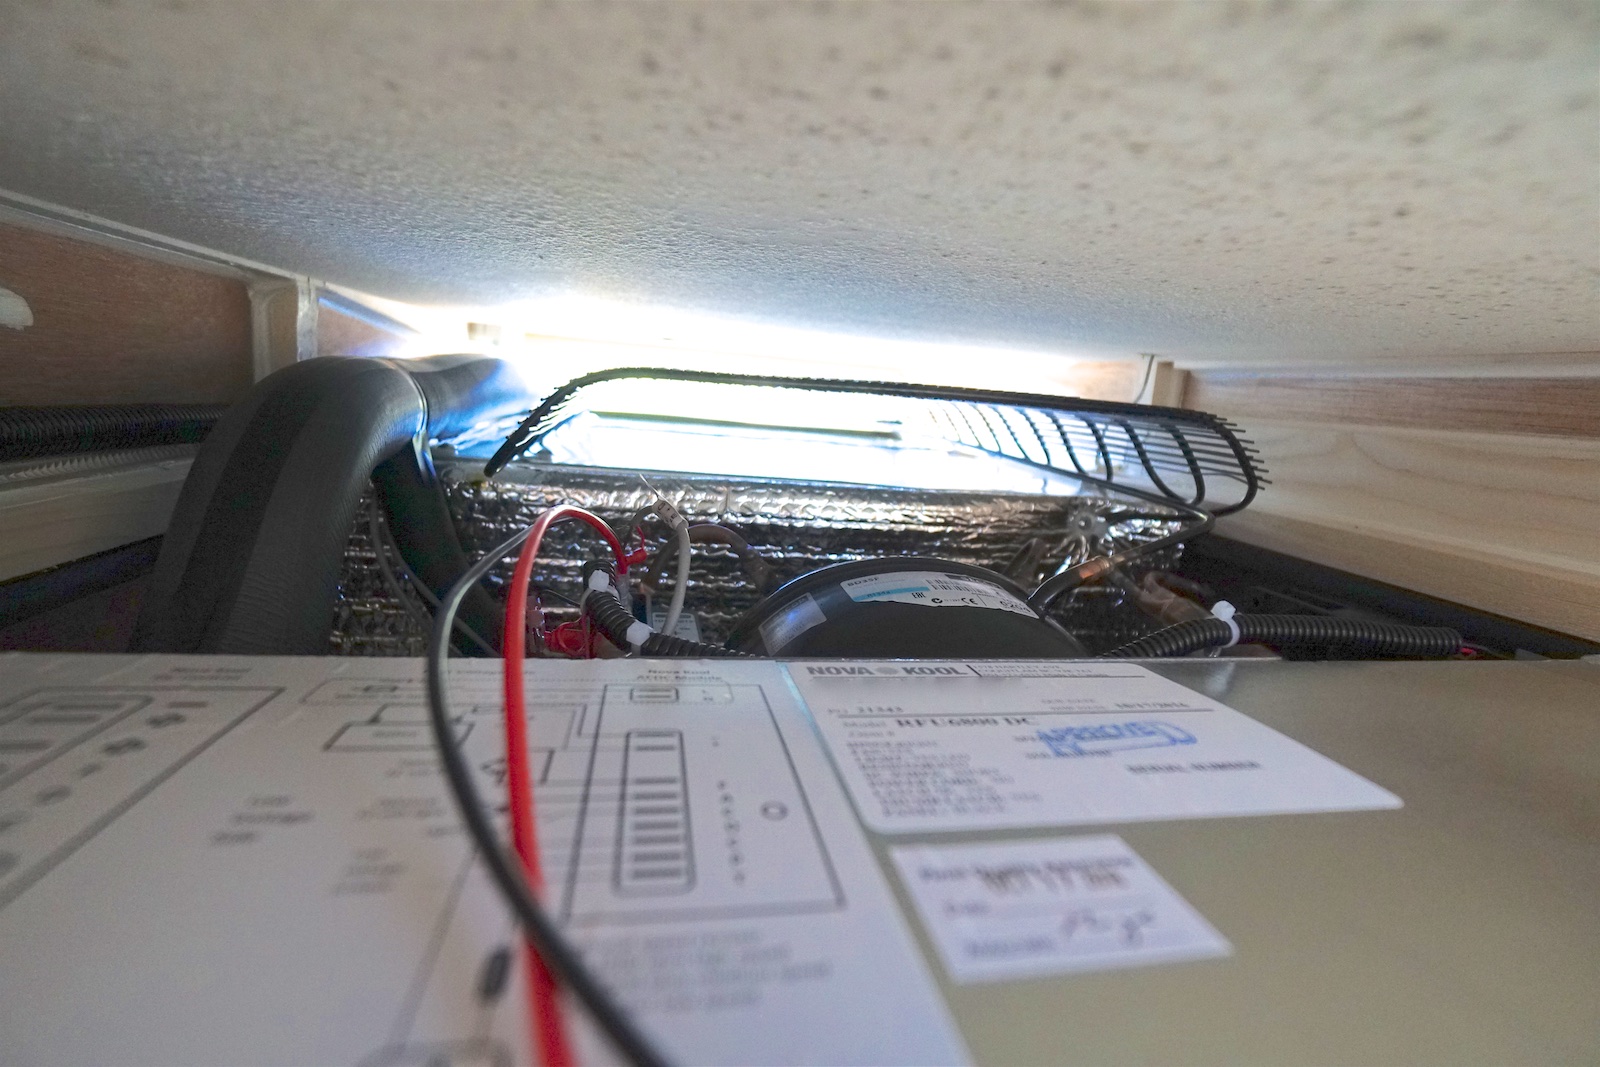
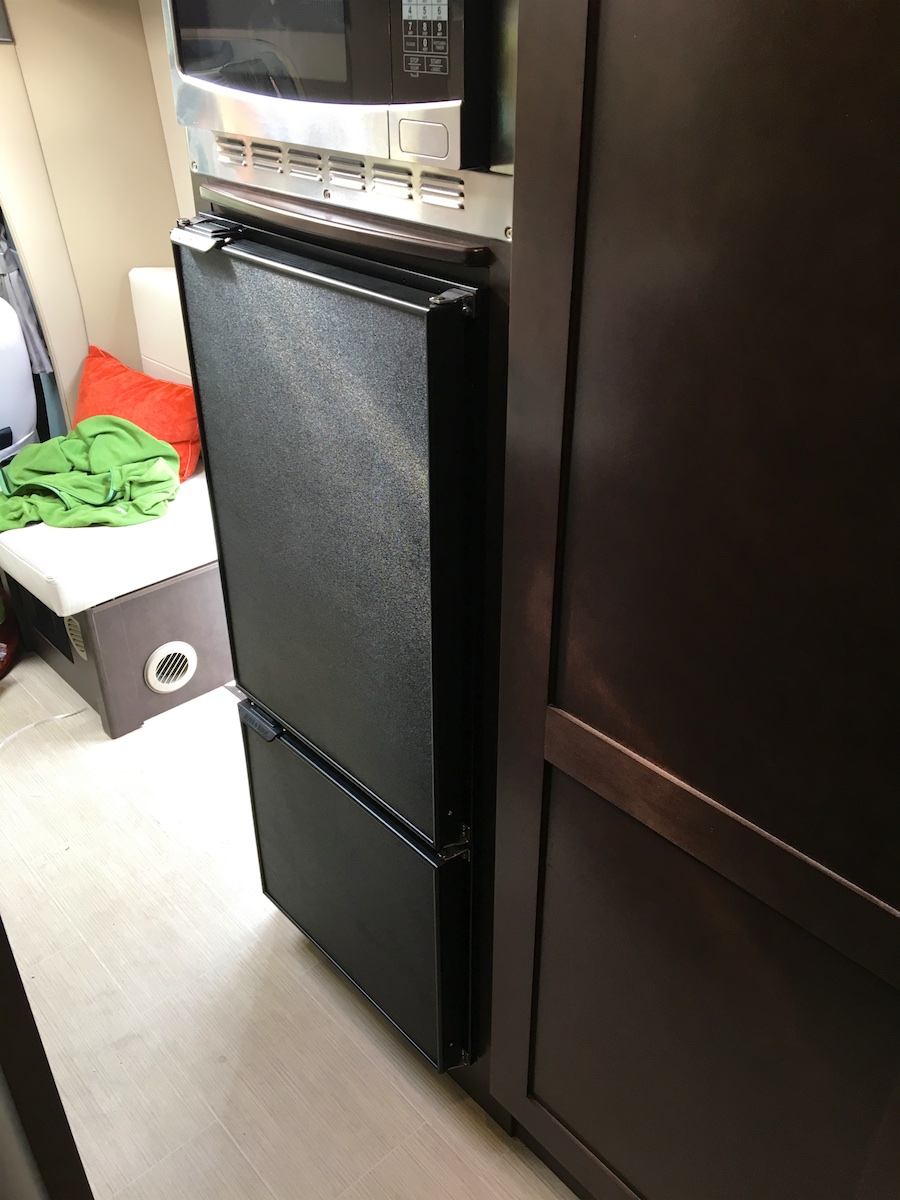
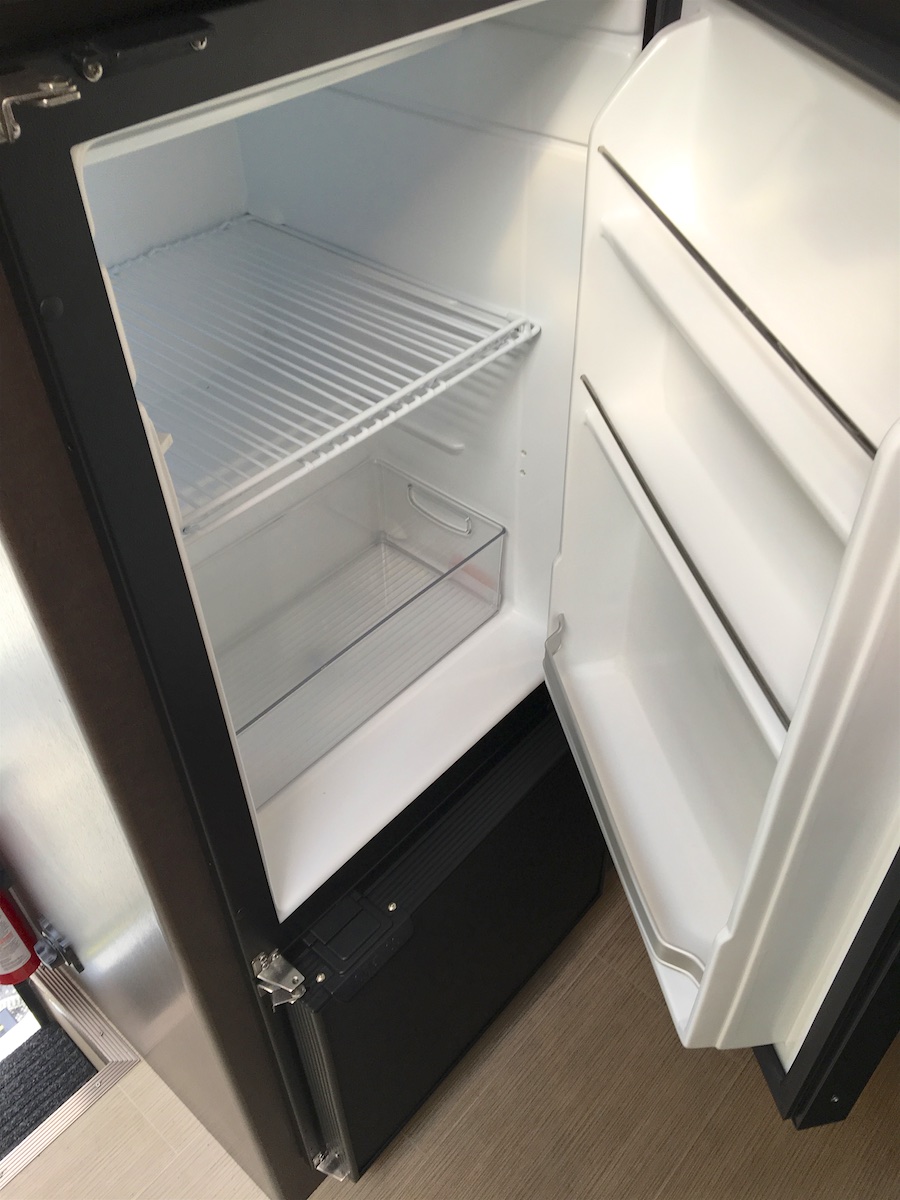
In the interest of converting over to mostly electric, I’ve ordered a Nova Kool 6800 DC compressor model which supposedly uses only about 60-80 Ah over 24 hours and I’m looking forward to swapping out the Dometic. (As a bonus, the refrigerator portion is on top and more easily accessible… yay!)
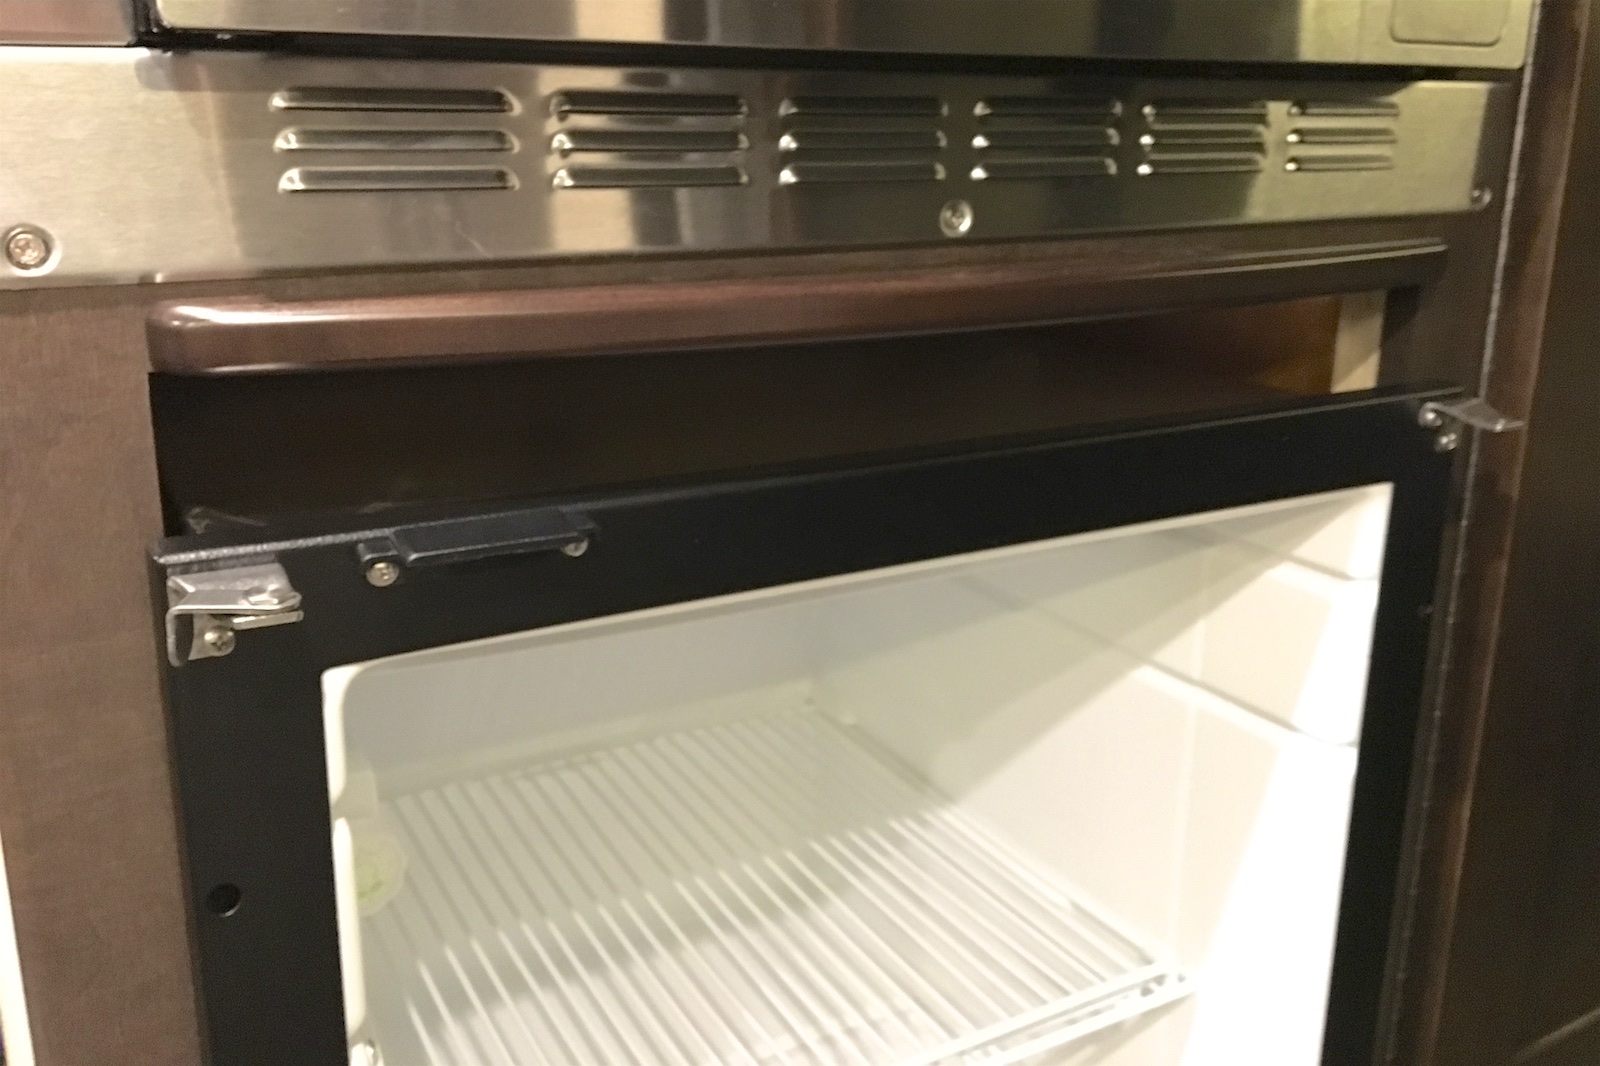

Completed: Well, the installation is finally finished and it’s working well but it was a bit of a hassle to put in and there are a few caveats to be aware of. Since the Nova Kool 6800 unit is a bit smaller in height and width than the original Dometic 8555, it was necessary to build a little platform to take up some of the vertical space. I originally built a platform to take up all of the excess (about 1 1/4″) but then this caused a problem getting the rear of the unit to fit into the original frame behind the fridge. It’s a really tight fit back there – but at least it does fit as is if you position it at the right height above the original cutout floor.
I had to lower the platform and make a little trim piece above to fill in the gap up front and along one side of the unit. Then I discovered how irregularly shaped this thing is. The middle top and sides of the unit bulge out by a quarter inch or more (which is about half the width of the unit’s frame in front). I had to redo the trim piece above and eventually forgo the side trim piece entirely because the middle bulges just wouldn’t let it slide in. To close up the gaps behind the frame in front, I used black insulation tape all around.
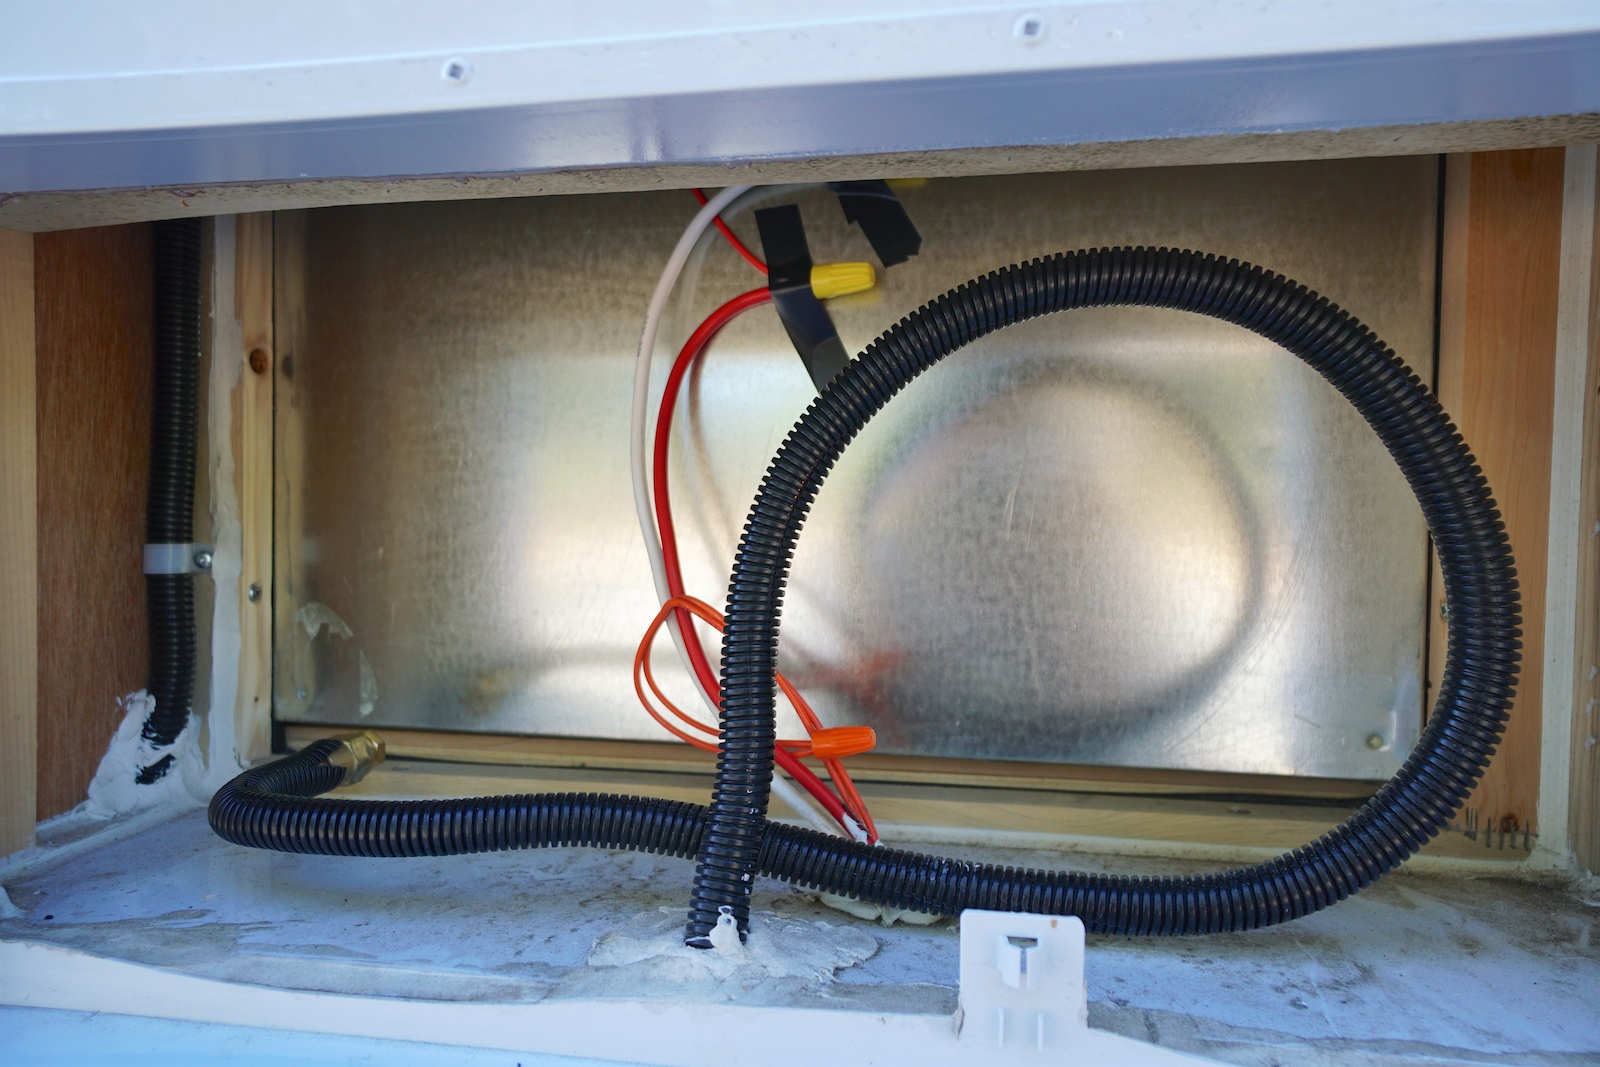
The provided 12V leads weren’t long enough to reach the coach power leads so I replaced them with longer lengths as well as removed the odd piggyback wiring for the interior fridge light. I forgot to take a picture of the back of the unit before finishing the installation, but the rear of the Nova Kool is not a solid block like the original Dometic. There’s a large inset portion behind the fridge block to make room for the compressor so this means that the warm air is going to circulate around the sides of the fridge in the cabinet. I’m contemplating using some adhesive sheets of heat insulation to hopefully mitigate that to some degree but I’ll have to pull the whole thing out again to do that. I’ll update this with pictures of this if/when I get around to that.
Paint matching: By the way, I found a pretty suitable match for the “Espresso Brown” interior decor of my LTV Unity with Benjamin Moore’s Regal Select matte paint in Mink (2112-10), available from Ace Hardware.
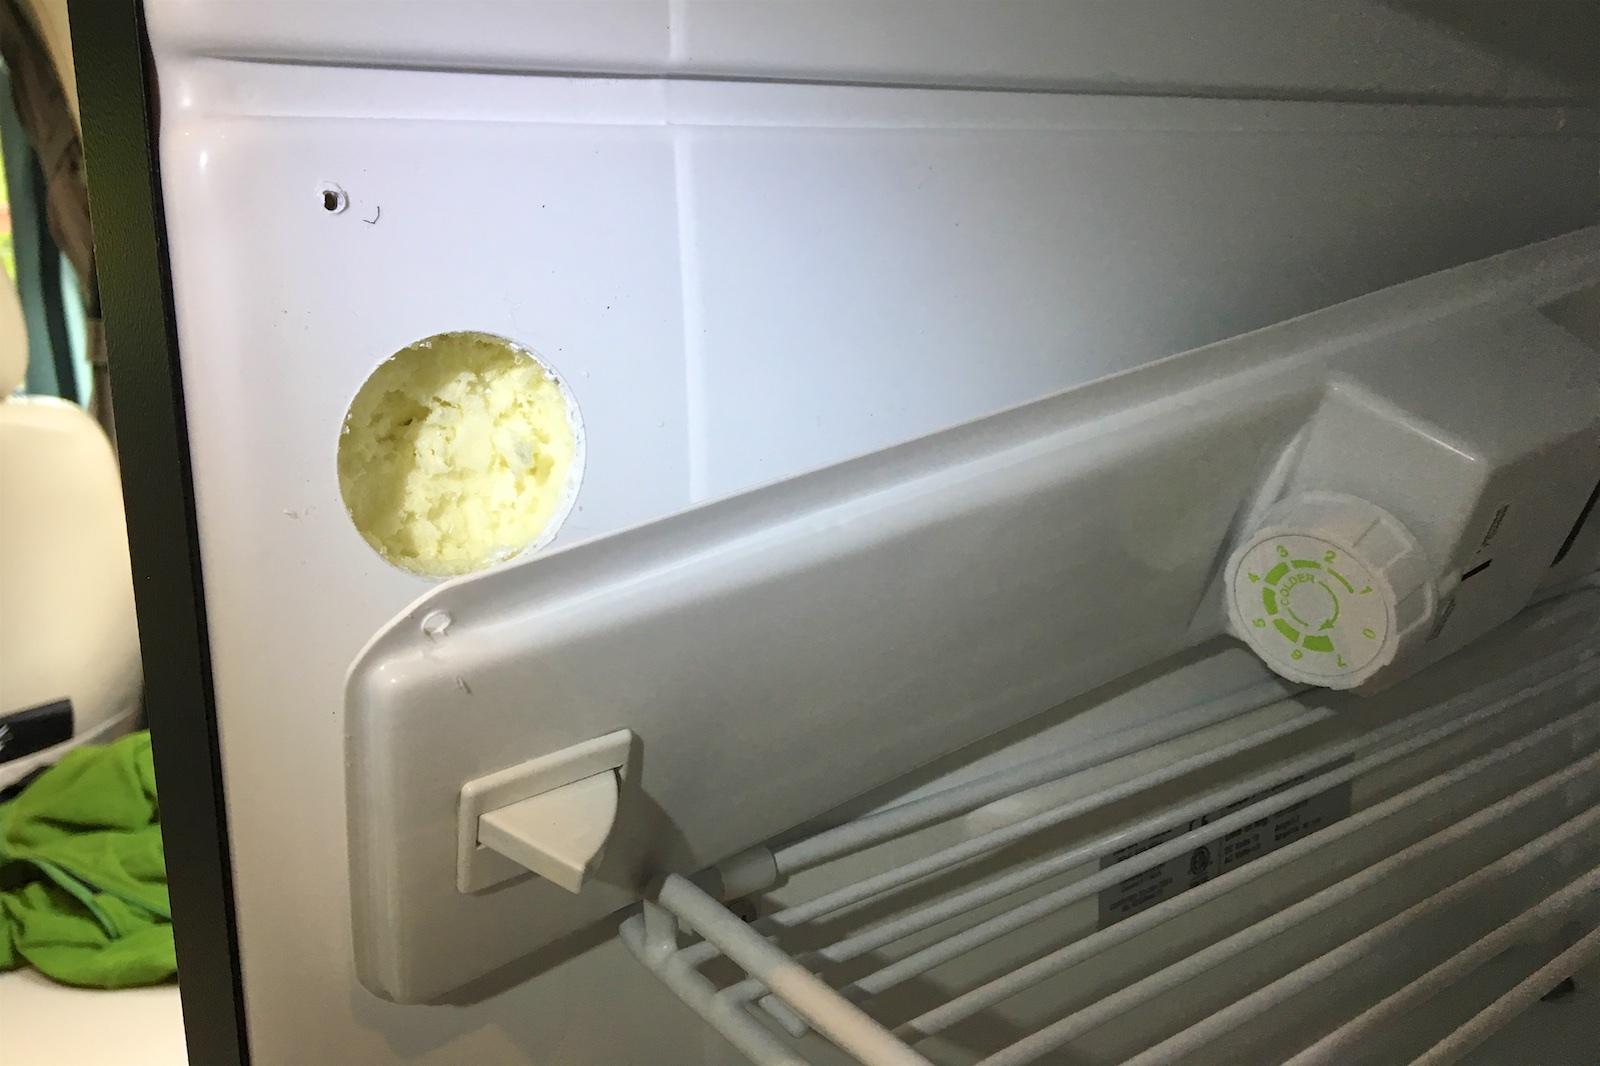 Unlike the frameless Dometic unit which screws into the surrounding cabinet frame outwards from inside the body, the Nova Kool unit is designed to be secured via screw holes in its front plastic frame to the front of the cabinet. Yuck. Even if I were willing to screw into the front of the cabinetry, the existing opening is a little too big anyway and because of the bulging sides, I couldn’t make a trim piece thick enough to be able to screw into it. So I secured it by using the two bottom screw holes (since these were going into my added platform base and not the original cabinetry) and then I mimicked the Dometic by screwing outwards from inside the unit into the surrounding frame. I was even able to use an existing hidden hole behind the control panel on the left (pictured).
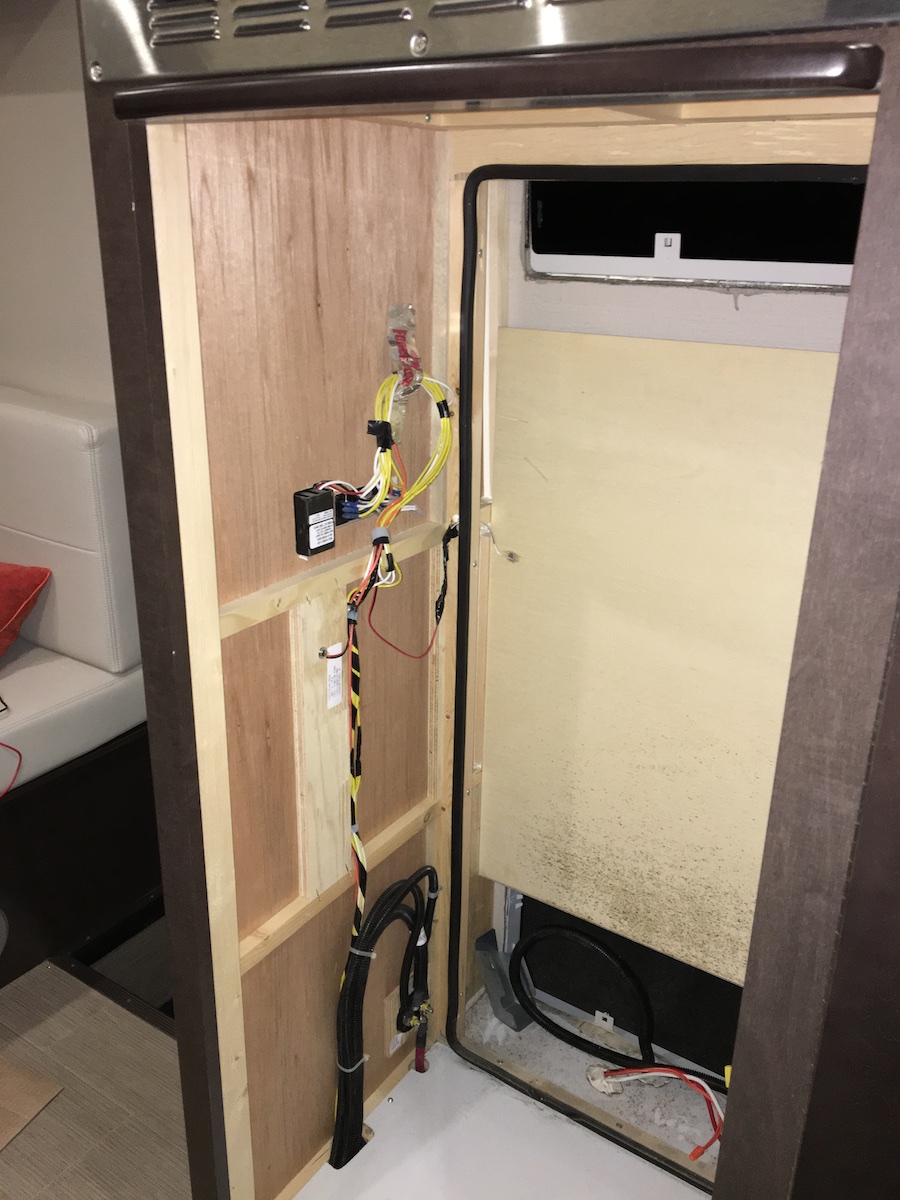
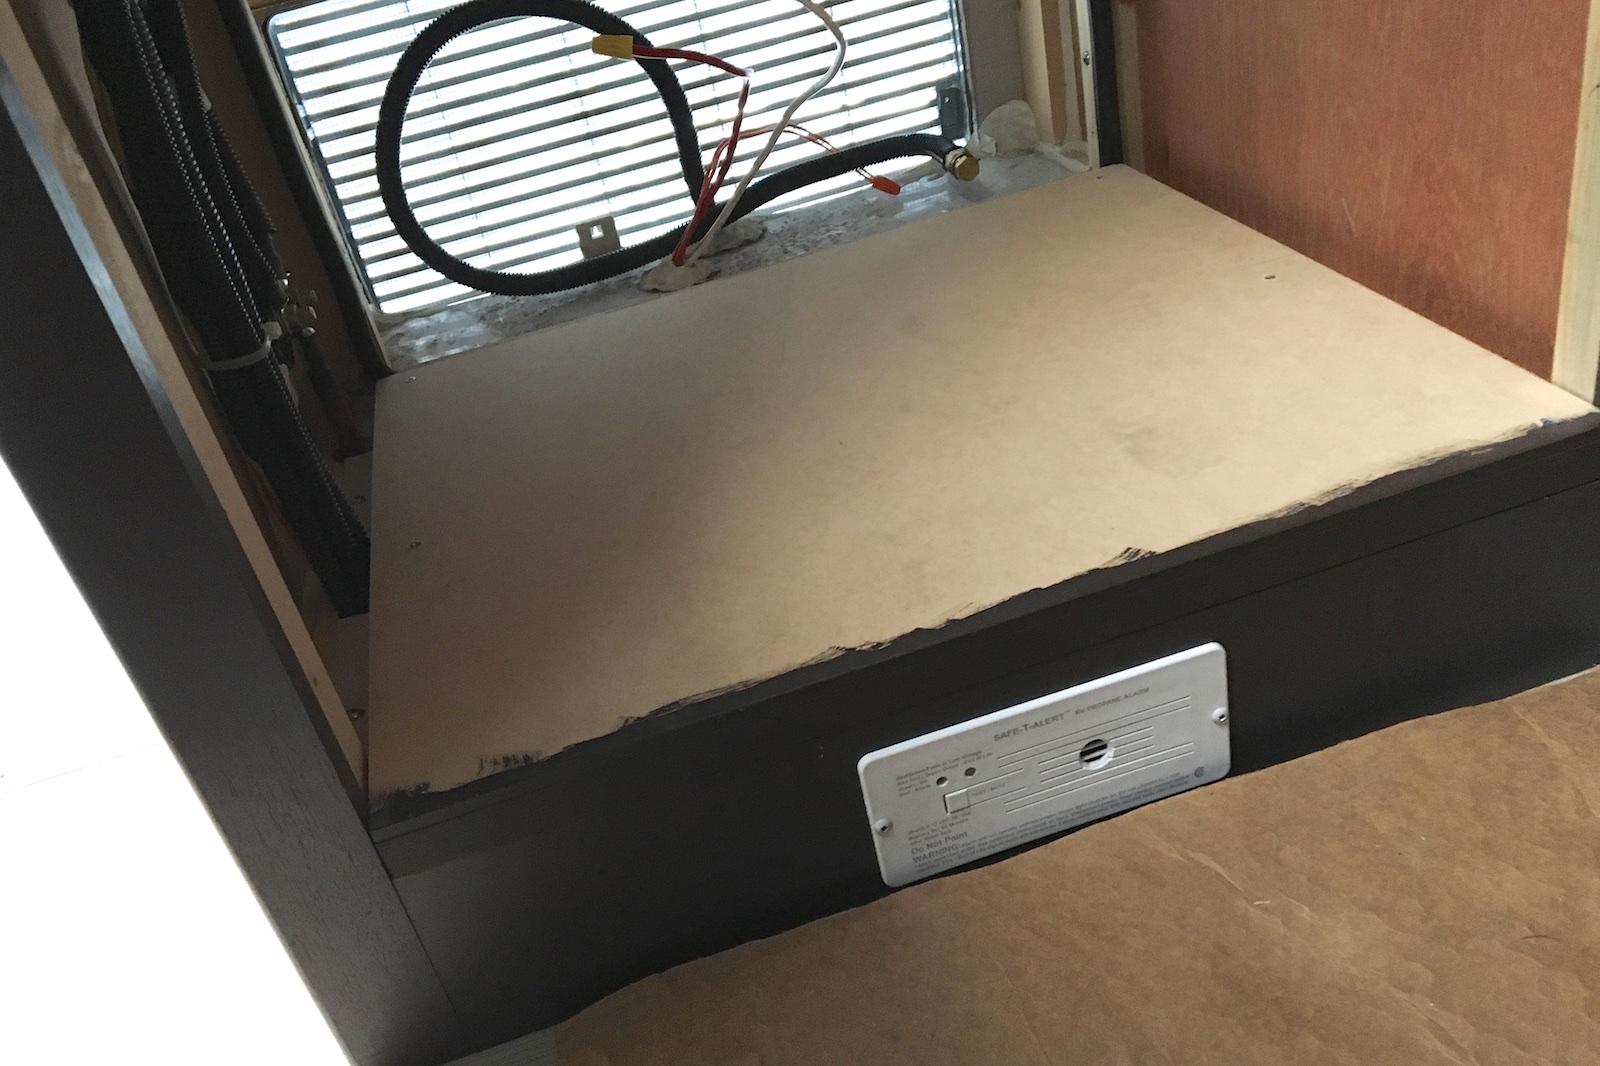
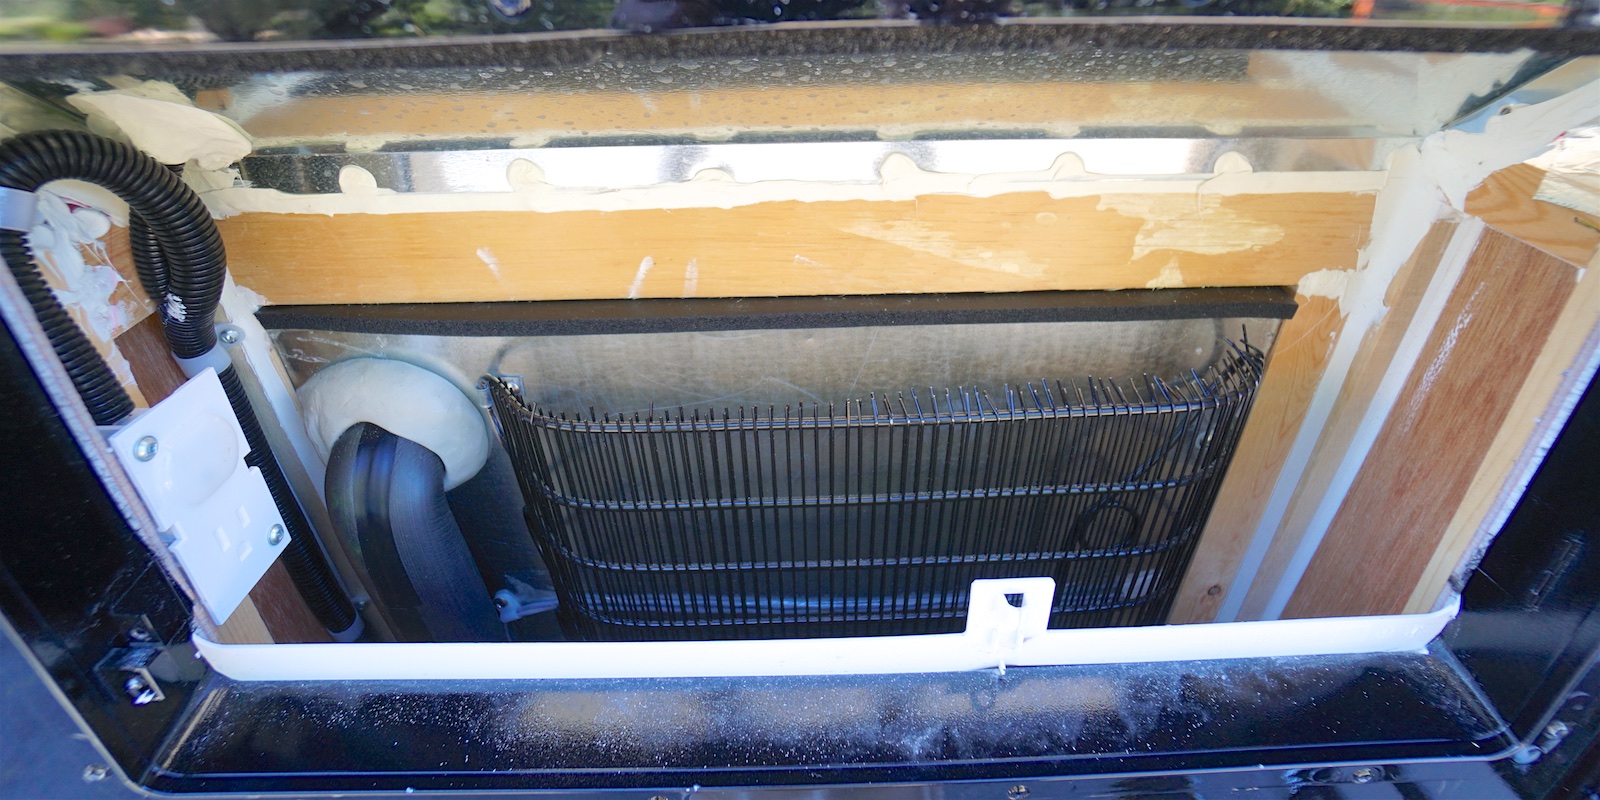
 So yes, it was quite the hassle to install it in the existing cutout but it does seem to run well in my initial testing. (See my update below though on having to rip out that false wall in the back of the compartment to allow the condenser coil enough room.)
I had to remove the semi-permanent bottom shelf to allow room for large common items like bottles of orange juice or milk cartons and I think I’ll need to fasten down the hinged openings in the wire shelf to keep it from rattling. Overall, I’m not impressed with the design or the clunky aesthetics or the apparent build quality. The refrigerator box is just held above the freezer box with a couple of metal straps on the sides, the uneven bulging of both boxes makes any cutout fit less than ideal, they use rounded-top rather than flattop screws all round so those all interfere with fitting it into a cutout as well, they give up a large amount of interior space in the fridge (rather than from the freezer) for the compressor in back, the front frame mounting system doesn’t work well since you can’t size the cutout to fit the unit very closely, the semi-permanent interior shelving (screwed in!) is not well thought out and well… this and more just doesn’t compare to the Dometic. Ideally I think I would prefer to have the Dometic 8555 in an efficient DC-powered compressor version. (Hmmm… I wonder how easily the Dometic could be adapted using the parts from the Nova Kool?)
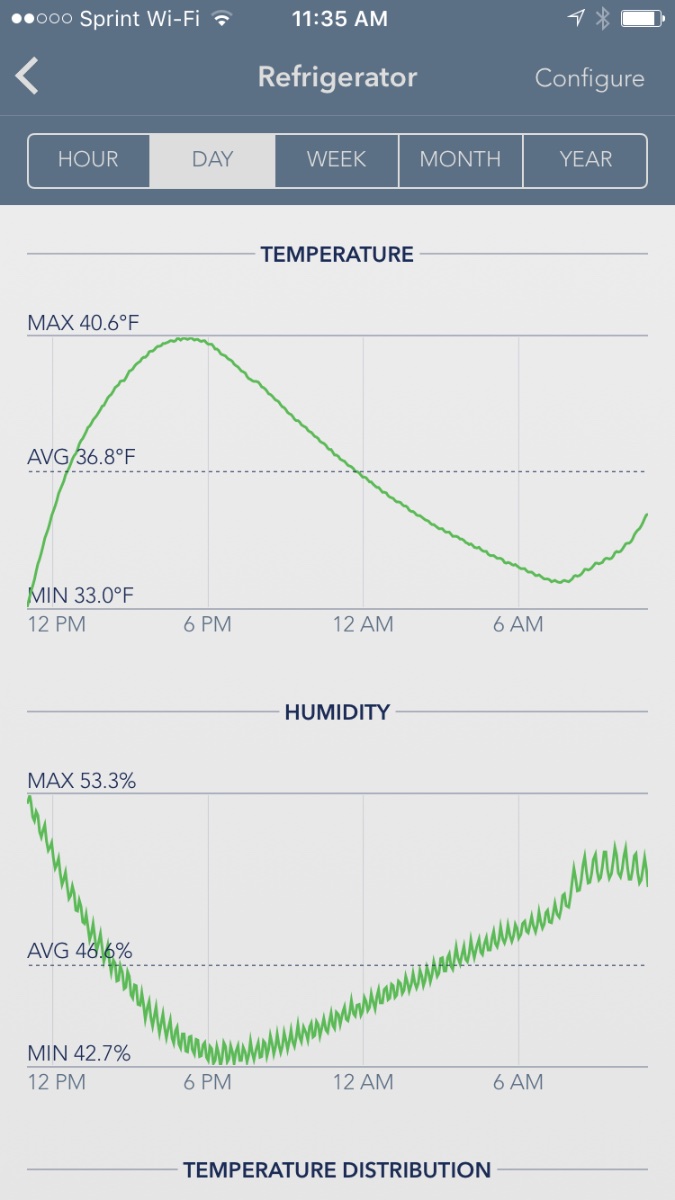
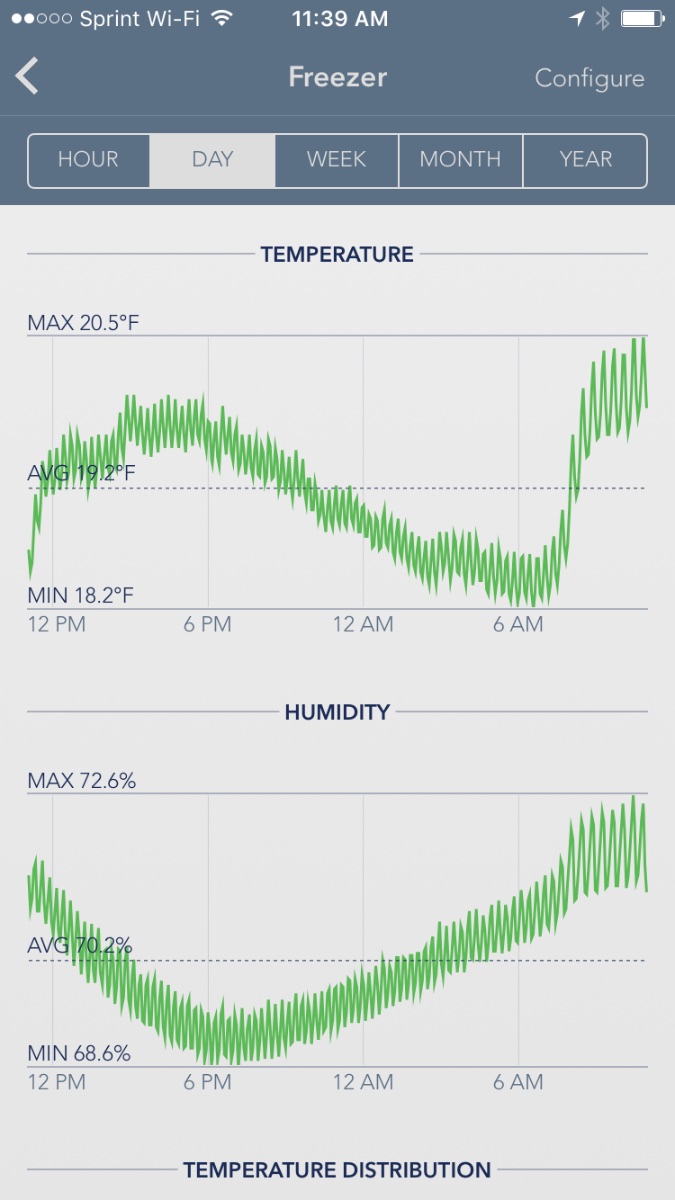 I was concerned about the potential noise of the compressor, but it turns out that it’s extremely quiet. It also seems to cool down very quickly and doesn’t run excessively, at least in the current mild weather. It pulls about 5.2A when it does run and seems to use about 15% of my 250Ah capacity overnight. Even in November at about 37 degrees latitude, there was enough from 200W of flat flex panels (about 6 amps) to charge things back up again by mid-day even while the fridge is left on. I now have 600W of solar with a great MPPT charge controller and 250Ah of lithium ion batteries so I should be fine even for multiple days without sunshine.
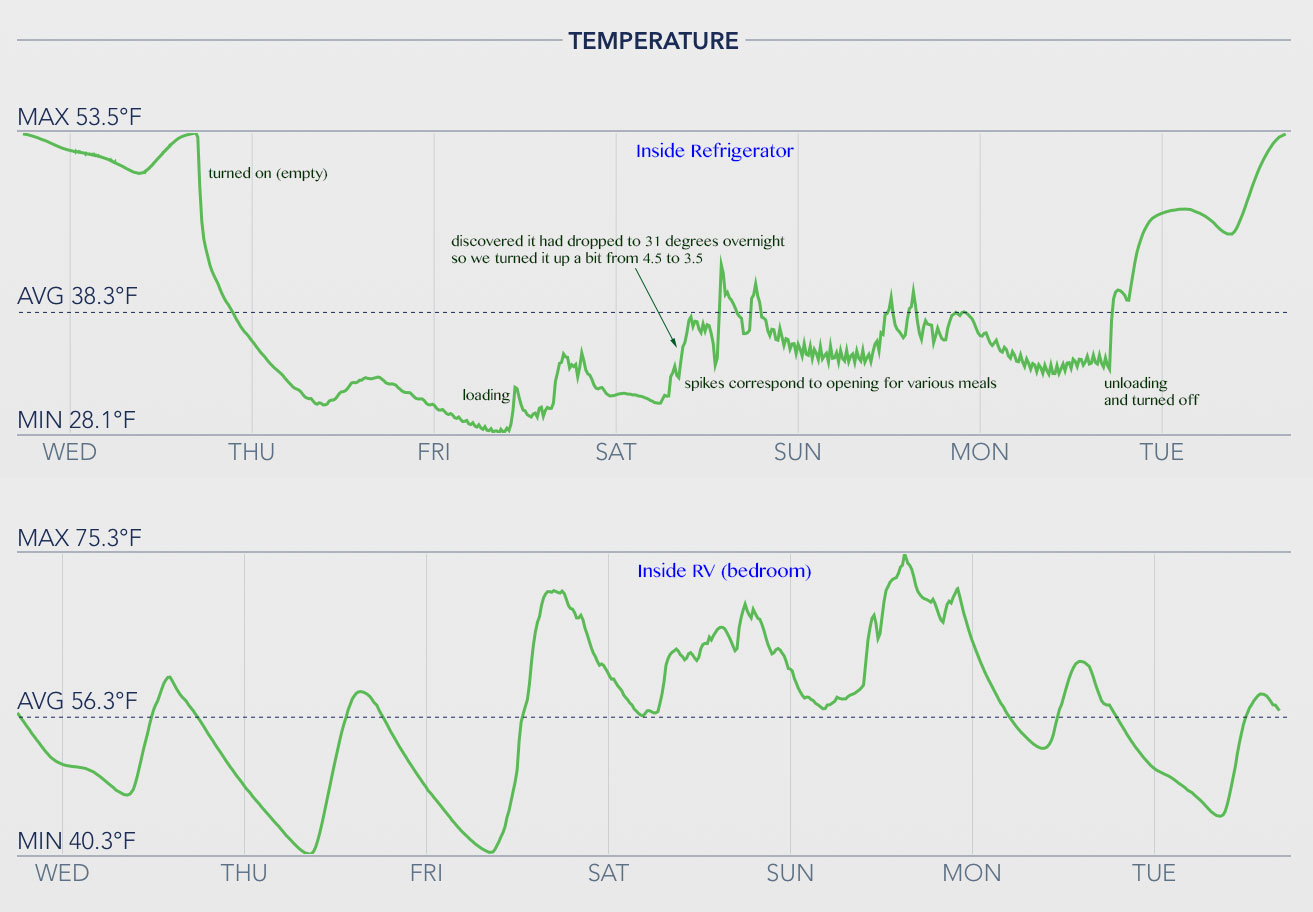
This unit definitely works well at keeping things cool (even in 95 degrees) but I’ve found that the thermostat doesn’t really seem to be based on temperature. Even when full of contents, the temperature seems to vary a lot over the course of a day and night – chasing the ambient temperature and cooling/warming over a ten-degree range. This graph shows the temperature over time both inside the fridge and in the RV. We turned it on while empty on Wednesday night but didn’t fill it until Friday morning. Note how the temp varied over the course of Thursday climbing with the mild inside temp and then falling again overnight.
The food kept cool and nothing froze in the refrigerator but it was disconcerting to see it sink to low temps overnight. We raised the thermostat a little when we saw it had sunk to just under freezing while loaded overnight. If it really has a temperature-based thermostat, why does it keep running as the temperature keeps dropping? After week long excursions, I’m now convinced that the “thermostat” just adjusts how much it runs per hour without any regard for the interior temperature. This makes it necessary to frequently adjust the thermostat to keep it from climbing up to the high 40’s or down to the low 30’s, depending on the day and night ambient temperatures.
| Dometic RMD 8555 | Nova Kool 6800 |
|
|
Update: I was always bothered by how the back of the Nova Kool was open to the surrounding cabinet but I since became aware that this was allowing in a huge air draft into the coach (very obvious in windy conditions) and was noticeably noisier when driving down the highway. I decided to finally address this by pulling the darn thing out again and insulating both the refrigerator compartment as well as the rear of the unit around the compressor.
I started by moving the compressor’s air circulation fan away from the edge of the compartment so I could then add some additional bubble insulation around the compressor area, isolating it from the airspace in the cabinet. (See before and after photos below.) I then used a bunch of leftover automative Thinsulate insulation (from insulating the cab doors) to line the walls and ceiling of the cabinet and stuff some in the gap between the refrigerator and freezer boxes. I also stuffed loose pieces of insulation above and to the side of refrigerator as I slid it into place. Lastly, a bit of foam insulation glued across the gap along the top in the back of the refrigerator opening.
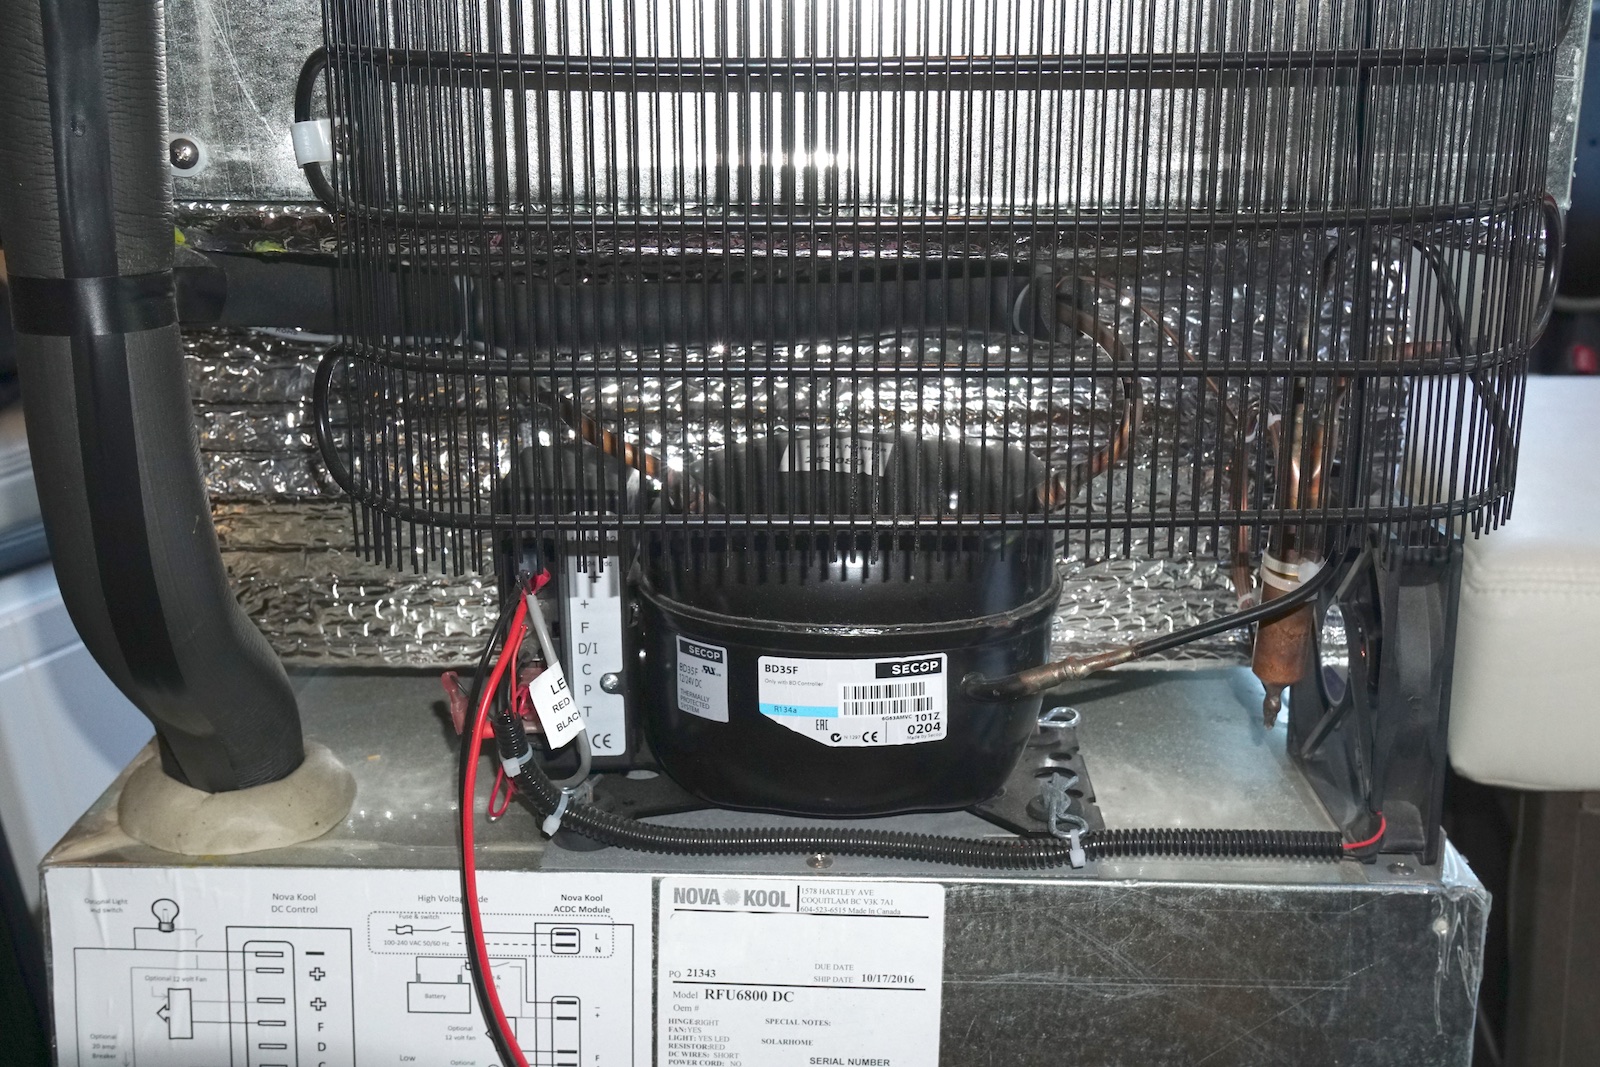
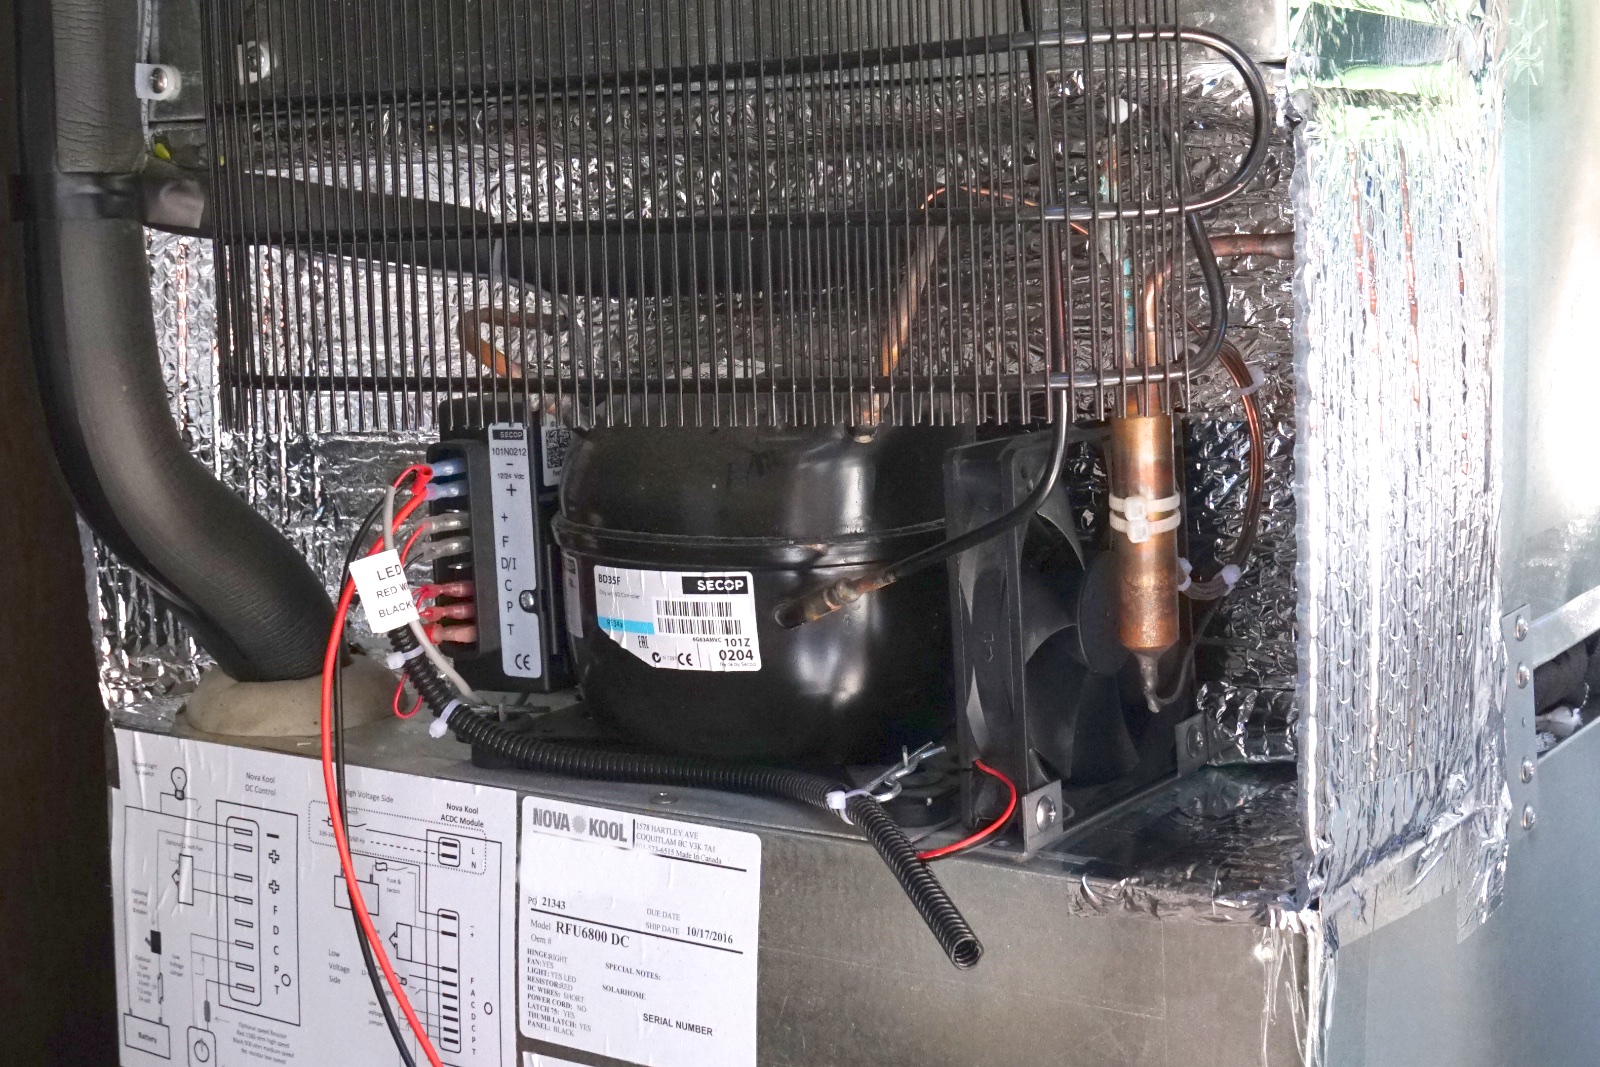
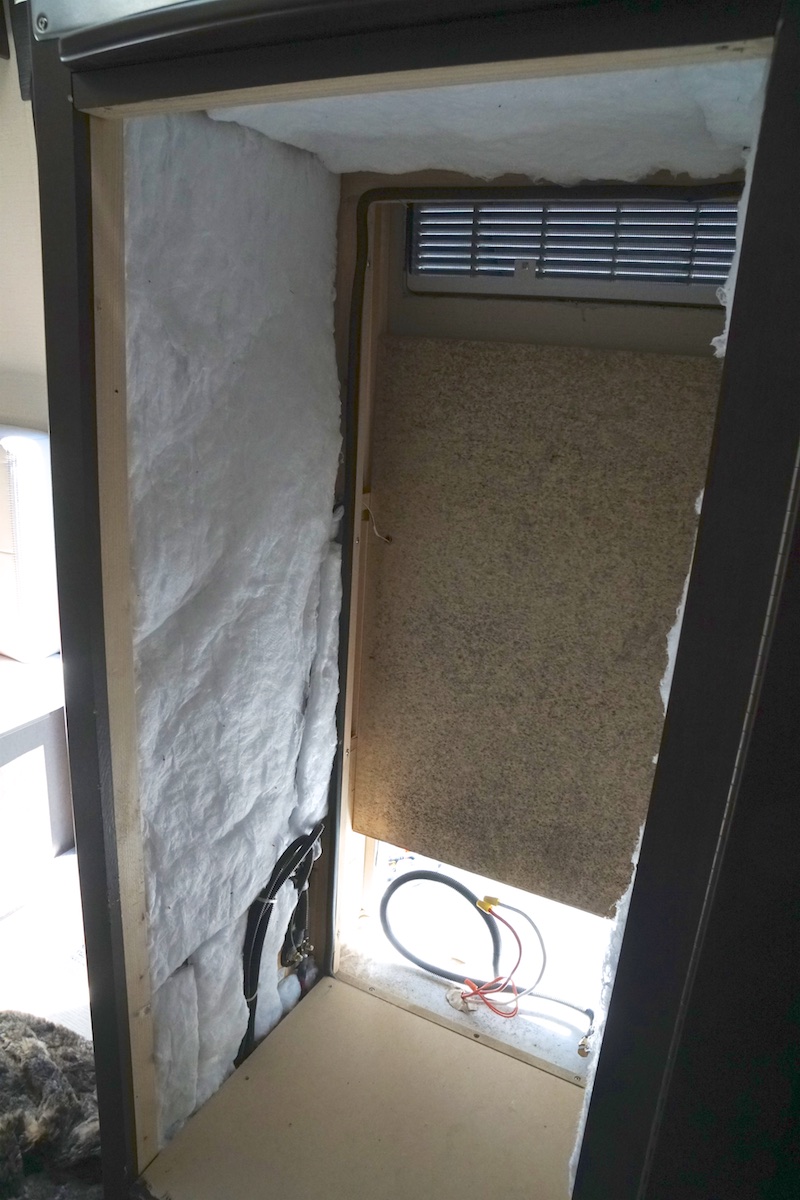
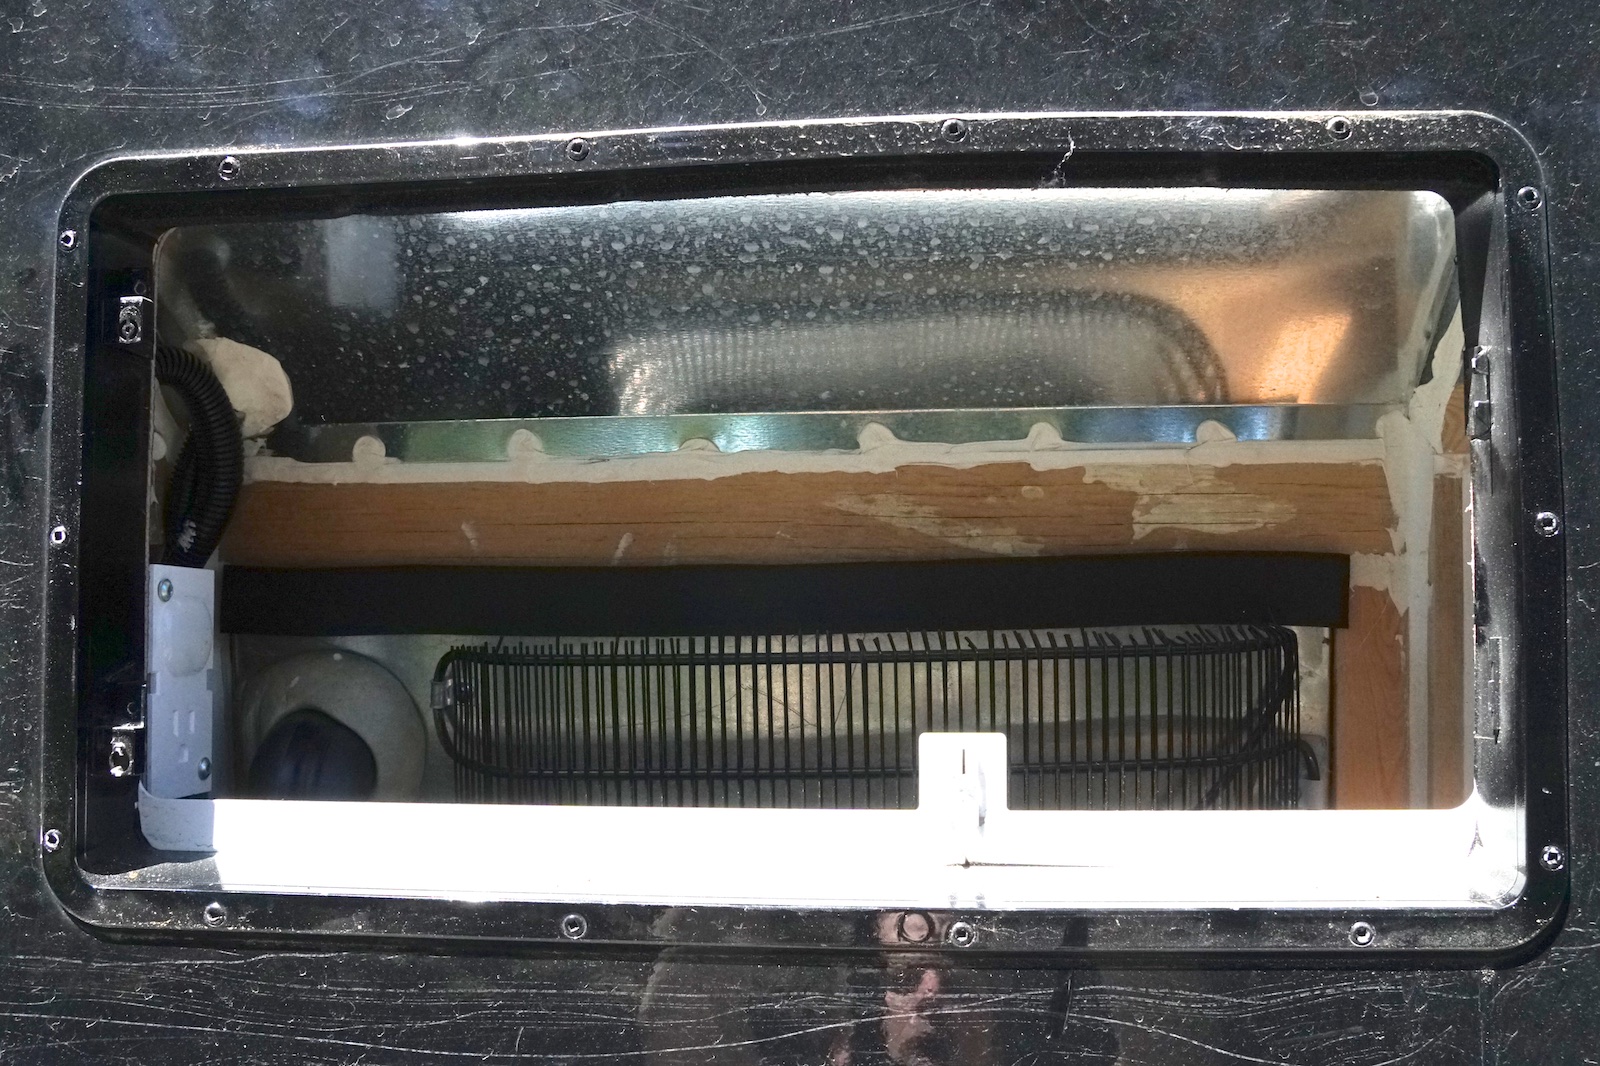
The result of this insulating effort is a quieter ride (less wind noise from the refrigerator compartment), no air draft into the coach (losing heat/cold), more efficient running of the fridge (less outside air circulating around the fridge), and even less noise from the compressor when it’s running (it was already very quiet). Sweet!
Update (mid-June 2019):
 So the fridge stopped working. No matter how far I turned thermostat, the compressor would not kick in. I could see from my sensor that the temperature was just steadily climbing, up into the 40’s. I tried disconnecting and reconnecting power but the compressor would just not run anymore.
I ended up pulling the fridge out entirely to try to figure out what was wrong. Looking on the web, I found some discussion where folks had solved a problem with how the fridge would stop running if the battery voltage got too low but that wasn’t it for me. I was measuring around 13.6V at the back of the fridge. That measurement also eliminated the possibility of voltage drop due to insufficient wiring. Well, interestingly enough, with the fridge pulled out of its compartment, the compressor started running normally again! So I started thinking that perhaps the problem was that the condenser coils are so close to the back wall of the compartment that they can’t dissipate the heat and the compressor has some mechanism to protect itself and turn off.
Turns out that the back of the compartment has a thin false wall so I ended up tearing it out, giving the back of the fridge a couple more inches of “breathing space”. Then I put the fridge back in and monitored it for the rest of the day and overnight. (Sorry, I forgot to take a picture after removing that false wall in the back.)
That was it! The compressor ran normally again, keeping the fridge nice and cold again. This also seemed to fix a strange fast cycling behavior I would often notice where the compressor would run for a few seconds, stop and then start up again and do this over and over again for minutes. That doesn’t happen any more either.
So, there you go: make sure you’ve got enough space behind the condenser coils – even potentially pulling out a back wall! It isn’t enough that there’s all that space between the condenser coil and the back of the fridge and that there’s a fan blowing and that there’s large enough venting.
Upgrade coach keyless entry lock
The 2016 Unity came with a Bauer EM keyless entry lock for the coach door. It turned out to be a pretty annoying latch and lock: 1) after locking, if you pulled on the outside paddle, the door would actually partially disengage until the deadbolts stopped you – you’d have to then push it closed again; 2) it would frequently reject any attempt to enter the passcode, particularly in high humidity; 3) it could apparently drain its batteries by falling rain causing false touches; 4) it squeaked badly against the strike plate (fixed here with tape); and 5) it’s a bit of pain to close from the inside (fixed here by adding a pull strap).
 Well, sometime in 2016, Bauer updated their lock and addressed some of these issues. The newer Bauer EM AlSentis model looks identical to the old one but now the outside paddle locks so that you don’t partially disengage the door when testing if it’s locked and they also supposedly fixed the problems with humidity and rain on the keypad so it should open reliably. So far, it does seem to be working well. As a bonus, I removed my little tape hack from the striker plate and it seems like the rubbing squeak is gone.
It’s an easy install to replace the old one with the new, but it doesn’t feel great buying a somewhat expensive replacement product for something that should have worked better to begin with. Here’s a little video showing how the new unit locks the paddle when you lock the door.
Replacing it is just a matter of removing six screws, pulling off the back half, disconnecting a wire lead, easing out the front half and then reversing all that for the new one.
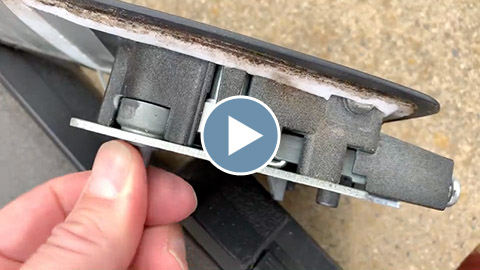
Update (04/2019): This newer Bauer EM AlSentis model had been causing trouble all last year. What happens is it becomes impossible to lock the door either by turning the knob inside or the key outside. It just won’t turn. You sometimes have to bang on it repeatedly to get it to free up and allow you to turn and lock it. (See video on the right.) There’s been occasions where we couldn’t get it to lock for many minutes of fiddling around and banging on it. Similarly, the electric mechanism to get it to lock wouldn’t work either.
I contacted the manufacturer (Bauer) about the problem (and linked to my demonstration video) and was very happy to hear back from them soon after. They sent me a redesigned replacement unit that addresses the problem that leads to the stuck dead bolt. All is well again – and it’s so nice to deal with a company that stands by their products!
Install cellular network booster
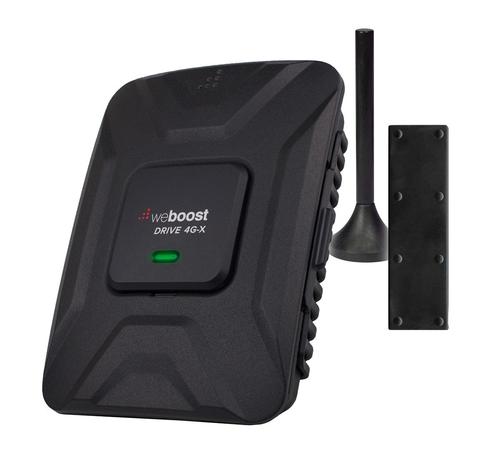 The WeBoost Drive 4G-X is a cellular booster that’s meant to be installed in a car, truck or RV. It acts as a go-between the cellular devices in your vehicle and any nearby cell towers. It comes with a small external antenna that should be mounted on a metal roof or at least on a small sheet of metal to act as a ground plane. The internal antenna is of course mounted inside.
Update: There’s now a newer model designed for RVs (WeBoost Drive 4G-X RV) which appears to have different, larger antennas. I haven’t tried this updated model.
Now, at first I didn’t have a lot of good results when I tested this thing. I was testing in different locations that had various levels of poor cellular signal and trying the antennas in various positions but I wasn’t seeing much or even sometimes any improvement. I contacted the manufacturer and they swapped out the unit but I didn’t see any improvements. Also, I read that its usefulness with Sprint (my carrier at the time) was limited as one of the LTE frequencies they use isn’t supported by the WeBoost.
However, I had also read people say that you really had to hold your device immediately against the internal antenna (as opposed to like 18″ away). So I tried this on a different trip and was surprised to see that it made quite a difference. I would see the signal go from a barely responding “1x” to 3G or even LTE just moving the internal antenna from a foot away to immediately behind my iPhone. In one location I tested my download speed and saw it go from 1.18 Mbps without any boost to 8.61 Mbps. This and other test results was enough to convince me that it was worth permanently installing the WeBoost.

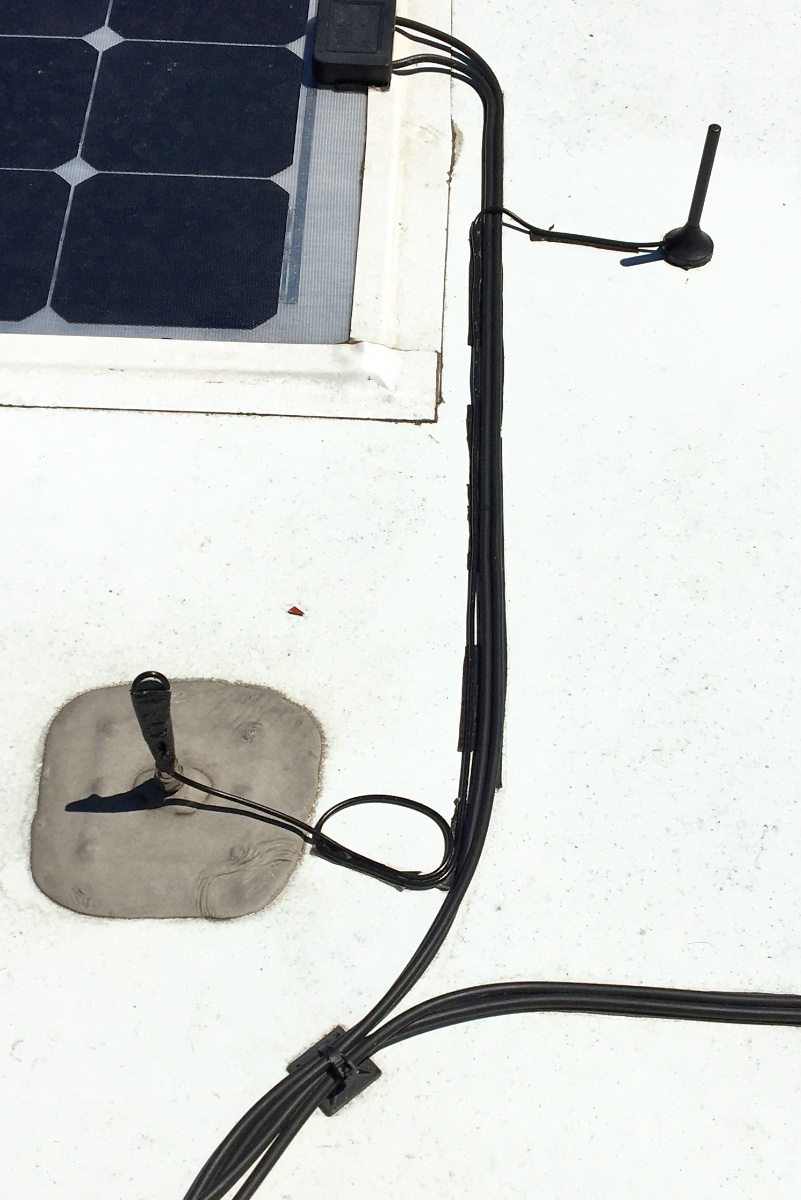 I decided to do as someone else had done and make use of LTV’s satellite pre-wire from the entertainment center to the roof behind the A/C unit. Yeah, I’ve read it’s not ideal to mix coax cable types like this, but in my testing it seemed to work just as well.
I bought this short adapter cable to go from the WeBoost’s SMA port for the external antenna to the RF coax jack in the cabinet. I shortened the provided external antenna cord so I wouldn’t have so much wire bundled up on the roof. I used this adapter to go from the RF coaxial jack on the roof to the antenna’s SMA F connector.
I had a 12″ square metal sheet I was using as a ground plane while testing the external antenna, but then I found that the antenna’s magnetic mount was grabbing to a similarly large area of metal a couple of feet back from the coax port on the roof and I was still getting good signal boost. So, I just used adhesive VHB tape to secure the antenna in the center of that area between my solar panels, without the additional sheet metal. Easy peasy!
I mounted the internal antenna with velcro in the entertainment cabinet where I also added some USB ports and a 12V port for the WeBoost. To make use of the WeBoost, I turn it on and I place my iPhone in the cabinet, right on top of the antenna. I then can use another device (like my iPad or Mac) to make use of the phone’s shared hotspot. Works great. If I really need to use the phone directly, I can stand near the cabinet or I can release the internal antenna and hold it against the phone.
And lastly, I switched to Verizon from Sprint. While I had a great deal with Sprint and it was working fine in cities and popular destinations, it’s clear that Verizon has much more coverage in remote and rural areas.
Suspension upgrade
I’ve seen a number of discussions about suspension upgrades for the Sprinter-based Unity to improve its handling. As described in these threads, several potential upgrades are possible:
- Sprinter suspenstion upgrades?
- Suspension upgrades to improve handling in gusty winds
- Suspension question for Scarecrow & others
My Unity already had some sort of anti-sway bar installed by the previous owner (I don’t know the model, was it a Hellwig?) but SumoSprings are also often recommended. I decided to give them a try and just had them installed today. After a 30-minute test drive, I do think they’ve made a nice improvement. The Unity now seems more solid making turns on the highway or going around corners on city streets. There seems to be less lateral sway movement than before. It feels like it swings less harshly when entering/exiting driveway openings. I also drove it on the highway up to 65 mph and did not feel any adverse effects. Not surprisingly, the bouncy, rocking motion over bumps or other uneven road surfaces remains the same as that is due to the stock shocks. The SumoSprings are actually replacements for the bumper stops and I believe they are designed to operate under partial compression. I’ll be taking it on another road trip soon so I’ll be able to report if I notice anything else.
SumoSprings are an inexpensive upgrade and it took less than an hour for a local shop to swap them in. Here are the specific versions I installed for my 2015 Sprinter chassis on my 2016 Leisure Travel Vans Unity.
- SuperSprings SSF-106-40 SumoSprings Solo Front Bump Stop Upgrade Kit
- SuperSprings SSR-338-47 SumoSprings Solo Rear Bump Stop Upgrade Kit
Install trickle charger for chassis battery
It’s great that the rooftop solar panels are more than sufficient to maintain the house batteries, but unfortunately that does nothing for the chassis/engine-starting battery. The recommended procedure is to disconnect the battery when the vehicle will not be in use for several weeks or more but that’s both a hassle and a shame since the solar panels are already maintaining the house batteries. I’ve seen many recommend an installation of a trickle charger like the Trik-L-Start, but I found other recommendations like replacing the existing battery isolator with a smart, automatic charging relay/isolator like Blue Sea Systems ML-ACR.
Also, I’m curious as to why Leisure Travel Vans did not connect the chassis battery as a second battery bank to the Go Power solar charge controller, thus keeping both battery systems maintained in the Unity.
Here’s a list of the more popular options:
- LSL Products Ultra Trik-L-Start 5-amp battery maintainer ($45)
- LSL Products Amp-L-Start 15-amp battery maintainer ($65)
- Xantrex Echo 15-amp battery maintainer ($116 on Amazon)
- Blue Sea Systems automatic charging relays (five 12V models available, $45-$202 on Amazon, including ML-ACR w/manual control)
- Magnum Energy ME-SBC smart battery combiner, 25 amp, adjustable settings ($118 on Amazon)
I was torn over the many options but ultimately decided to forgo the more expensive automatic charging relay/combiners since these seem to be intended more for combining battery banks. As explained very well by someone more knowledgeable, frequently combining batteries with very different voltage levels can lead to premature failure of your batteries. Like the Trik-L-Start, the Amp-L-Start is intended for charging a starter battery when you’re charging your house battery. It protects for both under- and over-voltages (on at 13.2V, off below 12.8V or above 14.75V) and it includes an audible alarm for low battery voltage. (Some of this is more than what you get with the more basic Trik-L-Start.) Since I replaced the Jensen house audio system with an aftermarket audio system in the dashboard (on the chassis/starter battery), I think the higher 15-amp charging rate and the low battery warning will both be useful.
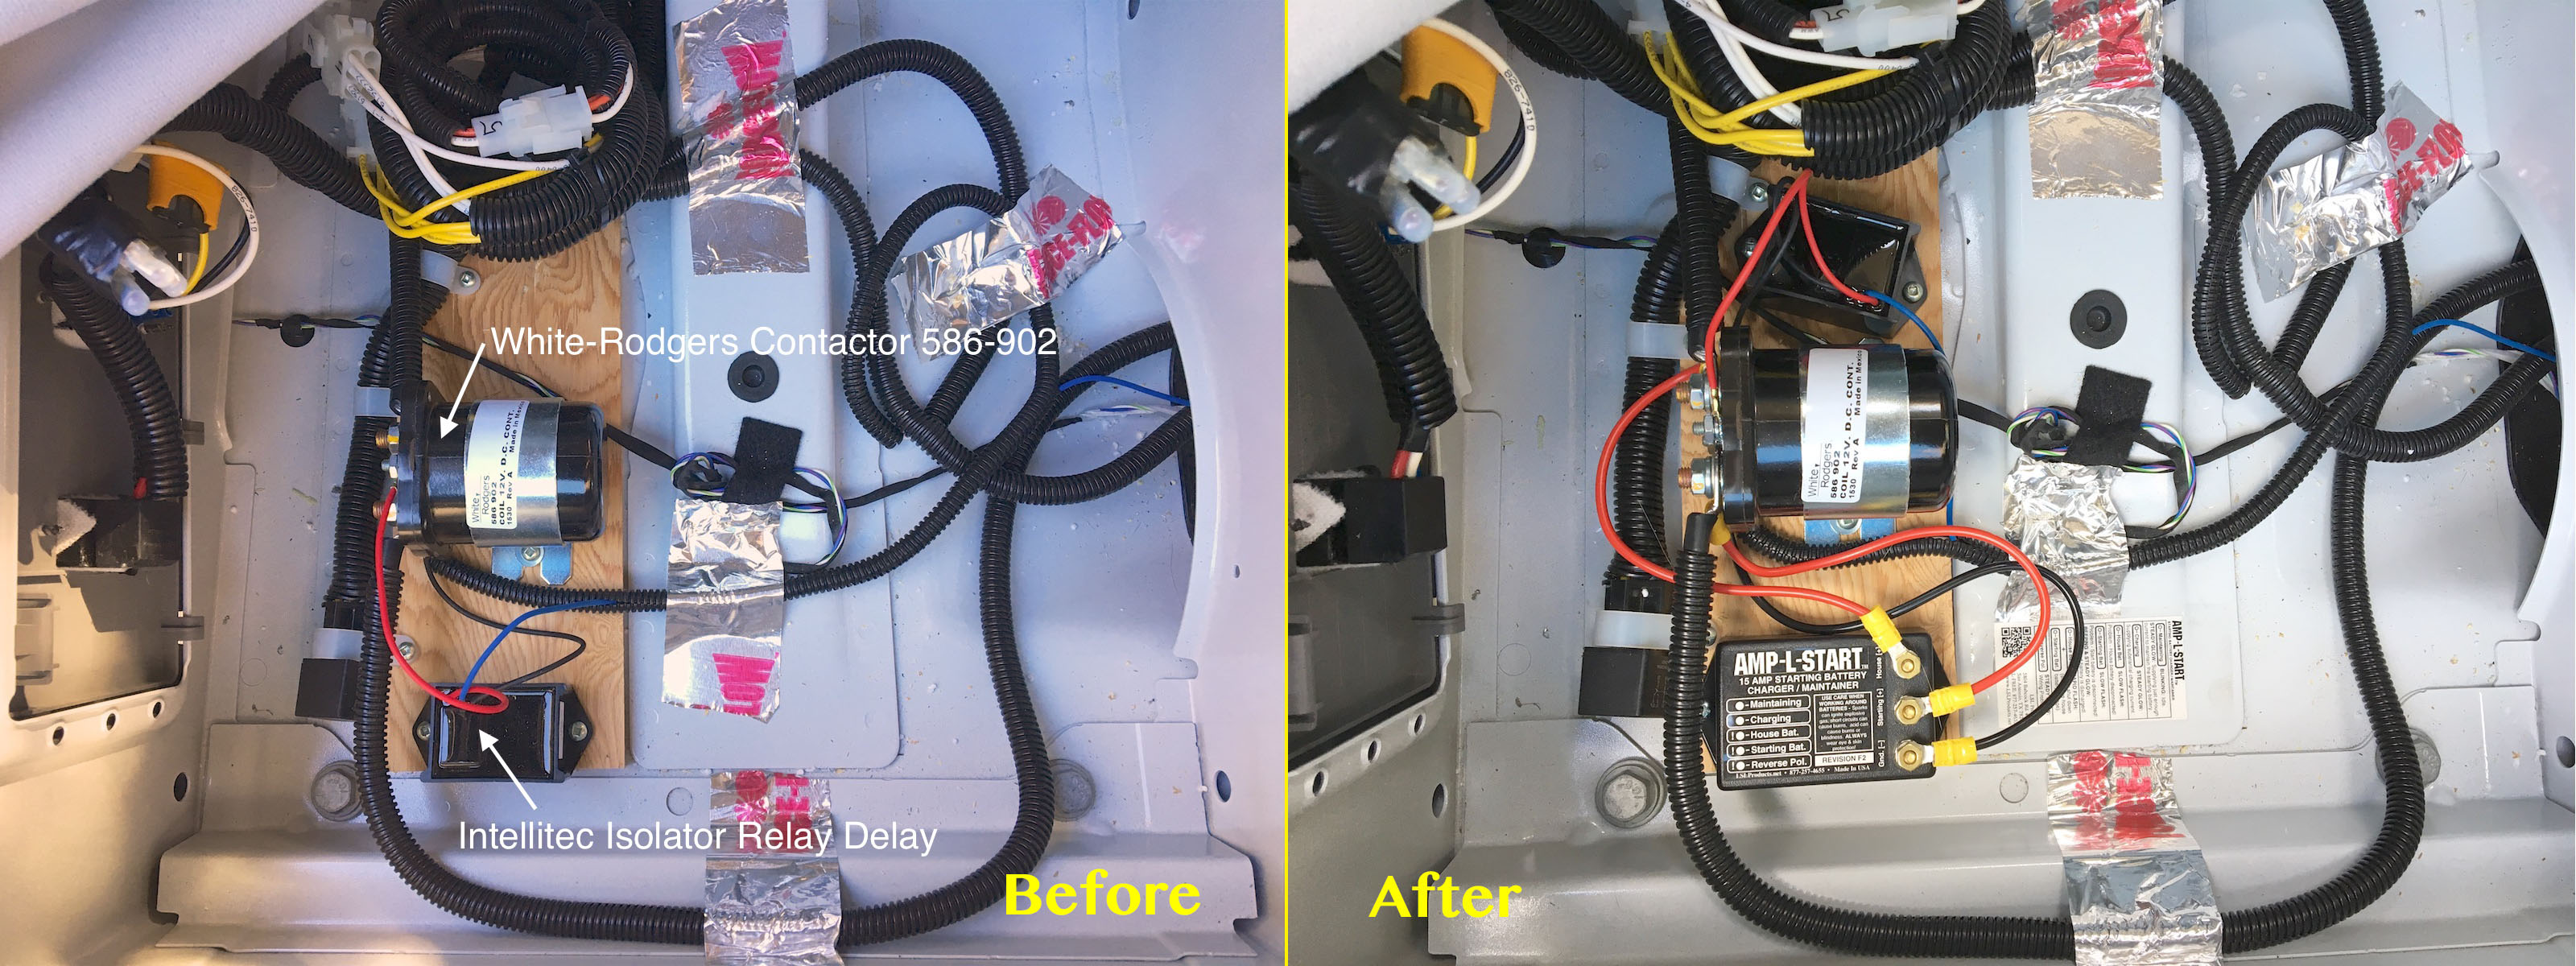
For the 2016 Unity TB, the installation location is next to the isolator/contactor and relay delay modules found under the passenger seat (pictured). Both battery systems have connections here because the isolator/contactor keep the two battery systems isolated and only bring them together to charge them both when the engine/alternator is running (after a suitable delay imposed by the delay module).
I ended up moving the delay module to make room for mounting the Amp-L-Start (see before/after pics), but everything went smoothly. Biggest hassle was really just getting to the starter battery under the floor and removing the passenger seat. Do make sure you follow the instructions though and disconnect the negative leads on both the start battery and the house battery as well as cover up your solar panels because it would be very difficult to even make the connection changes on this relay without accidentally touching multiple contacts in this tight space.
☞ This is one of a few things I think Leisure Travel Vans is at fault for not including as part of the original build. Either install some sort of trickle charger or wire up the provided Go Power solar controller’s 2nd battery charging option to the starter battery.
Temperature/humidity sensors

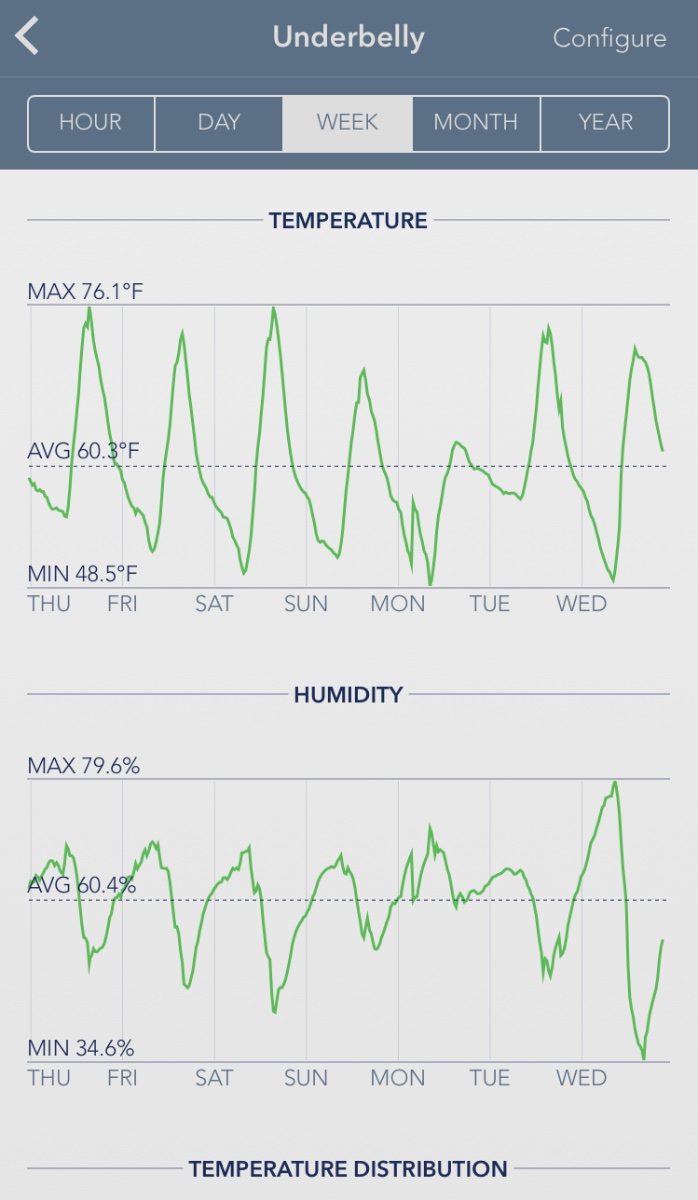
 This is a cool find. I was looking at a number of mountable weather/temp sensors when I stumbled on the SensorPush Wireless Thermometer/Hygrometer. You drop these little guys wherever you’d like to monitor temp or humidity and they collect data over time and automatically sync to your smartphone via bluetooth – even from hundreds of feet away, in your house! They apparently run on their little watch batteries for upwards of a year. I put one in the coach and hung another underneath, next to the gray tank to watch for freezing temps and put still another in the fridge. Unlike typical wireless weather sensors, you can view the accumulated data over time and set alerts to be notified about exceeding a set range.
Collapsible ladder for roof access
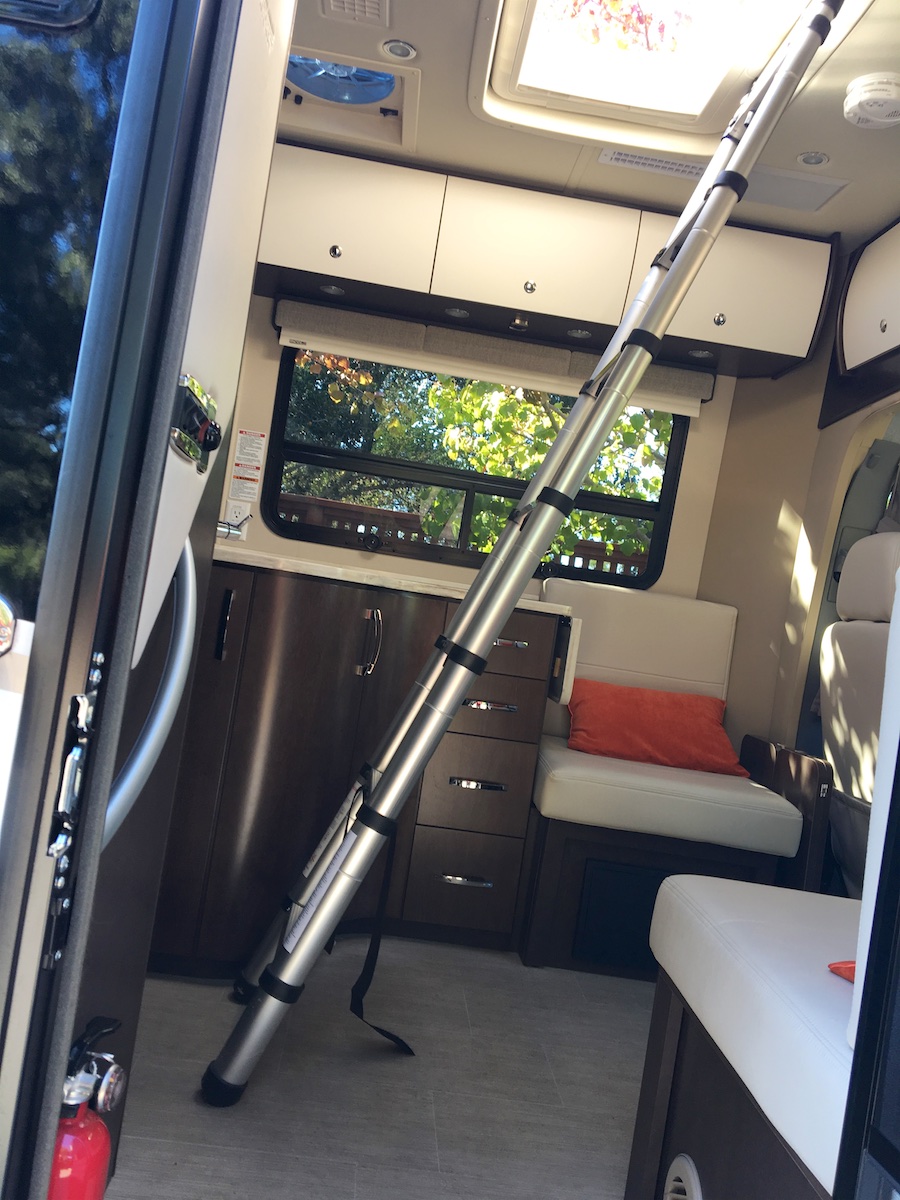
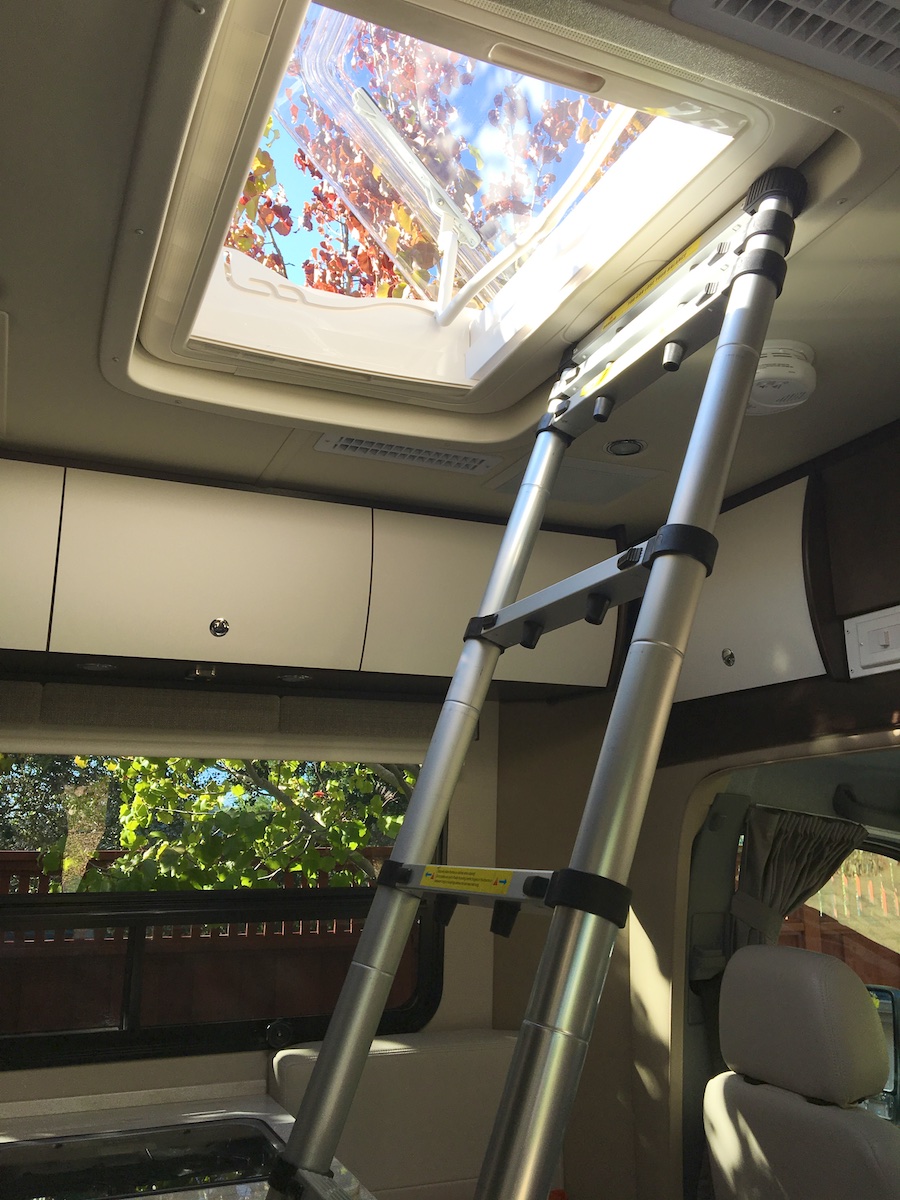
As an aside, this collapsible ladder is what I used to climb on the roof for my solar installation. I felt more comfortable climbing up through the skylight in the RV rather than climbing up over the edge on the outside with no one around to stabilize the ladder.
When collapsed, it’s small enough you could carry in one of the outside storage areas, but I don’t think it’s all that necessary to carry around.
Bike storage
Lack of bike storage is a big limitation of most North American RV/campervan designs and I’m definitely not very comfortable with keeping my/our expensive bikes on a normal hitch carrier. Custom van conversions (and European campervans) will often create a platform bed that allows for bike storage inside and underneath, sometimes even with an awesome slide-out tray. I’ve considered getting one of those big, expensive, fully-enclosed carriers… which sucks also because it will add several feet to the length of the vehicle and it’s not like they can be tucked away somewhere. Erg. I wanted to try to stow them inside the vehicle somehow. I saw there are some fully enclosed bike bags (which vary quite a bit in design and price) but that means taking up a good chunk of the bedroom to stash a couple of bikes. Not exactly ideal.

Interestingly, all but one of the usual, hitch-mounted, bike rack makers don’t recommend or warranty usage on RVs. Not Yakima, Thule, Kuat, Saris… all but 1UpUSA. After trying it out, I can see why their design is certainly more sturdy and rigid. Another issue with all of these racks though is that, even with a 10-inch hitch extension, the inside bike’s handlebars bang up against the rear of the RV – at least with mountain bike handlebars. This is of course because the rear wall of the RV is vertical and does not slope away from the carrier like most vehicles. This means that to use this rack on the back of the RV would require loosening the handlebars to rotate them away from striking the rear wall or finding something to protect both the bike and the RV.
Okay, I decided to cut open a tennis ball to fit it over the handlebar that would otherwise bang up against the back of the RV. This does work – as long as this ball rubbing on the back of the motorhome doesn’t wear away the paint:
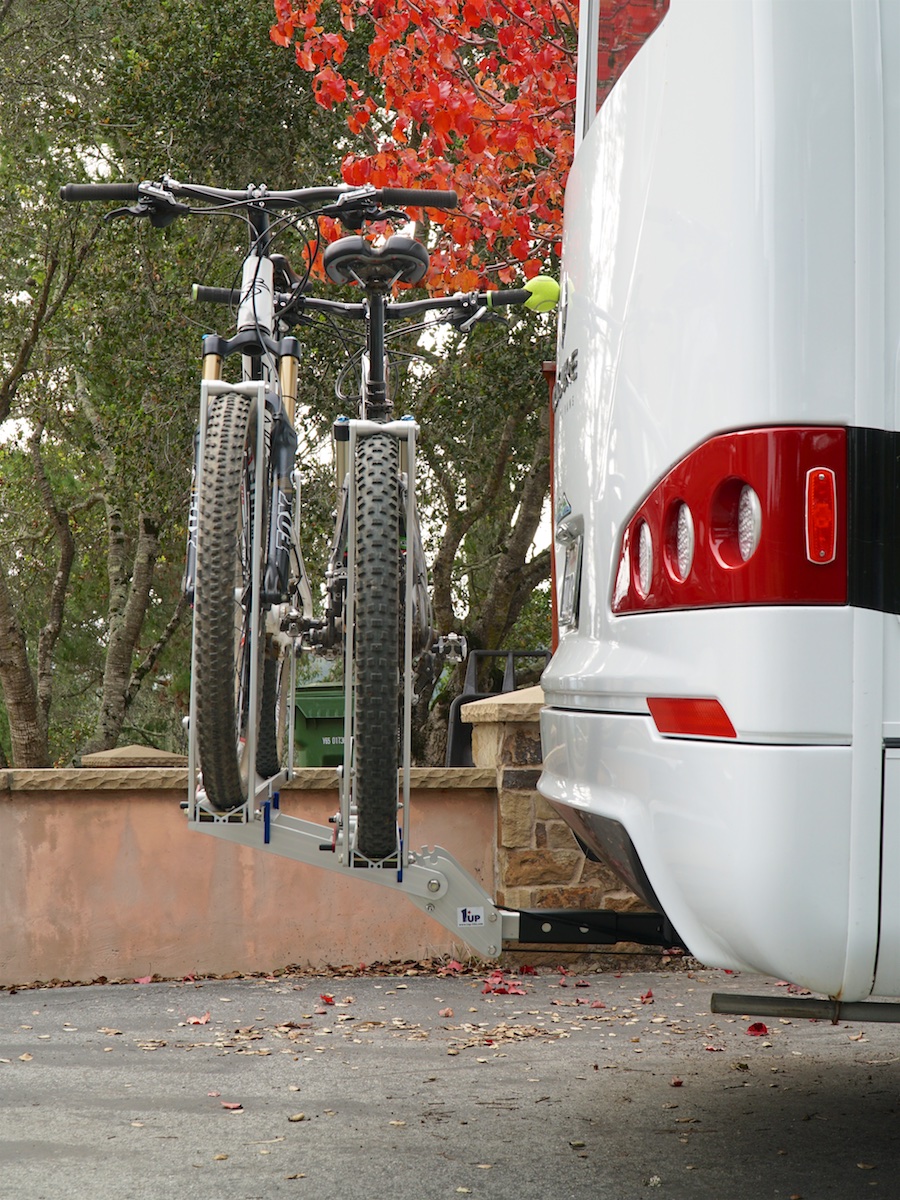
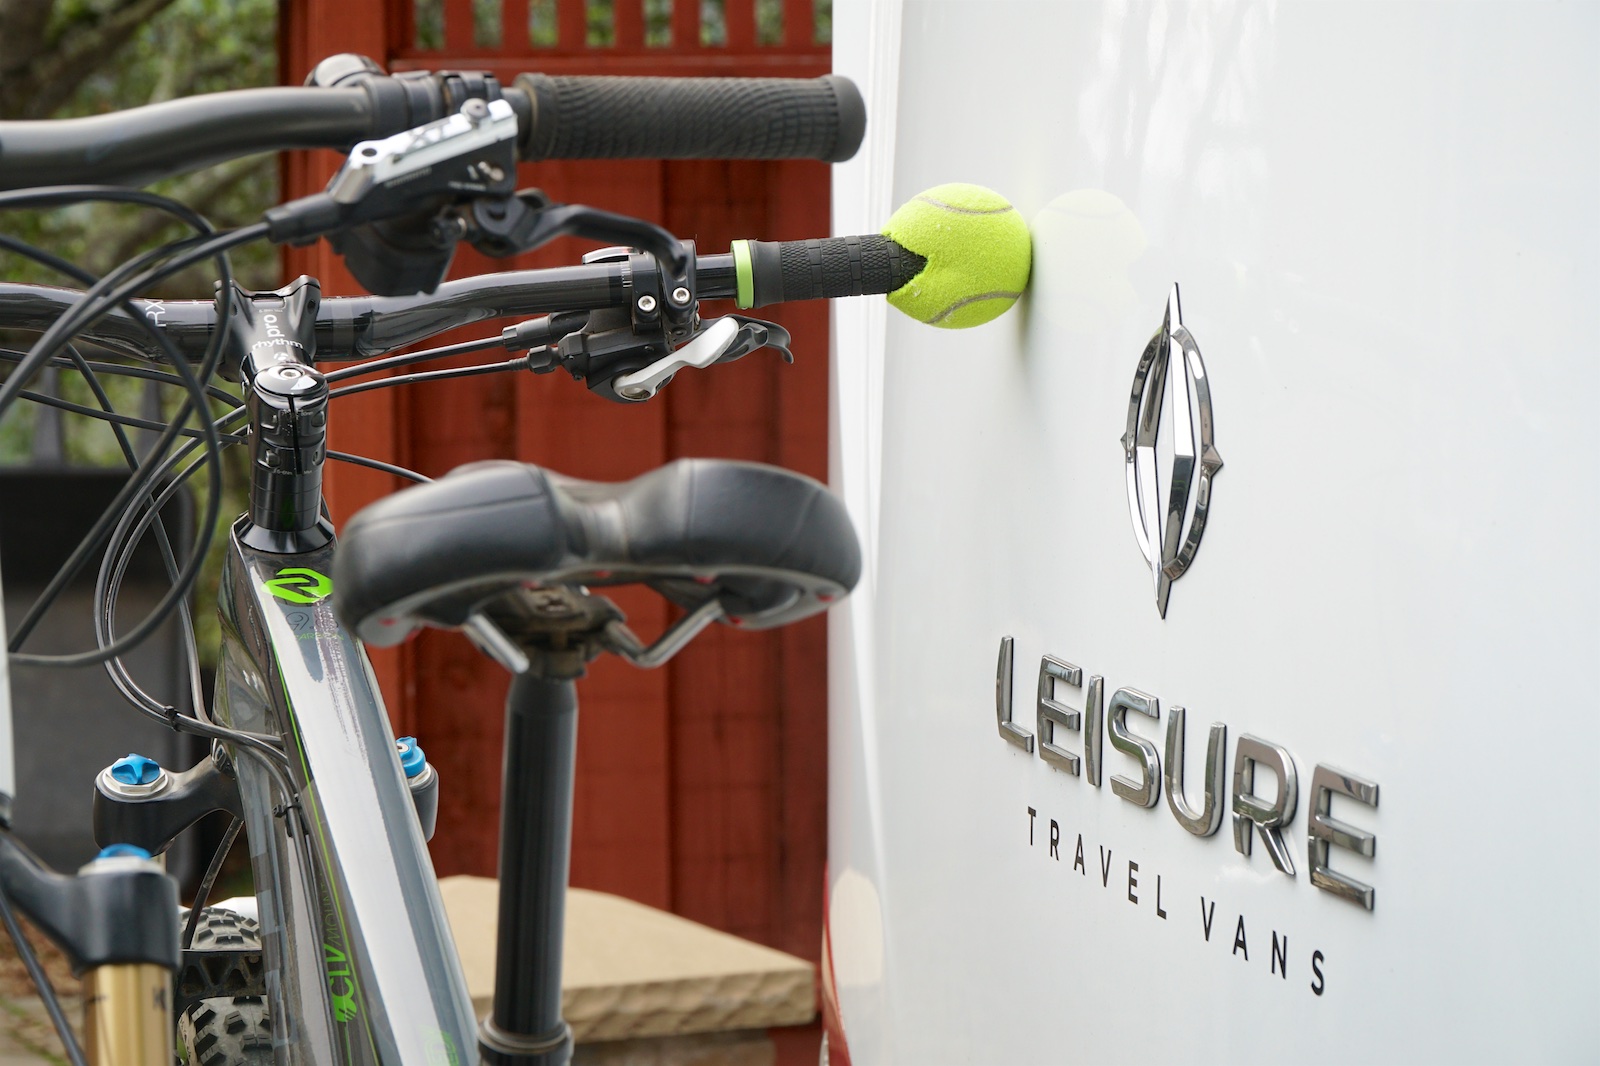
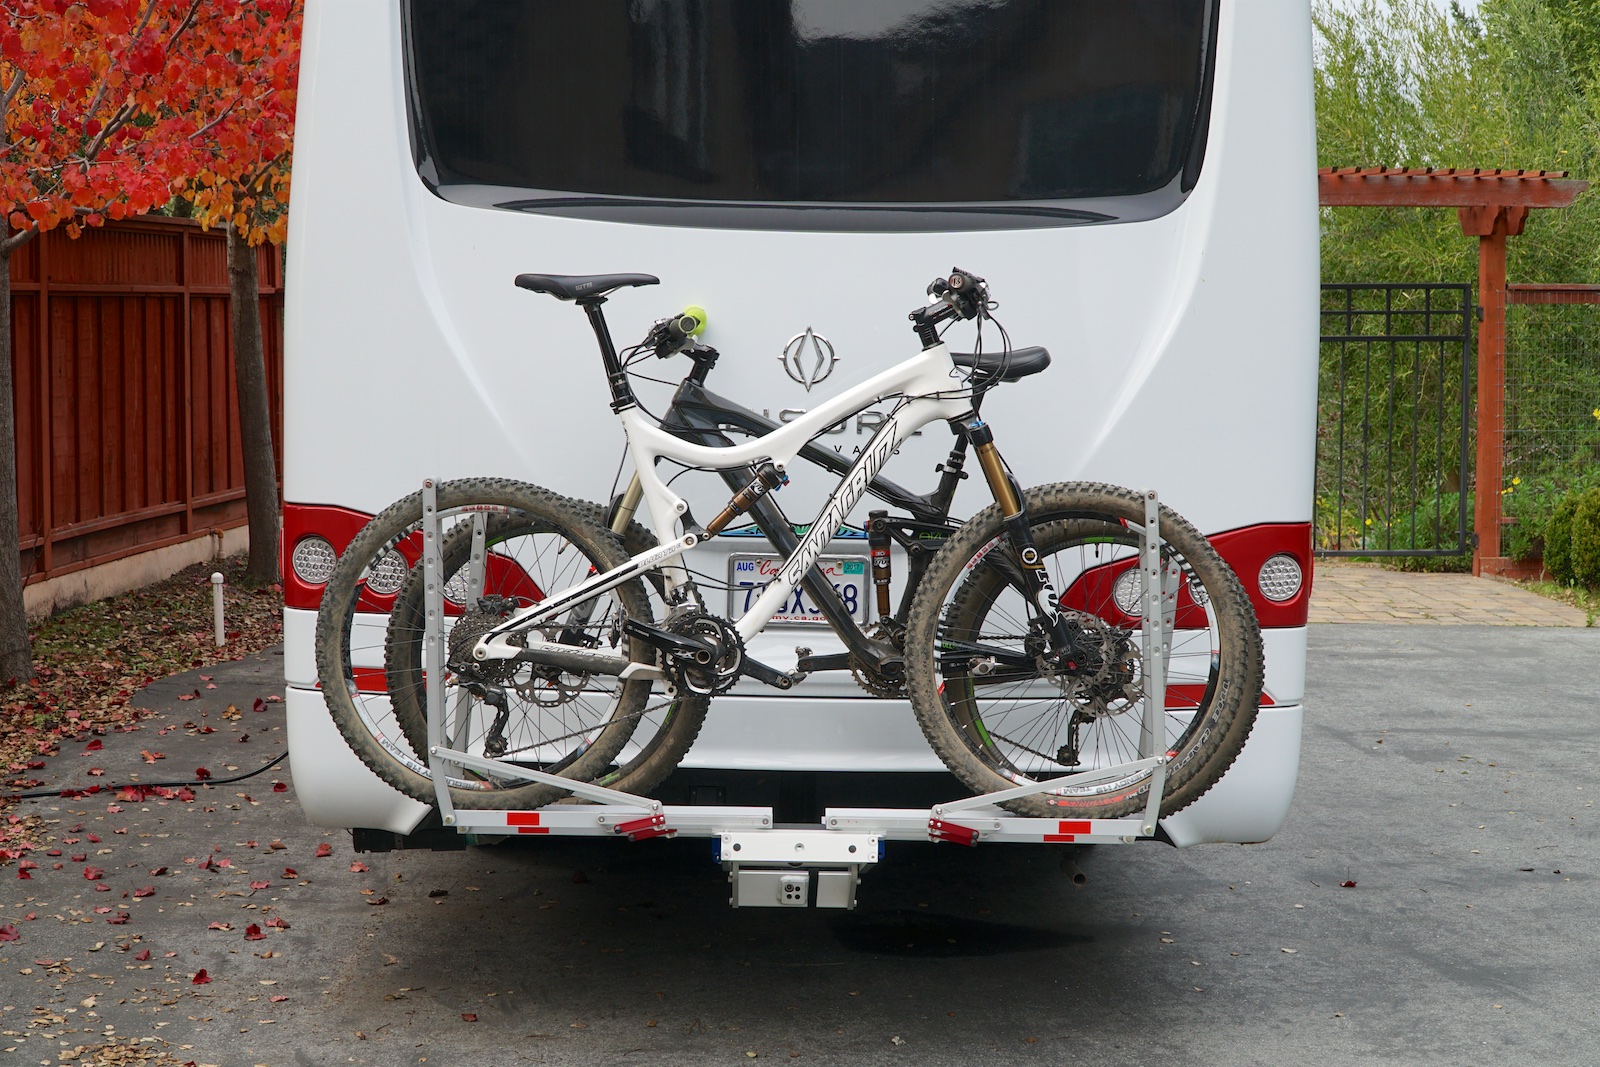
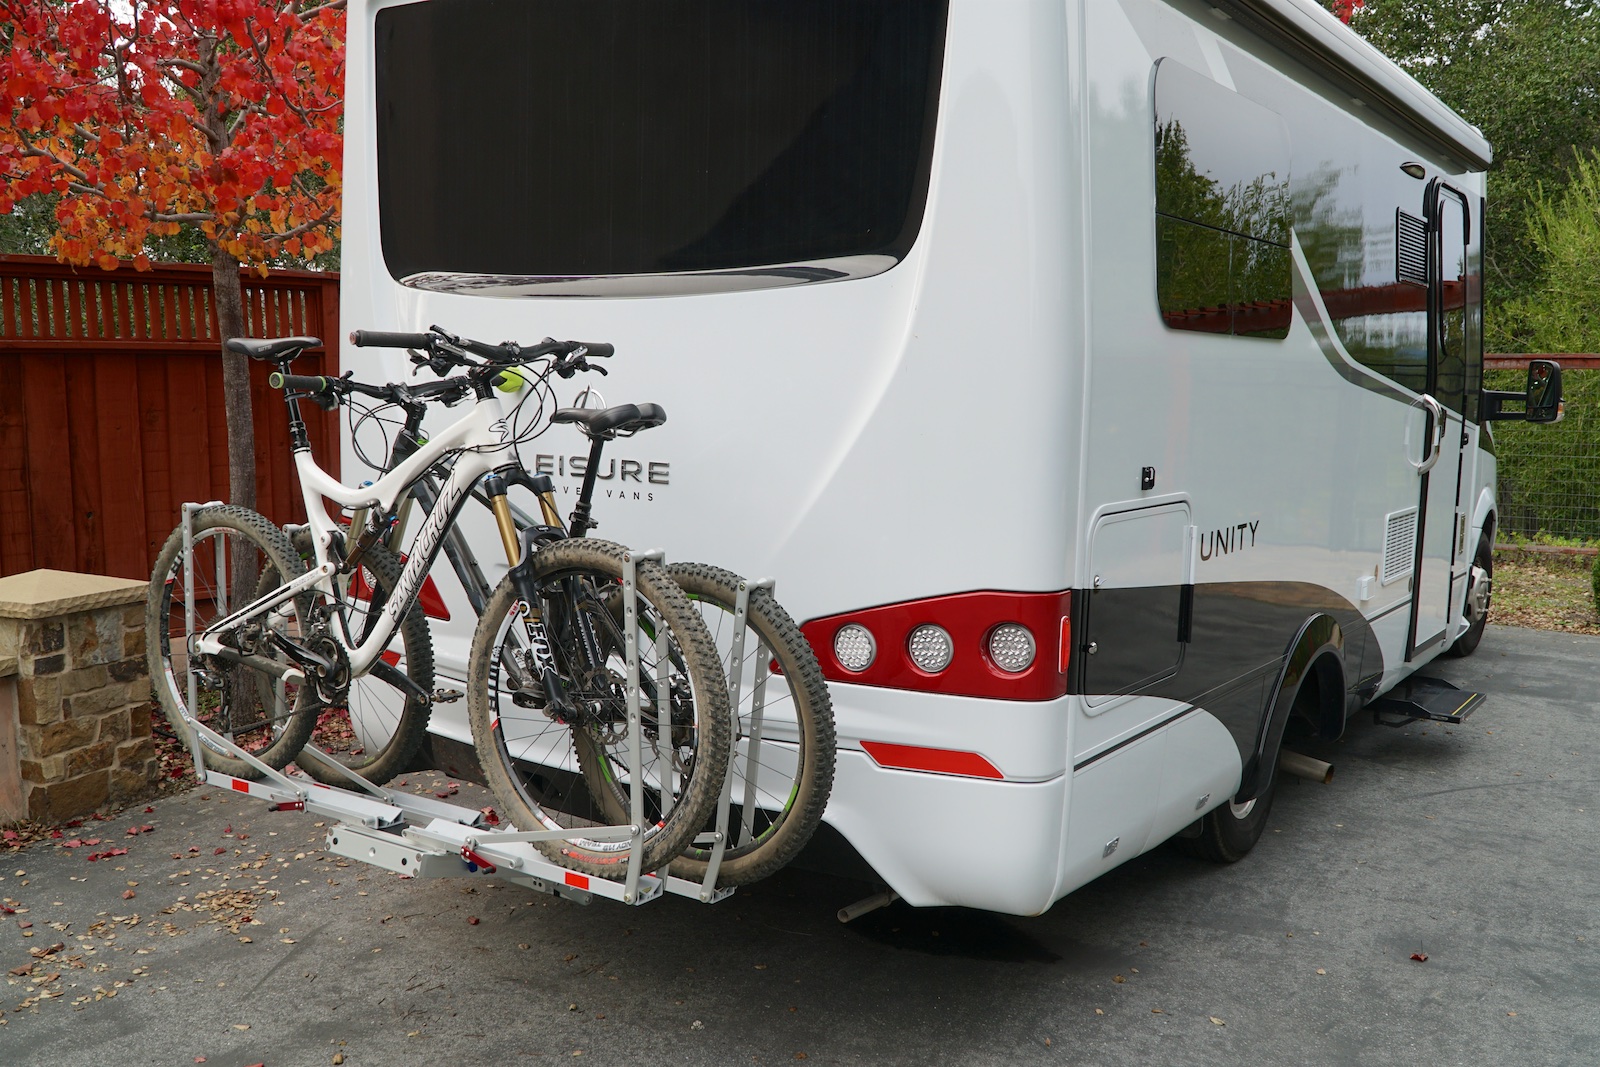
After a few hours of driving, it looked like it might eventually rub through the paint so I placed a small square of white adhesive tape on the spot on the RV’s back wall. This is working fine after weeks of driving. It does however mean that the bikes get dirty (particularly so on unpaved roads) and so now prepping to ride means cleaning the chain, brushing off the gears, wiping down all the shock shafts, etc. I’ve started looking for a cover for at least the drivetrains, if not the whole bikes (which would completely obscure the rear license plate).
To secure the bikes, I bought an eight-foot long, relatively difficult-to-cut chain from Abus with a loop link on the end as well as a Kryptonite Evolution Series 4 U-Lock and a secondary cable to secure the rack to the hitch mount. I might get a double size bike cover to make them less noticeable when parked in a public area overnight. Erg, still not very comfortable with this means of transporting them but it’s working for now.
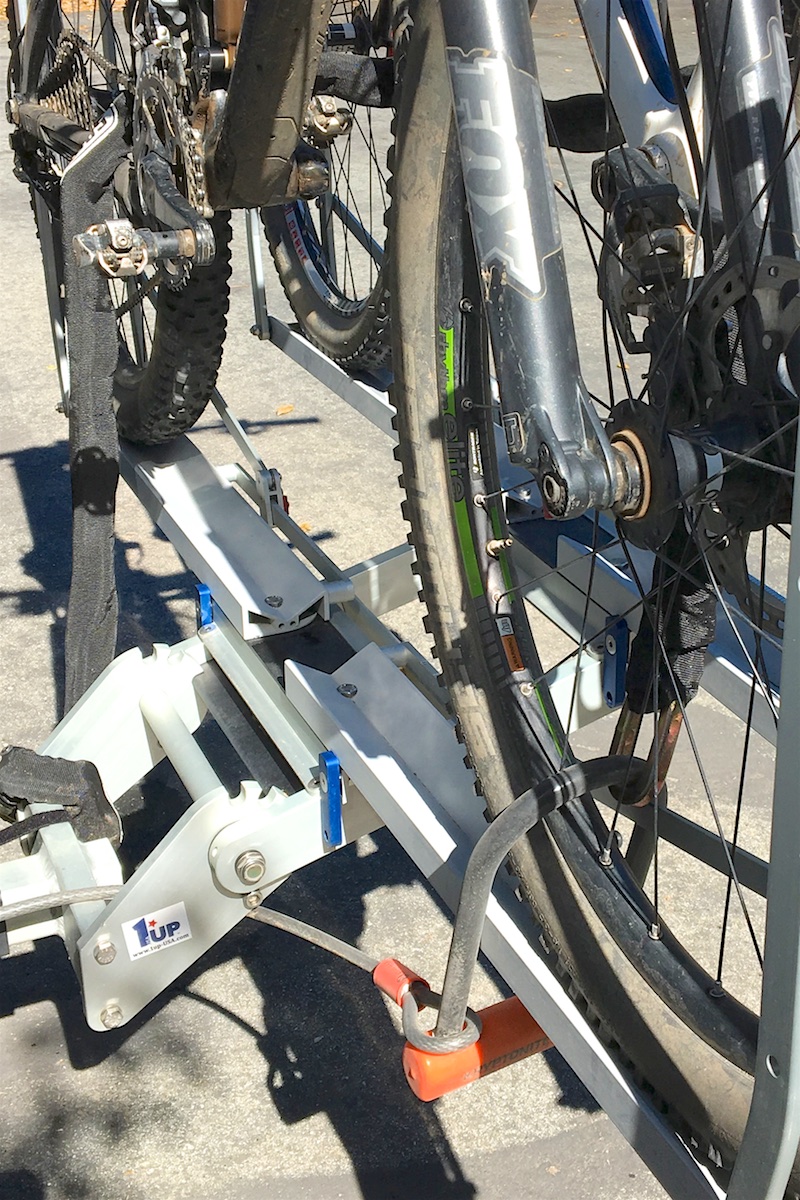
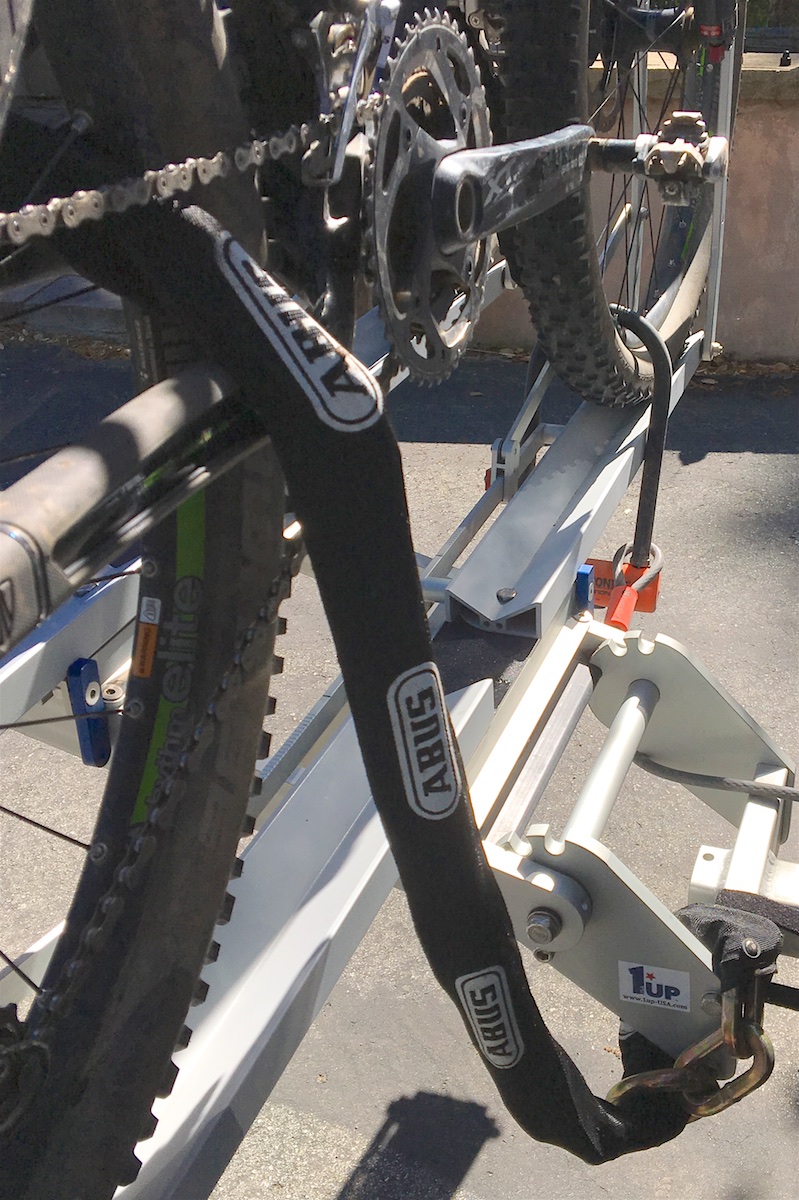

Sink-fitting plastic basins

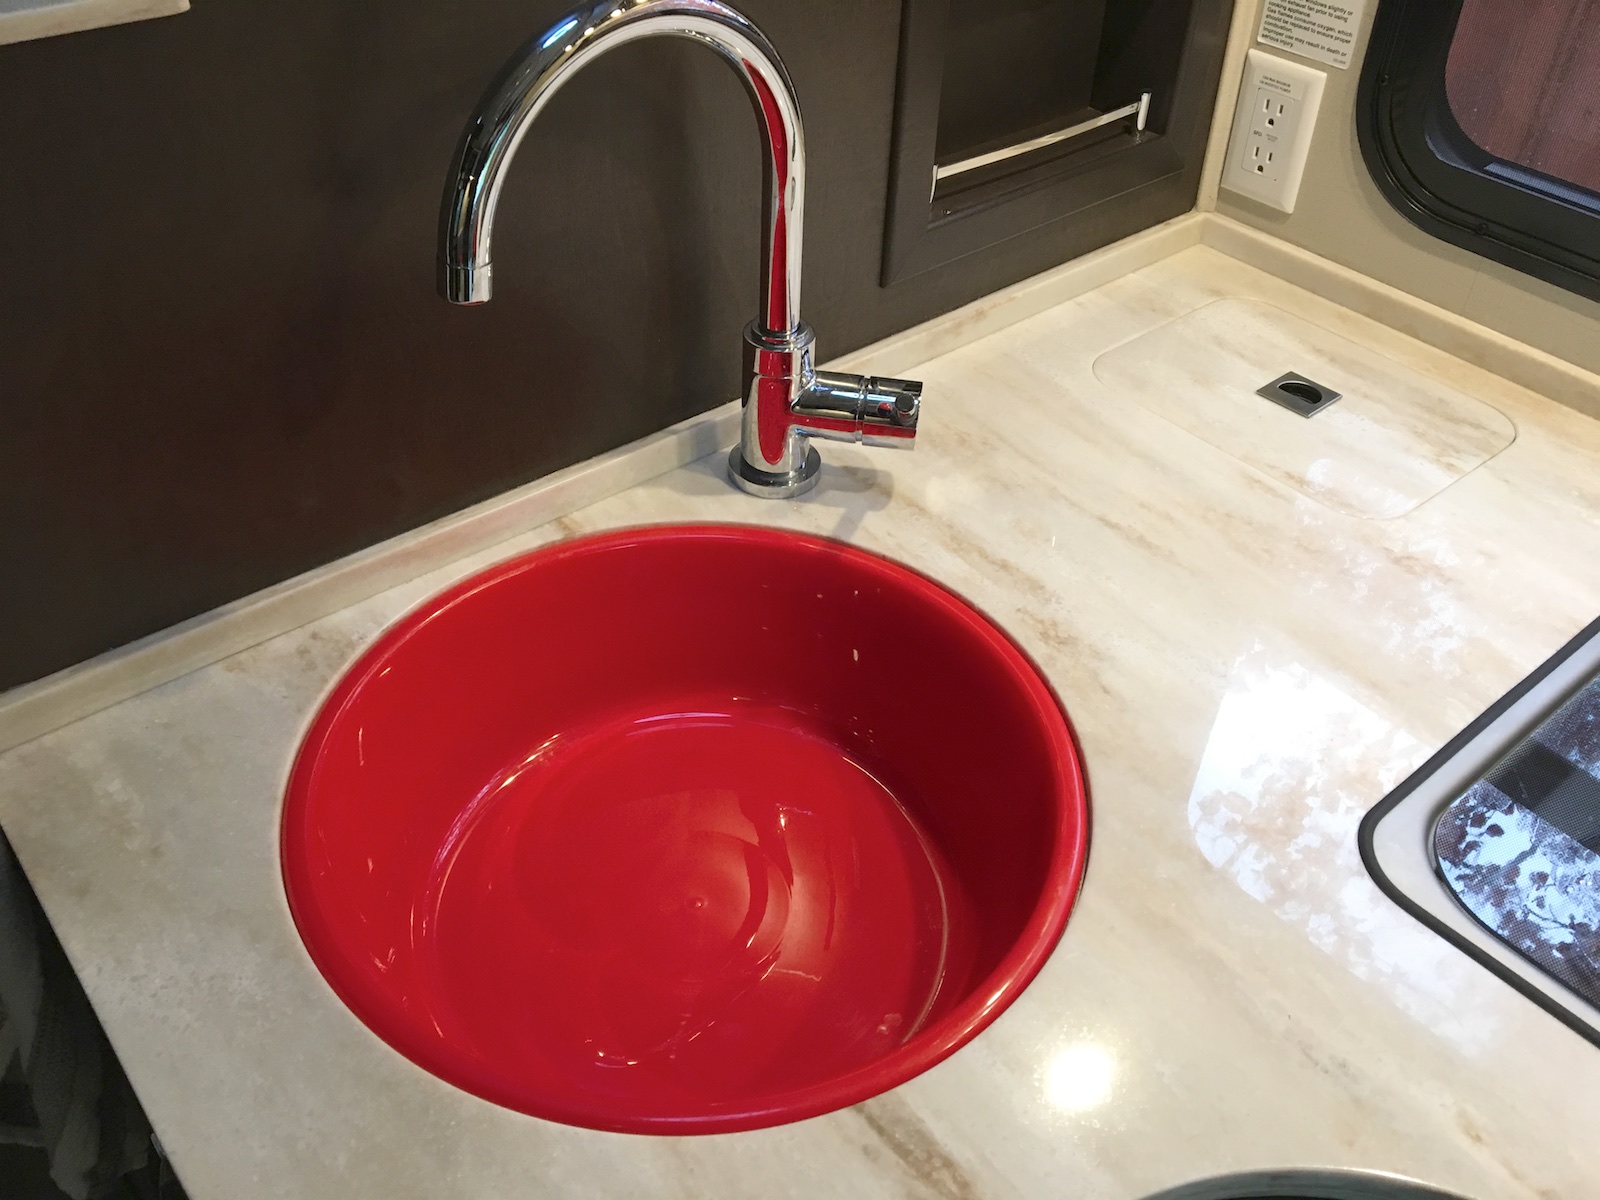
I found a nice plastic wash/rinse basin that fits in the sink perfectly. This is useful for making the most of your wash or rinse water but also for catching it for reuse when you want to stretch your use of your fresh water supply. For example, you could potentially keep it in the shower and reuse it to flush the toilet rather than using fresh water. Even on the low flush mode, that macerator toilet uses 4/10‘s of a gallon of water and the Unity only carries 30 gallons of fresh – that’s not a lot of flushes! In fact, I make a habit of turning off the water pump most of the time when merely flushing urine.
Also, having the wash basins is nice in freezing temps to avoid inadvertently sending water into your plumbing system.
Portable grill using RV’s onboard propane
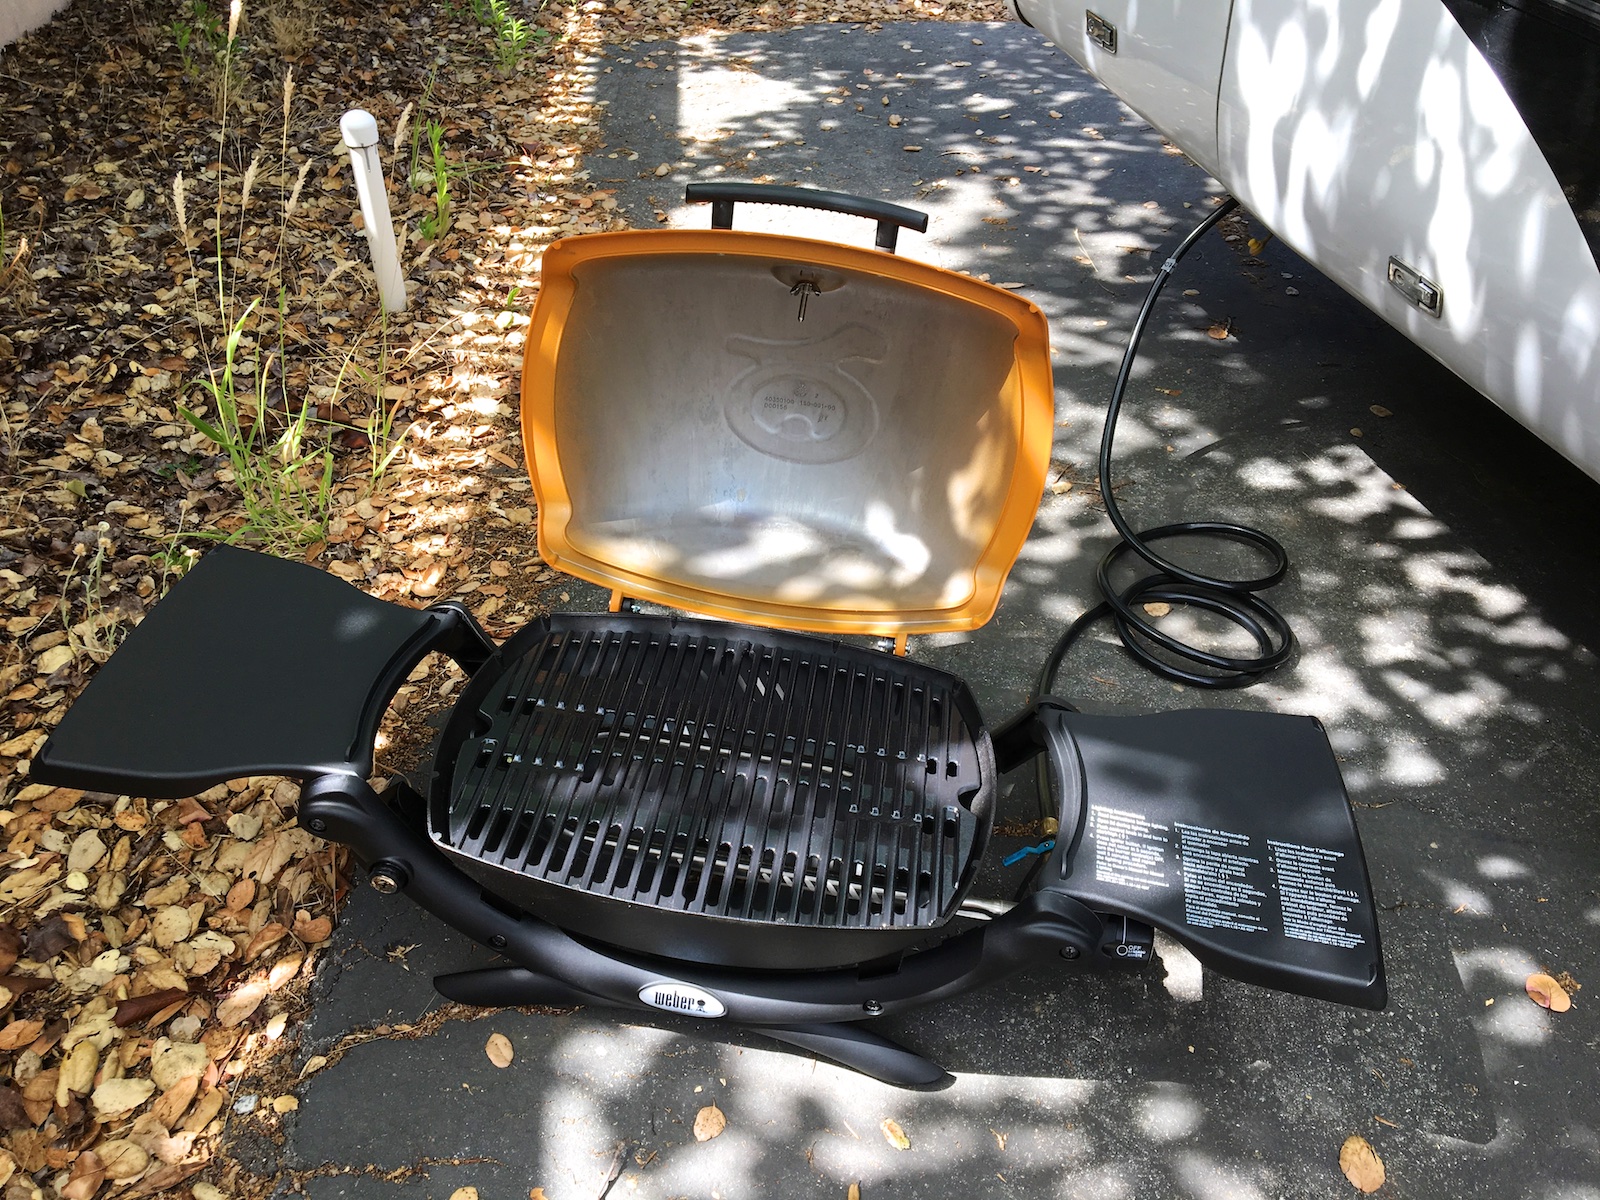 I decided it would be nice to have a little portable grill along and so, after reading reviews of different models, I settled on the Weber Q1200 – which, importantly, lets you grill with the cover closed and has a temperature gauge.
Like most grills, it comes with a high pressure regulator so that you can use those little one pound propane canisters. However, it’s pretty easy to convert it for use with the RV’s on-board propane and its external, low pressure port. You’ll need to remove the high pressure regulator from the grill and replace it with a quick disconnect port. These are the parts you’ll need:
- FasParts 1/4″ Female NPT to 1/8″ Female NPT Reducing Coupling Brass Pipe Fitting
- Camco Propane Quick-Connect Fitting – 1/4″ NPT x Full Flow Male Plug
- Camco 10 ft Propane Quick-Connect Hose
- Rectorseal No.5 Pipe Thread Sealant-1-3/4-Ounce Tube
- Rectorseal Better Bubble Leak Locator 8-oz Bottle
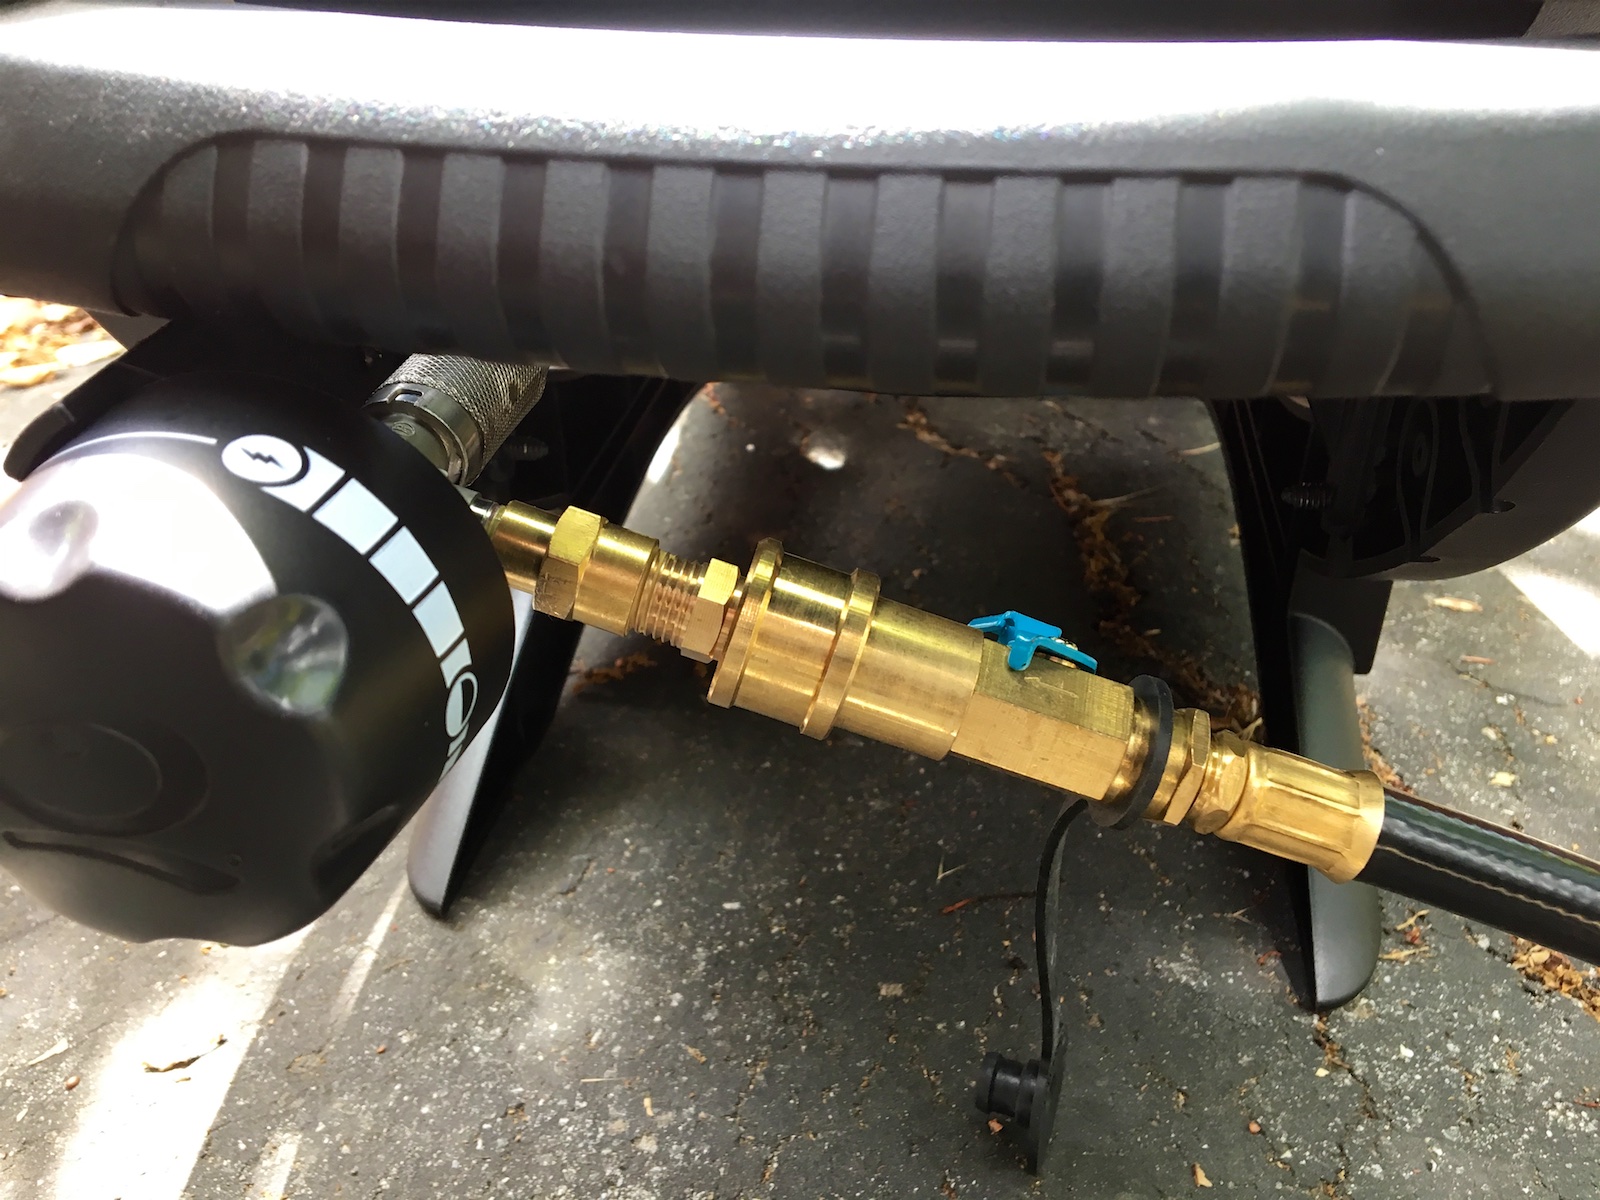 You’ll simply remove the high pressure regulator from the grill and then install (using the pipe thread sealant that’s appropriate for gas fittings) the adapter from 1/8″ NPT to 1/4″ NPT followed by the quick-connect fitting. Here’s one of the better videos on YouTube demonstrating how to do this – note that this one is from a company that sells a bundle of items similar to what I’ve listed above.
You can then connect directly to the RV’s external low pressure port. Be sure you actually do a leak check on the fittings you installed. (I found a leak on mine until I tightened things up better.)
If you want to still be able to sometimes use those one pound propane canisters, you can set up the regulator with a quick connect port so that you can use the regulator and those canisters or the RV’s low pressure port. (I didn’t bother to do this.)
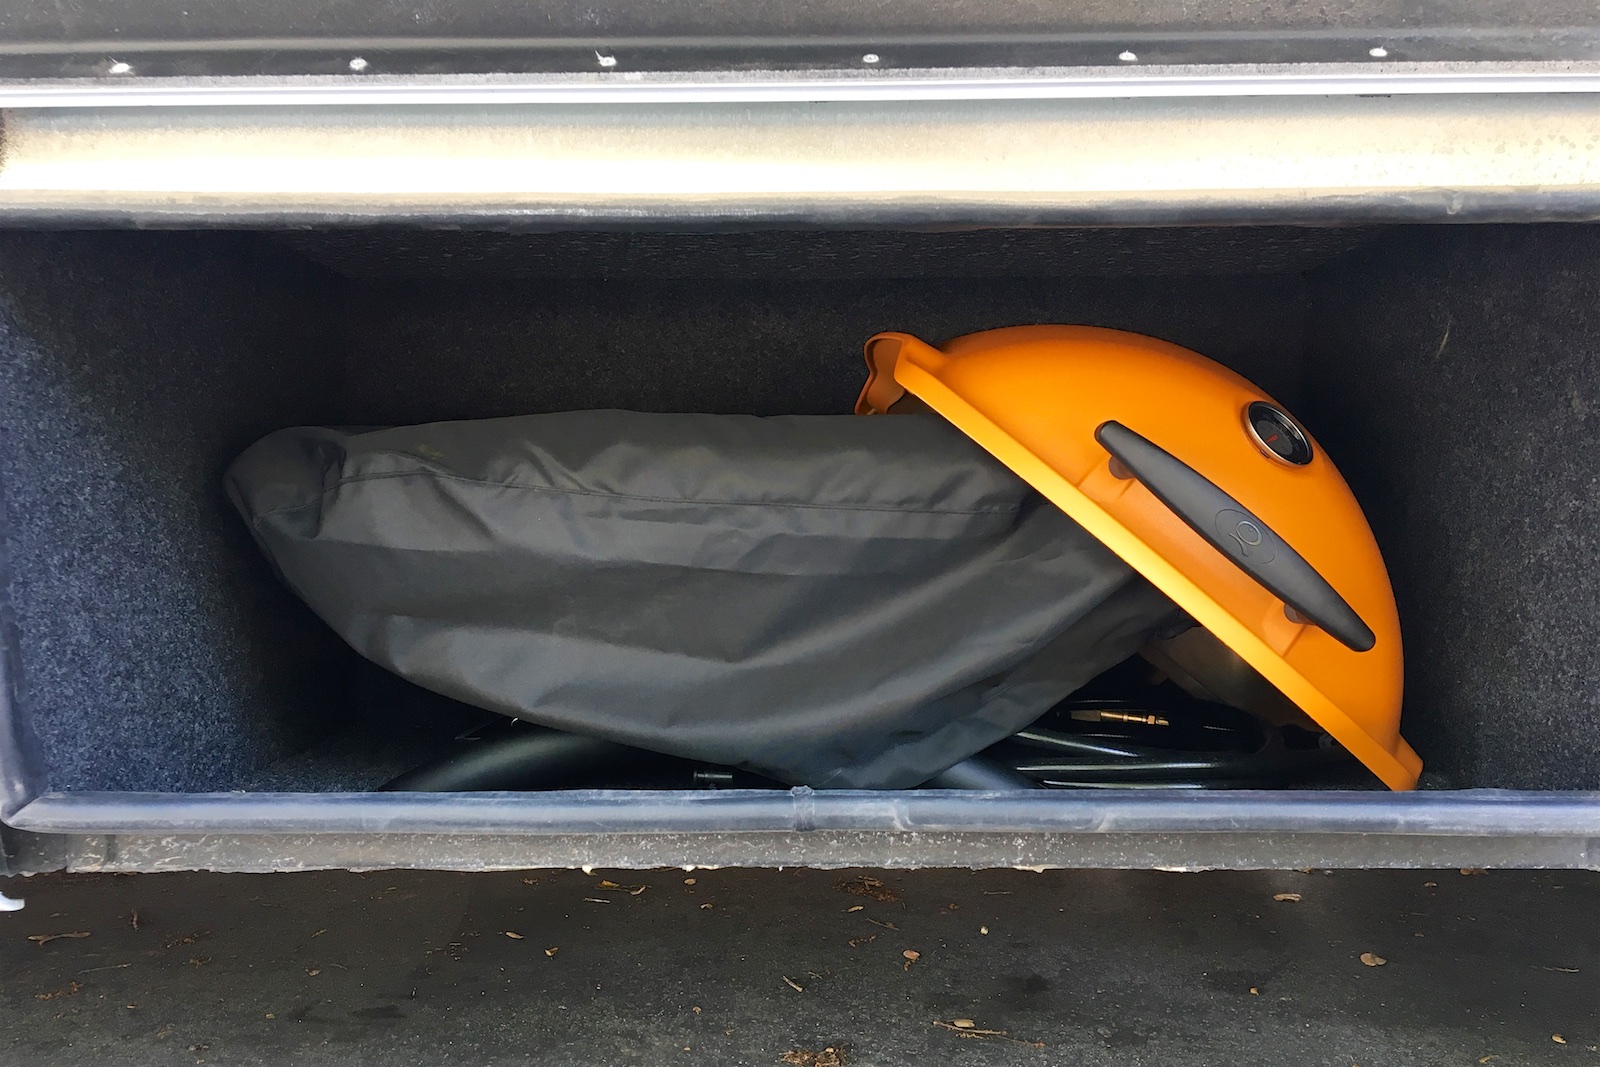 As for storing the grill, I had to do a little reorganization. Given all the other large gear I have on board (folding chairs, 8″ SCT telescope, tracking mount and gear, two-person inflatable kayak and gear, biking gear, space for the litter box, etc.) I was forced to use one of the undercarriage compartments. You’ll find that even the little Weber Q1200 won’t fit as one piece under there because it’s about an inch too tall. This means that you have to remove the lid and slide it in afterwards. Not a big deal though since it’s just a pair of cotter pins holding it on. I also decided to get the Weber Grill Cover for Q1000 Series, a grill brush and metal “supertong” spatula/tong combo.
And there you go! Grilling on the road!
Mice in the battery, inverter and engine compartments
I was impressed with how well the gaps into the coach/house portion were all well sealed but I didn’t notice that the battery and inverter compartments were not so well protected. And then of course there’s the engine compartment which can’t be sealed off.
Jump to the end of this section if you want to skip to what became my ultimate solution!
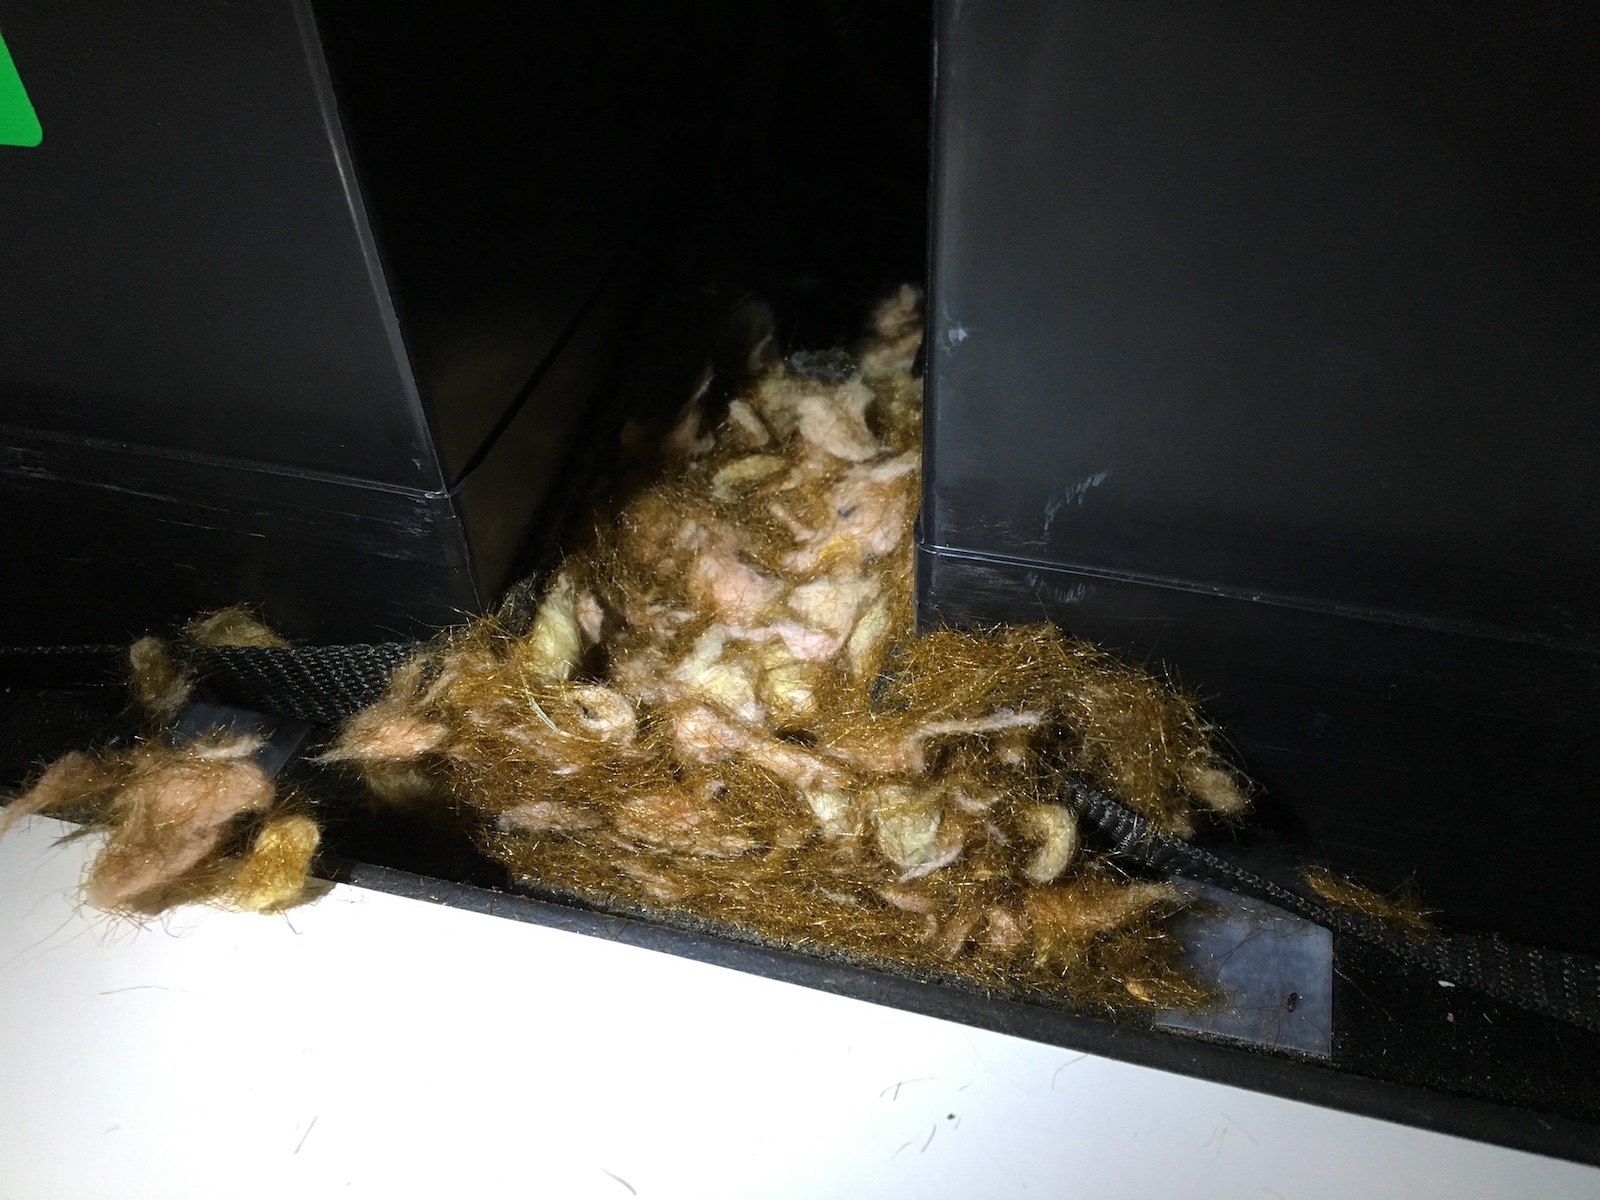
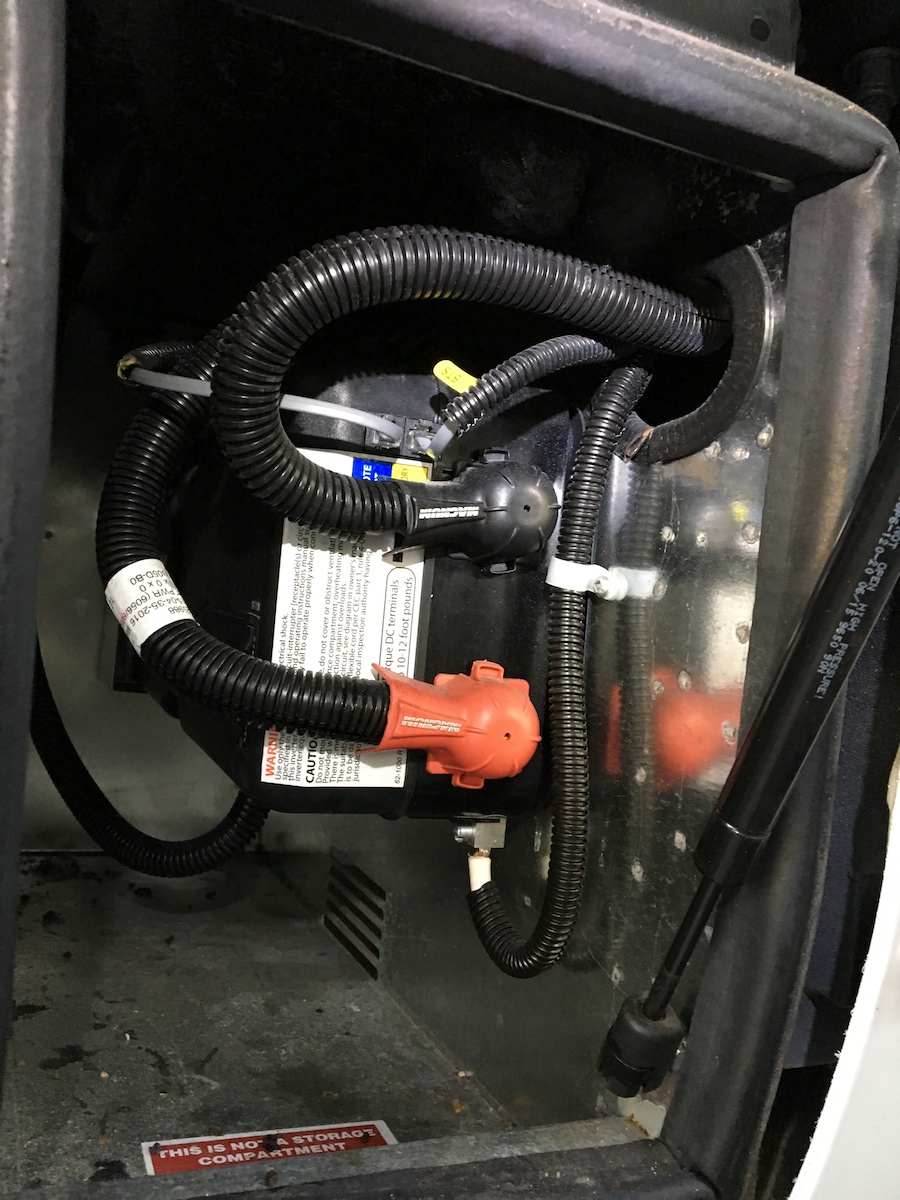
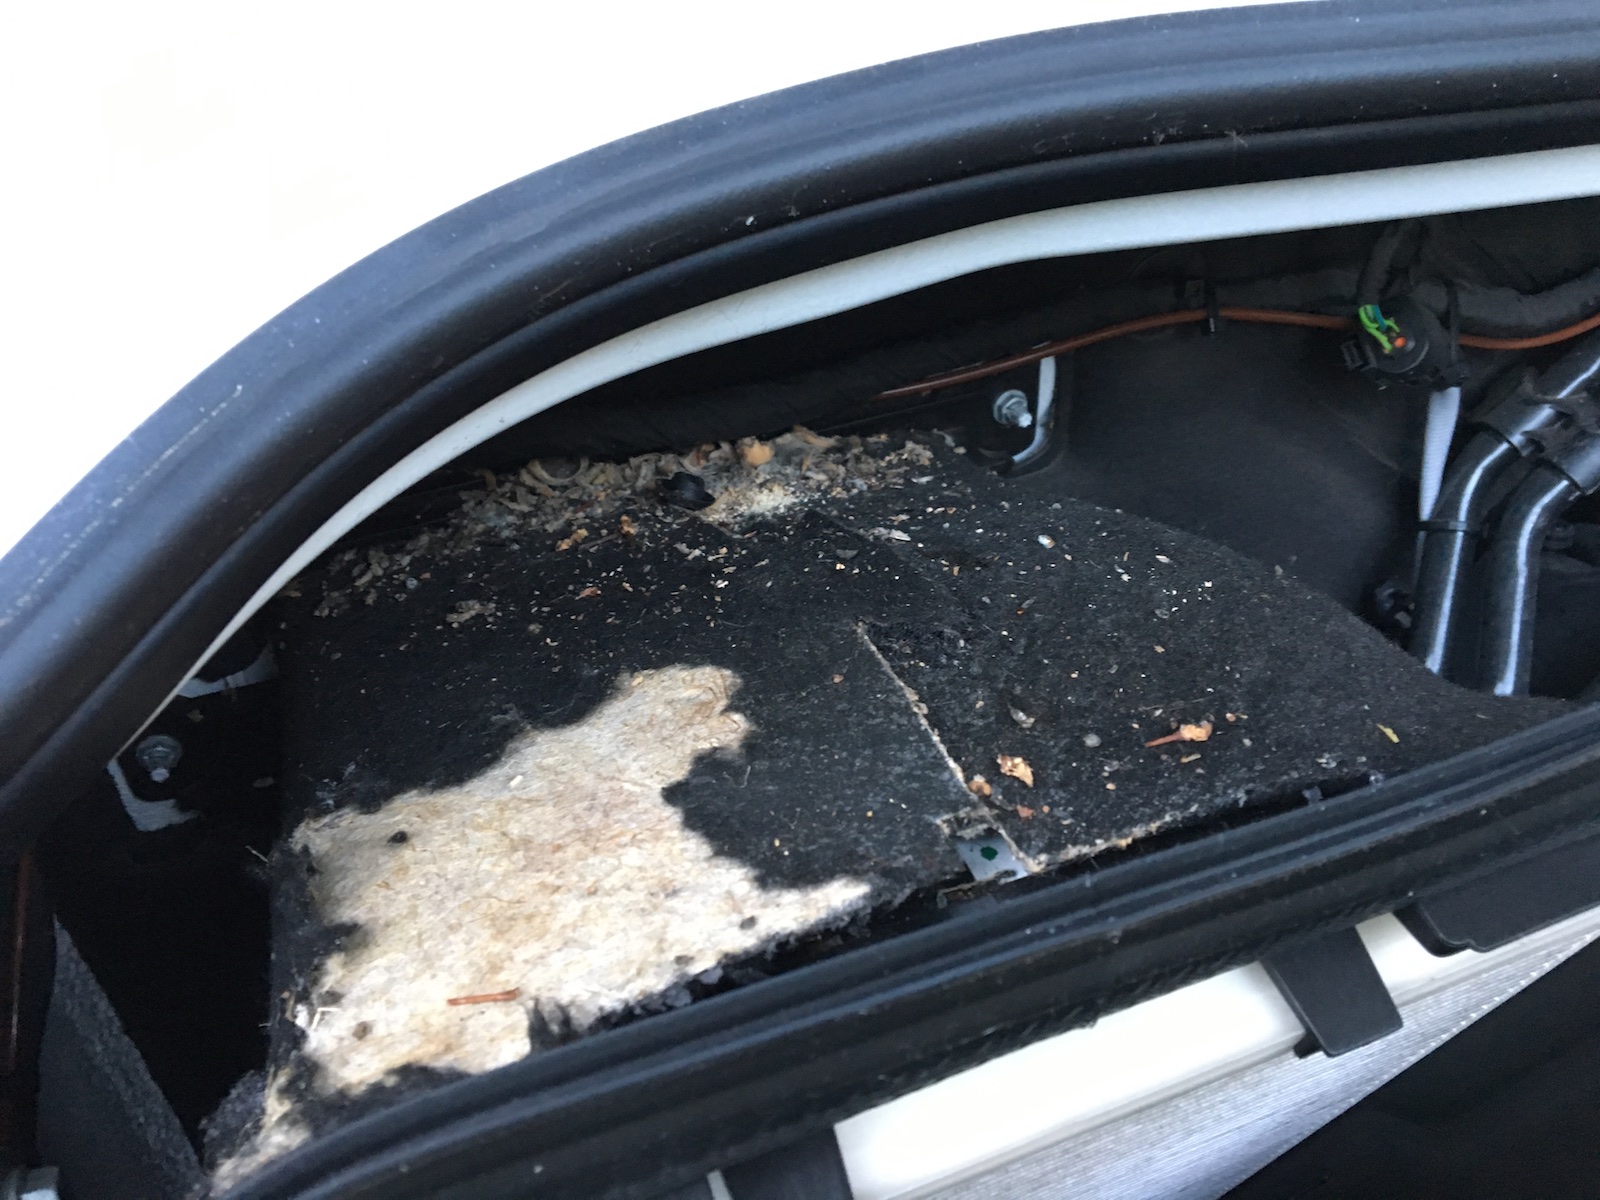
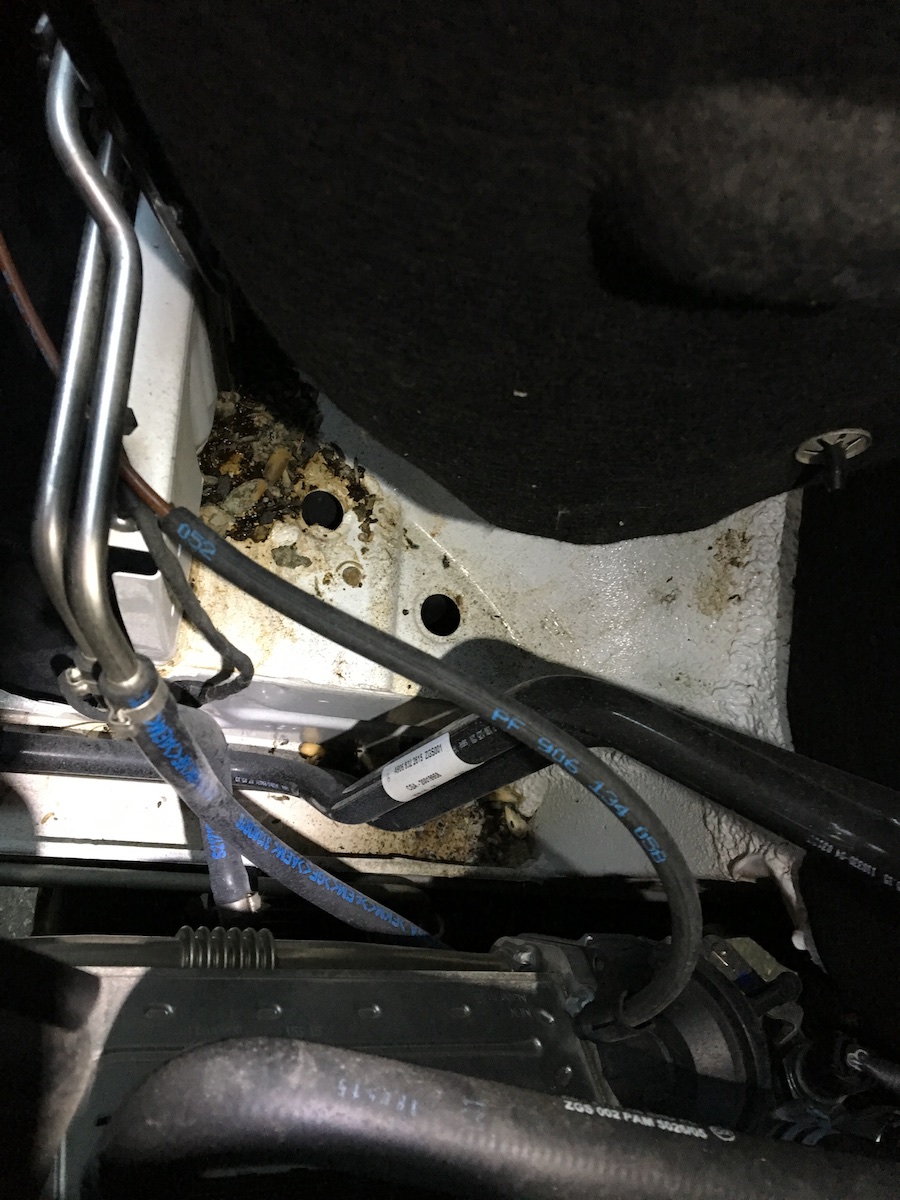
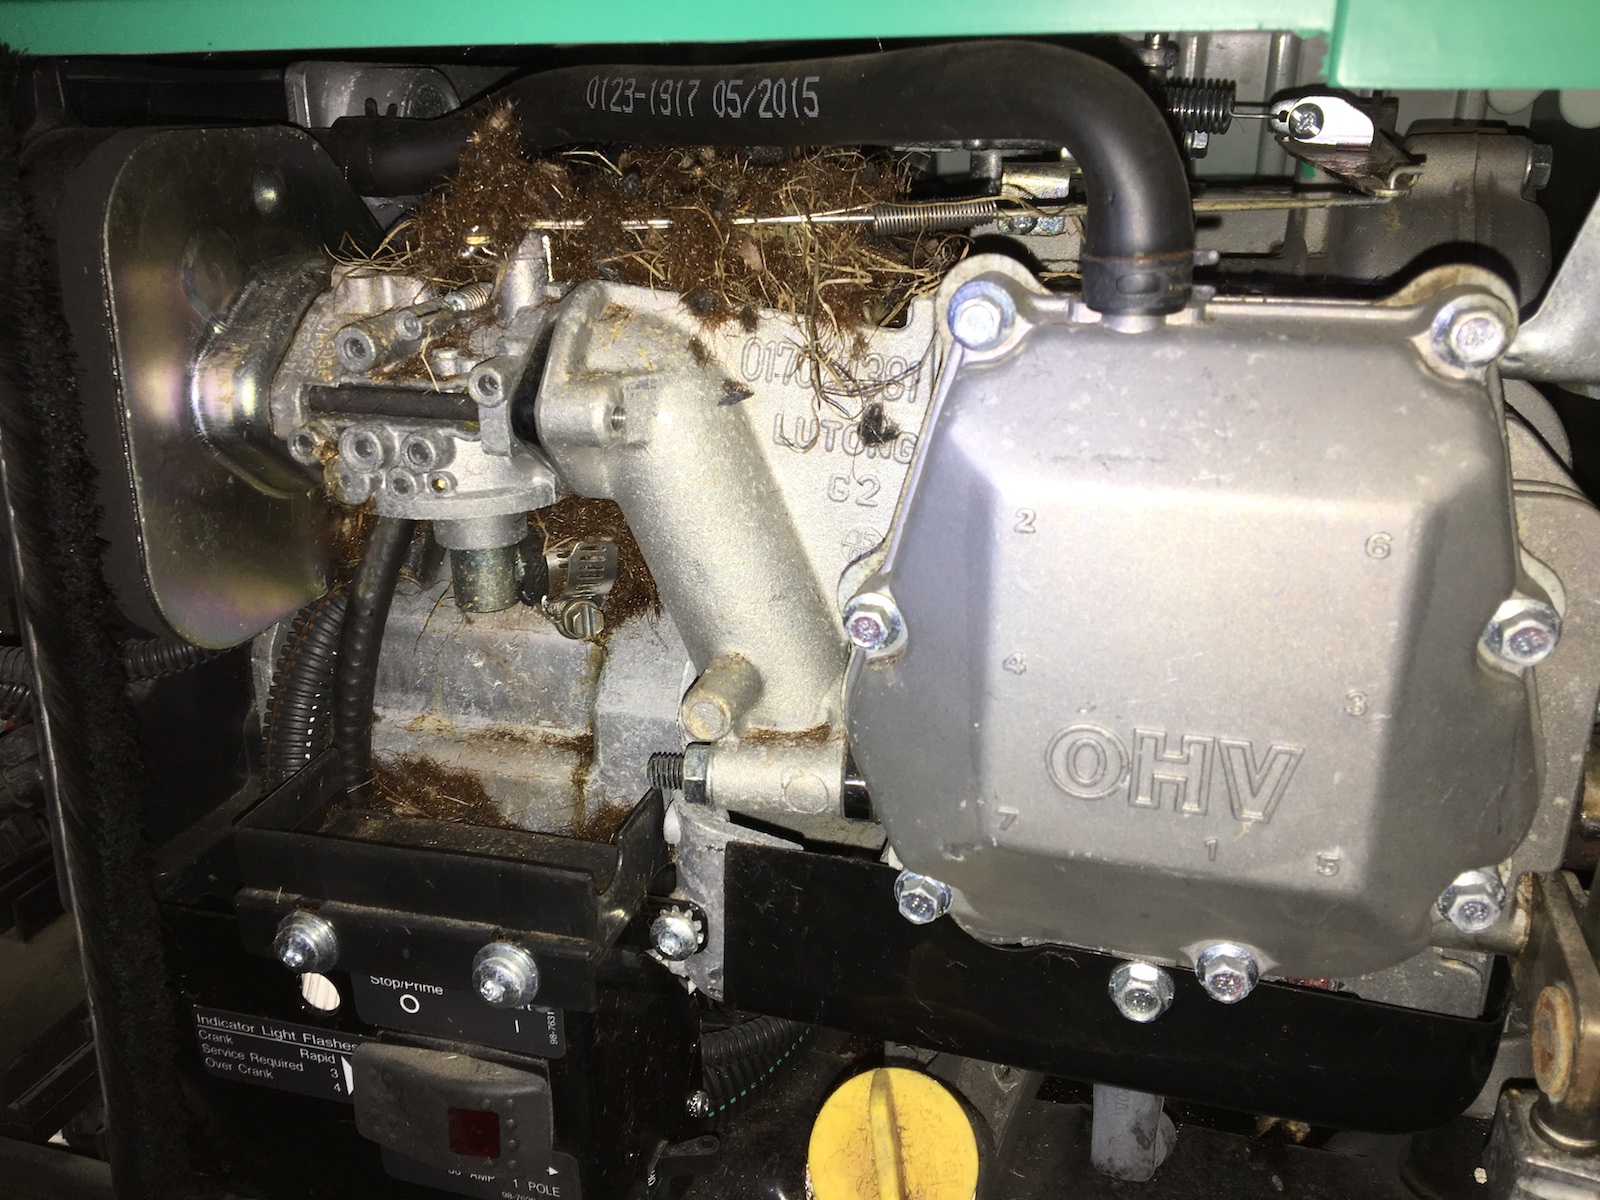
They chewed up a portion of some insulation material on top of the air filter and I found the debris of acorns and the like in various places in the engine compartment and the inverter compartment, as well as a nest in the battery compartment under the step – I don’t know what or where that material came from.
Update: Many weeks later, I also found the largest, thickest nest inside the Onan propane generator!
I tried placing a dryer sheet between the batteries after cleaning out the nest, which I’ve read is supposed to deter the mice, but I found chew marks in it a few days later and then it was completely gone (removed) from the battery compartment a week later. They clearly aren’t so easily deterred by dryer sheets!


I sealed up the cable opening in the inverter compartment with heavy adhesive tape and I plan to fill the opening in the back of the battery compartment with Great Stuff Pestblock Gap Filler. But the big fix was installing a well-reviewed, wired, noise-making rodent deterrent from Apesto for under the hood. It was a hassle to wire it up though as there isn’t any easy access to the battery since it’s under the driver’s side floor. I had to find where the majority of the wires pass through from the engine compartment to behind the dashboard. This involved taking apart a good portion of the driver side trying to get access to where the wire bundle comes through the firewall – which didn’t help. I was finally able to feed some wire through from the engine compartment by first feeding a heavy, rigid length of Romex cable through the insulated opening and then feeding my 14 gauge power wire until it came out beneath the fuse box inside the cab. I used an Add-a-Circuit fuse tap kit to connect it. Beware that some of these circuits only remain active for a few minutes after turning off the vehicle or the lights. You’ll need to find one that’s always active.
There is one catch though and that is that this product doesn’t operate when it sees a charging voltage on the battery. Since my starter battery is now being maintained along with my house battery by my solar system, this means that it won’t run most of the day. Hopefully this won’t be a problem.
So far (months later) it seems to be working – there’s no new evidence of mice. I have it on the low setting because the high setting was quite obnoxiously loud even well away from the vehicle. On the low setting, I only really hear it while standing immediately in front of the vehicle. We’ll see how the cats do but I assume I’ll need to unplug it when traveling with them. Perhaps I’ll add a switch.
Update: I’ve found evidence of mice once again – in the battery compartment, in the propane generator and even under the hood. I’ve now switched the electronic rodent deterrent to the annoying, high setting. I’ve also finally properly sealed up the conduit in the back of the battery compartment with Great Stuff Pestblock Gap Filler and someone else has suggested using Fresh Cab, which I will give a try in the propane generator behind the removable panel. Fingers crossed…
Update again: It’s been months since the last improvements of sealing up more gaps and using Fresh Cab in the utilities bay and in the generator (with the breaker turned off so, if I ever use the thing, I’ll see it and remember to remove it). With all that and the powered, noise-making rodent deterrent – all good so far! Nope, not good at all. I’ve got mice making a mess in the engine compartment and I found a huge nest in the utility bay. The noisemaker clearly doesn’t help, even on the “high” setting and the scented bags of repellent aren’t doing the trick either. Going to try mothballs next….
This is what’s happened to the insulation around the cabin air intake housing:
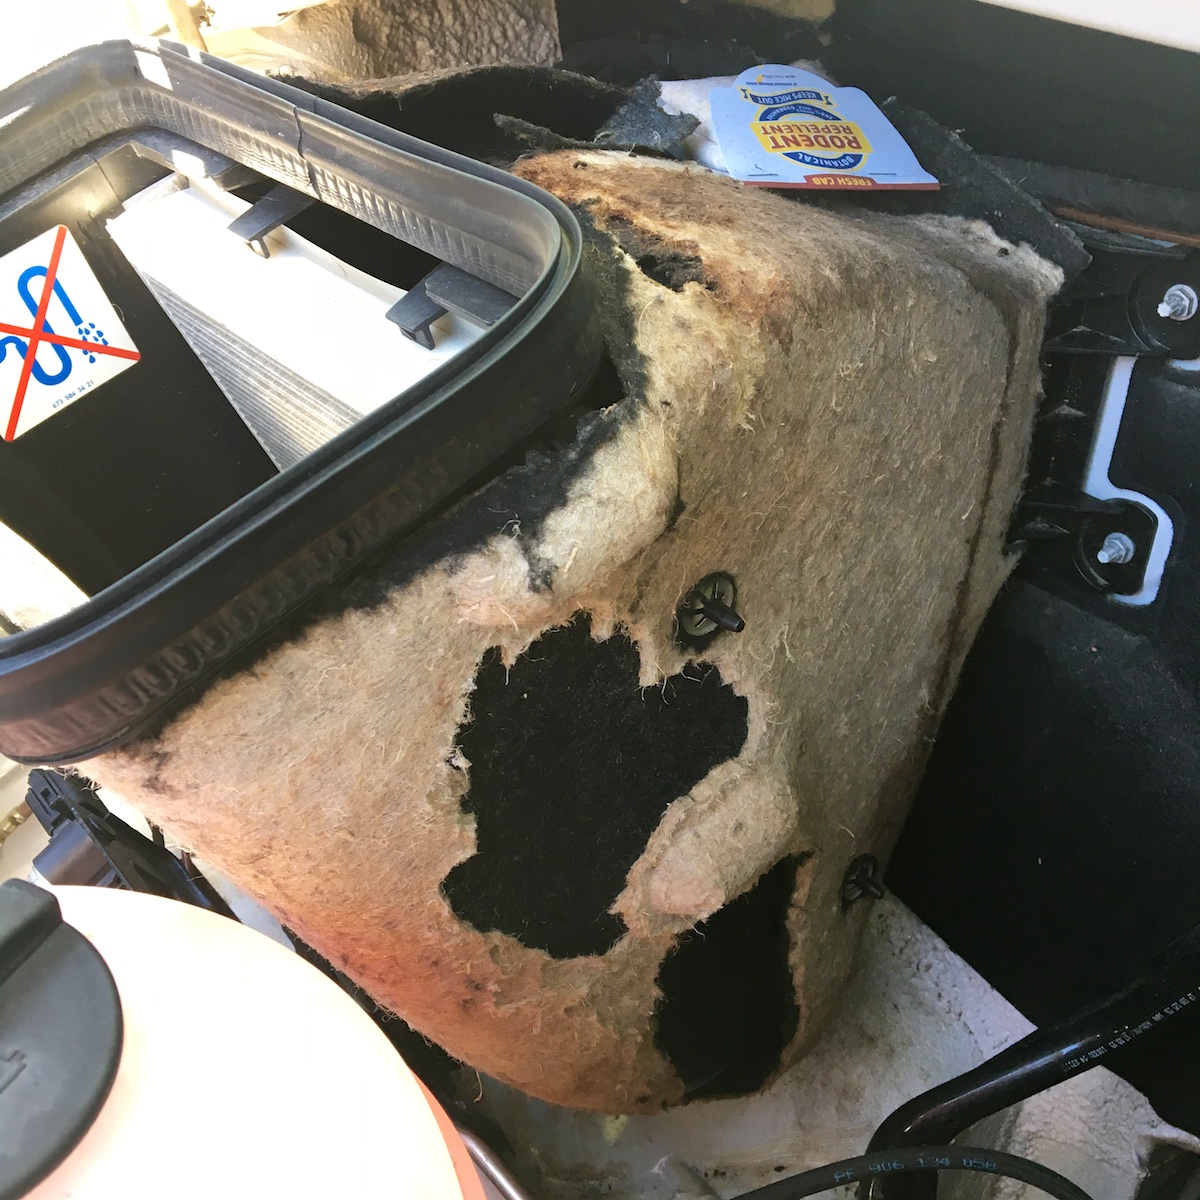
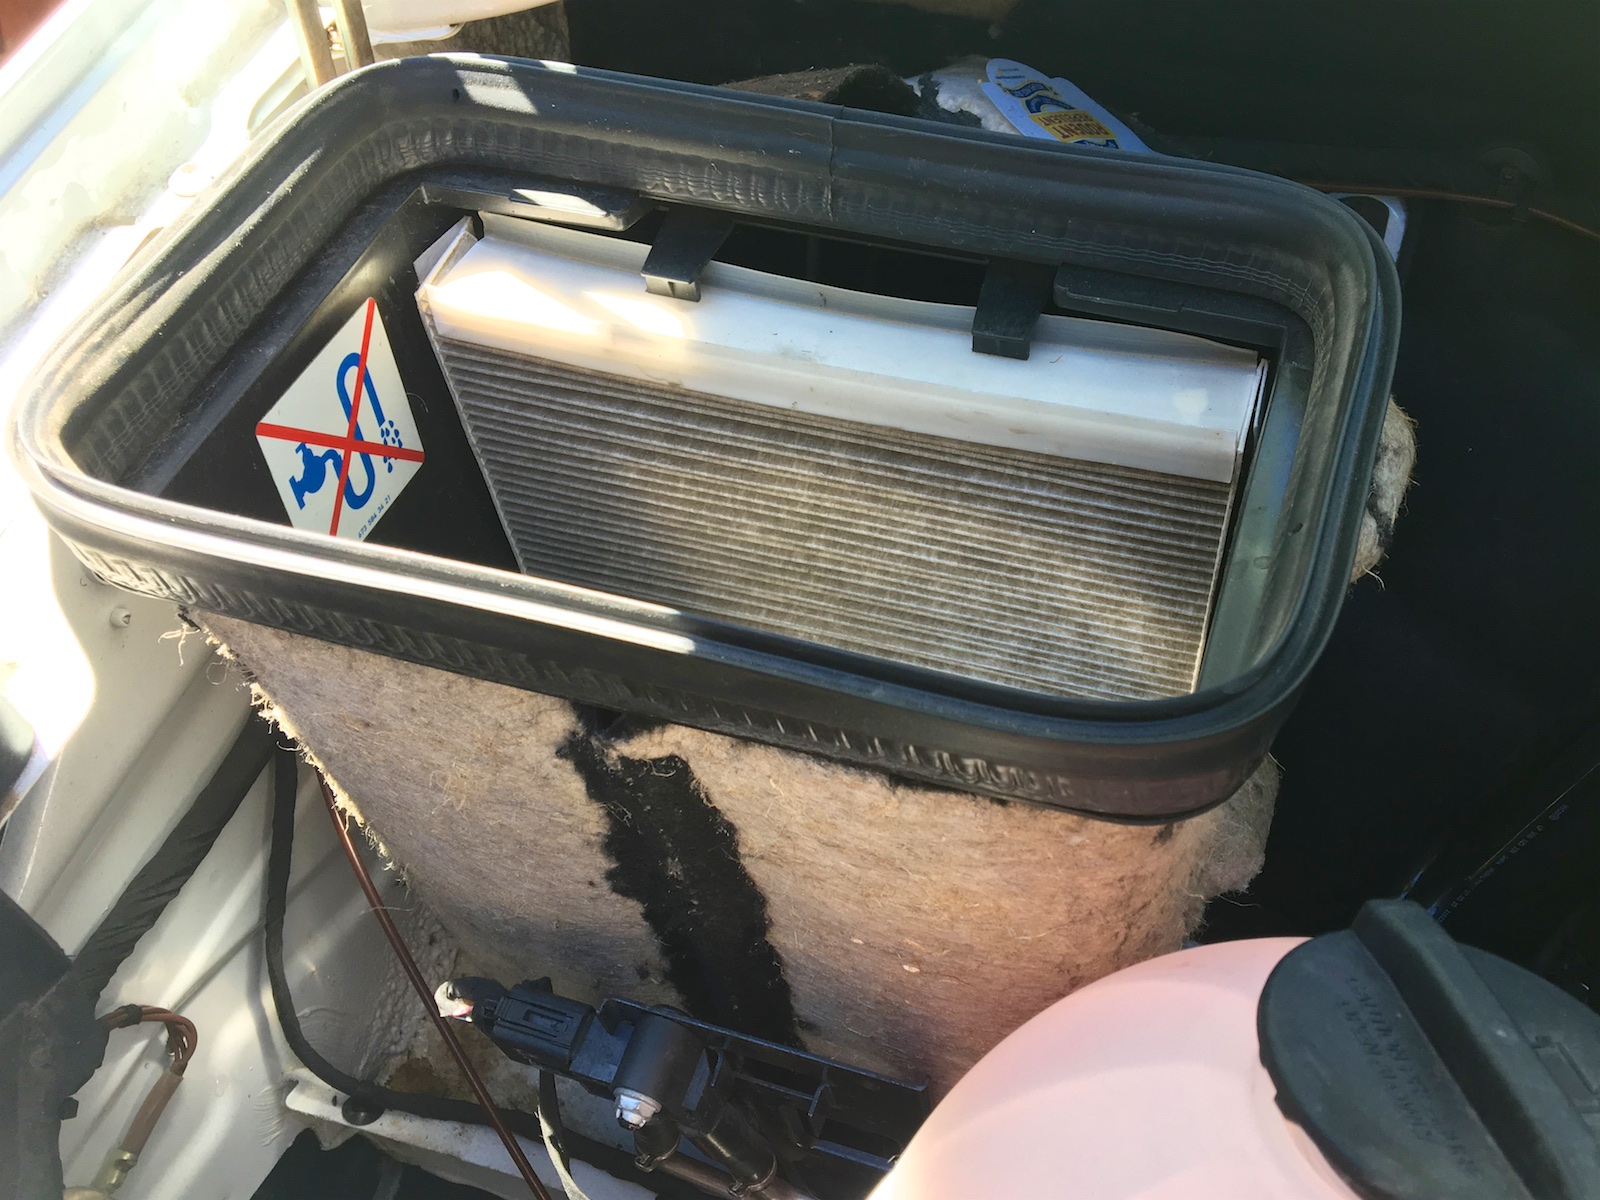
I tried looking for the Mercedes Sprinter molded insulation replacement part on-line and checking with salvage/junk yards, but I couldn’t find it. I ended up stopping at a Mercedes dealer near Portland, Oregon while we were traveling and they had them in stock and gave me a part number: 9068310096. It was $50. Presumably it would be easy enough to order it in the future, now that we have the part number.
By the way, installing it is a bit of a challenge as it’s difficult to reach around in the tight space, and it’s not at all possible without at least disconnecting the housing. You can’t remove it entirely without disassembling some other components, but getting it loose was enough to replace the insulation. And those retaining clips are tough too. You need to bend back a couple of teeth in order to work the thing off of the center pin on each one.

Update again (June 2019): Still having mice intrusions! A couple of new things to deal with:
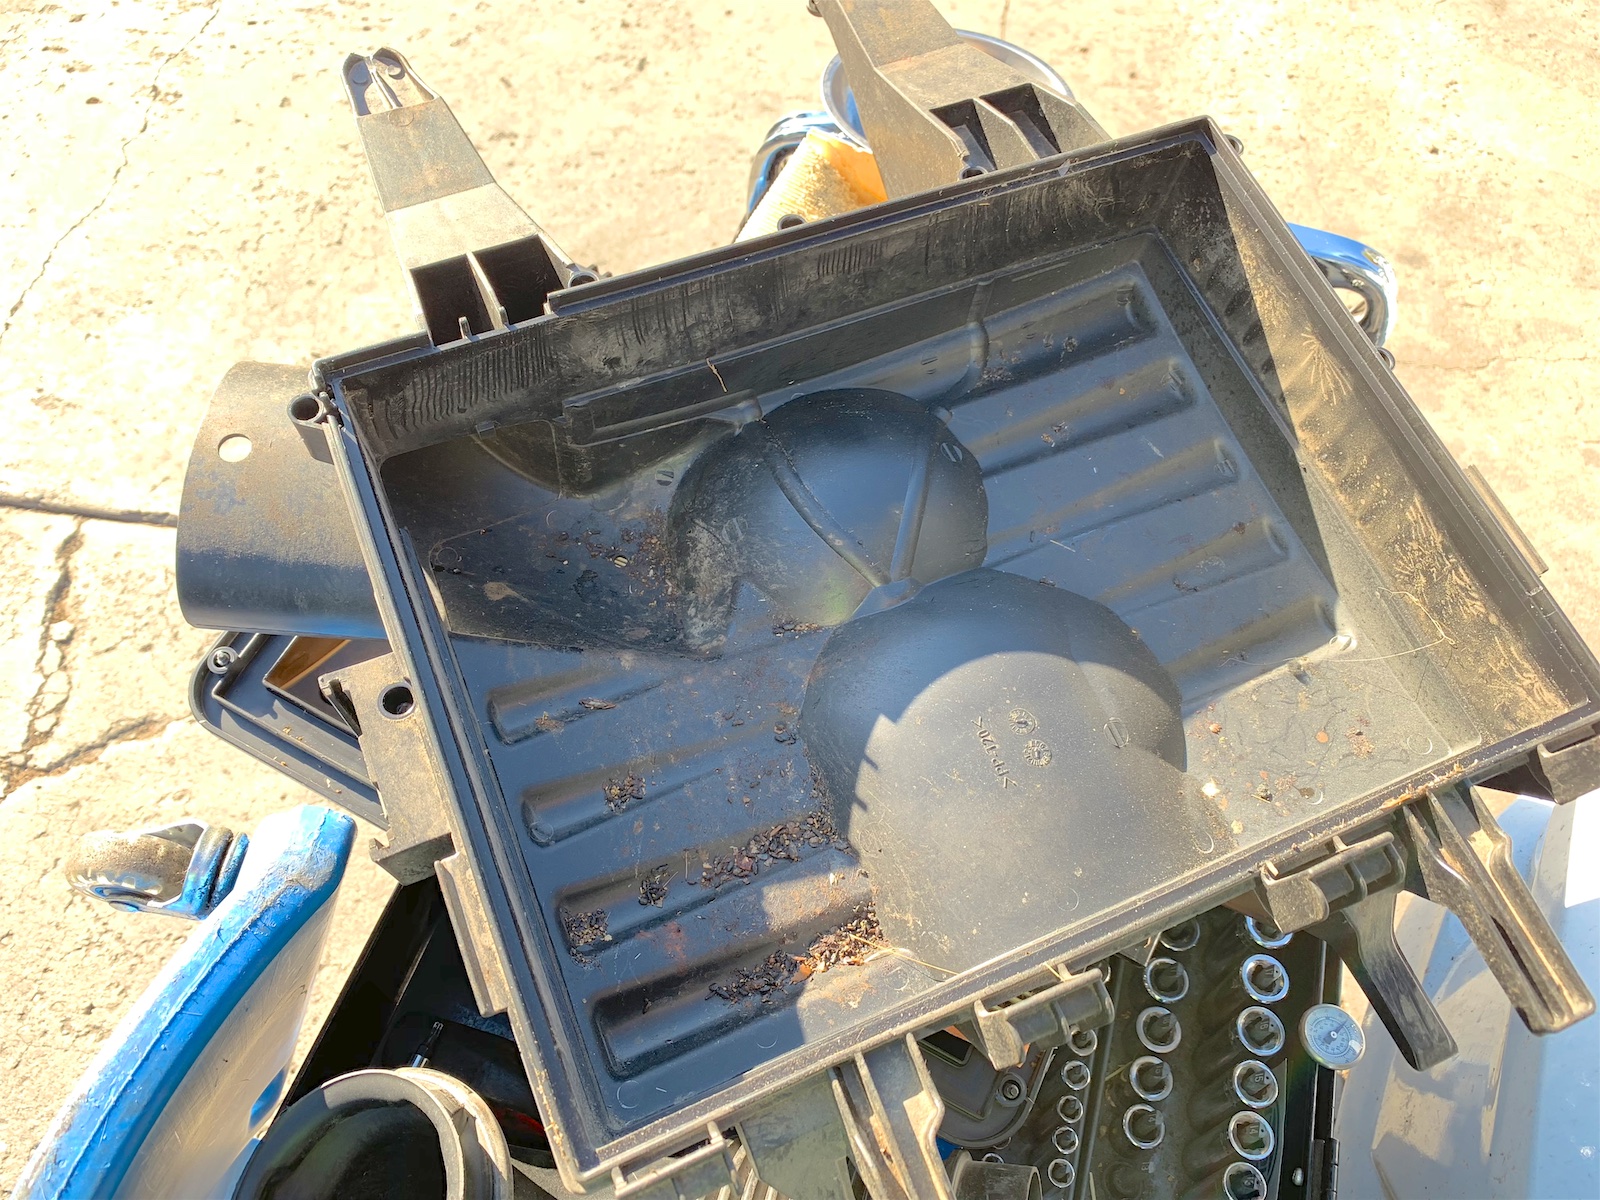
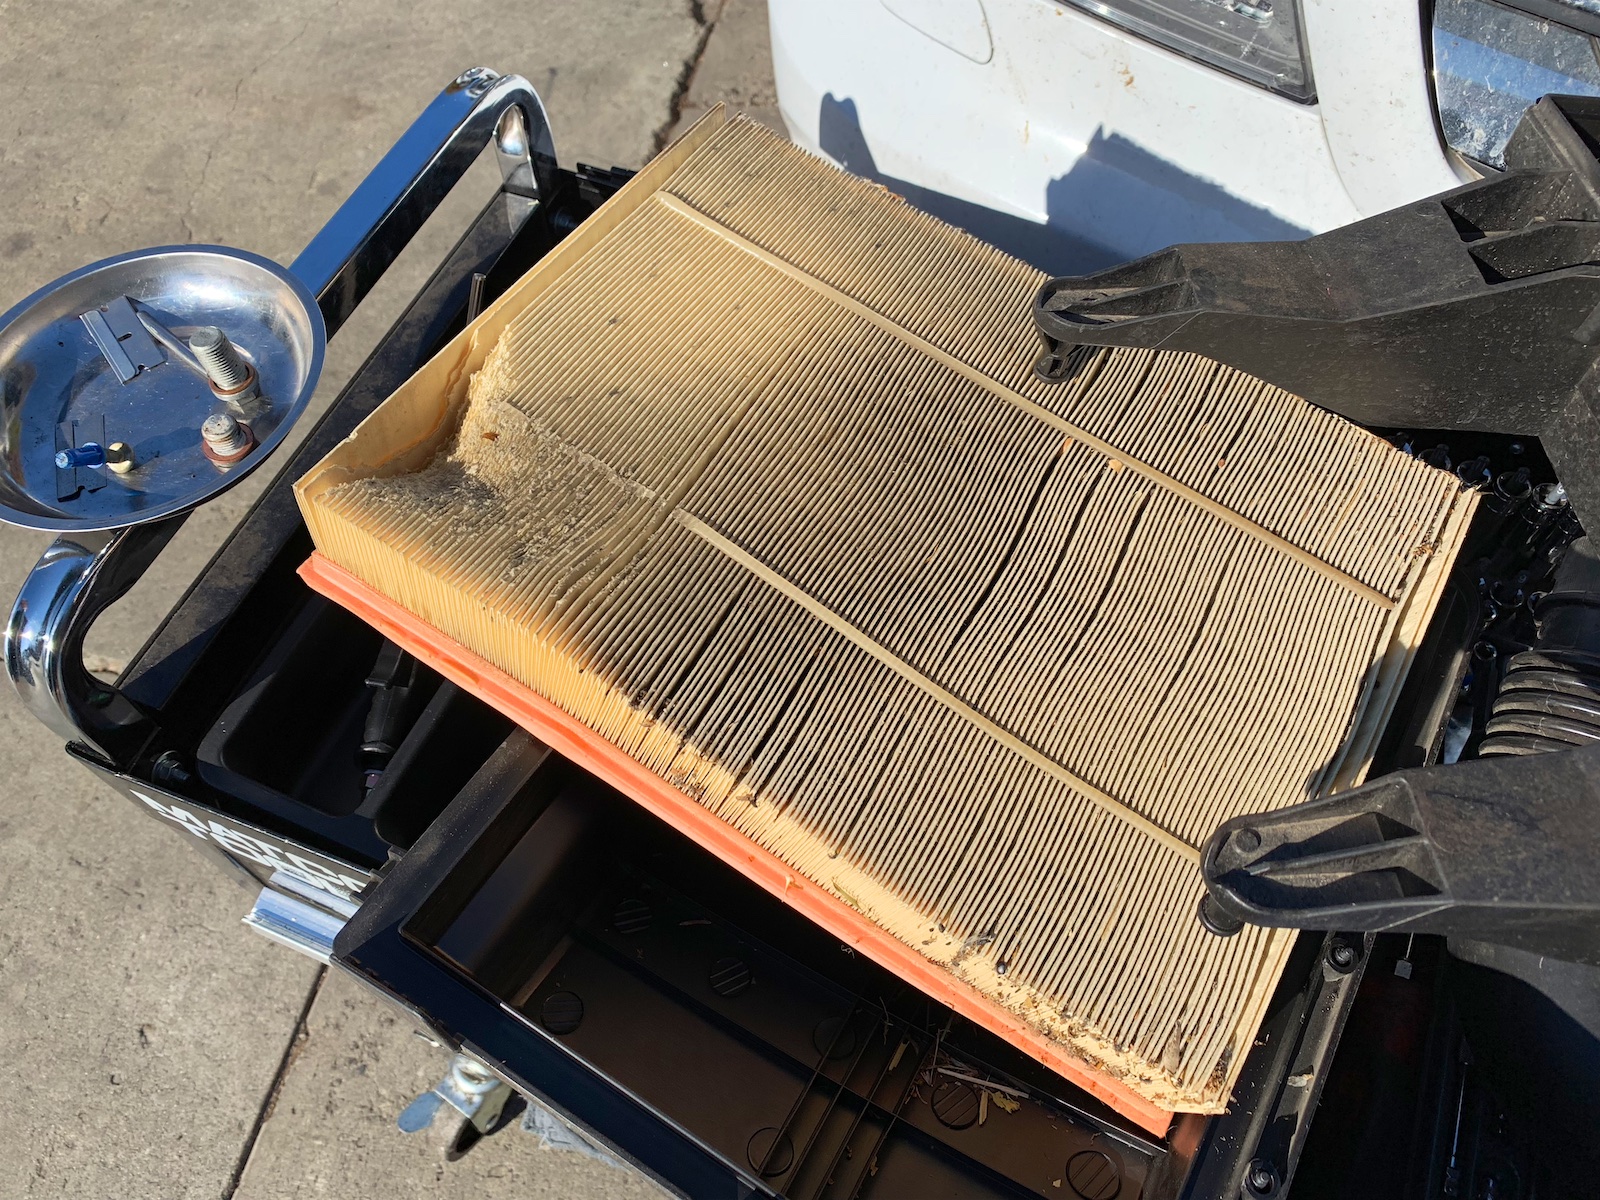
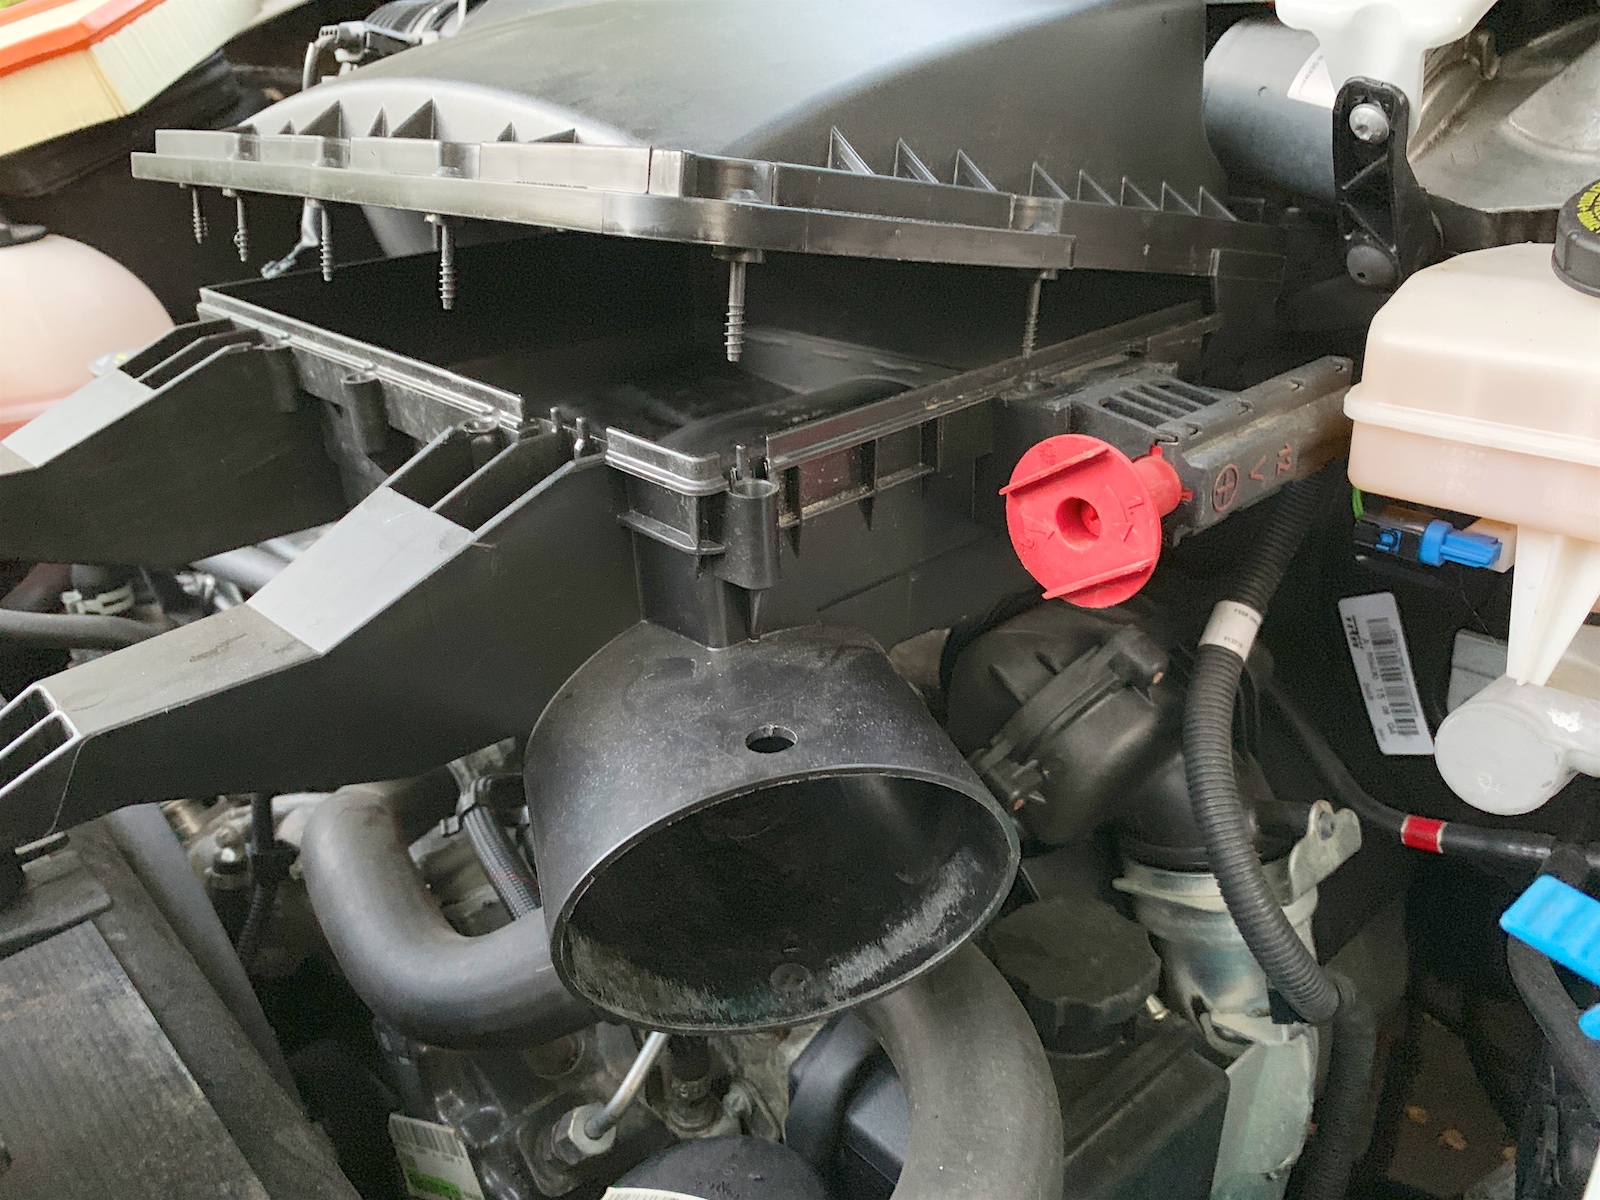
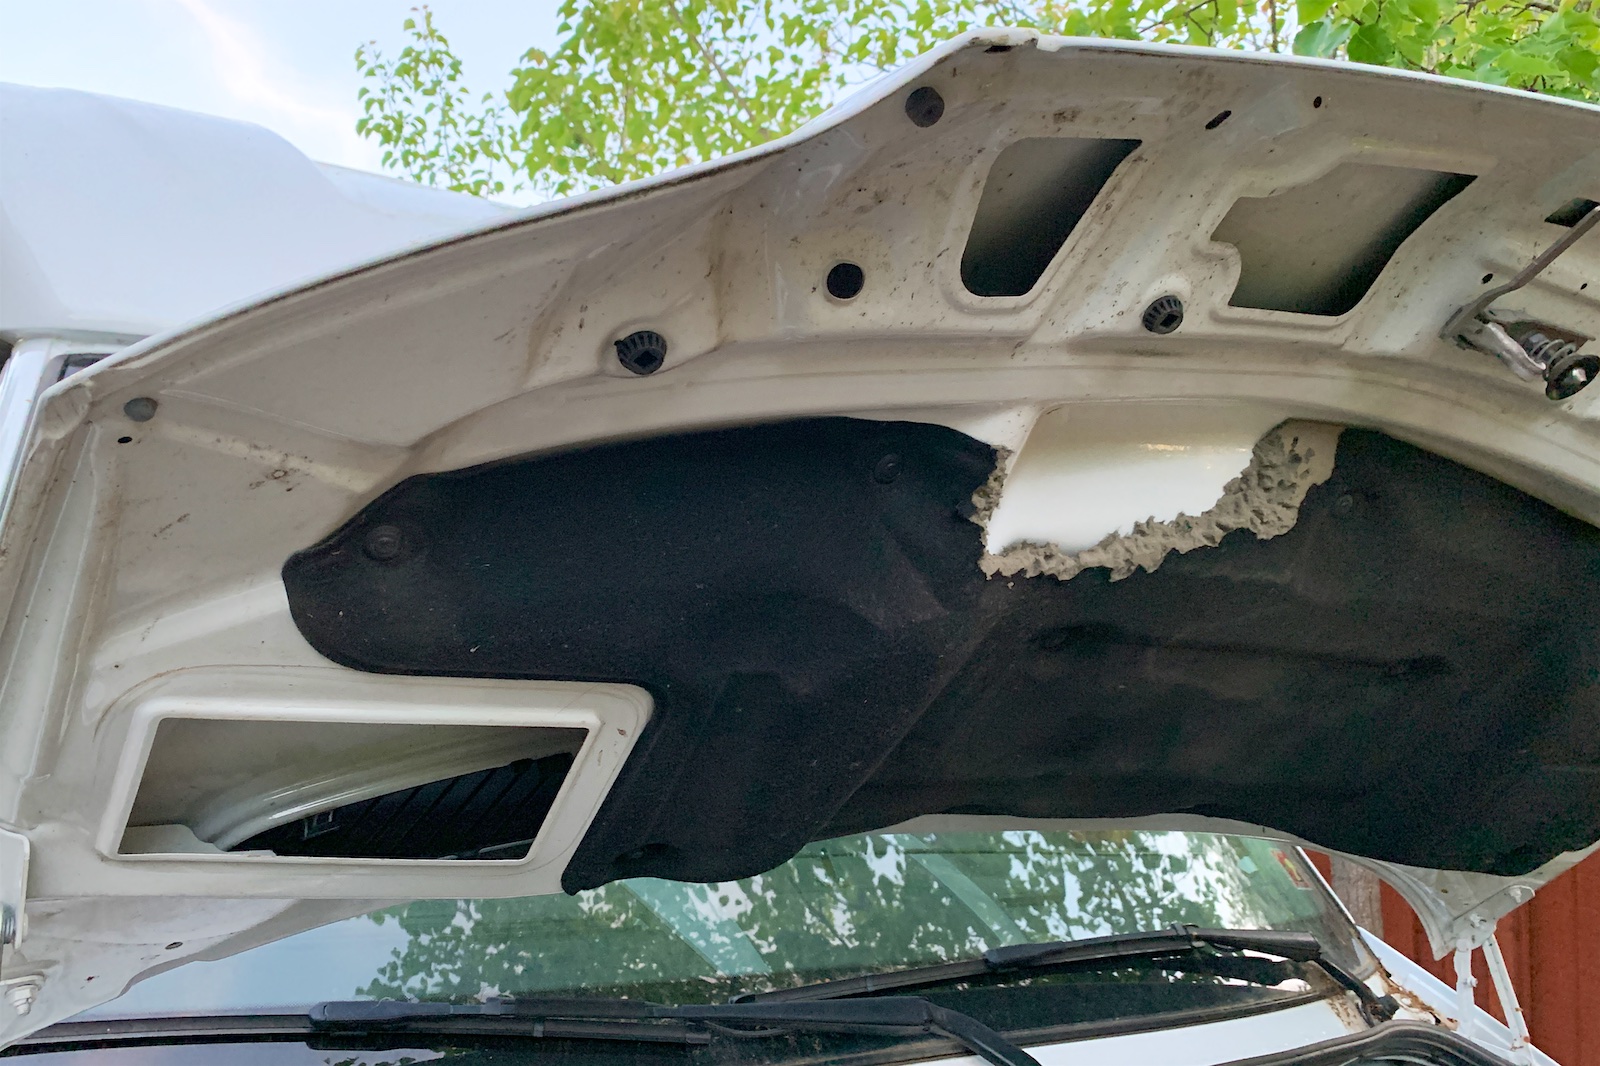
#1: The air intake for the Sprinter engine is a huge wide open intake facing the front of the vehicle that is completely open to rodents to crawl into and nest in and tear apart your air filter. (Guess how I found this out!) After cleaning it out and getting a new air filter installed, I created a makeshift barrier out of some metal wire mesh and stuffed it into the front of the intake.
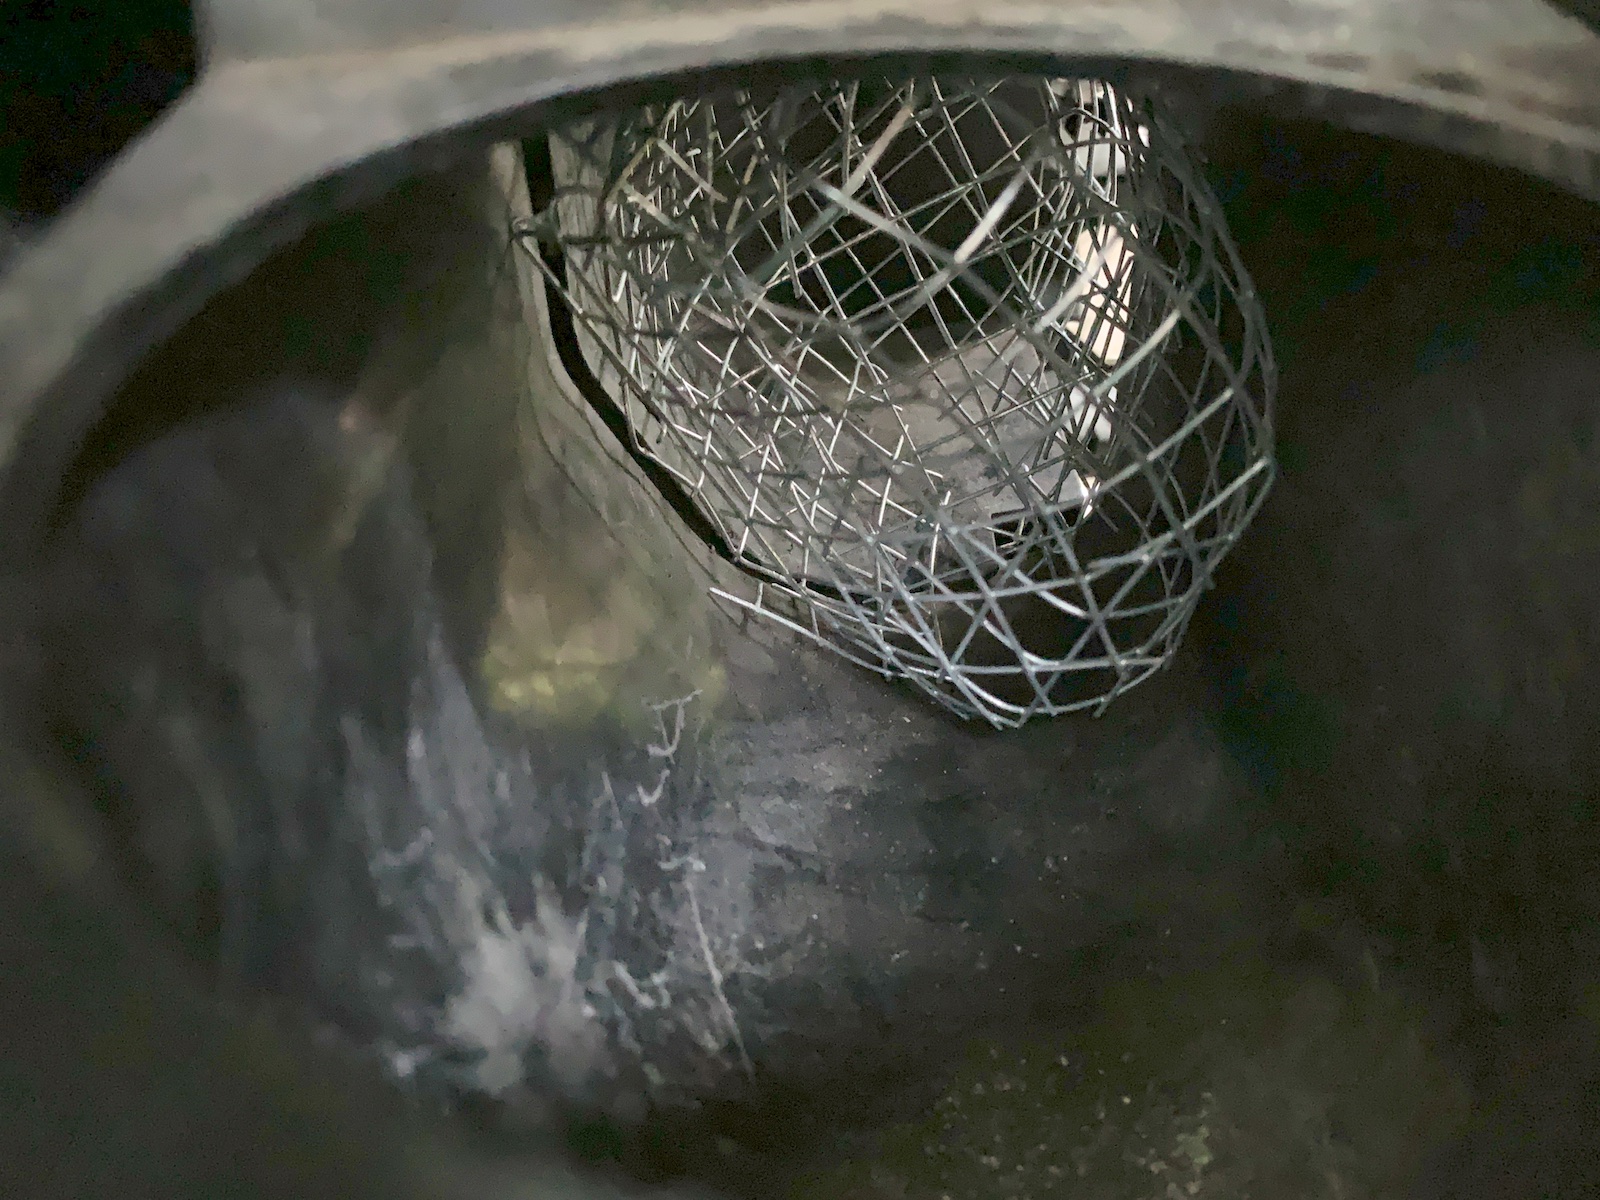
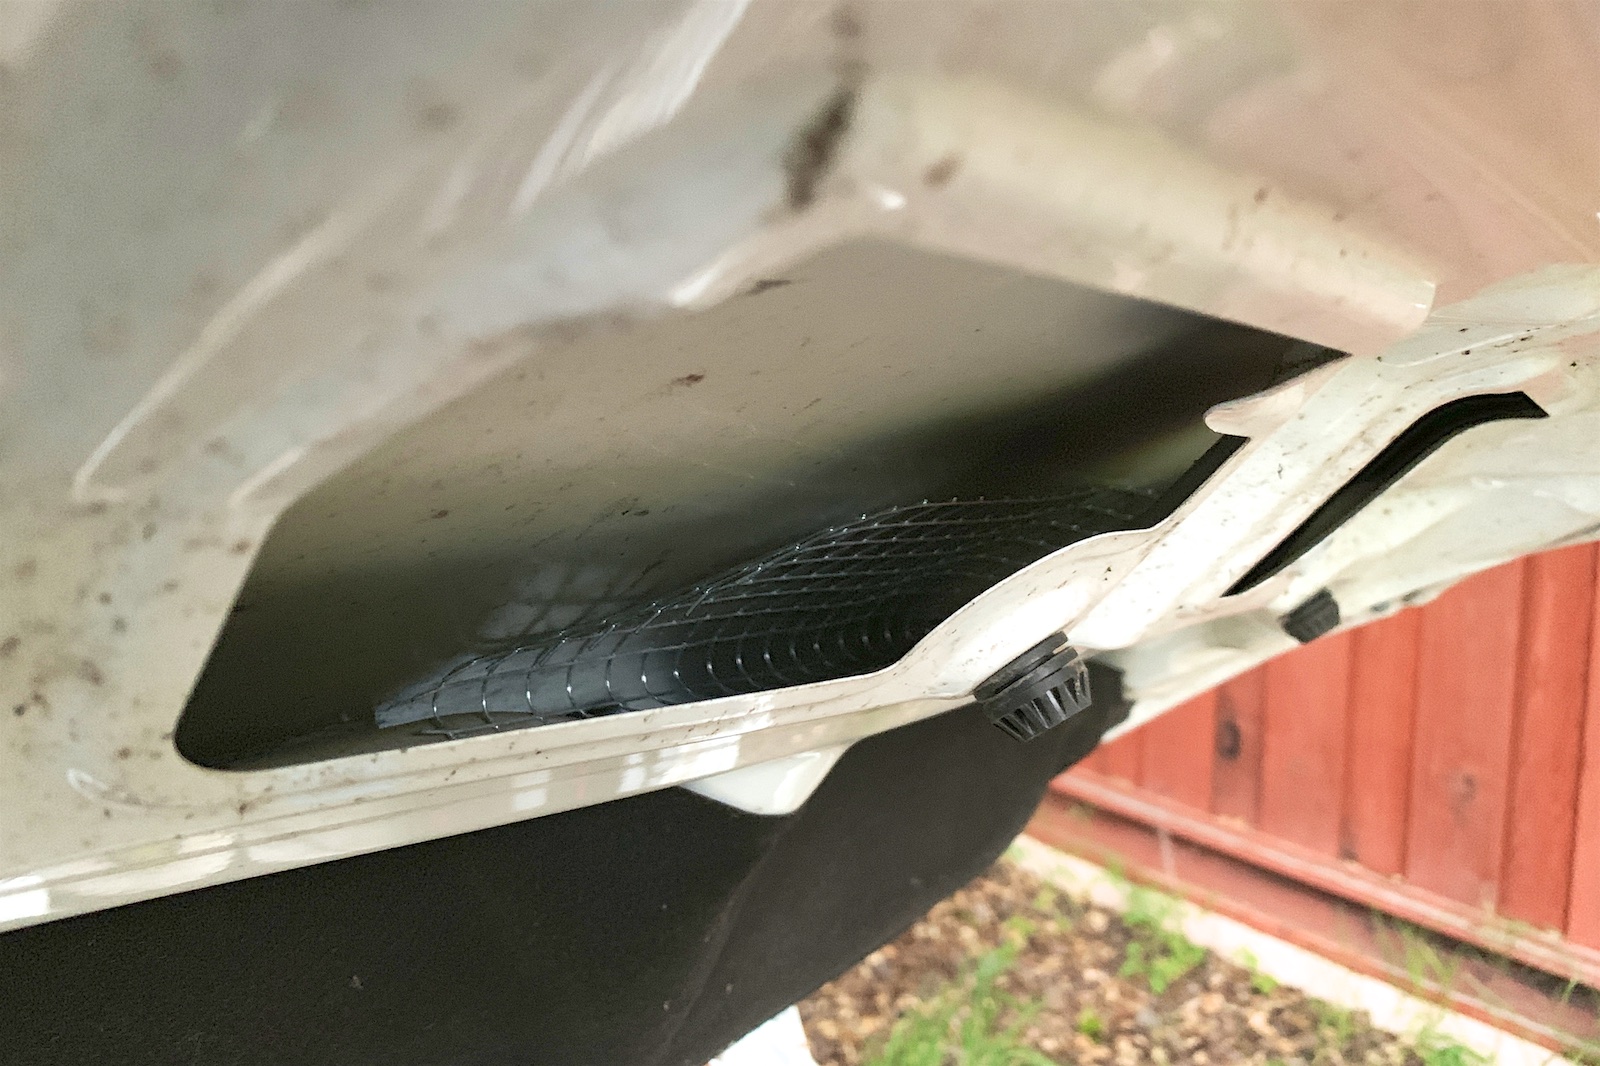
#2: There are also huge openings in the hood that allow rodents to crawl inside the hood and which lead into the cabin air intake and filter compartment. (Guess how I found *this* out – yes, a mouse actually running around inside the hood while I was inspecting the engine compartment!) I fixed this like I did for the engine air intake: stuffing wire mesh into those big open pockets at the front of the hood. Why the heck did the Mercedes engineers leave these air intakes so wide open to rodents??
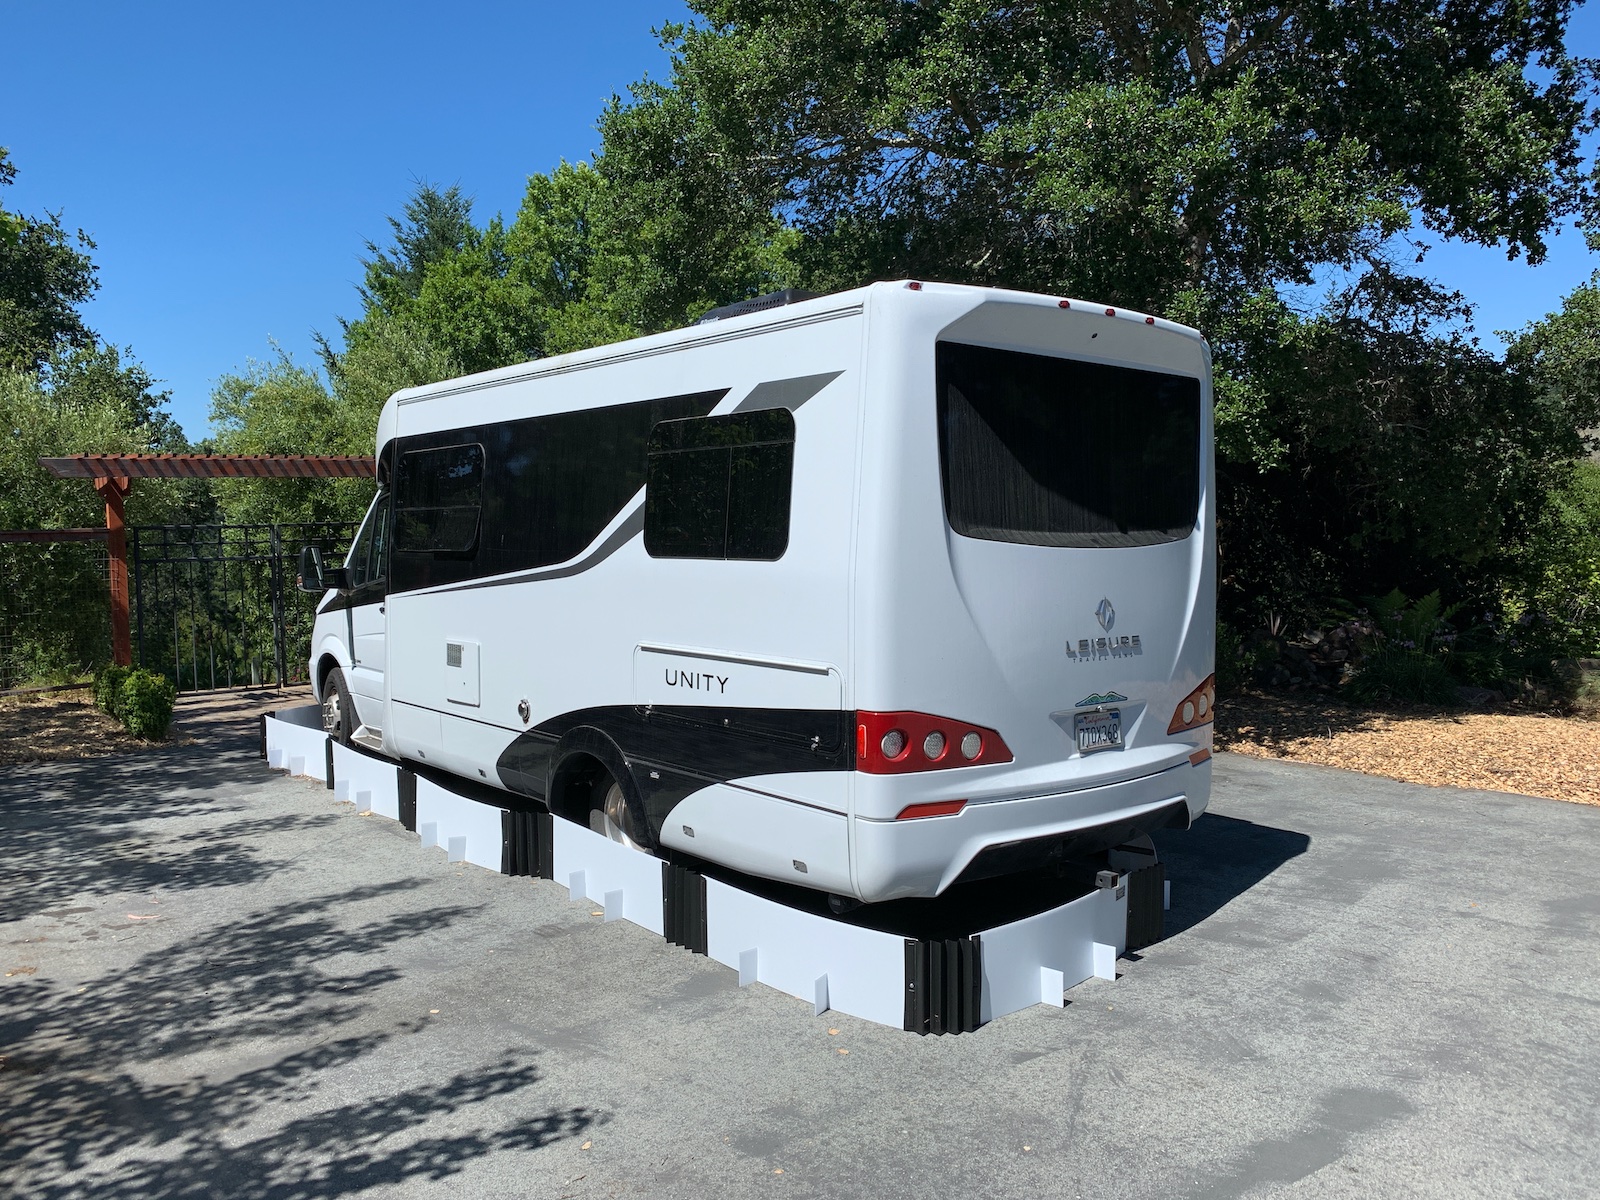
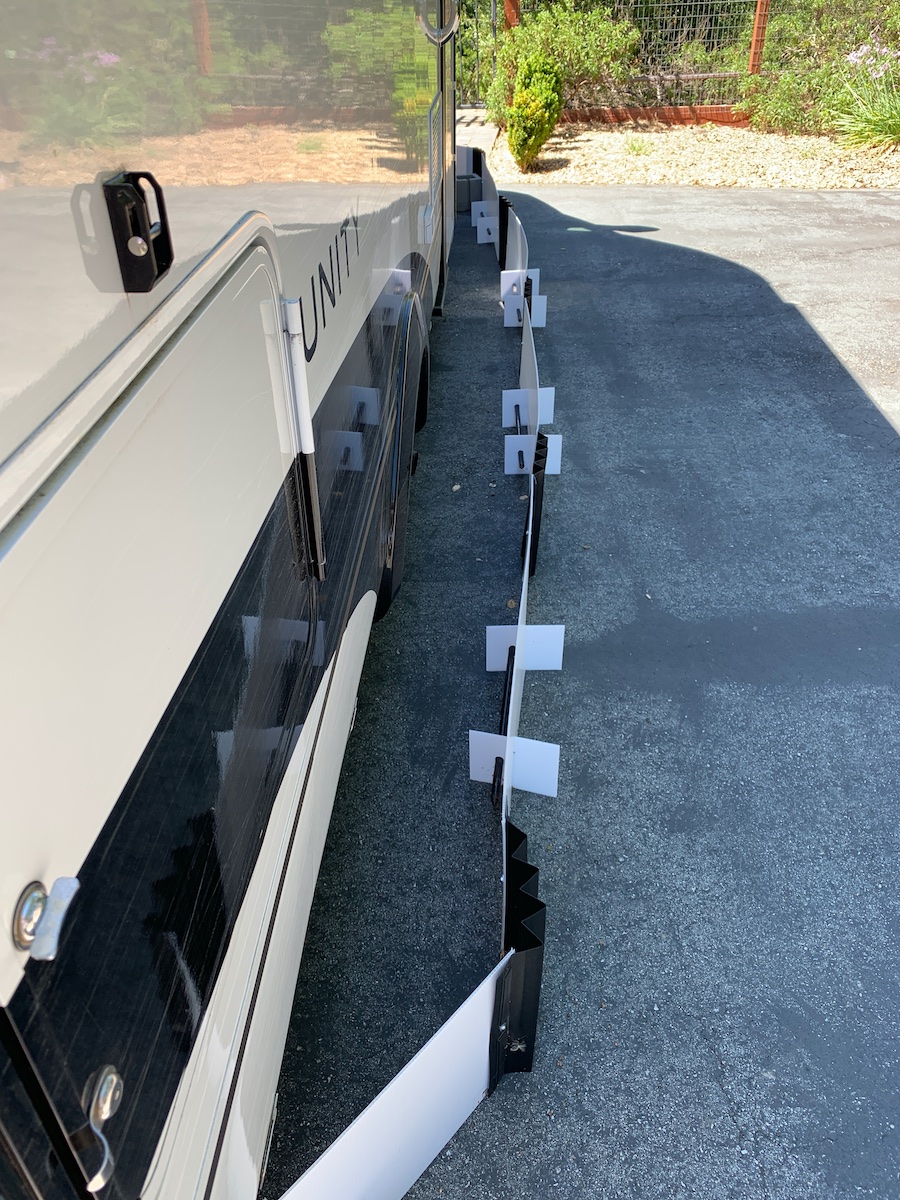
Update (June-October 2019): The ultimate solution I arrived at: a walled rodent barrier around the RV and traps (just in case). I did another web search to try again to find some sort of wall or barrier to simply keep rodents out of the whole vehicle’s undercarriage and this time I found something!
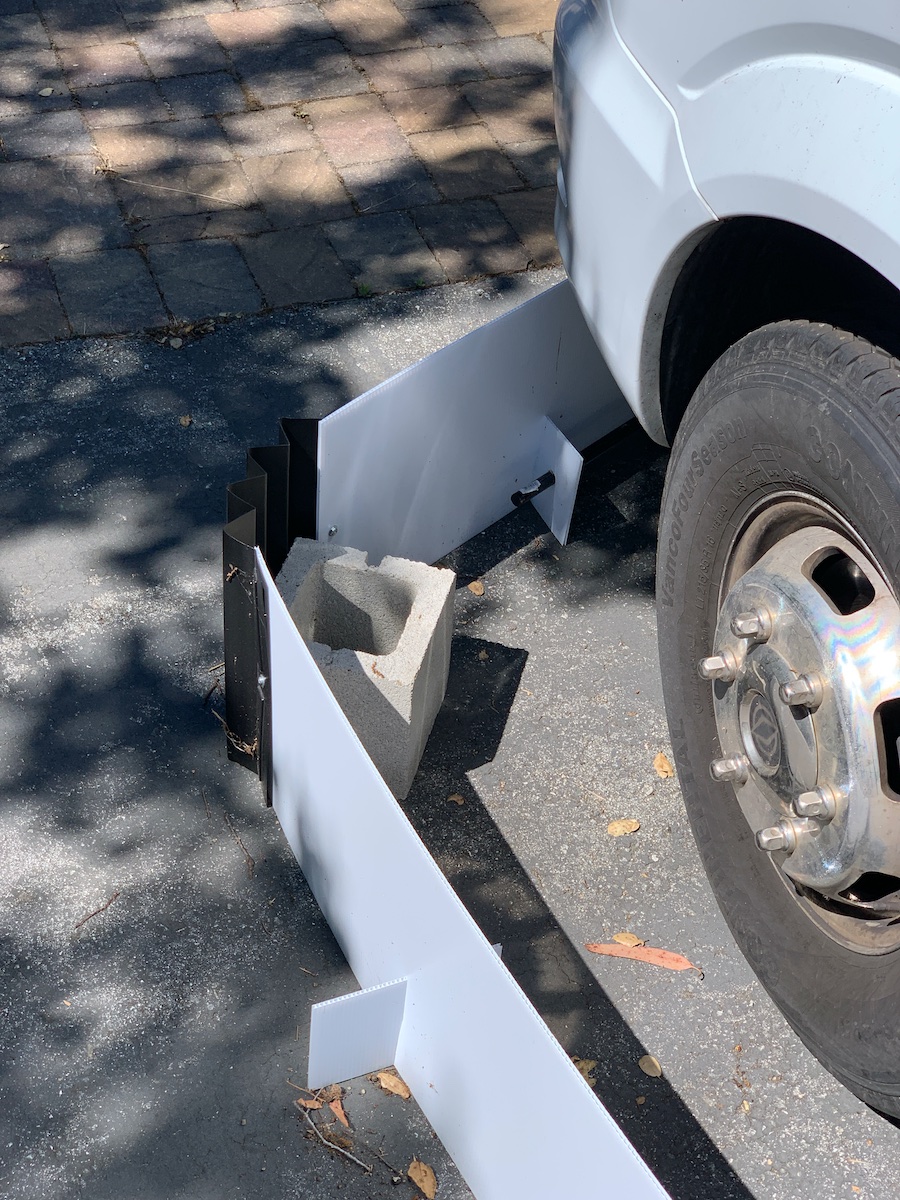 It’s called the “BoxKat”. I ordered it in May and tested it over the summer and fall. It’s a flexible/collapsible barrier for keeping rodents out of a given area (like your car or RV). It’s a little expensive but it does seem to work. I had a little trouble getting it to sit flat and not have any gaps in an area of my driveway that isn’t perfectly smooth due to underlying tree roots lifting up the asphalt. I also had to take BoxKat inventor Tom Sharp’s recommendation to buy some steel rods and then I still had to add some hollow concrete blocks to get the pieces of the barrier to stay in place with the extreme gusts of wind I get around my hilltop home.
I also bought a couple of electronic WiFi-enabled rat traps (from Victor) to make sure that if anything did get past the barrier, it wouldn’t be likely to do any damage. These are great traps in that they connect to your WiFi network and notify you if the trap is ever triggered so that you don’t have to make a point of regularly checking on them.
Anyway, the upshot is this final system of a physical rodent barrier around the whole vehicle with traps as backups has been working. The few times I have caught anything in the traps has been during actual trips outside the barrier and during times when the barrier was disturbed before I secured things down with the rods and blocks.
Update (January 2023): My brother ended up getting a BoxKat for their van too and when it arrived he sent me a photo of the label on the box – it features the image above from this very web page!
Update (October 2025):
The creator of the BoxKat rodent barrier, Tom Sharp, reached out to me and offered to send his new and improved “BoxKat 2.0” for me to try. I took him up on the offer and installed it on our camper van. There’s some significant changes I describe here.
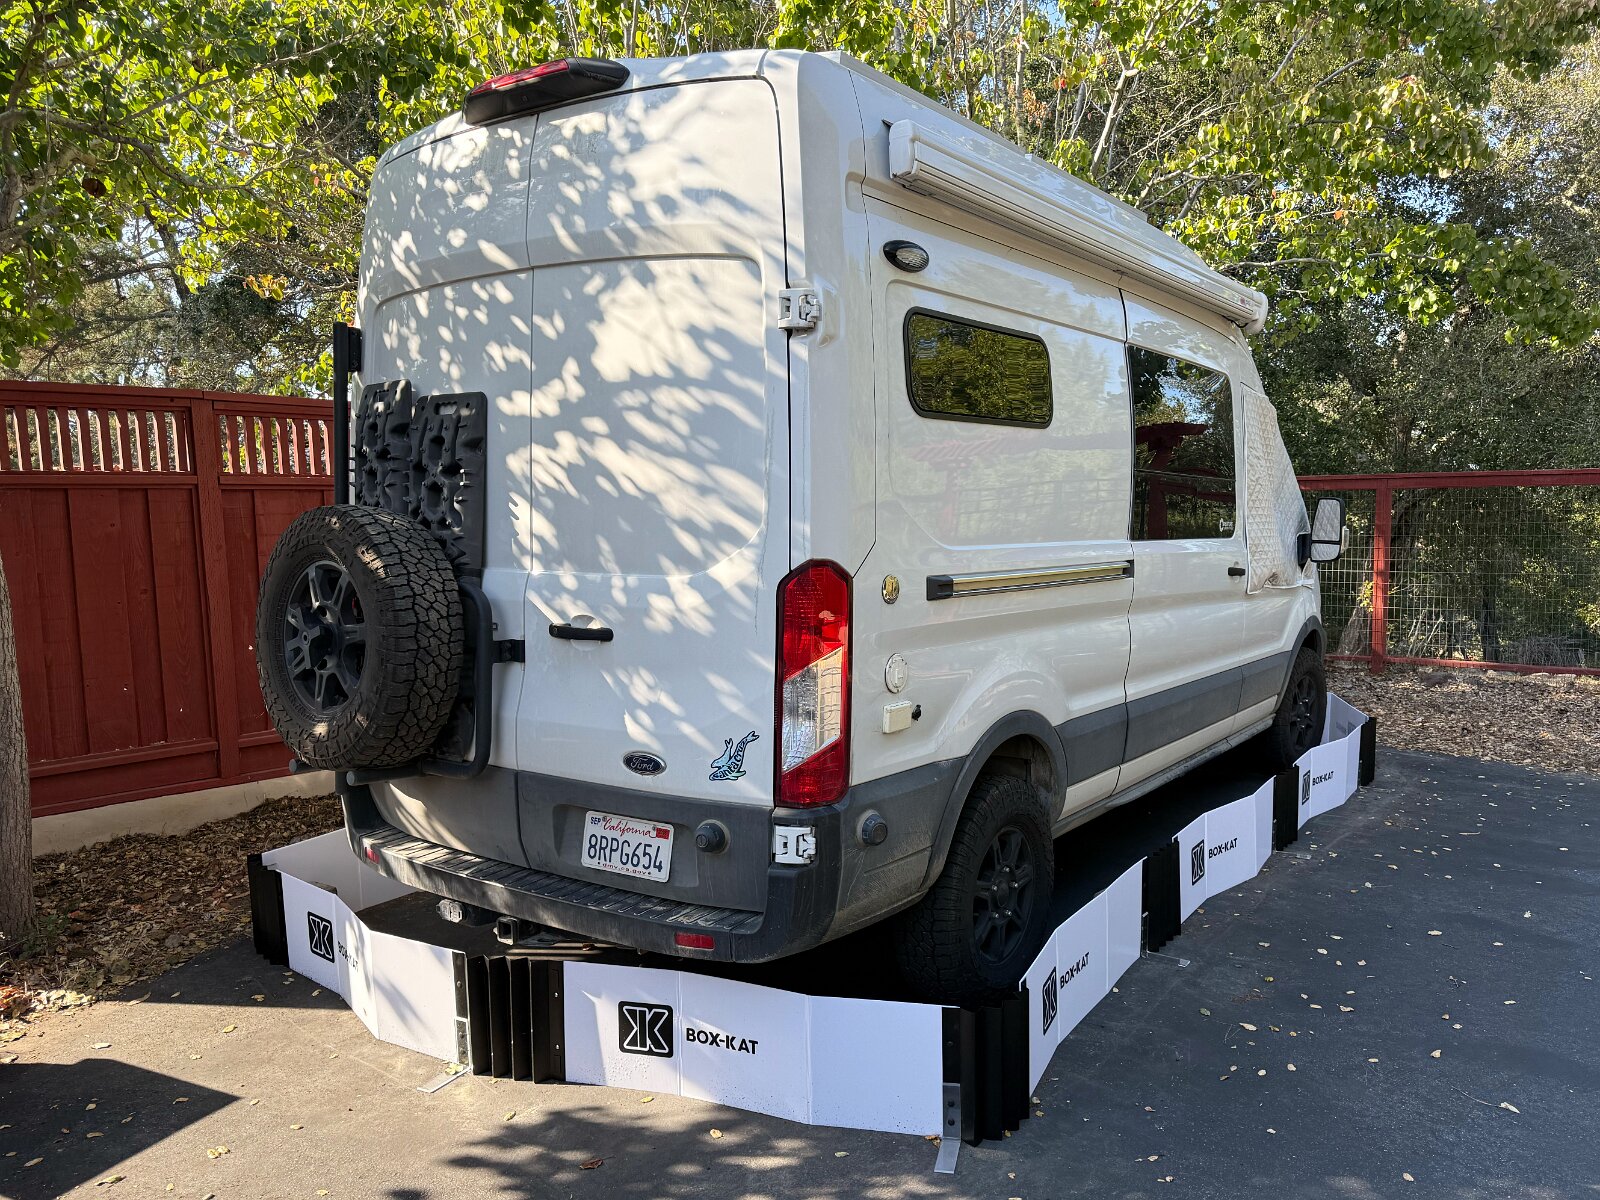
Water in the cabin air filter?!
 Well, this is something I’ve never encountered before with other vehicles. Apparently water can get into that huge air filter tub under the engine hood and there’s a drain in the bottom of it that can get clogged with debris. I had to clear out the little drain to get rid of the collected water – something to check on regularly with the Sprinter van, I guess.
Fixing non-working items
1) Flaky light in passenger wardrobe
Doesn’t light up like the one in the other wardrobe. I tried taking it apart and while I figured out how the spring-loaded switch breaks and completes the circuit, I couldn’t figure out what the problem is. All the wires appear to be secure and it seems to make good contact but yet it works intermittently.
Update: I ended up ordering a replacement switch and the new one works fine.
2) Two non-working AC outlets
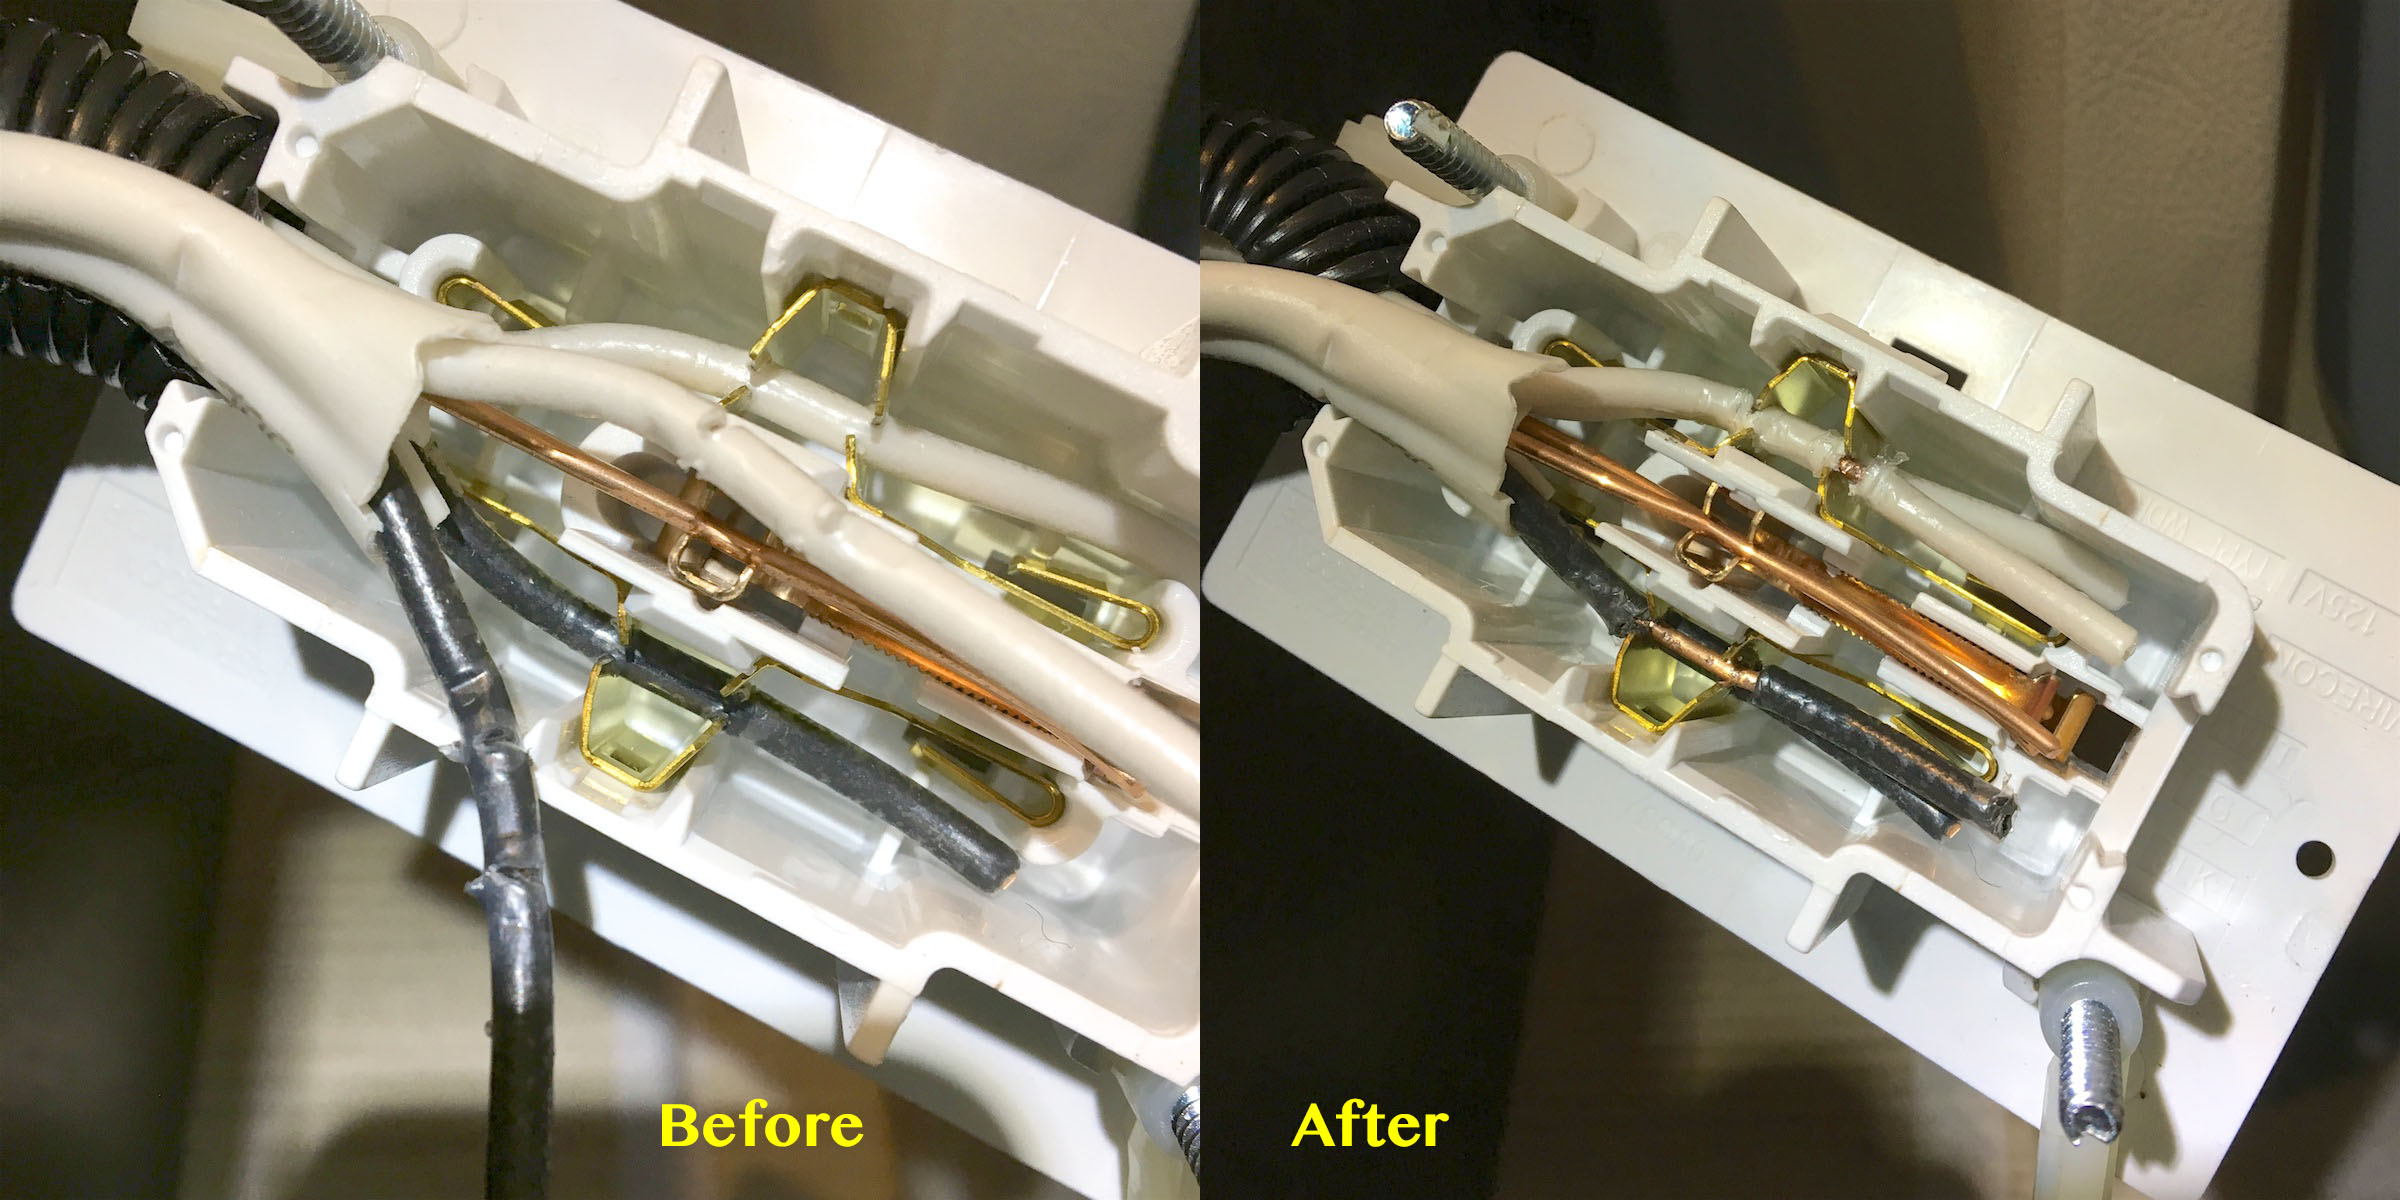
First I was just surprised to learn that the wiring diagram shows the AC outlets in the bathroom, behind the driver’s seat and out on the exterior of the coach are not connected to the inverter. They’re only supposed to work with shore power or the generator output. Then I found that the one in the bathroom and the one outside don’t work at all.
Given that the one behind the driver’s seat works and the others that don’t come after it in the wiring diagram, I took it apart and found this funky RV-oriented outlet. I also found after looking up the manufacturer’s guide that you’re not supposed to wire a pair of wires this way, both feeding on one side of the outlet. As you can see, one pair of wires isn’t really making contact. What’s also worrisome to me is that this whole design means you only get a very thin connection point even when it is wired up correctly. Anyway, I tried stripping the wire insulation away to make better contact but then found it was really difficult to stuff two sets wires into there securely.

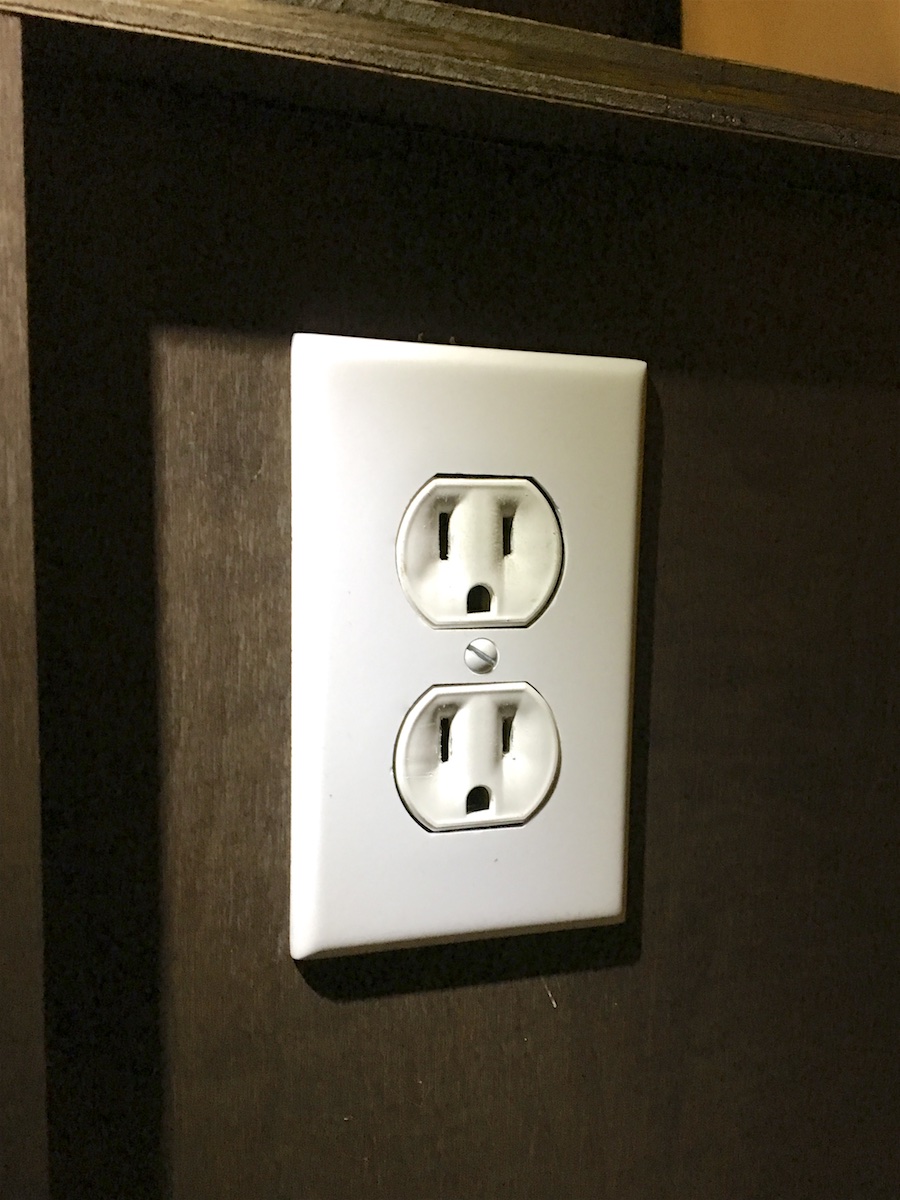 So, I ended up just swapping out the outlet for a normal residential outlet with screw down connection points and within a plastic electrical box. All good now and the other two outlets down the line now work.
☞ This is one of those things that Leisure Travel Vans should do differently at the factory! As I mentioned above, this one outlet wasn’t wired up properly for a pass-through connection, as per the manufacturer of the outlet.
3) HDMI switch box stopped working
Well, that was strange. The provided NexTech HDMI switch box was definitely working for a while but then stopped working this past weekend. It shows a power light and still switches sources but it doesn’t feed an output signal any more. Disconnecting and reconnecting everything doesn’t help. Bypassing it proves that the HDMI connection to the TV is fine. I’ve simply removed it and added a male-to-male HDMI adapter so I can reach the Blu-Ray player when desired.
4) Generator not supplying power
This was the most serious failure yet: the Onan propane generator would run but it would not deliver any electricity. I remember testing the microwave off the generator when I first checked out the vehicle before buying it from the owner. Many months later though was the first time we tried to use the microwave (and thus the generator) for something. Even after a couple of minutes, there was no power to the microwave or other 120V outlets and no charging from the Magnum inverter/charger. Later, I plugged in shore power and, sure enough, everything worked fine, including the microwave. All the breakers were on, including the breaker on the generator itself and resetting them did nothing to help.
Inspecting inside the access panel of the generator, I found that there was a great deal of rodent nesting material stuffed in the generator. Vacuuming it out still didn’t solve the problem. It seemed to me like the automatic transfer switch wasn’t switching over to deliver power from the generator.
I ended up bringing in the Unity to a local RV service center in Santa Cruz and sure enough, it turned out to be the transfer switch. All they did to get it going again was push on the contactor plate inside the transfer switch box. Sorry I didn’t take a picture but you’ll see a metal bar that’s mounted between two contact points vertically. Down is for power from the generator and up is for shore power. (You can see it move as you engage or disengage the generator.) Just move that contactor (with something non-conductive) to set it free if it gets stuck for some reason like mine did.
5) Bathroom door retainer strap keeps breaking
This Unity floorplan has a curved, sliding bathroom door that’s held in the open position with a plastic strap using button snaps. The problem is that the button snaps shear off and break after a few months of usage. I replaced the original once with the same sort of snap but it didn’t last any longer. And I see from this forum thread that it’s a common problem.
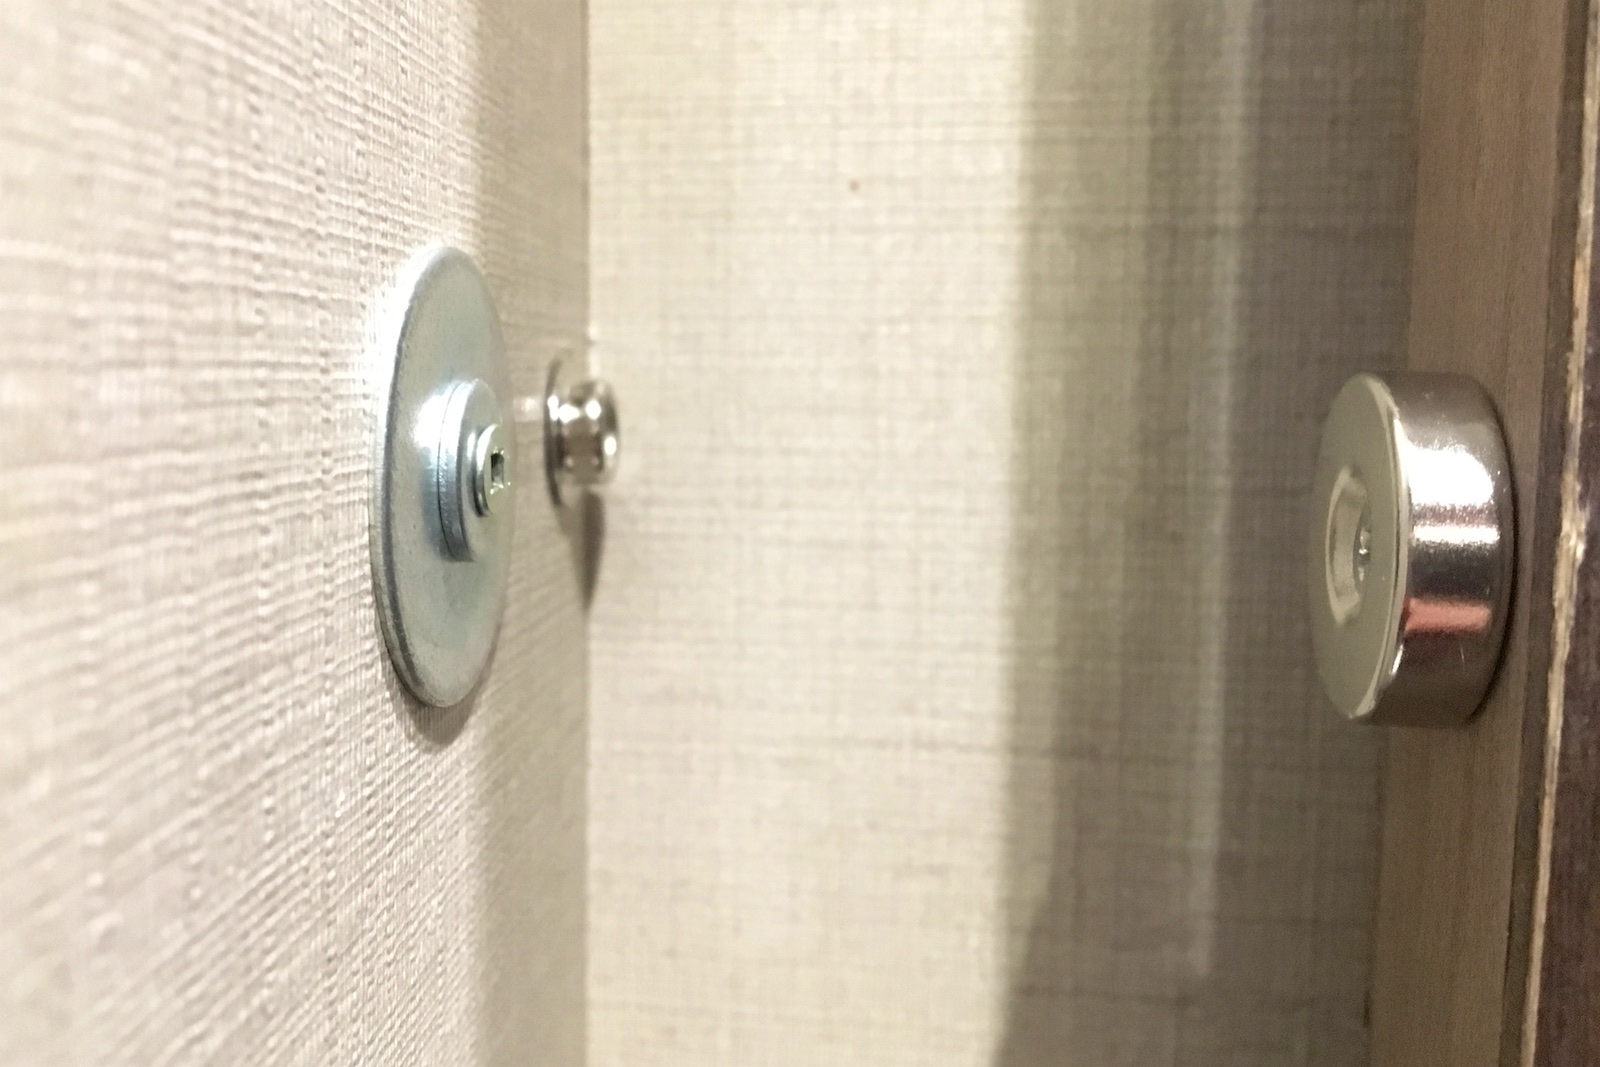 So, I decided to install a very strong magnet to hold the door open. This is one of those super magnets with a center hole for a screw. I removed the strap from the wall and used one of the existing holes to secure a large metal washer for the magnet to hold to. Seems to work well. It takes a good deal of force to pull the door free so it shouldn’t come loose while driving. It actually feels more convenient than the old button snaps and it certainly isn’t going to wear out and break.
☞ This is one of a few things I think Leisure Travel Vans is at fault for not including as part of the original build. The existing button snaps don’t last long before shearing off!
Litter box placement
The most typical RV location would probably be in a shower stall (with the drain covered) but that doesn’t work in this unit since the shower has a solid door that can’t be left open.
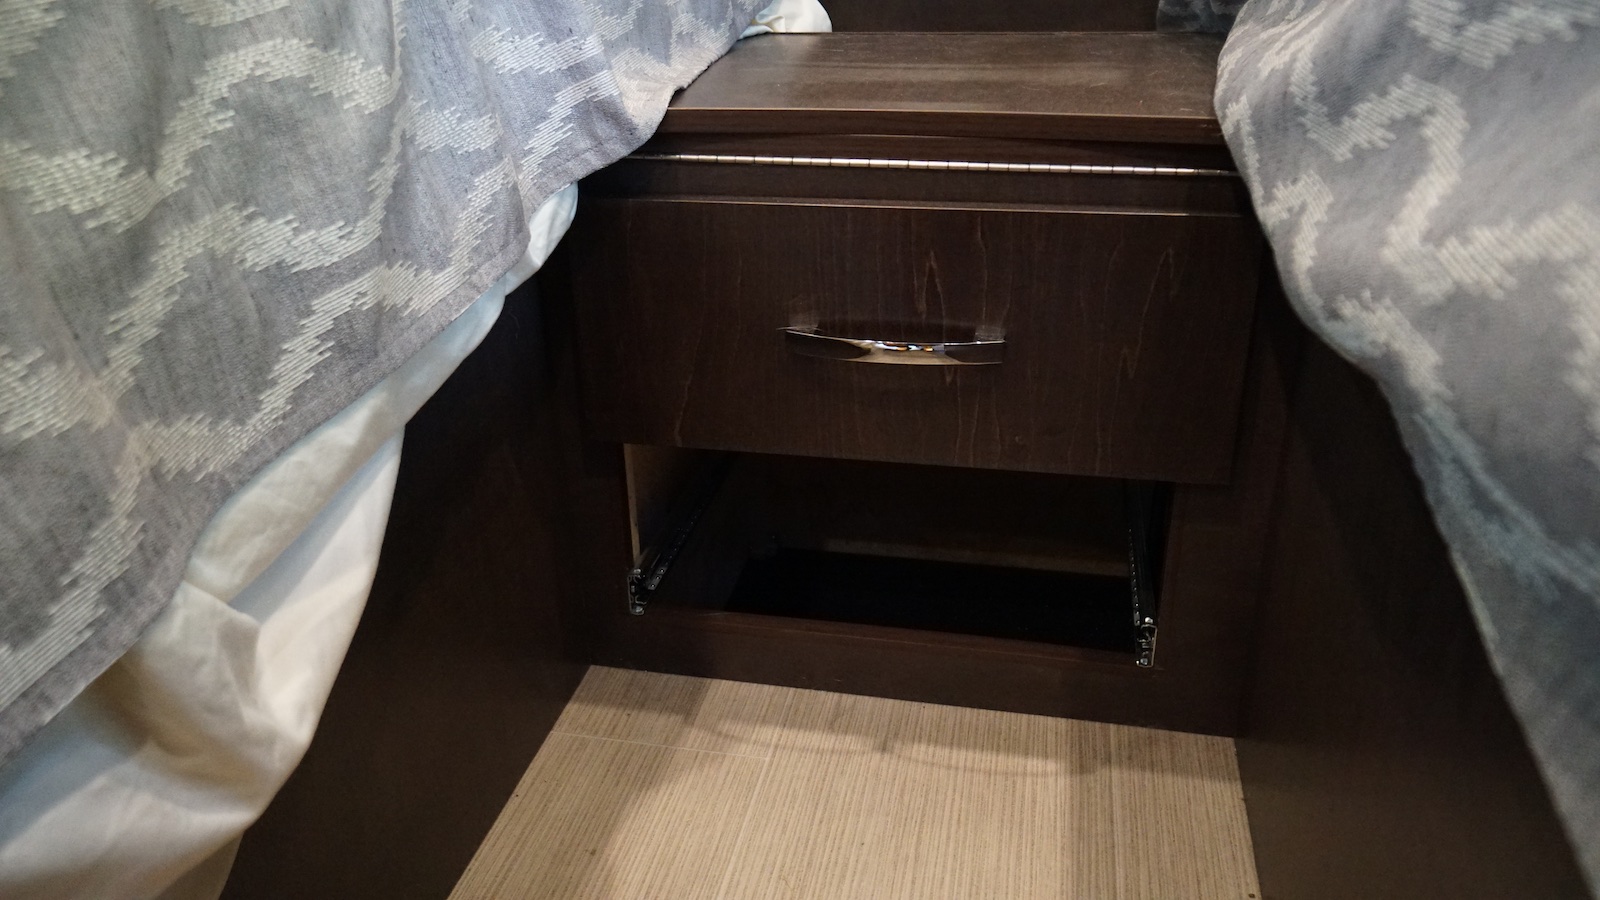
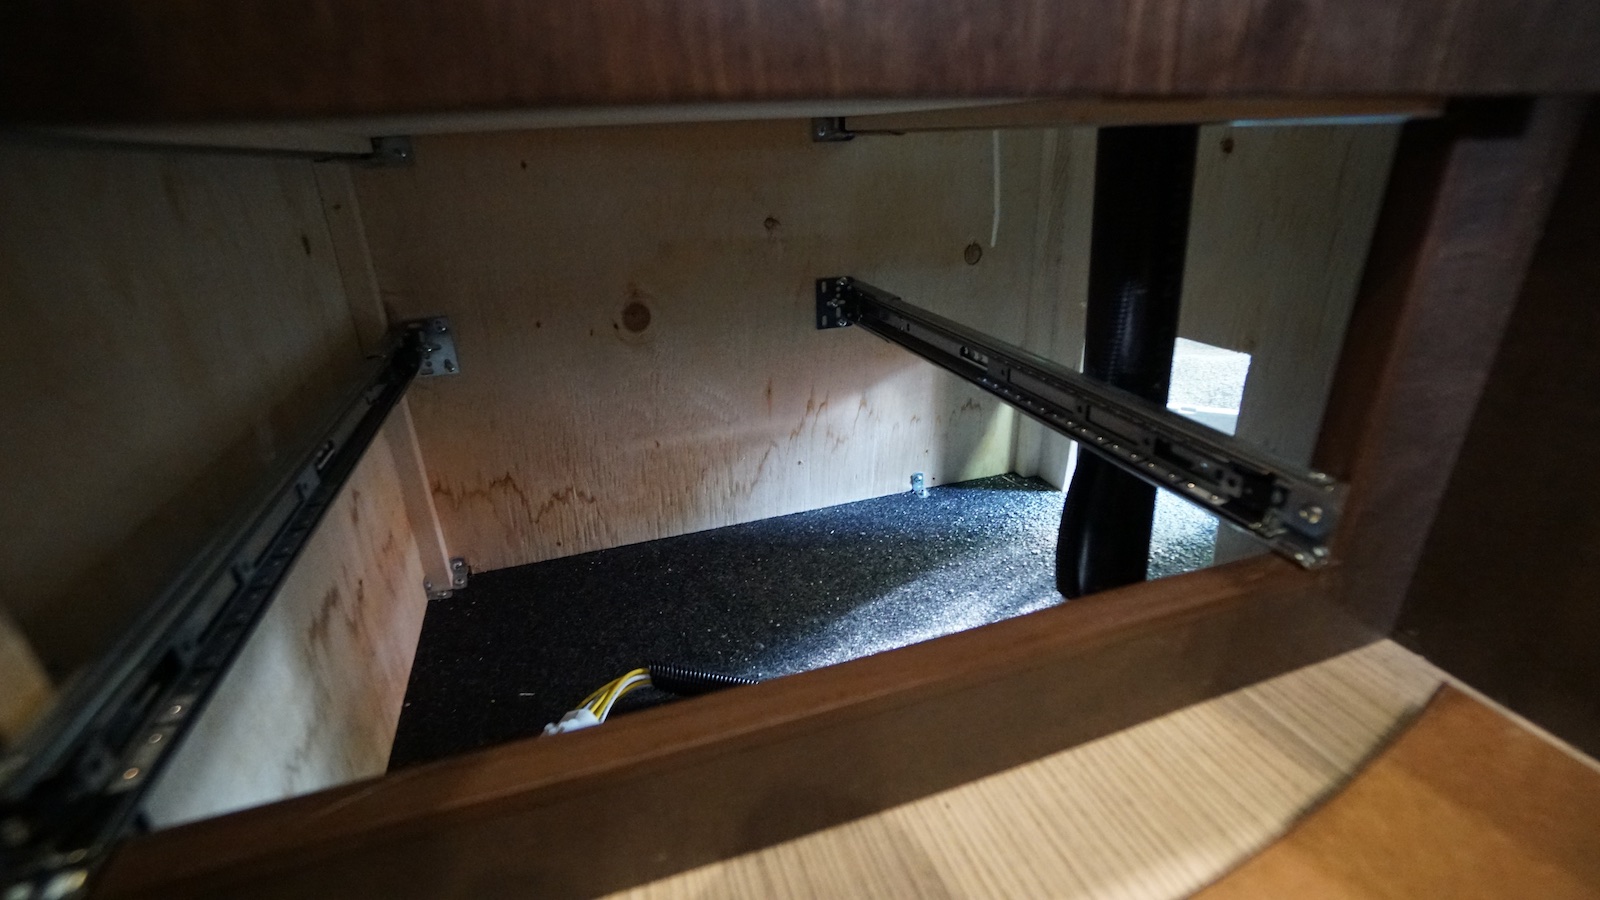
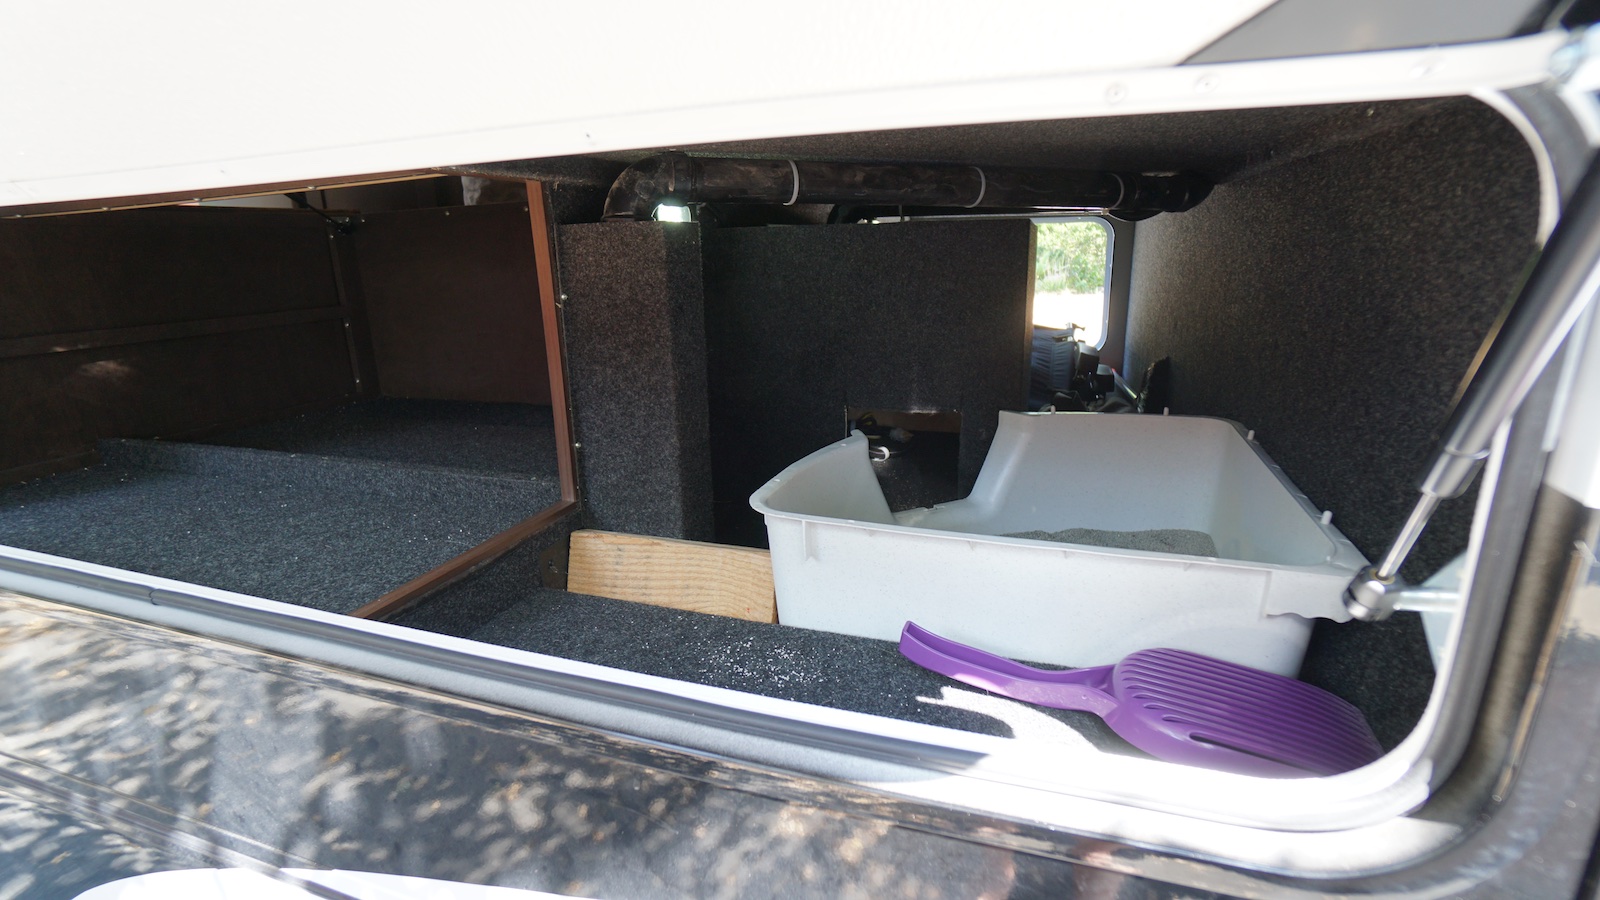
By removing the lower nightstand drawer and cutting a hole in the hidden wall between the inside of the nightstand and the outer storage area, the cats now have free access to the external storage area that extends all the away around and under both twin beds. So the litter box can be placed in a corner of the storage area, completely out-of-sight! As a bonus, it’s easily accessible for cleaning or removal from the outside compartment door!
There’s a switch that turns on a set of LED lights throughout all the storage areas, but the cats really just need one very low power light for the litter box area. I first found a nice wired low amperage LED courtesy light, but then I found dozens of these little battery-operated, motion-sensing LED lights that can run for most of a year on a single charge. I chose this one, just 15 lumens and mounted it above the partition so that it lights up with motion from either side.
Dealing with the macerator toilet
The twin bed model of the Unity has a Dometic toilet with a built-in macerator. This is necessary because the floorplan places the bathroom mid-way inside the van, rather than directly over the black tank. Unfortunately, the macerating toilet doesn’t work very well as designed. I’ll try not to be too gross here but be forewarned.
I don’t know how Dometic’s non-macerating toilet operates but the macerator version tends to use a lot of water on every flush (even in it’s eco, water-saving mode) and it doesn’t use the water in a way that is actually helpful for getting rid of solid waste. Usually the solid waste doesn’t even end up going down the drain and, even if it does, a lot of it floats backs up after the flush is over. Flushing again doesn’t take care of it either. It basically doesn’t work as is. I think the main problem is that not enough water is added at the initiation of the flush. Instead it seems to come in too slowly and too late. The trick is to take over when and how much water comes with the flush.
Through lots of trial and error we have worked out a system that works though and, as it happens, saves water to boot. First off, we keep a one-gallon, plastic water jug in the bathroom to essentially manually flush. This can be filled with waste water from doing dishes or showering or simply filled separately when the fresh water tank is filled or, when it’s used up, filled from the kitchen tap. The point is that you want to be able to manually add water as needed when you flush the toilet.
Secondly, we always make sure the water pump is turned off before flushing. The extra water isn’t needed when flushing just urine since the macerator seems to draw some water from the plumbing system even when the pump is off. So, with urine only, just flush without the pump turned on. You can of course add a little water with the jug while flushing when you want the bowl rinsed out. Flushing without the water pump turned on has the added benefit of not leaving a bunch of water in the toilet that could splash out while driving.
For solid waste, before you start the flush, make sure the bowl is reasonably full (like half full) of water. Have the water jug in hand when you start the flush and then immediately add a good amount of water to start everything down the drain properly. It’ll be fairly obvious how much water is needed to get things going but it won’t be anywhere near the full gallon. After that flush completes, you may find you need to flush a second time (again, with the pump turned off) and follow with a bit more water. We’ve found that this manual flushing works much better than letting the toilet control the water flow. I think it’s because you’re sending the water through mostly at the start of the flush. Instead of flushing again and again to no avail, you get it done in one or two tries.
 By the way, don’t bother messing around with those nasty chemical odor control additives for the black tank. We’ve found that this RV Digest-It bacteria/enzyme formula works really well and is very simple and easy to use.
Winter usage
Here are some helpful forum threads on winter travel/camping:
- Winter Unity Experiences
- Winterization with RV Antifreeze
- (to be updated)
Freeze Damage – The most important consideration is avoiding freezing damage from your plumbing. While the freshwater tank and system is in the interior of the van, the gray and blackwater waste tanks are most definitely not. The exterior shower is also of course vulnerable to freezing. The safest approach is to fully winterize your plumbing system using RV anti-freeze and just not use your plumbing system at all. You’re truly “dry” camping now. Some of us make occasional use of our toilet (like in the middle of the night!) by flushing with RV anti-freeze instead of water. (to be updated)
Insulation – Leisure Travel Vans do have better ceiling, wall and floor insulation than many RV’s but there are still a number of simple things that can be done to improve insulation from the cold:
1) Adding warm and fuzzy floor coverings!
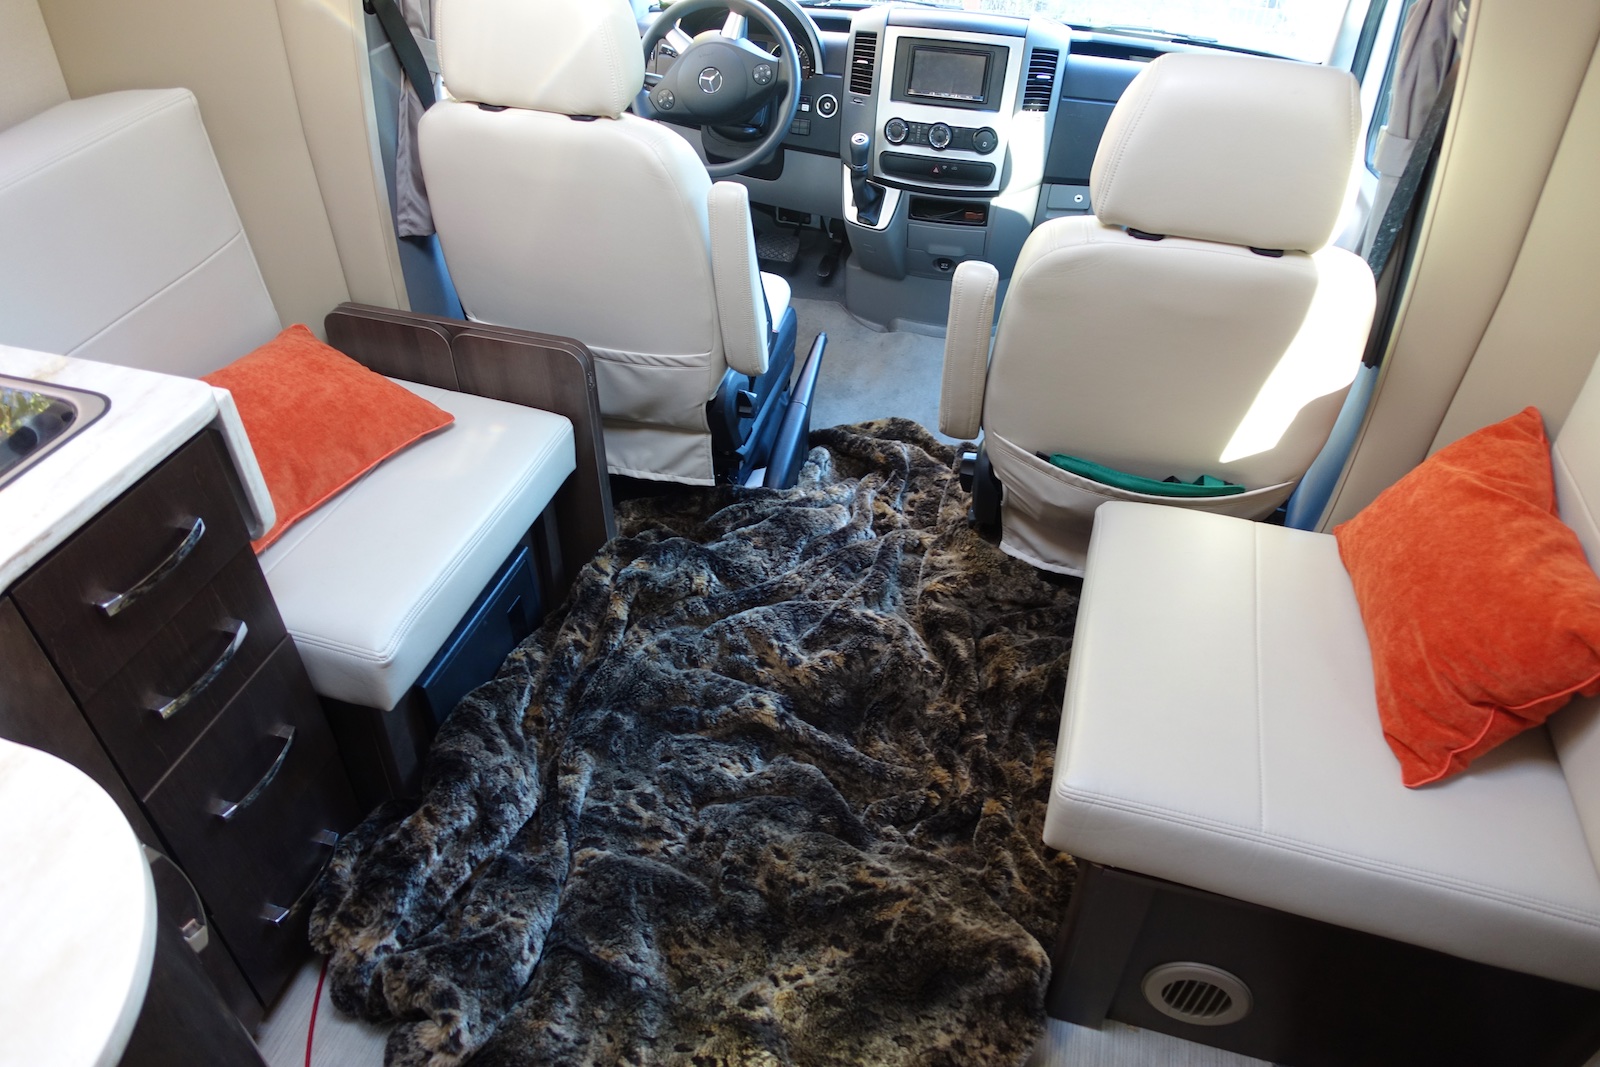
The floors are pretty well insulated, but a fuzzy blanket or rug can make it all the more comfy for pets and humans alike in cold weather.
What you see here is actually a fake fur duvet cover with a thick comforter stuffed inside. It also makes a great way to insulate the cold leaking in from the bottom of the coach door and battery compartment under the steps.
2) Custom fitting some pieces of Reflectix insulation material for each of the windows.


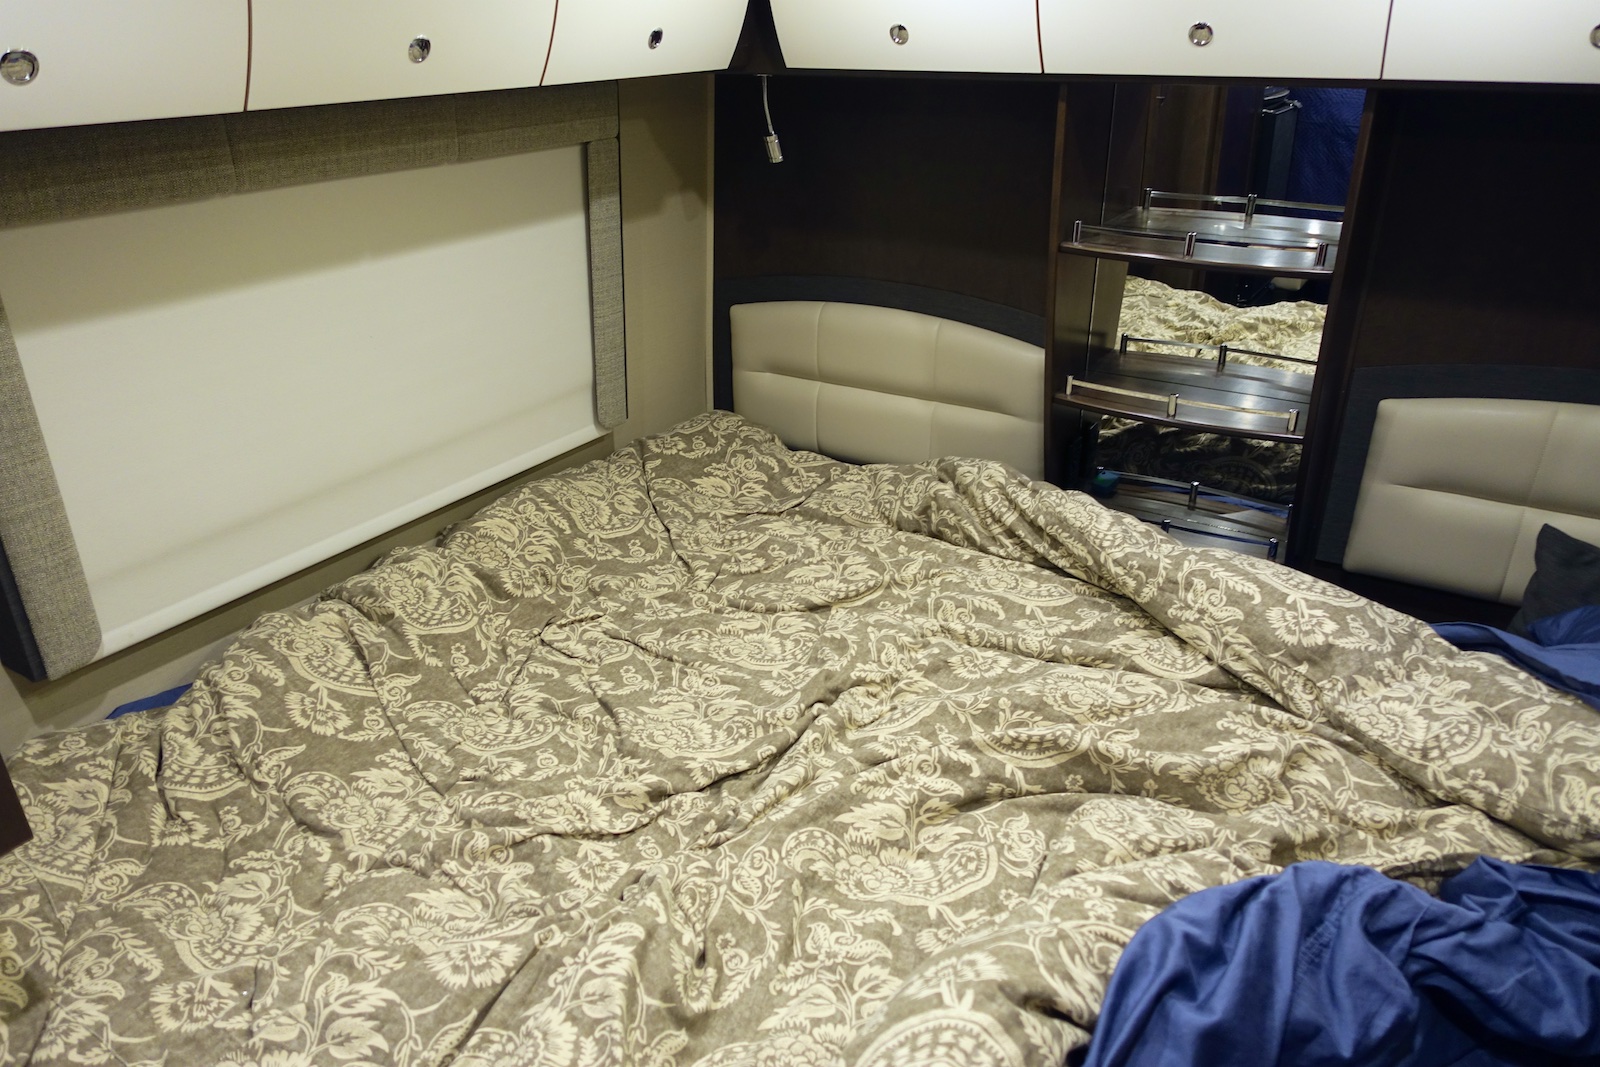
This stuff is super easy to work with and it’s fairly stiff so you can just cut it to be slightly larger than the space you’re going to fit and it will tend to stay in place. With the windows, we cut slits to fit it over the window knobs and added velcro tape where necessary to keep it flush.
My understanding is that it will be necessary to keep something cracked open somewhere to circulate air and avoid excessive moisture build-up, so I’ll be experimenting with that. So far I’m finding that we still get a lot of condensation on the windows in cold weather, so I want to try a couple of things:
One is to try cutting some of the Reflectix to just fit inside the window frames rather than over the frames. This might help prevent warm air from reaching the cold glass and condensing. The other thing to try is this 3M window film insulator you can buy to temporarily put over the inside of the windows for the cold season to accomplish the same thing. It’s very inexpensive, so I’ve ordered some to try as well.
3) Hanging a heavy blanket between the cab area and the house.
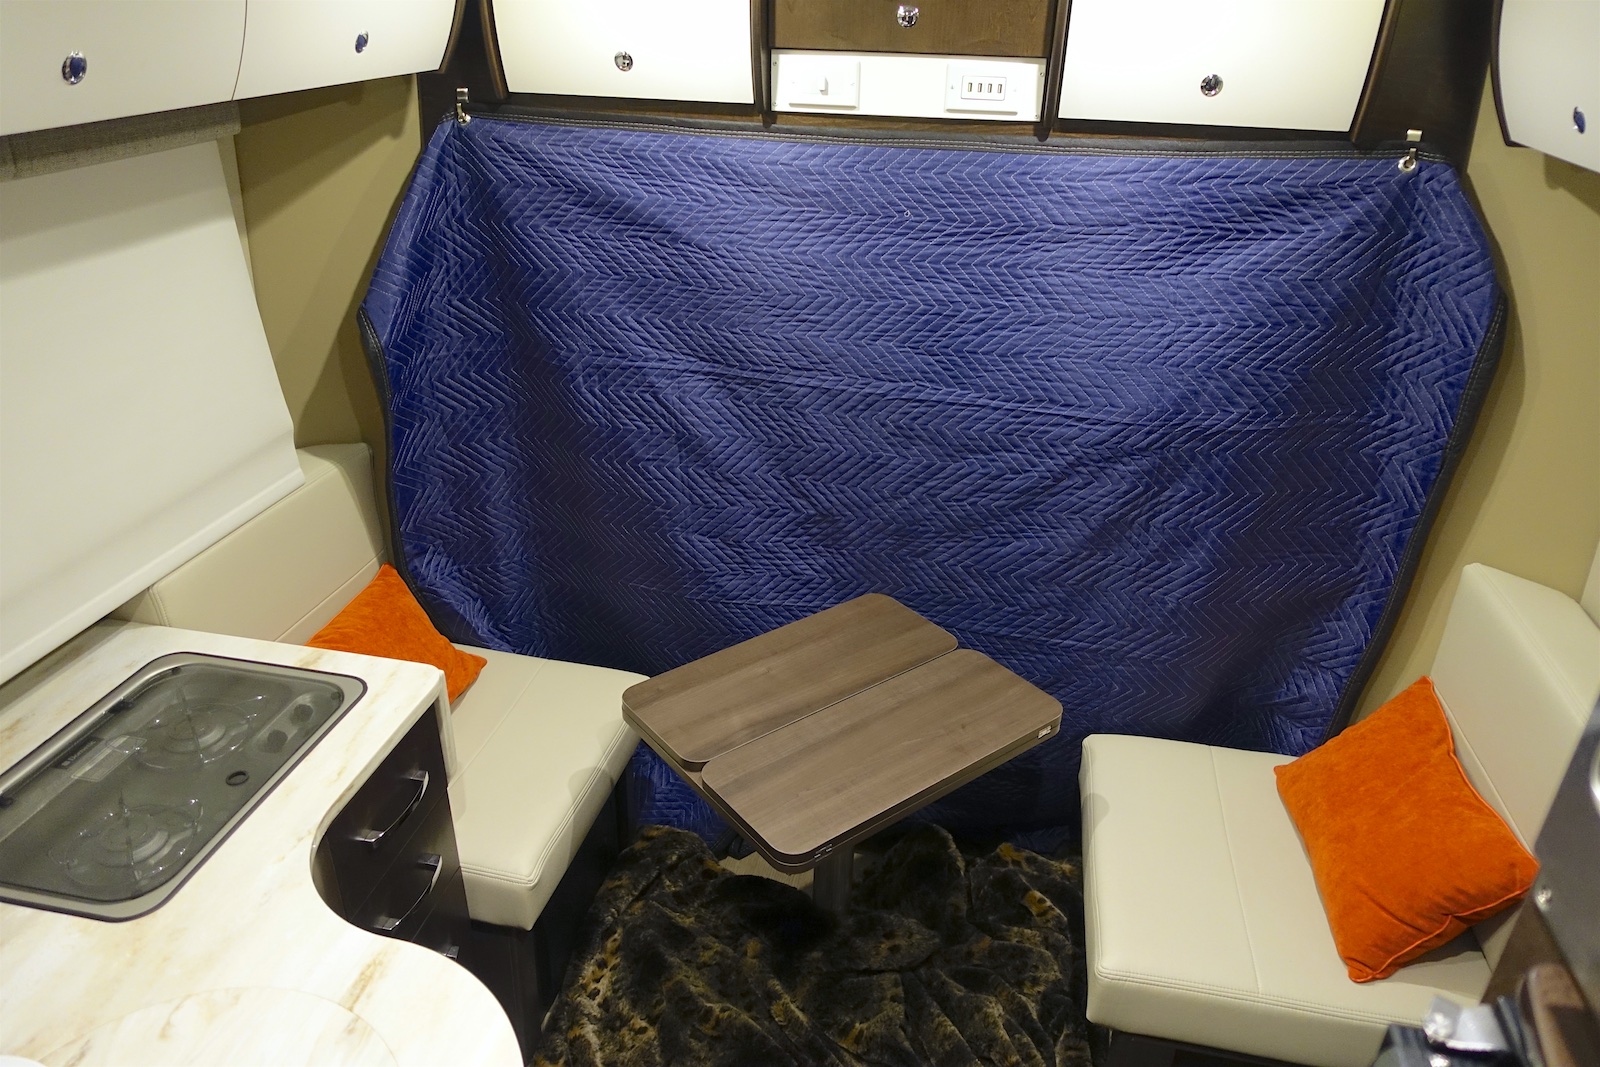 The cab area is not particularly well-insulated, even with the windows covered. Plus it’s always easier to keep a smaller space heated, so I got this idea from someone else who decided to block off the cab area with a blanket. I placed two adhesive hooks on either end of the overhead cabinets and installed a couple of grommets in a moving/packing blanket. When desired, it’s quick and easy to hang it up on the hooks. (We might find and sacrifice a nicer looking blanket to hang in its place. Darlene jokes that we should get one with the image of a fireplace on it – to inspire warm thoughts.)
Anyway, the results were immediately obvious. Without the blanket in place, we watched a movie using the cab seats one evening in cold weather and always felt a cold draft even while the furnace ran frequently trying to keep up. Then afterwards, and on subsequent nights, we hung the blanket and found the gallery area stayed noticeably warmer and the furnace ran much left often. In fact, in combination with the added window insulation, I found the bedroom area started around 69 F at 10 pm when we turned down the furnace to go to sleep. It took all night to reach about 53 F just before 6 am. The undercarriage temp fell to under 40 F that night.

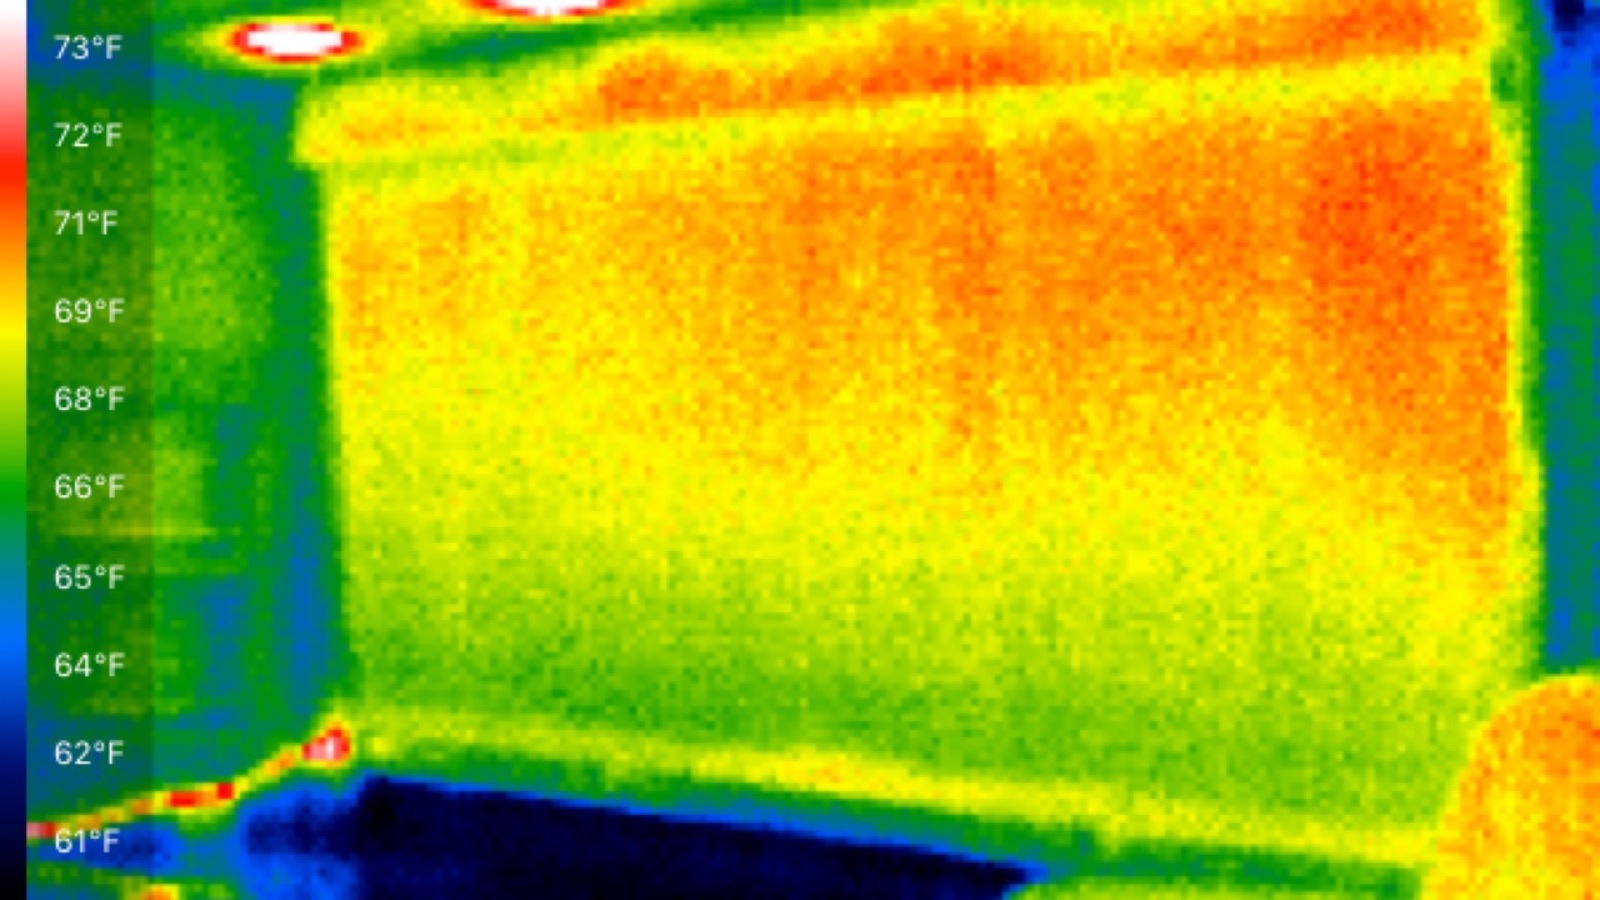
I’ve got a fun little infrared imager for my iPhone that I’ll use to help illustrate here how these improvements help keep out the cold. The image on the left above is one of the bedroom windows without any insulation. The warmer green patch on the left is from the window screen. You can see from the scale on the left that the imager is seeing a difference of over 10 degrees Fahrenheit from the surrounding wall. The image on the right is after slipping in a sheet of Reflectix insulation material – quite the difference! And you can see (and feel) some cold air falling down below the insulation – hence the need for some magnets to make a better seal.
Tires and Chains – I’ve bought a set of Laclede 2317 snow chains for my LT 215/85R16 tires. They’re low-profile as recommended in this forum thread.
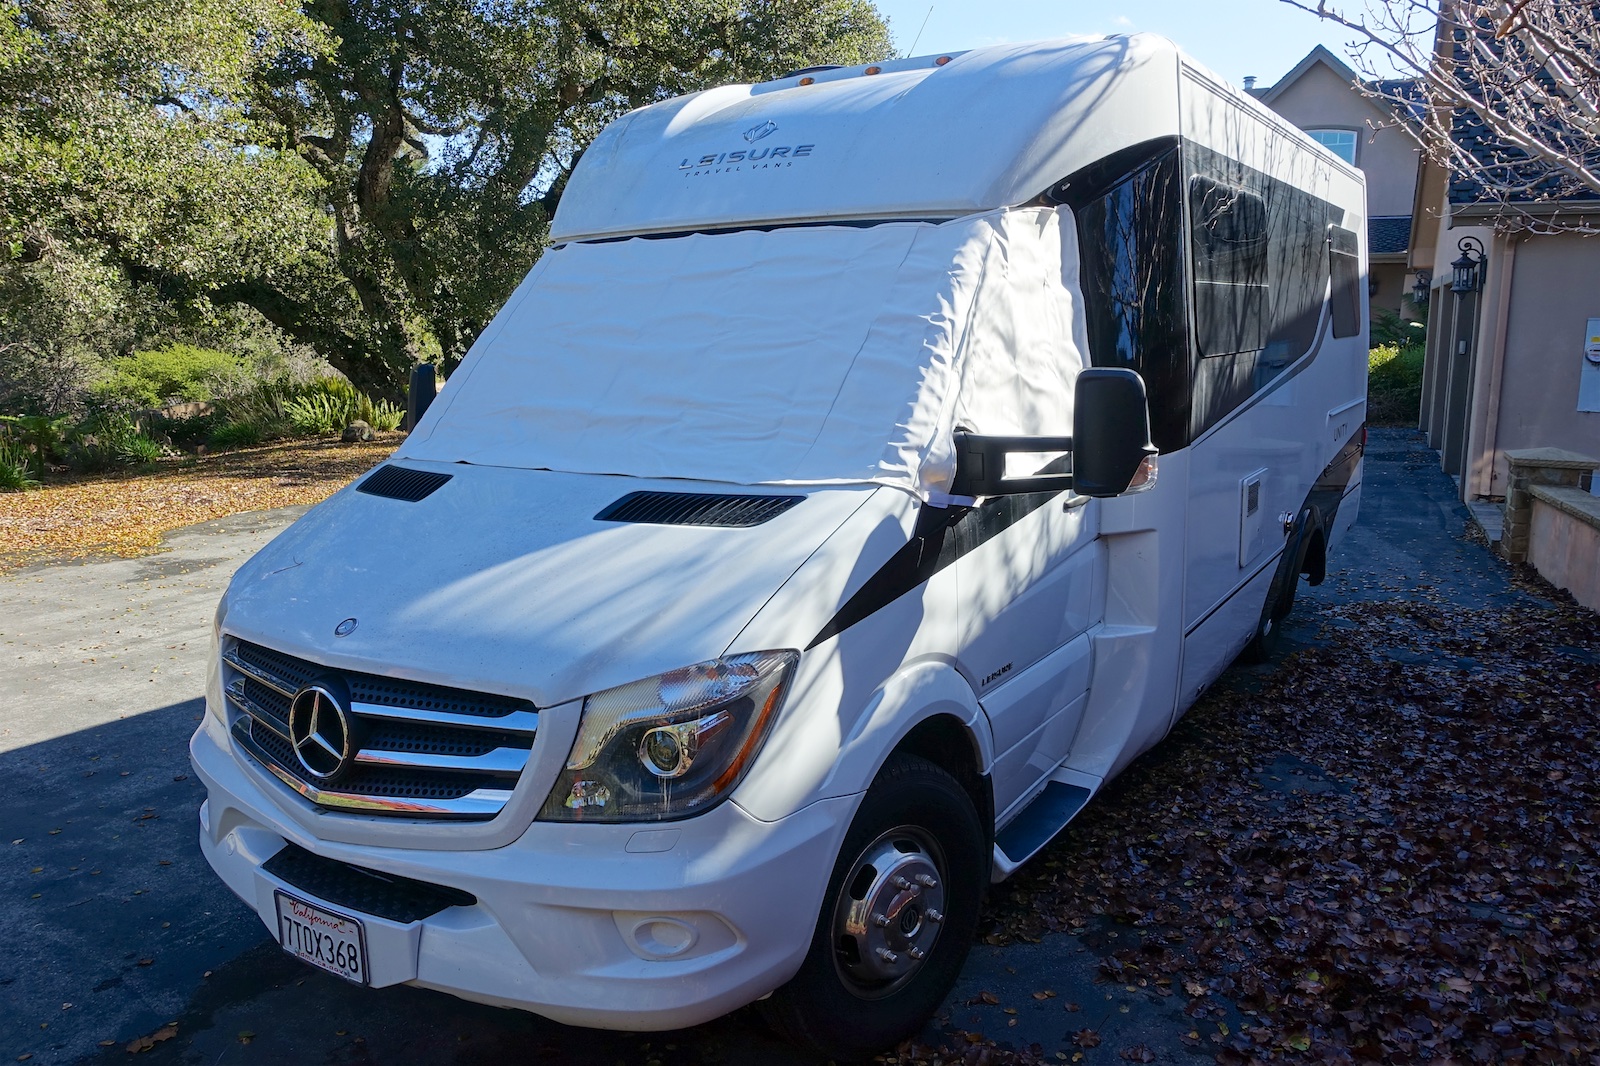 External Cab Windows Cover – I bought a vinyl, exterior windshield cover from Adco for winter use. This model is labelled as for Sprinter vans 2007-2012 but I couldn’t find anything that included later model years (mine is a 2015). I don’t know if something actually changed for 2015 or not, but it didn’t quite fit as is and we had to customize it to make it work. The issue is that the top corners did not reach far enough to be looped over the doors on either side. However, it is big enough to cover the windows entirely so we bought some super magnets and sewed them into a little pocket on each top corner. These magnets make good contact with the doors just above the windows and hold the cover in place. (It already has magnets for the bottom corners.)
Insulating against summer heat
Most of the upgrades to improve insulation for cold winter weather (see above) are of course helpful for keeping out the heat in the summer.
 Sliding Blinds for Cab Windows – The upgrade of mounting a complete set of sliding blinds to the front windshield and cab door windows is great for quickly blocking out the sun and some of the heat. Unfortunately, unlike the skylight blinds, these don’t have reflective material on the exterior so it’s still very helpful to make use of a dedicated Reflectix-style windshield blind in front of the Remi blinds if you’re going to be parked in the sun for a little while. Yes, you can place a reflective shield in front of the Remi blinds and yes, it does help a lot. The Remi blinds work well alone but you’ll definitely feel less heat radiating from the windshield with the reflective windshield blind in front of the Remi blinds. We definitely observed this while in 95 degree weather in Death Valley. We also insulated the cab doors (for noise and heat) and I suspect that helps too – the cab area is the least insulated area of the RV.
Cab/Coach Insulating Divider – Hanging a blanket to separate the cab area from the coach area is just as effective in the summer heat as it is in the winter cold. As described above in insulating for winter, I added a couple of adhesive hooks and then put a pair of grommets into a heavy moving blanket to use as an insulating divider. You’ll notice the difference this makes almost immediately. Even with the sun shades closed in the cab windows, the cab area lets in a *lot* of heat.
In fact, we’ve found that even when the weather is mild and breezy and we have the house windows and door open, if there’s any sun striking the cab area it’s necessary to hang this blanket and cut-off the cab from the house to keep it cool. Because of this, I want to see if there’s a way to insulate the cab area while still including the cab seats in the usable space. I want to try insulating the cab roof area and see about hanging a pair of these blanket around the cab but behind the swiveled seats. I’ll update this once we give it a try.
Interior Reflectix Window Covers – We actually carry Reflectix bubble insulation sheets cut for all the windows and the skylights. You’ll need to decide when you want to bother putting them in place but it’s definitely worthwhile leaving the one installed in the shower skylight at all times we’re not actually showering as that stops a lot of unwanted heat. I’ve also taken to keeping the one in the main skylight, right up against the plastic, when we’re traveling in very hot climates.
External Cab Windows Cover – Sometimes we’ll even go so far as putting the external vinyl cover over the cab windows. This is of course a bit more hassle to set up but it does mean keeping even more heat from even reaching the interior of the cab.
While traveling in Death Valley in May (95 degree daytime highs), we kept the blackout blinds in the coach mostly closed during the day (and used the privacy blinds). When stopping somewhere for a while, we would point the back end of the RV towards where the sun was going to be, put the thick Reflectix in the windshield (keeping the Reflectix sheets in the skylights), close the Remi blinds, fully close the shades on the sunny side, open the windows (and partially open the blinds) on the shaded side and set the two Fantastic Fans to run. These fans are fantastic at continually drawing large amounts of air through your open windows – but it’s better to pull the air in from the shaded side of the vehicle. This procedure was able to keep the temp inside a few degrees below the outside temperature for at least a couple of hours. In other words, it wasn’t a higher temperature inside than out over that time. (I would now add putting the Reflectix sheets into the sunny side windows.)
I’ve started experimenting with whether letting the back wall heat up from the sun or pointing the cab front into the sun with the addition of the external window cover and the cab/coach divider blanket will work better at keeping the temps down. I don’t have a definitive answer yet. But even if the cab isn’t pointed into the sun, hanging the cab/coach divider blanket is definitely worthwhile!
The forced air flow from the vents makes it feel cooler than the ambient temperature implies, though its not as free-flowing and cooling as being outside in the shade. And of course you’re immediately exchanging the cool air leftover after having the cab A/C running while driving with the hot outside air. On the other hand, we have found that sealing everything up will keep the cool air from warming up too quickly and it’s okay for a short duration — like 30-ish minutes to have a meal at a restaurant.
All of this effort was experimenting with how long we could safely leave the vehicle with the cats inside while parked in such heat and sun. I should note that I’m not comfortable with the idea of running the coach A/C unattended. Besides annoying everyone around with the constant noise of the generator, you’d be relying on more complex components not shutting down for some reason and risking the sealed up RV eventually getting much hotter inside than out. Opening up the RV to the shaded side and making use of the simpler and redundant fans seems much safer. In fact, we have yet to ever use the coach A/C at all though of course we do use the cab A/C while in transit. I’ve been surprised to occasionally see others driving their similar rig around with the generator going, presumably for additional A/C. We’ve found that the cab A/C works fine for the whole coach while driving and I’m not comfortable leaving the propane on anyway while in transit.
Repair Kwikee retractable step
Our Kwikee retractable step started making a grinding noise when opening or closing and proceeded to get worse until it just seemed to grind endlessly. Looking this issue up on the web, I found that this is a fairly common issue. Apparently there’s a gear that can get worn down or stripped so that it merely grinds away without properly engaging. I found several different resources for how to deal with it. (See below.) I particularly liked how someone worked out a way to take the mechanism apart partially, move the gear around to a portion that isn’t worn out and reset things so that it would use this portion for a while. Unfortunately, that trick didn’t work for me and I had to replace the parts entirely. I probably could have replaced just the control arm/linkage assembly and not the electric motor but I’m not sure. I’ll keep the old parts for spare pieces though.
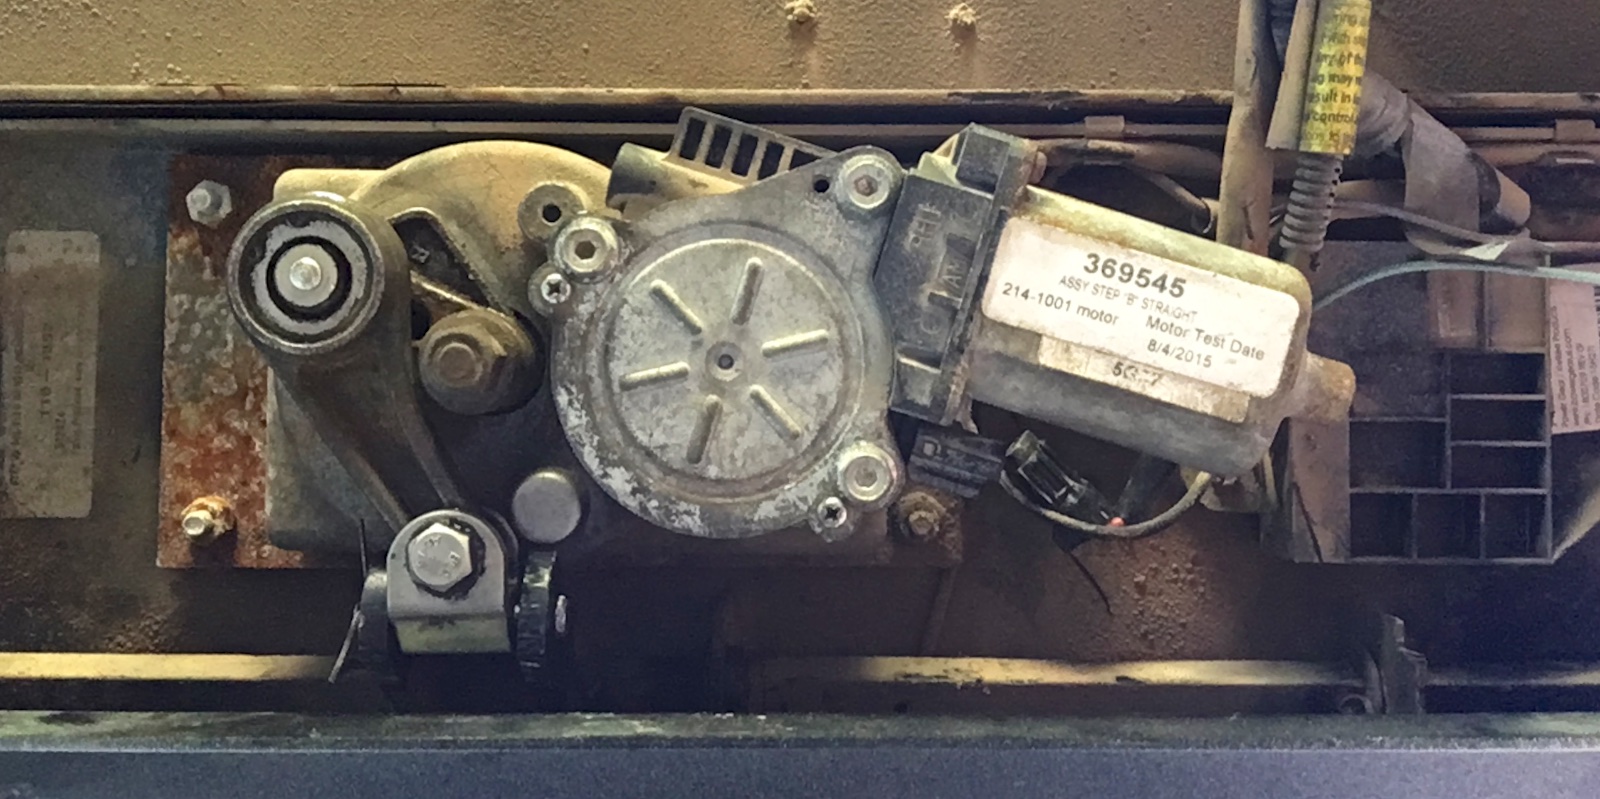
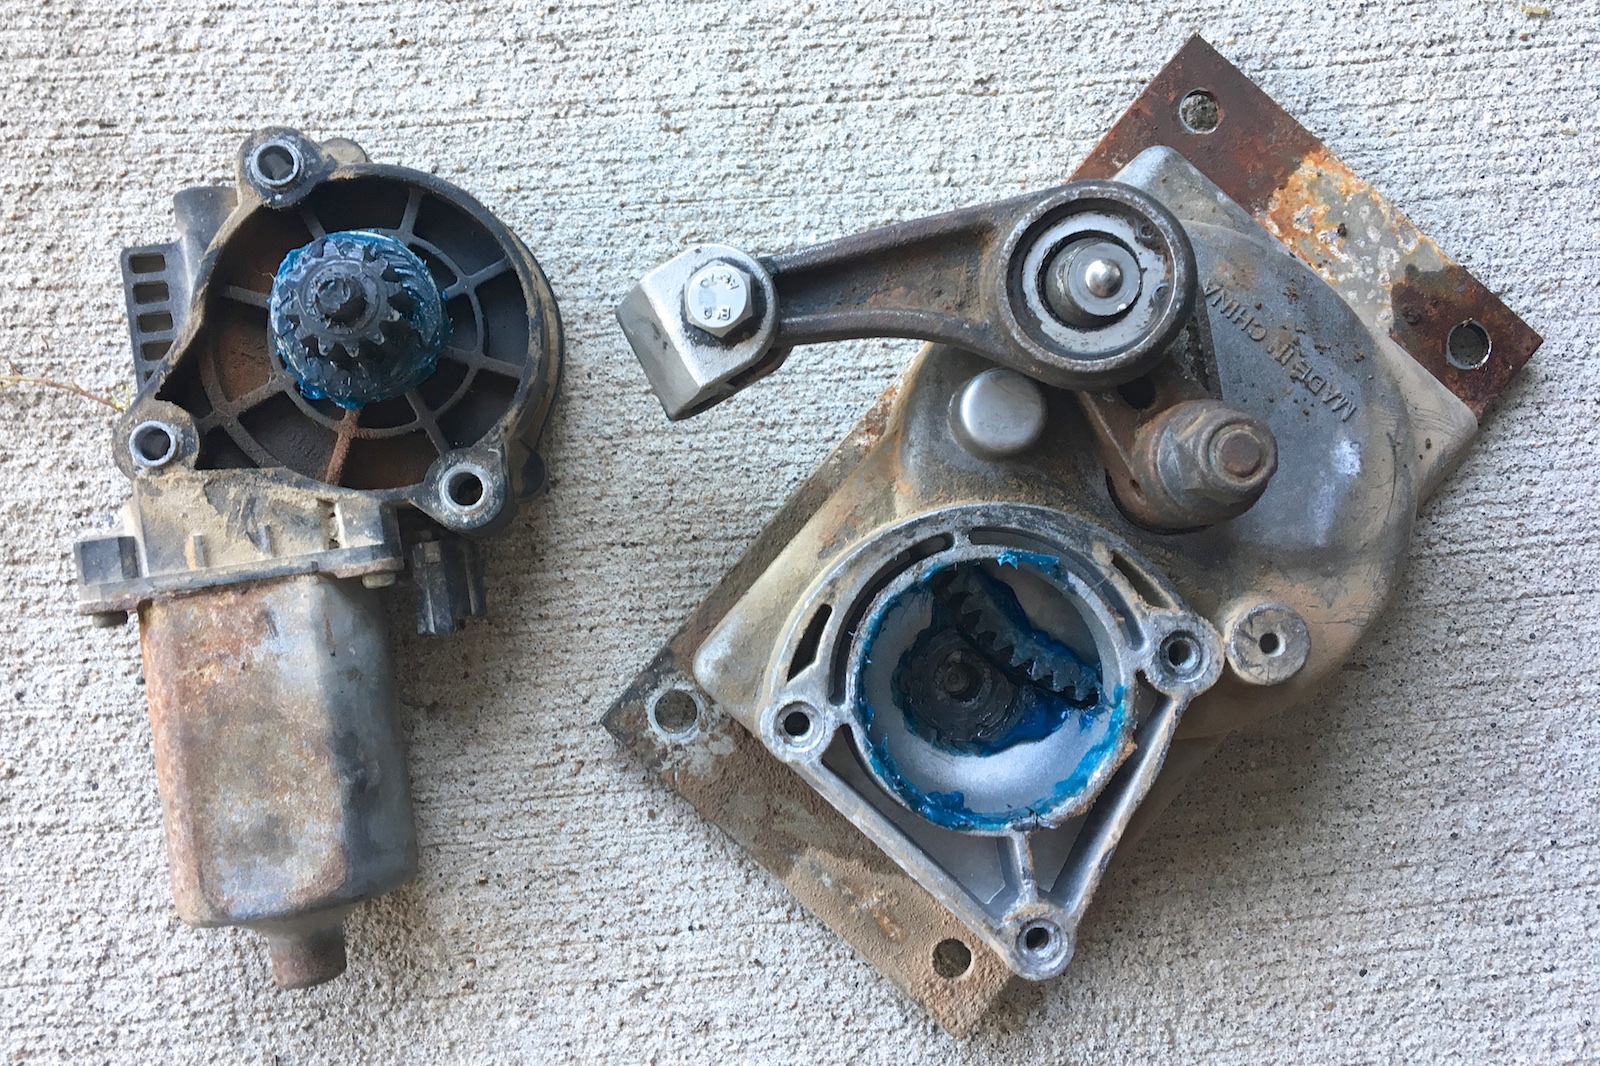
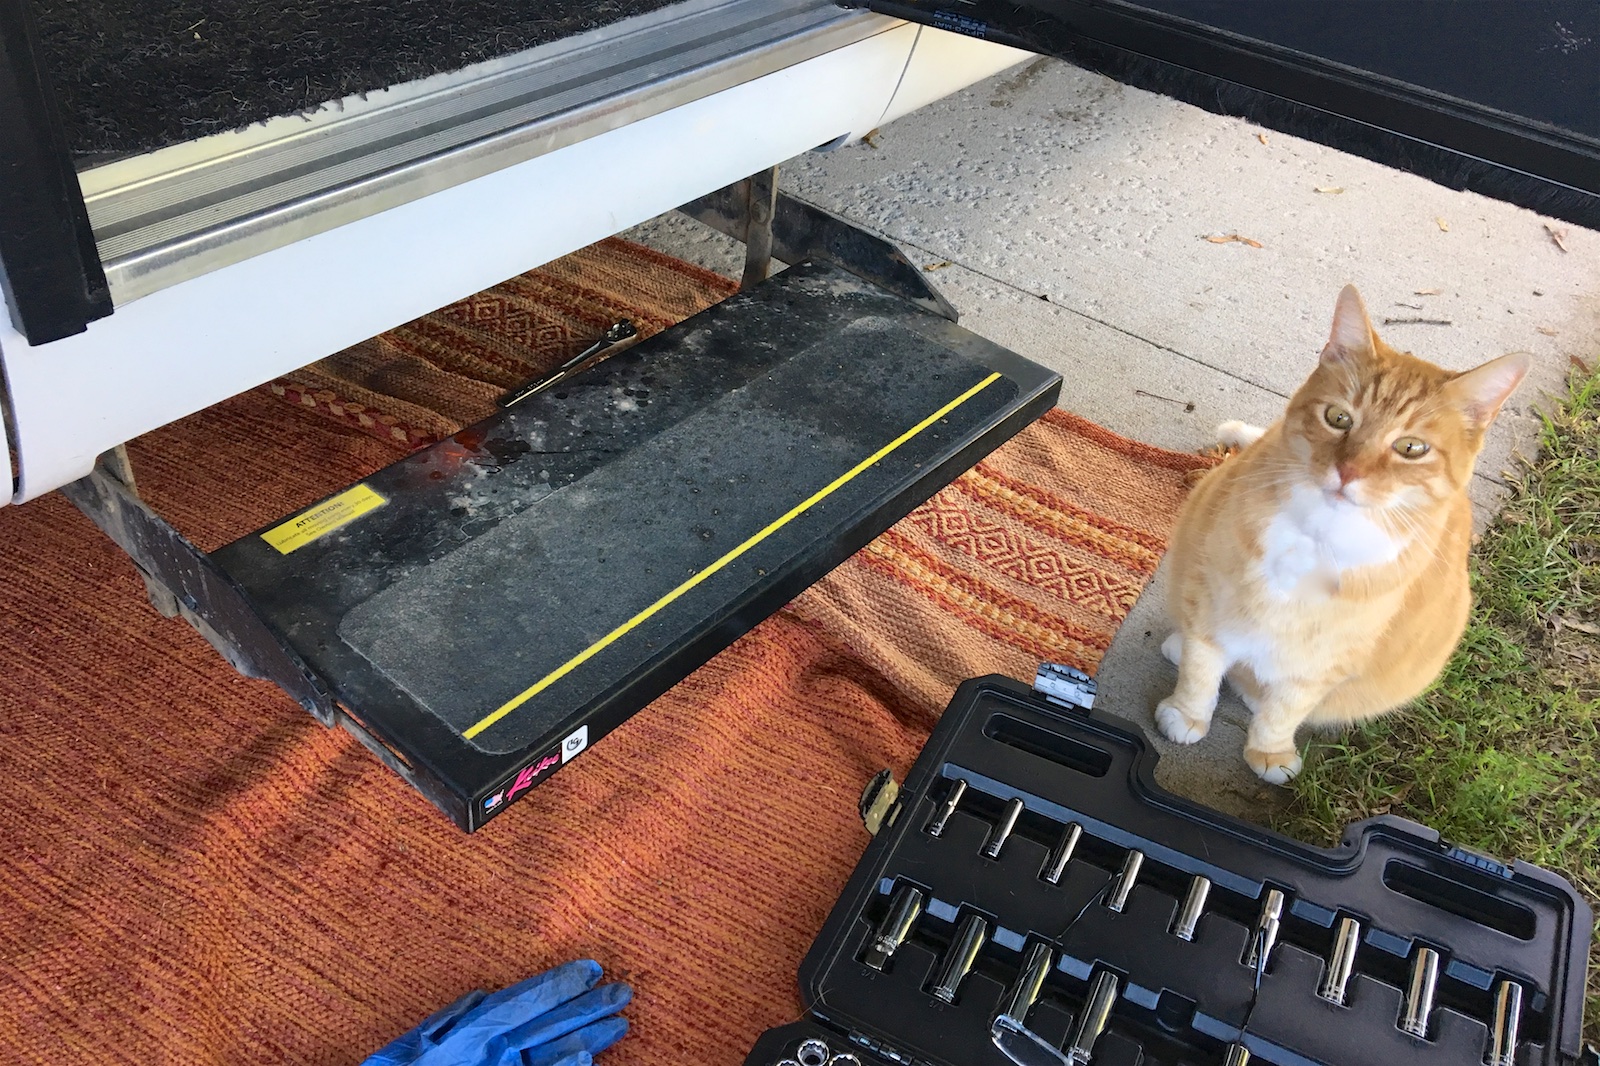
Anyway, here’s a number of resources for instructions on taking apart the assembly, on doing that reset trick to use a different part of the gearing and Amazon links to the appropriate parts for our LTV Unity’s step model. (Getting the right part was a bit tricky as the part numbers on ours didn’t seem to match anything – but I eventually found someone who had already figured out which parts were correct.)
- Kwikee 1101426 Gear/Linkage B control arm linkage
- Kwikee 379147 Motor Replacement Kit
- Kwiklube Spray Grease/Lubricant (for maintenance of the step joints)
- A troubleshooting guide for Kwikee steps
- Forum discussion about worn down/stripped Kwikee step gear
- How-to video on replacing Kwikee step gear assembly and motor
- How-to video on resetting to use non-stripped part of gearing
- Watch out for a worn, broken or missing cotter or clevis pin
Get your wheel alignment re-done!
While researching before my purchase of this Leisure Travel Vans Unity, I had read that it’s a good idea to get your alignment redone. It was on my checklist of things to do, but I never did get around to it.
Well, here we are at 20,000 miles and I recently noticed that the front tires are wearing heavily on the outside edge. The passenger side is particularly bad and I’m told the cracks I see are signs that the tire is approaching the point where it may fail. It’s inconvenient that I only noticed it while we’re thousands of miles away from home but it’s fortunate that I noticed before we tried to drive the thousands of miles on our return leg. Potentially major damage and/or scary accident averted!
|
|
|


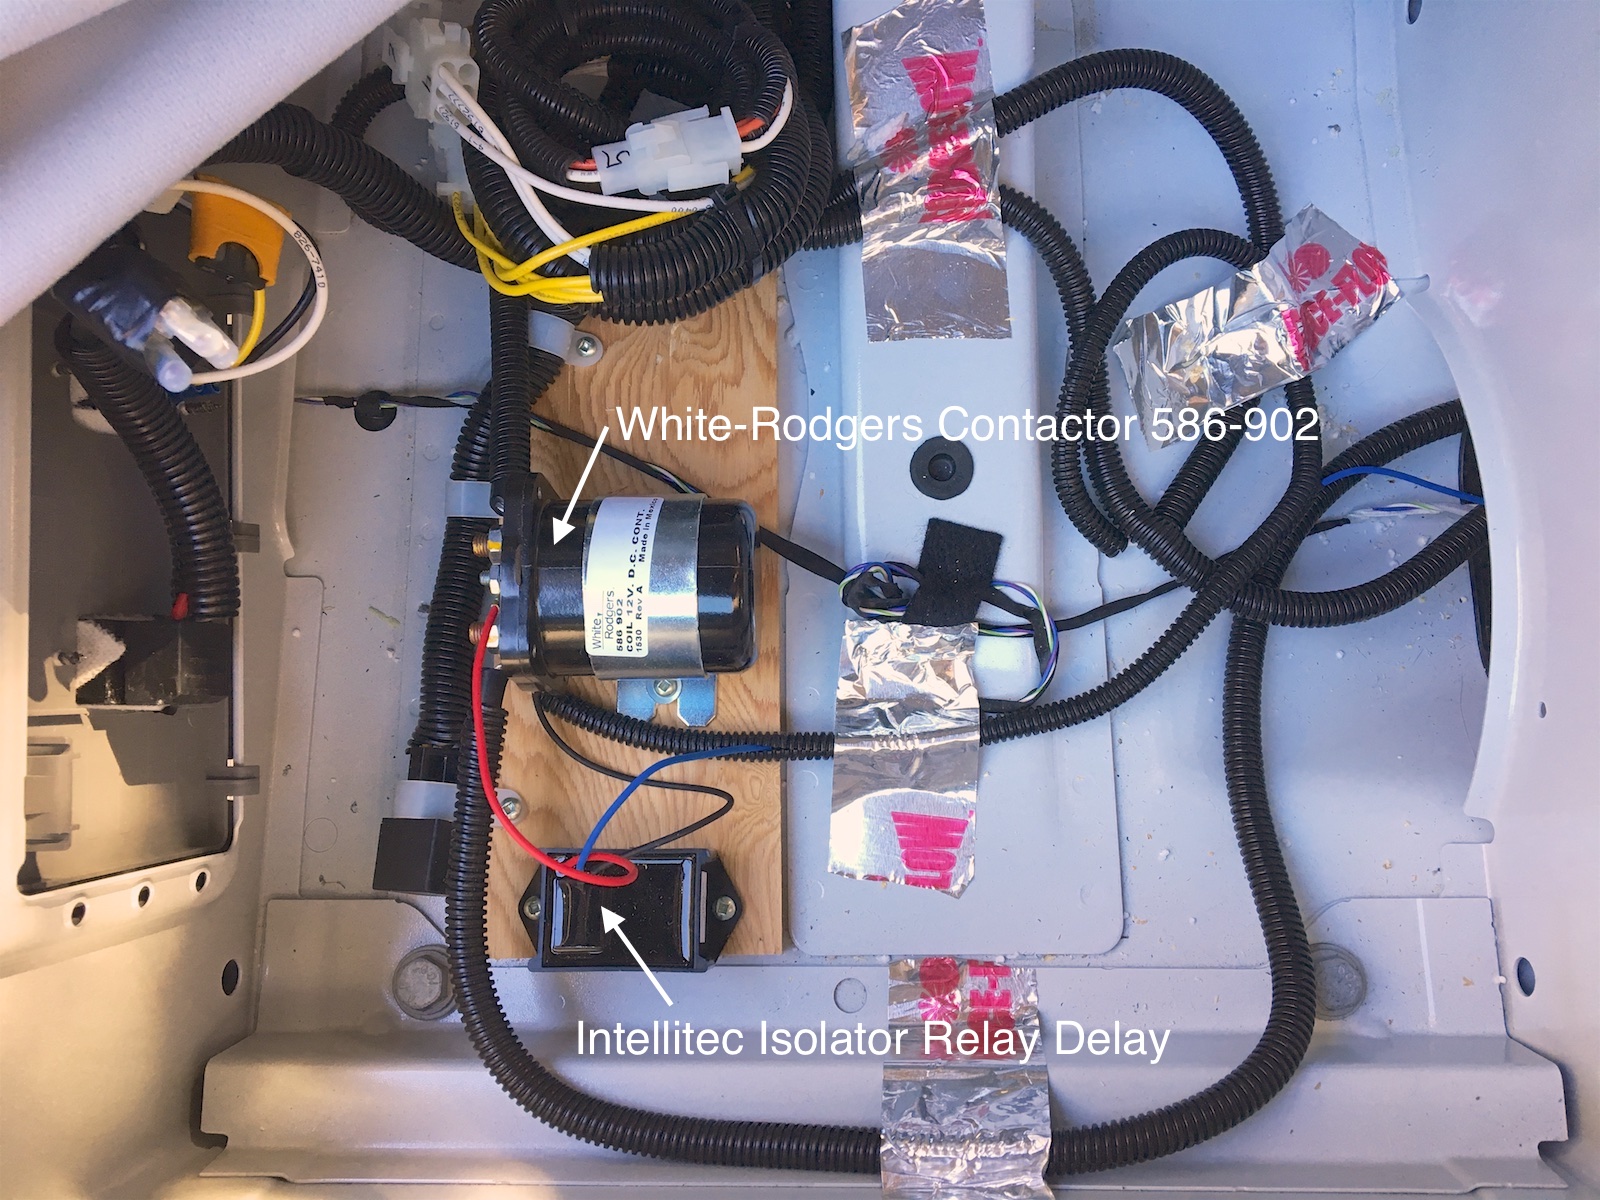
So getting two new tires for the front end now (the rear dualies are looking fine) plus getting that wheel alignment finally done!
Flexible solar panel durability/longevity test
(November 2019)

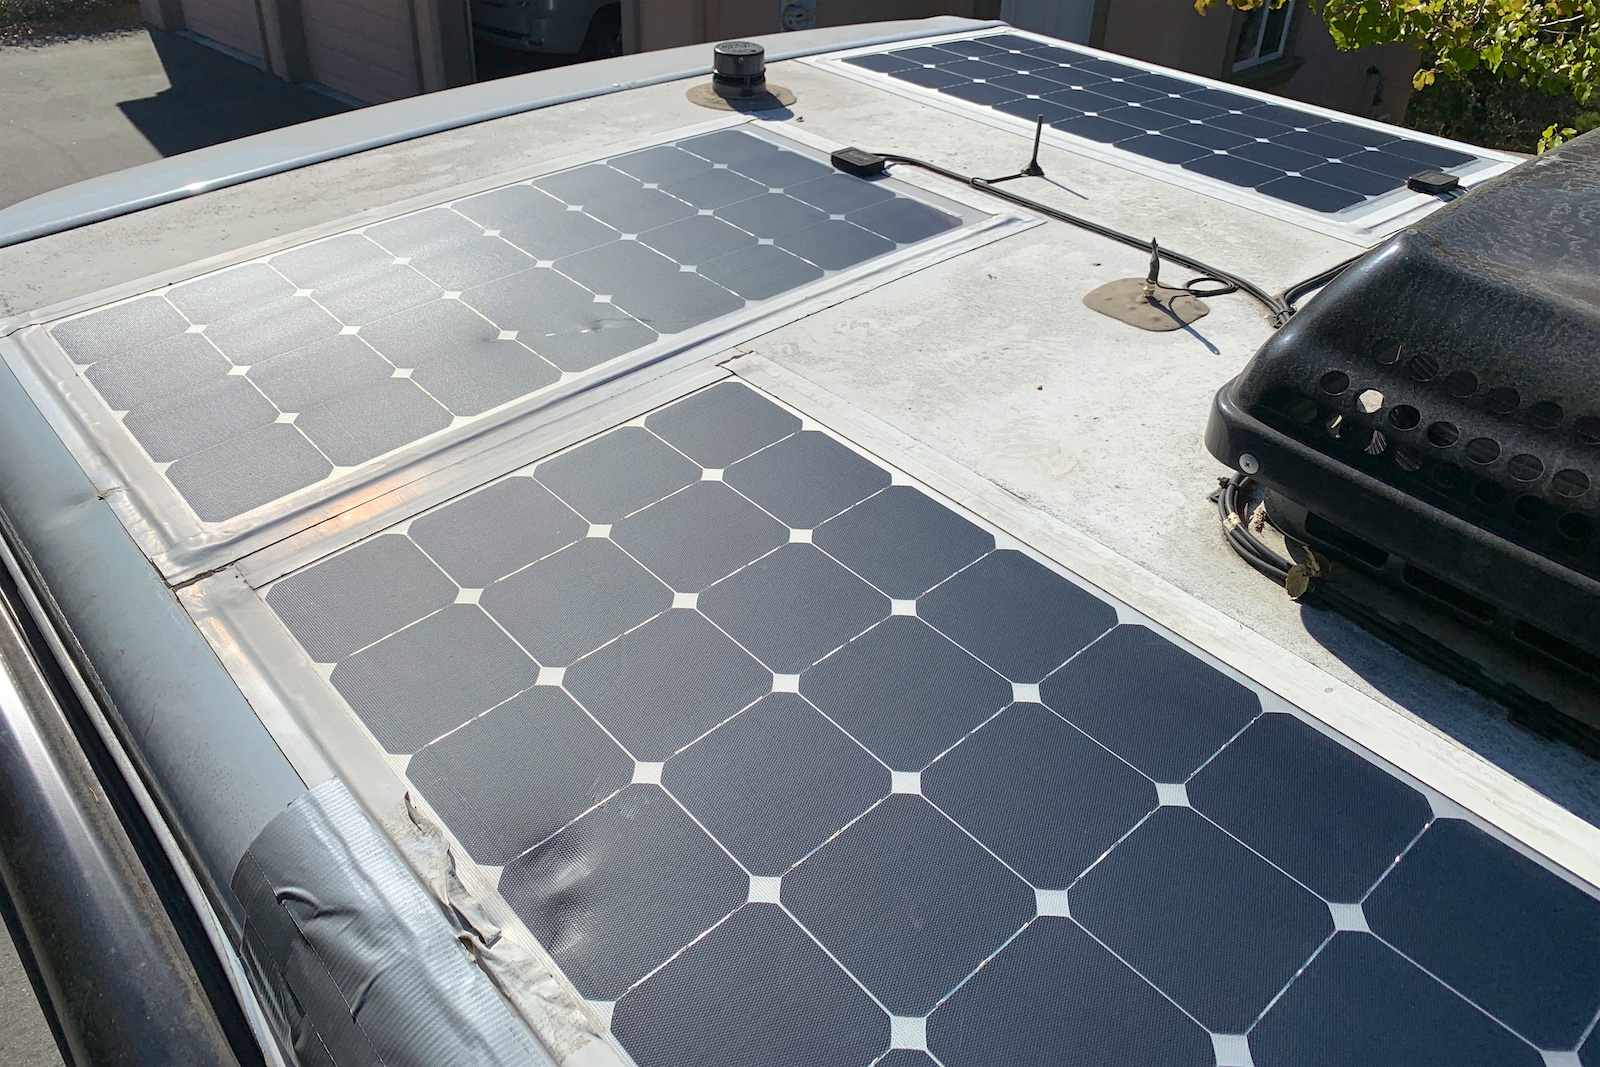
The Traveling Cat Adventure Vehicle suffered some significant damage caused by the fall of a large redwood tree limb. Besides the roof and awning damage, the tree limb also struck and dented one of my thin, flexible solar panels. Some time ago, I also damaged one of the panels with a faulty adhesive installation. So, this seemed like a good time to test whether either of these panels need to be replaced. I cleaned all six panels (using this great waterless car wash spray) and then set about isolating each pair of panels to test their relative response to the mid-day, mid-November sun. The six panels are wired up in a parallel-series arrangement: three parallel sets of two panels in series, to boost the voltage rather than the amperage, making use of the original wiring which is turn connected to my Victron MPPT controller that then converts the voltage to an appropriate level for the battery. (Details on my installation here.)
One pair is the original 100W GoPower panels and the other four are the GreeSonic panels I added (which have an arguably superior EFTE surface material) and use efficient SunPower cells which are also known to perform well in overcast conditions.
Somewhat unexpectedly, it’s the original, undamaged GoPower panels that turned out to be underperforming. The undamaged GreeSonic pair was producing as much as 7.7 amps (or 106 watts) and the other pair (with visible surface damage) was producing 6.9 amps (or 95 watts). Since the Unity’s roof is slightly curved, the first pair was angled slightly towards the sun and the other pair angled slightly away from the sun. So both GreeSonic pairs are really performing about the same. Keep in mind that the sun’s position in the sky during this test in mid-November was fairly low at about 34 degrees above the horizon, or about 55 degrees off of the vertical of the solar panels. Meanwhile, one of the GoPower panels has failed out right and was showing voltage but no amperage – presumably there’s a short in there somewhere. The other GoPower panel was only delivering 2.0 amps (30 watts) when isolated from its failed companion – compared to one of the “damaged” GreeSonic/SunPower panels on the same sloped side of the RV at 3.5 amps (48 watts).
So, in terms of durability, these flexible GreeSonic panels held up great to the impact of this quite large redwood limb – and the roof and awning didn’t fair so well. As for longevity, the original GoPower panels are probably about 4 years old while the GreeSonic panels are about 2.5 years old. (The Unity has been parked in full sun when not in use since I acquired it a little more than three years ago.)
Here’s the pictures of these solar panel tests:
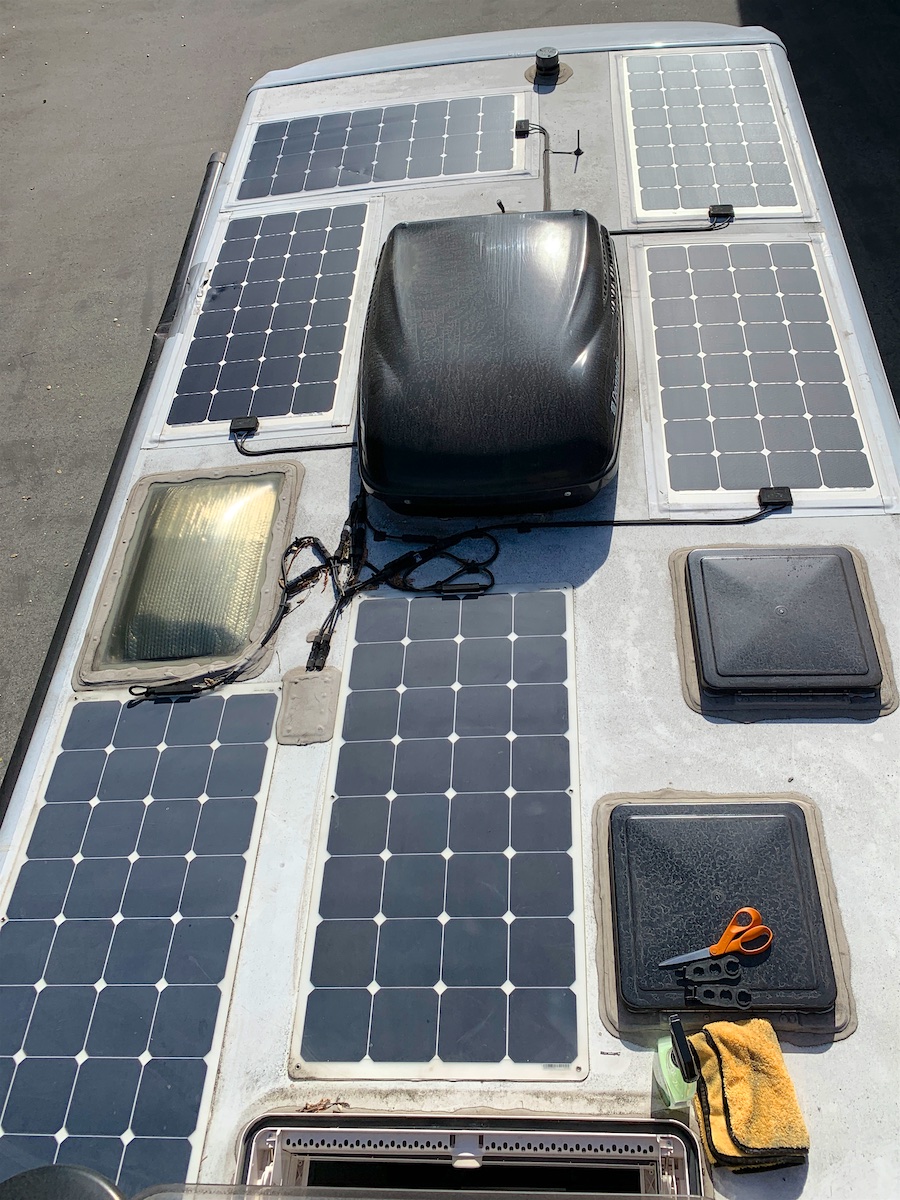

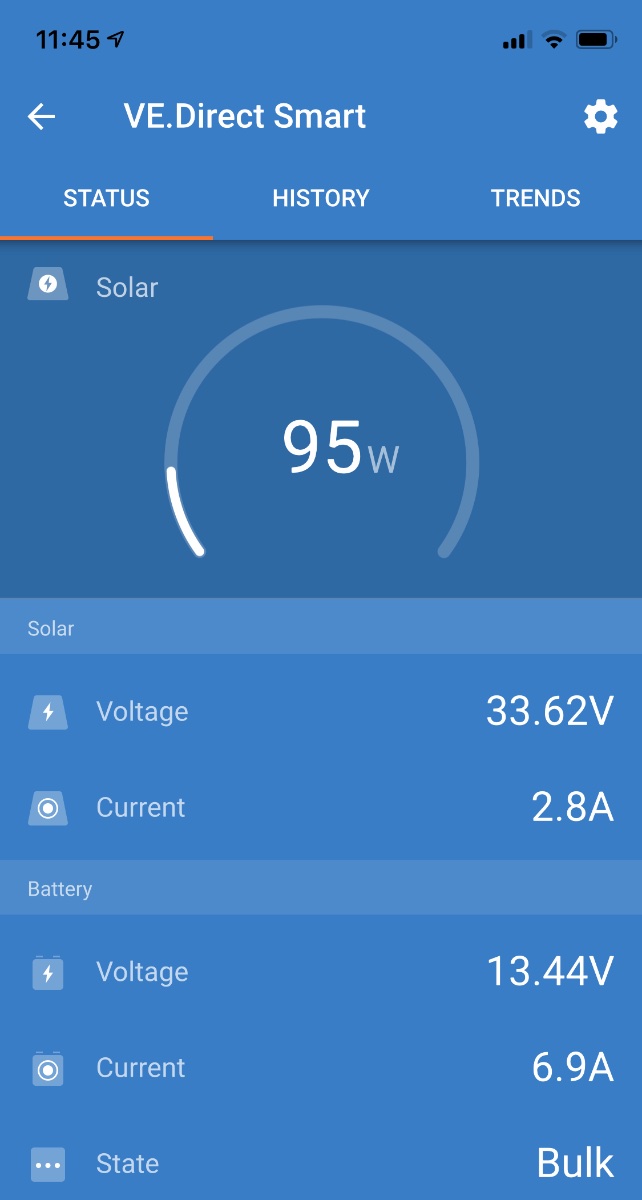
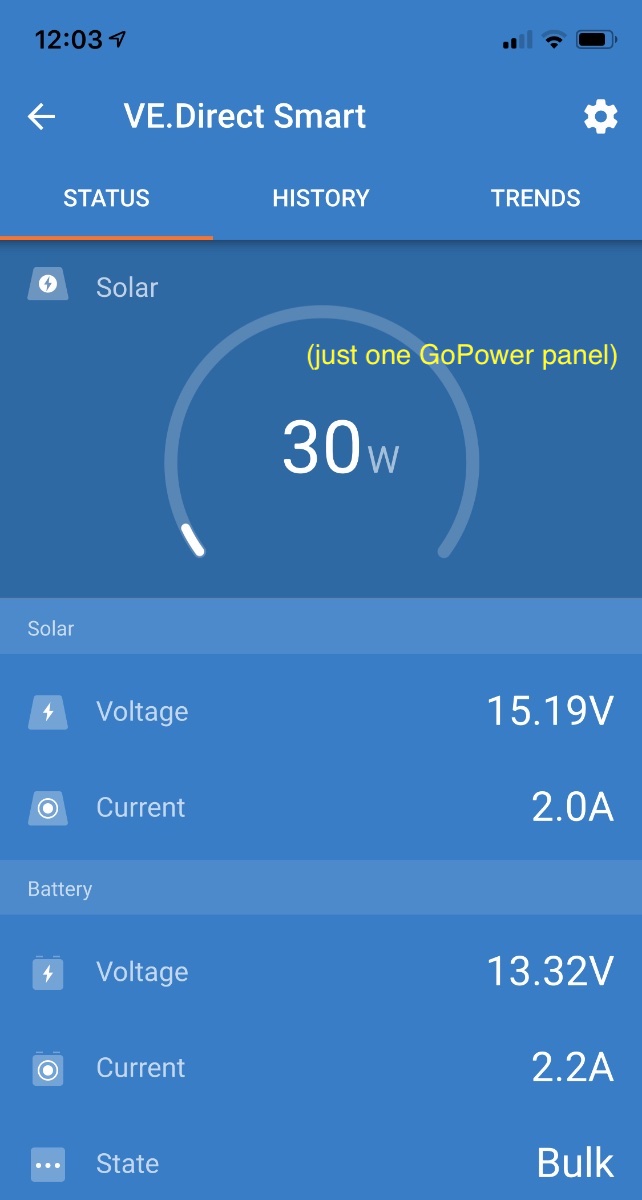

Update (January 2020):
I got the Unity back from the RV repair shop – they replaced the curved section of roof that was crushed and replaced the awning entirely. I was then able to go ahead and remove the factory-installed GoPower panels that weren’t performing well. I replaced them with these two SunPower panels from BougeRV that have a similar EFTE surface as the GreeSonic panels I added. I also had to reinstall the two GreeSonic panels that the RV repair facility removed.
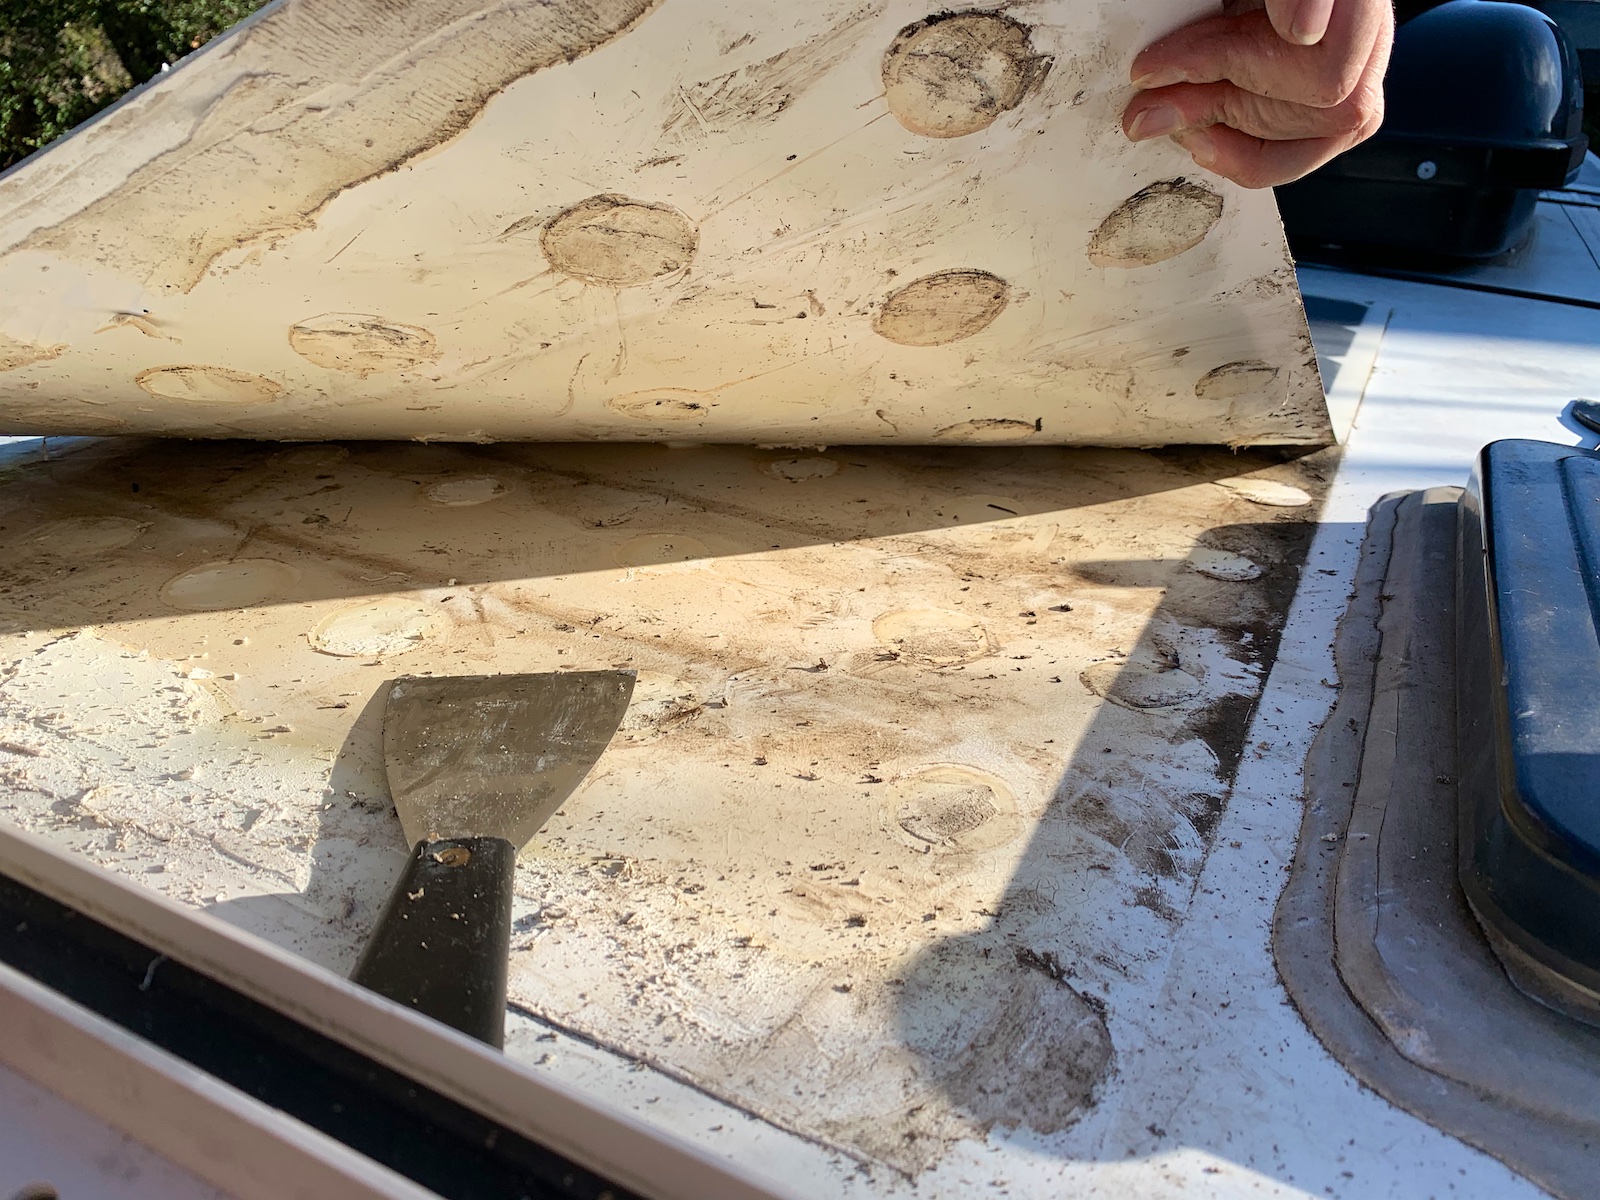

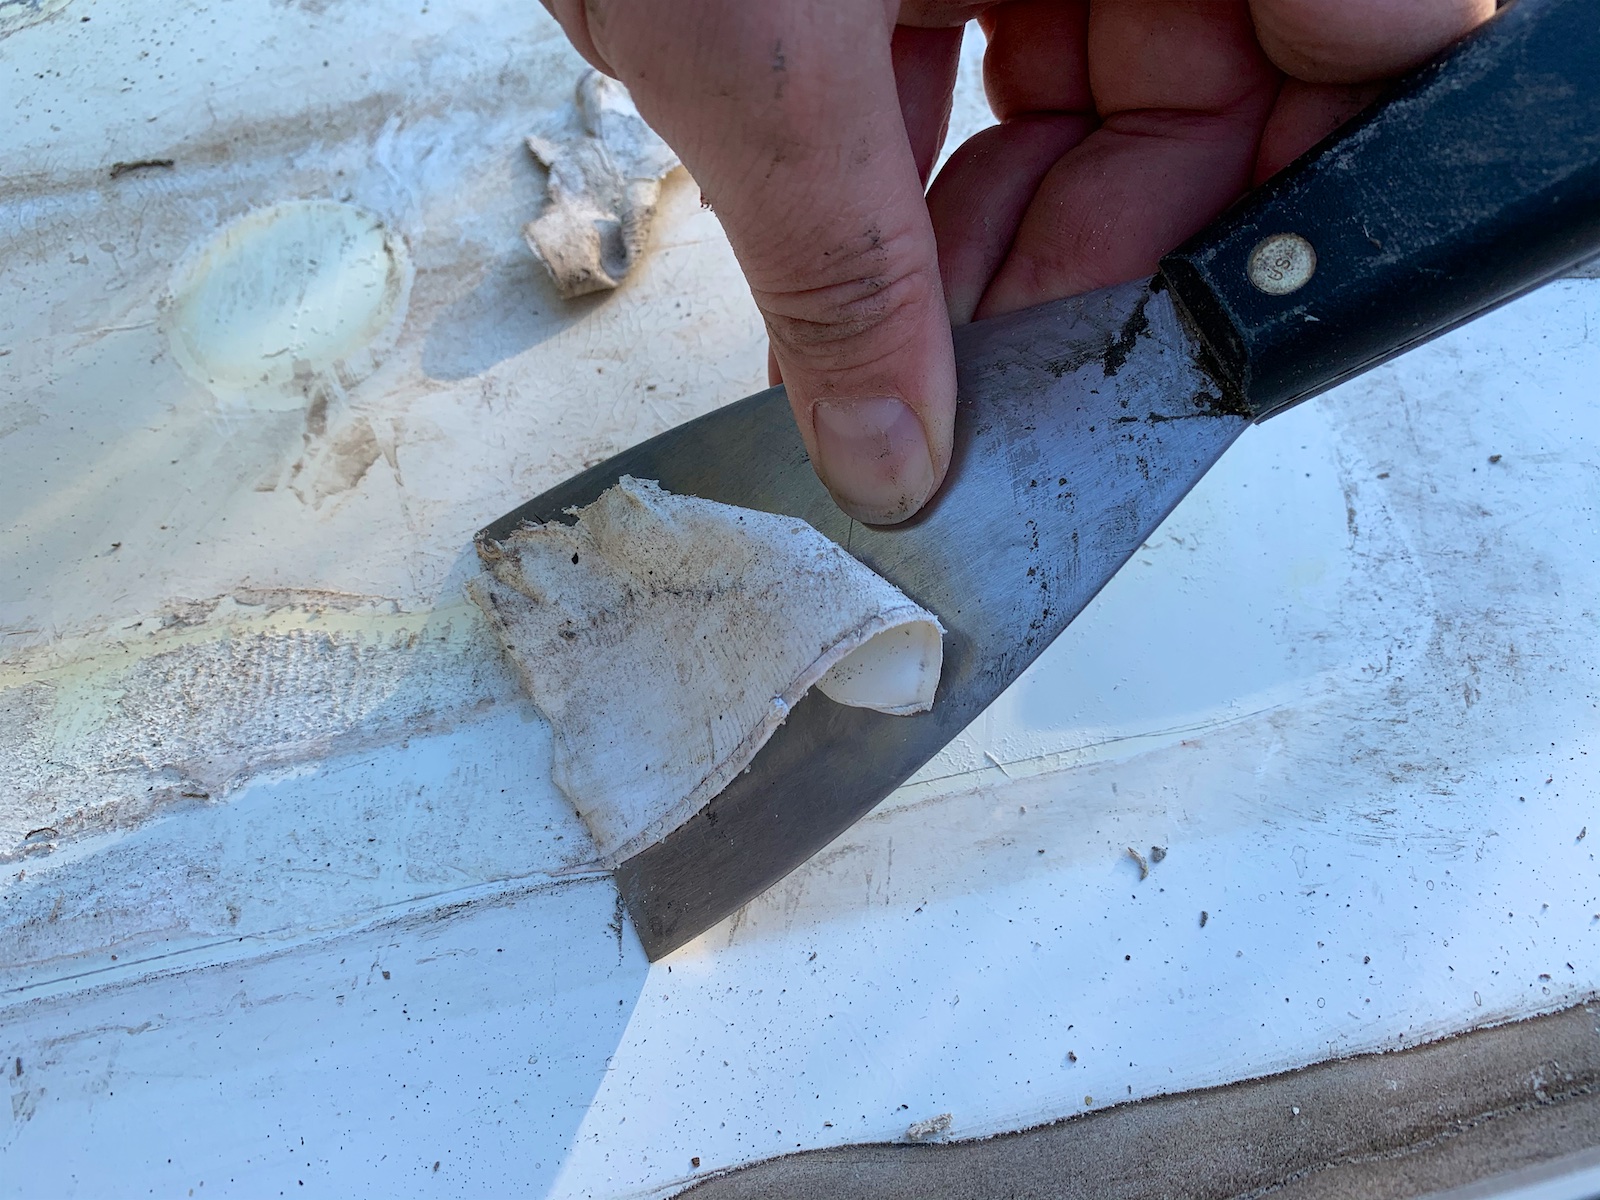
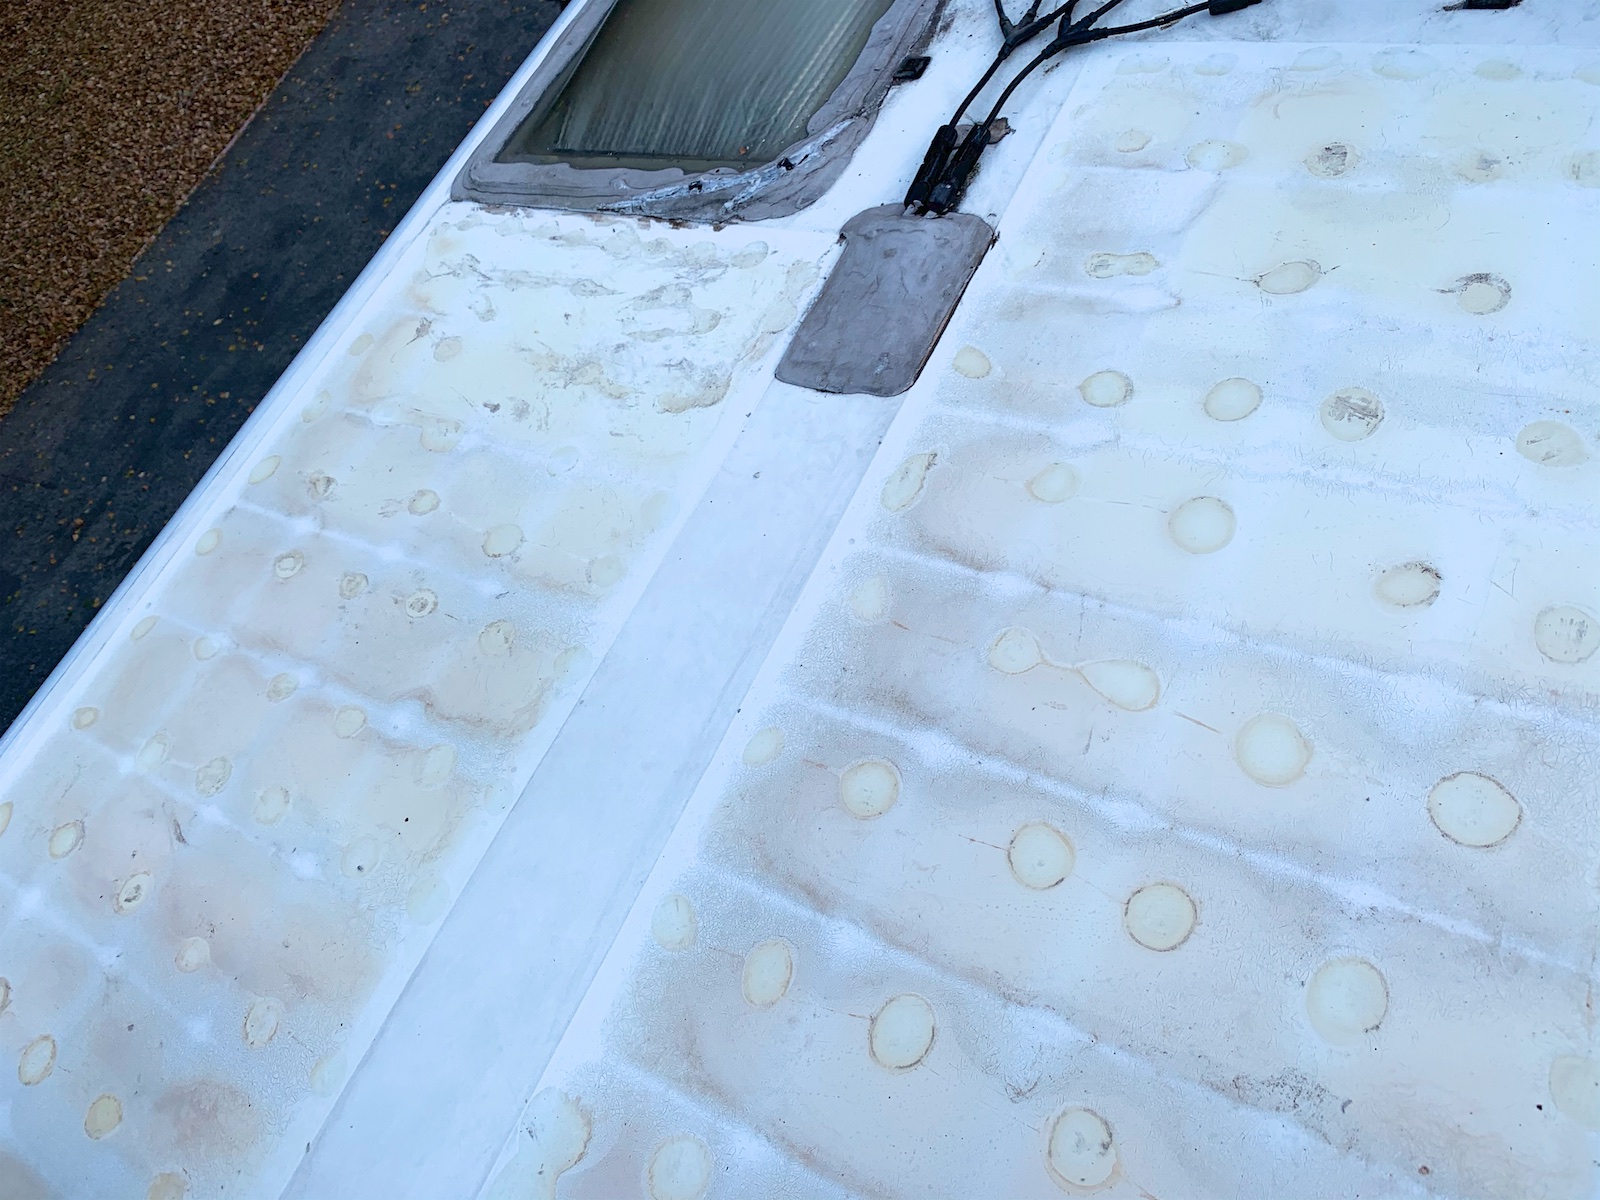
All 600 watts back up and running:

Wish List Items / Future Possibilities
Add tire pressure monitoring system?
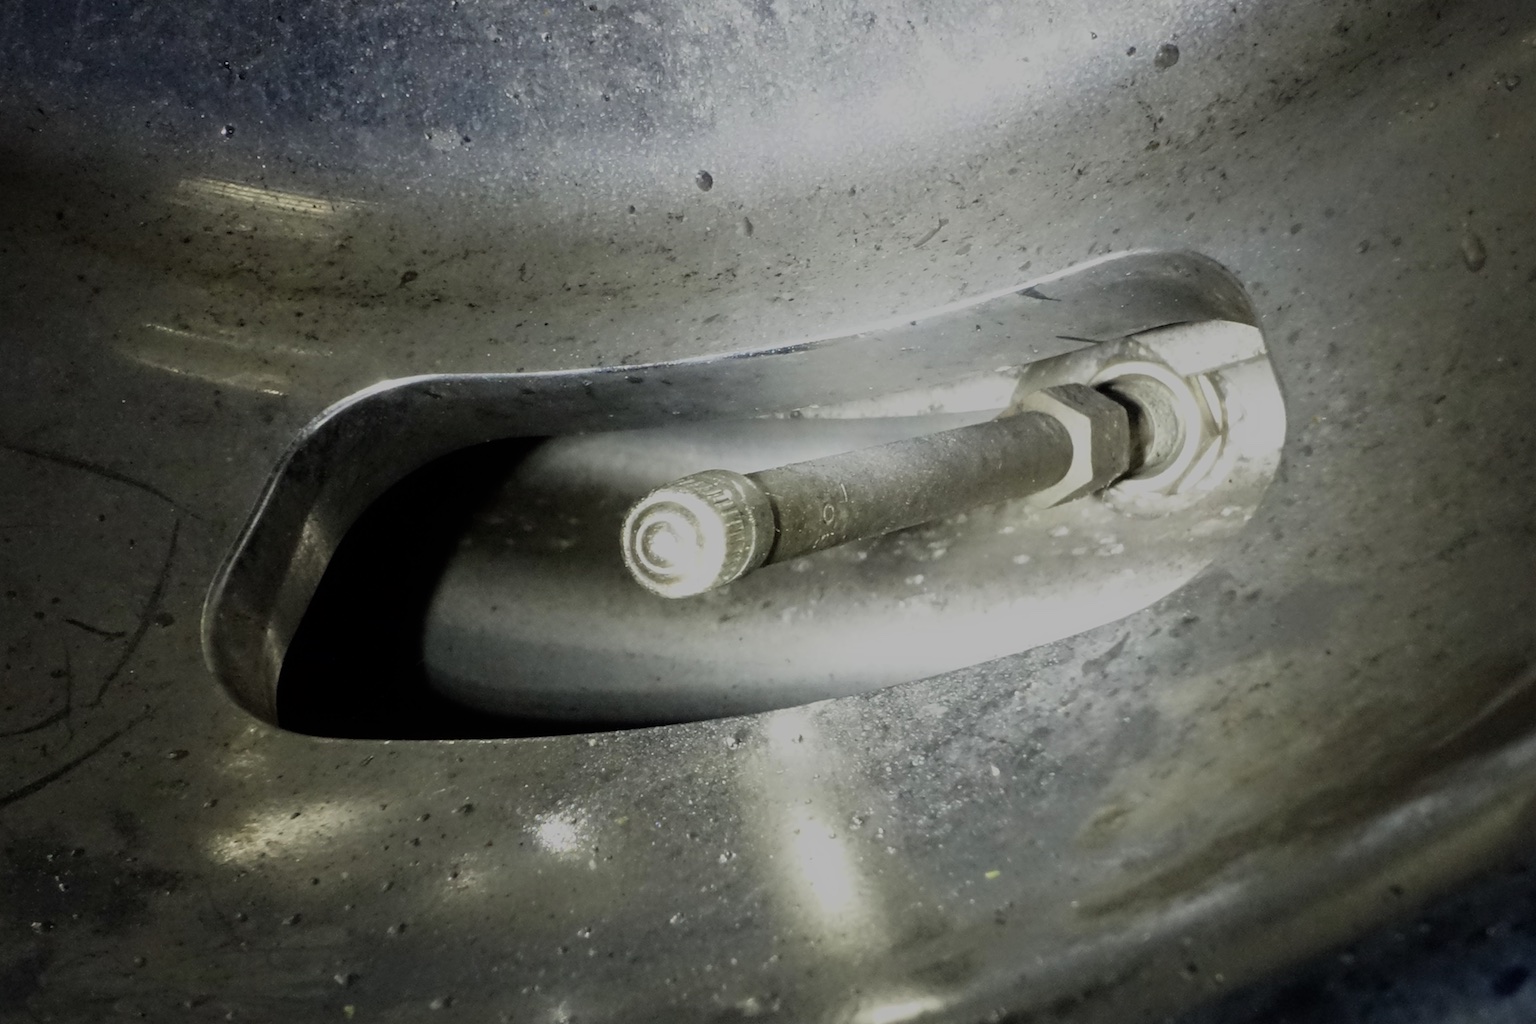 I’ve read that it can be very worthwhile to have a TPMS running on a dual wheel RV to avoid tire failures. Here’s one forum discussion on the subject: Tire Pressure Monitoring Systems
There are some serious issues to watch out for regarding whether your tire valve extensions will fail under the added stress. Still looking into it but it makes me wonder if it would be better to see about having the Mercedes OEM internal tire pressure sensors installed, if possible.
Replace rear view mirror?
The rear view mirror is pretty useless since you can only see the interior of the van with it. I’ve removed it for now but I’m thinking to replace it with either a dedicated rear view camera monitor or a dual dashcam with integrated screen to display a rear camera view and record both forward and rear views.
Replace propane cooktop with induction?
I want to replace the existing two burner propane cooktop with an induction cooktop. If you’ve never used an induction cooktop, these aren’t simply electric cooktops. They don’t heat up coils; there’s no burner. They use electromagnets to excite and heat the molecules of your pot to heat your food and they’re incredibly fast and responsive. Even better than working with natural gas or propane. And much more efficient use of energy: all of the energy goes into the pot, not into the air. Plus of course the electrical energy is replenishable from solar or via the alternator while driving to the next destination.
I want to install the True Induction MD-2B Mini Duo, though this will involve expanding the existing cut-out by a couple of inches. I can’t do this though until I upgrade my battery capacity and my 1200W inverter/charger to handle the 1800 watts needed.
Larger inverter / more inverted circuits?
My existing Magnum inverter supports 1200 W, but that’s not enough to support an induction cooktop (1800W) or run the microwave (1500W) on battery power. Was thinking to go with about 3000W which would be plenty as long as I don’t try to run two max loads at once, but I guess there’s more overhead with running larger inverters. May want to consider going with something smaller, like 2000W, but that might be cutting it a bit close as almost nothing else could be running while maxing out the cooktop.
Additional alternator / eliminate propane generator?
I may also want to look into adding an additional alternator and possibly the high idle option. The high idle option allows the Mercedes diesel engine to idle safely for extended periods and the additional alternator can allow recharging a large lithium battery pack in less than an hour, eliminating the need for a propane or diesel generator. My unit came with the propane generator but that would be a nice, big chunk of weight to get rid of. Besides, they’re super noisy! First I’ll wait and see if I actually have the need to charge the battery system any faster than with solar and the existing, standard alternator. Might just be fine without the additional alternator (or the generator).
(Please note: As an Amazon Associate I earn from qualifying purchases via my links to Amazon.)
68 comments
We just purchased a 2016 unity wb the Murphy Bed it seems to have a lot of motion while moving is there an upgrade to secure bed.
Sorry, I don’t have any experience with the Murphy bed version. I suggest you try this subforum, dedicated to all Unity models: Sprinter-Source LTV Unity subforum
Hi Chris, we have a 2016 unity TB…and wanting to remove the rear cabinet that has the mirrors and worthless shelves. Do you recall how that cabinet is attached…perhaps it is nailed or screwed from the behind the cabinets? I was hoping to take it out to make more room for sleeping…and didn’t want to start cutting in the case the unit can be removed in one piece.
Thank you in advance if able to assist.
Ah, good question but sorry, I don’t know. Maybe try asking on the Sprinter-Source LTV Unity subforum
Hi Chris, quick question for you: How did you remove the lower drawer in the bedroom to create the cat litter box access? Is there a release on the slider tracks somewhere, if you recall?
There is definitely a release on both tracks, like something you pinch, but I don’t remember the specifics and I don’t have the Unity any more. I suggest pulling out the top drawer so you can look underneath with a flashlight and see the mechanism. Good luck!
Hi Chris, I’m looking to upgrade my 2014 unity’s inverter but suck at wiring. Would I be able to replace the magnum standard inverter with another brand with ease, or would the controller have to be replaced as well? Thanks!
I don’t know for certain, but I would expect that you would need to replace or disconnect the old inverter’s controller if you replace the inverter with a different brand. That might not be difficult though as perhaps you would just reuse the existing wiring.
Hello Chris. We just bought a 2016 Unity IB and my do-it-yourself hubsand is pouring over all the items he can now tinker with so thanks for the great posts! Our RV did not come with leveling jacks, only stablizers. My childhood memories of my parents comming to divorice blows over trying to level our camper each night has made me a bit worried for my own marriage, haha. Have you heard of adding leveling Jacks after market to these RV’s
Thanks!
Hi Cynthia, congratulations on your Unity! And I’m happy to hear you’re finding my page helpful.
We haven’t found leveling the Unity to be an argument inducing task. I did stick a little compact level under the rail of the passenger seat so that it’s easier to judge from the driver’s seat and I usually just spend a few minutes maneuvering back and forth to find a decent level. Doesn’t need to be perfect. Most of the time, 9 out of 10 locations, I don’t even use the leveling blocks. I suggest giving it a try for a while without adding leveling jacks.
But yes, I believe I have read of some folks adding leveling jacks. Look in the Unity subforum of the Sprinter-Source forum: https://sprinter-source.com/forums/index.php?forums/193/
Cheers!
Chris
Thanks for the quick response. We will give the manual levels some tries but thanks for the link to the Sprinter forum, lots of good information there. And we can’t wait for the the induction cooktop retrofit. I have one at home and can’t understand how anyone can cookwith out one. Hope to see you on the road sometime…Carrizo Plain, its the best and no one goes there! (did you see any antelope?)
Yeah, induction cooking is fantastic but you get frustrated whenever you have to cook with gas or (gasp) traditional electric somewhere! We did see a couple of antelope far off, but that’s all – Carrizo Plain was very nice though. We’ll certainly go back someday and maybe catch a spring flower bloom.
So what new unit did you purchase?
It’s a Ford Transit van, being converted by Van Haus:
https://crimdom.net/2019/12/transit-van-arrives/
Things have been delayed due to Covid-19 but I’ll be posting some build progress pictures soon.
Hi Chris – saw your blog. Question on your RV grill hookup. I removed the regulator from my Volcano grill and connected to the external low pressure LP port. It lights, but a much smaller flame than when running off a propane tank. Have you experienced that? Thinking I just need to drill out the orifice a little, but looking for input.
Thanks for your blog. Lots of great ideas.
Hi Tom,
That sounds strange. I don’t recall experiencing any difference in flame height or strength after converting to use the RV’s propane port. However, while I expect I tested the grill with a portable tank before doing the conversion, it would have been a brief test as I bought the grill specifically to use with the Unity.
You might want to look to the sprinter source Unity forum – here’s some threads on the topic, including someone asking about weak propane flow:
https://sprinter-source.com/forums/index.php?search/24687/&q=Propane+grill&o=relevance
Good luck,
Chris
I talked to Volcano yesterday. They say their unit as designed won’t work with the low pressure connection from an RV. Apparently their regulator delivers higher pressure than a typical RV connection. They said they’re working on a different burner design which would work with an RV, but not available yet.
So – I’m going to just use the 1# bottles for now.
Maybe will try to figure out a different orifice size to try to make it work.
Thanks for the reply.
Awesome! Just bought a 2018 UMB and somehow ended up on your website! Love your fixes and upgrades. Nice of you to post all of that.
Hi,
Thanks for all the information here! I have been looking for a before and after picture for a late model Sprinter, thanks for that. With the TriK-L-Start installation did you disable your solar system before installing it? Some people recommend physically covering the solar panels. I would think turning off the power to the solar controller would be sufficient. (?) Was it difficult to get the passenger seat off?
Hi David,
I think you do want to disable the solar panels as the way they’re wired in, they would still be generating power even if your house battery disconnect switch was off. In other words, I believe the solar controller would still have power. (When I replaced my factory PWM solar controller with an MPPT controller in the inverter bay, I put in a solar disconnect switch in its place.) So, just cover the panels to be safe. You can use a little handheld tester to be sure there’s no current running where you’re working.
And no, removing the passenger seat wasn’t too bad – might’ve been a little hassle getting tools in there but it’s hard to recall as that was years ago.
Good luck on your install!
Thanks for sharing the tips. Upgrading in every sphere of life is necessary. For roof restoration I want to recommend RV Roof Magic. Liquid RV Roof will give your caravan a new look at a fraction of cost or new roof. With only a single coat and no primer needed it also saves labor and product cost.
Well, you are mine kind of man, so i have something what i am installing in my 2018 Couchman Prism, Its a multi split 110 volt
9000 BTU ac/ heater, that runs on solar/battery and high running at 450 w and regularly at 250 watts, 5 Li battery 500 watt solar can run it almost all day long
Wow.. my complements for the detail of your work with pictures and descriptions.. a treasure of information.. thanks so much.. am currently researching the leisure travel utility mb as an option and so appreciate your insights and detail.. !!!
Thanks! Glad to hear you may find this info useful! Good luck on your potential LTV Unity purchase!
Thank you for all your sharing of valuable info. I also – after reading about your experience- replaced my Lead Acid batteries with a Starkpower lithium. It has worked well though the bluetooth info does not seem to be that accurate. I also noticed that their site is down and previous it showed that every item was out of stock. I am hoping that they are not out of business though if the battery continues to work it seems like a moot point. I am also thinking that someday I will need to replace the stock shocks. Do you have any advice on what you will do when the time comes?
Mahalo,
Derrick
Hmmm, I also see that StarkPower’s web site is blank right now. I hope they’re not going out of business – that would be a shame.
And sorry, no, I haven’t looked into shocks. A friend mentioned some popular Fox shocks for the 4×4 version of the Sprinter, but I don’t know if that would apply to our Unity’s.
I saw the Fox 2.5 by Agile suspension. They sound great though $475 for a pair. I am thinking of Bilstein or Koni but will go with the FOX 2.5’s if they seem better.
thanks again!
This website is utterly fantastic! My wife and I are considering an RV for continuation of work, and play, and a LTV MB will likely be our choice. I’ve watched hundreds of hours of YouTube videos (I hear Dean’s voice when I go to sleep), and most of what you’ve documented here are things I’ve thought about but had no way to confirm whether or not they were do-able. I feel like I just found the TRUE Leisure Travel Van Unity owner’s manual! Thank you!!
One thing I’ve not had luck in finding is a doozie – we want to do a lot of back-roads boondocking. I haven’t found any lift kits or other mods that might work for this, and a true 4×4 upgrade to the Mercedes 3500 chassis is almost $30K. Not impossible, but hard to digest given we already have a very capable 4×4 SUV. So, I’m now about to dig into all of the other great links and info you’ve shared.
Thanks again for such an amazing and thorough write-up!
Thanks, glad to hear you’ve been able to get a lot out of the info I’ve gathered here!
Regarding 4×4, I’m actually currently looking to downsize from the LTV Unity to a short wheelbase (144″) 4×4 Sprinter campervan conversion. (Maybe from somebody like Outside Van.) Want to be able to continue on the rougher forest/desert dirt roads we currently have to sometimes turn back on, want to keep our mountain bikes *inside* the vehicle and want to be able to park in typical parking spaces when necessary.
We are big fans of the outdoor / cycling lifestyle as well. However, after years of literally tent-camping, we are ready for ‘glamping’, but still want access to all the cool spots we enjoy visiting. Besides, the wife demands a full bath at this point, and I can’t disagree.
Thanks for the flexible panel tips I am using Liquid Nails Heavy Duty Construction Adhesive. After a test, there is no way it will come off without removing the paint :)
LTV uses Silkaflex 252 White Polyurethane adhesive to glue down their GoPower solar panels which can be found on Amazon for $16 per tube. One tube will do 2 panels. No too bad to clean of old adhesive.
Need a auxiliary in-out handle for passenger side, bad nee.
Great information! Have you (or anyone else out there) thought about replacing the driver and passenger seats? With my long legs, I find them to be very uncomfortable while driving long distances. I would love to hear suggestions on replacing or adapting the seats.
Jim, the passenger seat on the Sprinter can be converted to swivel horizontally (to face the back). About $400. The driver seat, I don’t think so, because there’s a lot of wiring underneath (2010 model).
I’m doing a swap right now, to convert the inverter to pure sine wave (Renogy), and a better battery management system. 1000 watts should be enough — and there was also an energy management system (original), that gives the microwave priority and shuts everything else off, if required. LED light bulbs are replacing the old halogen units. T-8’s, I think they’re called.
We have a propane generator, and I’m still researching whether it has the required isolation relay to keep shore power and generator power separated. Anyone know about this? There’s that 20-second warming up function, that seems to indicate that the answer is “yes”.
I’ve taken out the Murphy bed and the reclining dinette seats — they seemed to be an example of useless “bling” that only becomes a mechanical and electrical maintenance issue later. The TV is gone, too. We are campers who don’t need the easy life while on the road. Perhaps the Leisure Van people should offer a ruggedized, stripped-down model for those of us who don’t put on a tie for dinner!
Wow Chris, what great advice. We live on a boat about six months/yr and have many of the same challenges as will present when we pick up our new Unity TB in Feb. You talk about getting a bigger alternator and some of the challenges of alternators overheating. You might want to look at a newish technology called hairpin stator alternators. They reach max output at much lower RPM than brushless alternators and operate at greatly reduced temperature. Also you can get huge amperage units like 600 amps if you want to run a tig welder. Just so you know I have not bought one yet but will be doing so soon. Several friends have them and speak highly about them. DCPowerInc and Mechman are two manufacturers and will work with you on frame size etc. At the Seattle boat show I ran into a specialist out of Anacortes that does Li conversions for boaters and he says that placing a fan that blows air onto the back of the alternator is very effective. He also promotes Hairpin Stator technology. Don’t be surprised when you find out that most of the hairpin stator applications are for serious off-road vehicles that want welding capability in the sticks and boulders.
My wife has a CatTrike Tadpole and I have a 2 wheel hybrid. I found you when I started researching racks. Yikes!
Thanks for your note and your suggestion. For now, I’m not looking to upgrade the alternator though I’ve read that others have done so. My upgraded solar and the existing alternator have been working fine. Thanks again!
Hi. Your website, and your improvements and descriptions are nothing short of amazing — thank you! We also have a Unity TB and I need to replace or repair the HDMI cables that run from the HDMI Switch box to the TVs and the Jensen unit. I damaged the male terminals removing them from the switching box. What is the best way to access these cables — I imagine that I’m going to have to remove panels to do this. I thought about a pull through — new cable attached to old cable — but cables are clearly secured as they run through the walls. I could bring it in to the dealer, but, I’d rather do it myself, if possible. Thanks,
Jon
Oh, ouch, that sounds like a challenge. I don’t know how you’ll get at the cables behind the walls. I would be interested in hearing about it if you do manage to do it. Good luck!
Thanks for really quick reply. Fall back is to replace the terminal adapters. This is a very intense and time consuming process — you have to determine which wires go to which poles of the adapter using a multimeter. It would be a lot simpler to replace the cables but, absent easy access (I wouldn’t want to tear open the walls and make a mess) I’m going to do the terminal adapter repair! I’ll follow up after the repair. Best,
Jon
Thanks for the very informative website. Are there any larger or second alternator add-ons available, with high idle kits, to obviate need of the generator? Any thoughts about propane v. diesel generators?
You think like an engineer and also write well. Much appreciated.
Thanks, glad you’ve found the info helpful! Yes, some folk have added a second alternator and high idle to the MB Sprinter that the Unity is based on. For us, we do just fine with the existing alternator and 600W of solar and have yet to ever need to use the generator (or shore power). Of course, in its current configuration, that also means never using the microwave or A/C. I’ve heard arguments about propane vs diesel generator and I guess I would lean towards propane, if we ever actually felt a need for a generator. Yeah, it’s dumb that we’re hauling around an unused generator, microwave and rooftop A/C unit but that’s because I figure if/when I ever sell it, potential buyers would likely expect those items. I’m soon going to get to check out the much smaller, off-road capable 4×4 Winnebago Revel (based on the short wheelspan Sprinter) and so I may well be selling the Unity in the next year.
TPMS experiencel with 2011 LTV Serenity. To take the worry out of tire pressure/heat/condition, we use two main pieces: 1) chrome dually valve kit DL1SP from yourtireshopsupply dot com, and 2) TPMS from eezrvproduct dot com. This allows me to check tire condition whenever I want, comparing temp & heat values of all tires, and I never have to check tire pressure at fuel stops. Just replaced the watch battery on each tire stem sensor (originals lasted 2.5 years). Also carry a 12v tire pump by P.I. Auto Store on Amazon, along with 12v extension cord to reach rear tires with ease.
Hi,
I”m also just under 6′ 4″, and I have a high end mountain bike as well (I just upgraded my SC Blur LT2 to a closeout Ibis HD3–you should check out the prices if you have any interest!). I currently travel with a Yakima bike rack on the back of my Toyota Tundra, but I know that bike locks only slow thieves down–bike locks can’t prevent theft. In fact, the more locks you put on your bike will just steer the thieves to cut off the bike rack itself. As a result, I never let my bike out of my sight–except for grocery shopping–which is a hassle.
I’m thinking about trying to store my bike inside a Unity. I like the corner bed floor plan the best (I’m single), but I’m wondering if the twin bed with one twin bed removed might be the ticket for storing a bike inside. One time, I camped next to a guy who had a Sprinter van with a raised platform bed, and he showed me the aluminum slide out racks he made for his mountain bikes, and it was a really trick solution. It sure would be nice if LTV produced a “sport” model with a compartment big enough to store bikes. It seems to me that a compartment could be used as the platform for the corner bed model.
How is the height and size of the shower?
I’ve started to read horrible things about the Mercedes diesel engine. How much are you spending on maintenance per year?
Thanks for any insights.
Yeah, I liked the corner bed design as well but decided against it as the bed is fairly narrow for two people and not particularly long for someone who’s tall. As I’ve mentioned elsewhere, I too wish LTV would do a “sport / active lifestyle” model using a raised, platform bed design that provides room for gear like bikes underneath, accessed from outside. I’m envious of the many European designs that provide this as well as other cool designs in compact RV’s.
I think the shower space works alright. It’s compact of course, but you wouldn’t want to give up more living space. In fact, we use the shower for storing things when it’s not in use.
I haven’t seen horror stories about the Mercedes diesel engine and in fact I was under the impression that it’s a good design. But still, I’m very much looking forward to them introducing a full battery-electric drivetrain for the Sprinter in the not so distance future. I’ve only had to do one maintenance so far but the required oil was incredibly expensive ($500+?). On the other hand, I think the service interval is pretty long.
Thanks for the response! I did the math, and the diagonal of the corner bed is 92″, which should be long enough for me to sleep diagonally. How much clearance do you have above your head when you are in the shower? Is the shower height 6’5″ like the rest of the Unity?
Here are the links about the Mercedes diesel engine that I’ve been reading:
https://www.linkedin.com/pulse/fatal-flaw-mercedes-benz-sprinters-tom-robertson/
http://www.stephensservice.com/bluetec-diesel-issuesproblems/
I don’t remember how much room I have above my head but it’s fine – because of the skylight. Here’s a picture: https://crimdom.net/photos/2016/mobile-cat-unit/#DSC00387.jpg
I can’t speak to the issues raised in those two articles but the guy in the second link sure rambles like a madman – hard to trust. For what it’s worth, I don’t see a lot of complaints on the Sprinter forum: https://sprinter-source.com/forum/index.php
2012 unity IB do you have any suggestions on power upgrades for towing
Sorry, I don’t have any experience with towing. I suggest you check out one of the online forums, like this one dedicated to the LTV Unity:
https://sprinter-source.com/forum/forumdisplay.php?f=193
How are the Batteries and Refrigerator doing? I have a 2017 Unity FX and just ordered the Stark 125ah batteries. Also have decided to change out the fridge because of my trip earlier through Death Valley @ 118 degrees. The Dometic RMD8555 could not keep up and ended up throwing food out. I am looking at the same model you put in(helps when someone has already done it!) or the Dometic HDC 195 if available.
Also, I see Xantrex is releasing their new Freedom X inverter/charger this month hopefully and will upgrade to that to get the better Lithium charge profile plus Pure Sine.
Thank,
Mike (San Jose)
The batteries are doing great. Having the 250Ah of maintenance-free, quick-charging lithium has been nice.
The Nova Kool certainly seems to be able to keep things cool even in weather up to the high 90’s F but, as I described above, it’s a constant nuisance to have to monitor the temperature and adjust the control. We’ve had it drop to below freezing a couple of times (and freeze some items) when I didn’t notice the alert on my phone from the SmartPush wireless temp sensor. It’s surprising to me that the fridge doesn’t have a true temperature thermostat but perhaps that’s the case with the Dometic refrigerators as well. Also, I prefer the amount of fridge space provided by the Dometic over the Nova Kool. Anyway, the Nova Kool is usable and I’ve seen similar reports on the sprinter-source forums from others having trouble with the Dometic unit keeping cool.
I don’t know anything about the Xantrex inverters or if they would be any better than the Magnum pure sine inverter/chargers that are available, but it would be nice to get a large enough unit to power the microwave (not that we’ve ever used it since I also never run the generator).
Thanks for your comments and good luck on your upgrades!
I have spent the last 20 years on boats; heading for 70yrs of age we decided to buy a LTV TB for 2018 instead of sailing; I converted my boat to lithium 1,200 Ahrs and lithium engine batteries 180 Ahrs each ( it is a catamaran x2) the controllers needed for alternator to charge lithium are very different; Lithium batteries have no resistance so they suck the life out of any alternator which burst into flames in seconds; the problem is conventional regulators monitor voltage change which does not alter fast enough when there is a massive draw. There is a solution use a Sterling BBW1260 60AMP regulator x2 and a 120+ amp alternator
Thanks for your comment. I would like to clarify to any readers that a battery doesn’t really have a “draw” like a load does (lights, equipment, etc) but different batteries do have different charge rates and profiles. So while a lithium battery or a large battery bank can take a large sustained charge, not all alternators are up to the task of delivering their rated charge for a long duration and/or their regulators aren’t smart enough to protect the alternator. Here’s some links to details on this: “A Deep Cycle Battery Assassin”, “The Relationship Between Battery Size and Charge Capability”
Also, I should add that lithium batteries don’t really have “no resistance” but their resistance does remain relatively flat across their entire charge cycle, unlike lead acid or other older battery chemistries. Here’s some detail on this: “How does internal resistance affect battery performance?”
Really appreciate sharing your knowledge. I have a MB based class C and have been trying to figure out a way to make the RV quieter while driving. I will definitely add sound deadening materials to the door like you did. But I think much of the road noise comes from the rear wheel well. I was thinking about spraying Rustoleum bedliner spray into the wheel well. I would appreciate your thoughts on this. Thanks.
Rear wheel well noise, eh? I haven’t noticed that in mine, but my rear wheel wells are under the twin beds. Also, Leisure Travel Vans coats the underside of the vehicle with some sort of protective spray on foam (looks rather like that “Great Stuff” foam filler). I have noticed wind noise coming from the refrigerator compartment, which I hopefully addressed with the insulation I added – but haven’t taken it out yet to test. Next week!
Nice upgrades!
Did you end up getting rid of your generator? You’d need a more powerful inverter for the AC in that case, huh? I upgrade my inverter to a 3000W and have 300Ah of LFPs. I can run the AC, although the inverter doesn’t like the initial current draw, so am tempted to get rid of it too.
The alternator at idle provides 75ADC of charging which is really nice!
Thanks! No, still have the generator. Next big upgrade is indeed to see about a larger inverter (maybe 2000W) to support an induction cooktop and the microwave. Not expecting to be able to run the A/C as that would require a lot of battery capacity, I believe.
Thanks for the posts. My wife and I have the same year and model ltv and live in Aptos. Hope to see you around.
Cool and thanks!
FANTASTIC! Many thanks for sharing your wisdom and experience with modifications and tips.
Thanks, always glad to hear this info is useful!
Sincere thanks for taking the time to post all of your thoughts. I am just beginning to research a first time RV purchase and with this kind of info will be able to make a confident, informed purchase. LTV Unity for us.
Thanks and good luck with your purchase!
Thanks for all of these posts. Just FYI, using the blanket coach/cab divider when running the AC also makes it much easier to cool down the coach. Ditto window covers. Yes, it means it’s a bit dark in the coach but when it’s that hot and sunny outside, it can be a relief for the eyes, too.
Thanks. And that makes sense but we haven’t actually had cause to use the coach A/C (or even the generator) yet. Even in 95 degree Death Valley last week! We’ve only been using the cab A/C, in transit of course.
thanks SO MUCH for sharing your research and information on the 2016 LTV Unity TB (especially the daily convenience upgrades like the bigger trash container under the standard one! ) …we are looking at a used one to buy with only about 7k miles and all the factory options (2 solar panels, alcoa rims, propane generator, etc). My wife and I are newbies to the RV world (about to semi-retire and go to full time RV living in a LTV)! Besides everything you have listed on your site, any cautions you would note that we insure with the seller and the rig? – good news its still under factory warranty! (BTW I can’t tell from my research what is considered a “reasonable depreciation” for a 1 year old loaded LTV..any ideas?). Again, thanks for a multitude of great tips and ideas – especially since I am the most mechanically inept person I know – I’m a psychotherapist, not an engineer :)
It’s great to hear that you’ve been able to find useful information from my RV tips/customizations page. I’m a newbie to RV’s as well and I guess you already saw that I bought mine used too. That was for several reasons: not being able to see one on a lot at a dealership, not wanting to have to wait most of a year to get a new one and of course being able to avoid the heavy depreciation of buying new.
I don’t know of any special precautions to take besides just trying everything and looking for problems and asking about what problems the previous owner had to deal with. It seems to be normal that every individual rig will have some issues to be resolved.
I don’t know what’s “reasonable depreciation” but I’d recommend using rvtrader.com to compare prices.
I received a private email from someone with questions on the Unity, here’s my answers:
That’s the white Ultraleather. The tan version is much darker/yellower. I haven’t had any need to clean anything off it yet, but you’ll see people talk about how easy Ultraleather is to keep clean elsewhere on the web and in other contexts so I’m definitely not worried about it. And I think it looks really great!
The bed platform does cut out several inches. It’s enough that I have to stoop a bit there (I’m just under 6’4”). It’s not really a problem though since you don’t really stand around there except to load/unload the cabinets and the roof is padded/soft anyway.
I jumped on the twin bed in order to get the longest and largest bed: it converts to a larger than cal king bed, with some caveats that I go into here. The corner bed unit was tempting since it makes the whole unit so open, but the bed is pretty narrow for two people (8” narrower than a queen) and not as long as a normal queen. The island bed is almost as wide as a queen, but still 6” shorter. And I didn’t like how much space is dedicated to being able to walk around the bed and you get less storage space because of it.
I haven’t had any problems on windy roads – it’s not really difficult at all. Most challenging was the very twisty, rough and narrow road (rarely two full lanes) up to Fremont Peak State Park but it was still doable.