Introduction
(NOTE: As of September 2025, the company YawVR appears to have gone defunct.)
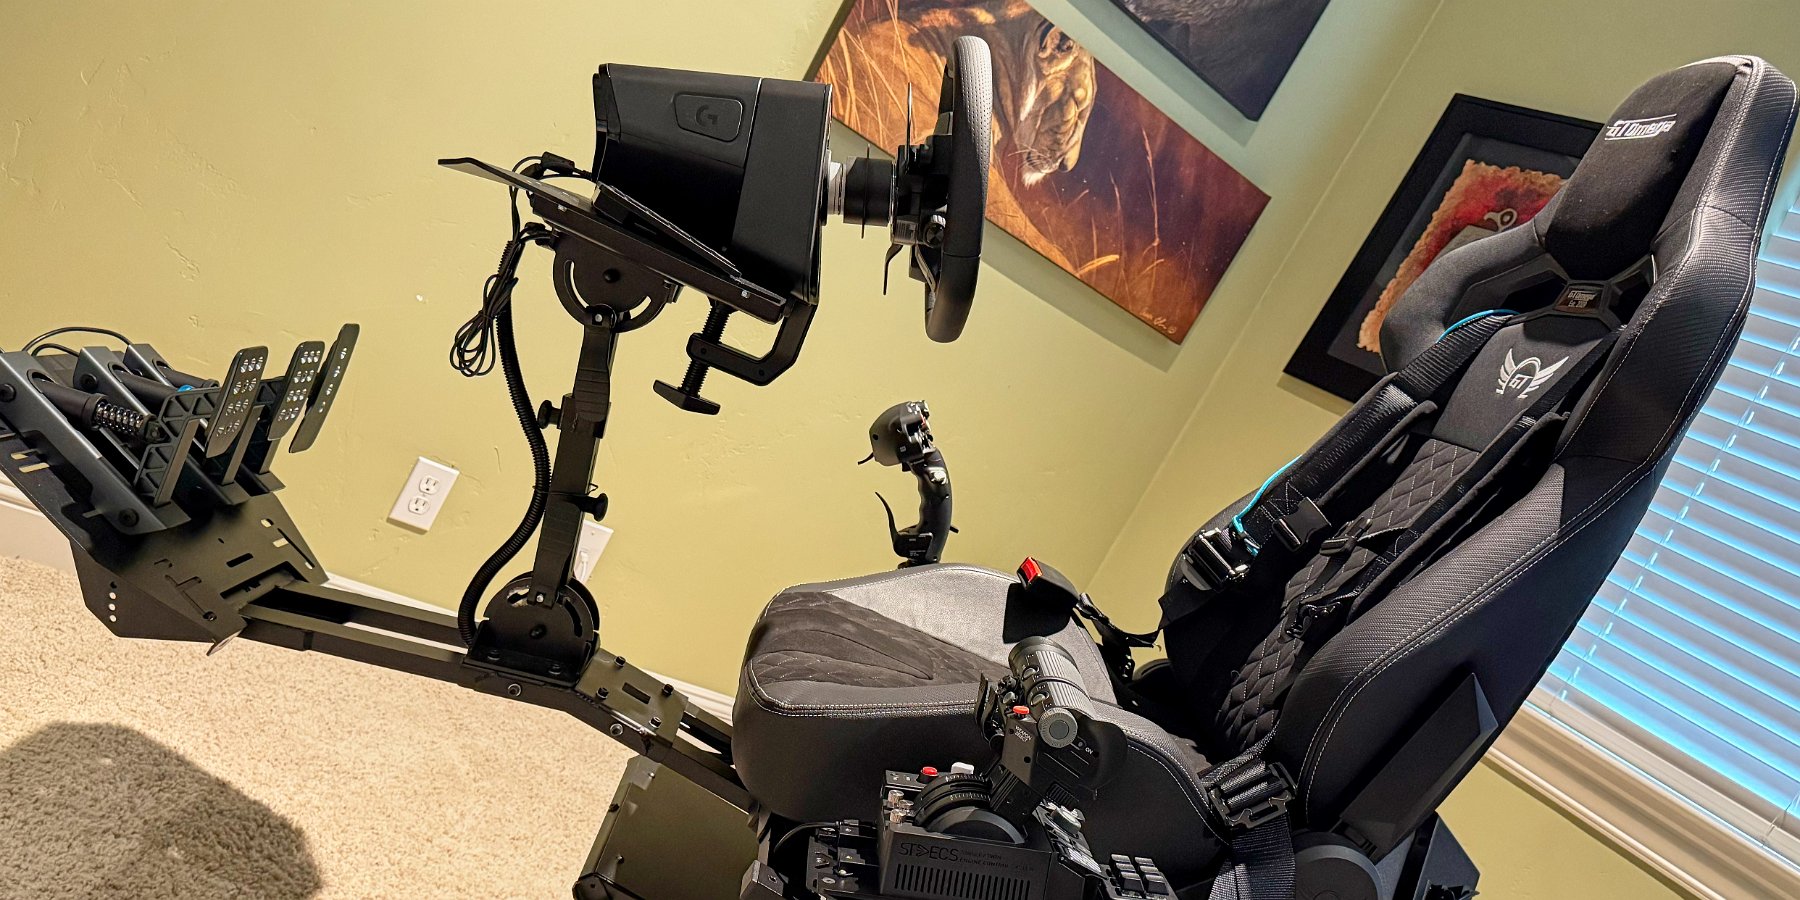
This is the Yaw 3 motion simulator from YawVR. The Yaw 3 is designed to give you a big leap in VR immersion when using flying and driving simulators – or really any game that involves motion in virtual reality – think roller coasters, kayaks, etc. VR is already an amazing immersive experience – it’s wild to fool your brain into believing you’re somewhere else with just sight and sound – so adding motion to a vehicle-oriented VR experience can take the immersion even further.
It was specifically Microsoft Flight Simulator (MSFS 2020 and now 2024) that led me to start thinking about getting a motion simulator. I’ve loved exploring the world in VR with MSFS. I find it utterly captivating to navigate around the many places I’ve lived or visited, enjoying new views from above and the fairly convincing feeling of flying you get sitting in a cockpit in VR with MSFS. I also love flying around in a third person view (outside the plane) that opens up the view of the surroundings even more. The fidelity to the real world that it can display is often amazing, even if not perfect or incomplete. So of course I was excited to try a virtual flying experience with the added dimension of motion.
While motion simulators can’t replicate the true forces acting on your body in a real driving or flying experience, they are capable of generating up to six degrees of motion – rotational movement: pitch, roll, yaw and translational movement: heave (up/down), sway (left/right) and surge (forward/backward).
The Yaw 3 is an interesting design built on a compact base that can freely rotate in the yaw direction (rotating left/right without limit), provide 40 degrees of roll (tilting left/right 20 degrees) and 70 degrees of pitch (tilting forward/back) – and it can do so very quickly: 160 degrees in a second for roll and pitch. It also supports generating vibrations to let you feel road surfaces and engine vibrations.
(Please note: As an Amazon Associate, I earn from qualifying purchases made via my affiliate links to Amazon listings.)
Assembly
Unfortunately, it hasn’t been a simple plug-n-play experience to get the Yaw 3 set up. Unlike some other folk though, at least my unit arrived without any apparent shipping damage. Not surprisingly, the unit does require some assembly. Setting up the Yaw base platform and connecting the roll and pitch component is fairly straightforward but they could use more detail in their assembly video. (At the time of my order in early November 2024, there was no written instructions.). For example, while connecting the drive belt for the pitch axis they tell you to make sure it is tightened appropriately without saying how tight or loose it should be. This would prove to come up again later.
Central Mount – Warped Base
 When I went to install the central vertical mount for the table, I discovered that the steel base of it was warped in such a way that it was impossible to even start to fit all four bolts through the holes into the leg extension below. While waiting to hear back from their support person via email (there’s a nine-hour time zone difference), I tried using a mallet to flatten out the base. I was able to flatten it out just enough to start the bolts but not far enough to reach the threads in the leg extension. The response from YawVR’s support person was that this deformed base was normal and not a problem. After I followed up explaining that I couldn’t even start to thread it, even after trying to bash the base more flat, they suggested I try longer bolts. I did go out and find some longer bolts and this did work. I was a little nervous about forcing the base to conform by threading the bolts to the support (fearing the threads would break), but it ultimately did work and de-warped the central mount’s base to fit. That does raise the question of how the shorter provided bolts were expected to work and whether my central mount’s base was actually not manufactured wrong.
Central Mount – Orientation and Position
Another detail that wasn’t spelled out in the setup video was the orientation of the central mount. It is not symmetrical. The mount has a spring resisting movement in one direction and the cutout allows it to rotate farther in one direction than the other. The video showed the shorter end of the cutout facing towards the seat but after trying this I decided it was a bad idea because with added weight of a driving wheel on the table, it was far too easy to mistakenly let slip the table to drop very quickly and smash the foot plate (and any pedals installed there). I decided to flip it around and secure the central mount so that the shorter end of the movement would face away from the seat and prevent it from falling all the way.
Later on I also decided to give myself more leg room for getting into and out of the seat by moving the mount to the set of bolt holes farther away from the seat. (More on that later.)
Damaged Threads
While continuing to assemble the unit, I went around checking that every bolt along the assembled leg extension and footrest was secure. I was doing this manually with an Alan (hex) wrench, not a power tool, and yet one of the bolts broke free – the internal threading in one bolt hole of the leg extension broke off and fell out. I contacted support over this and after the usual back-and-forth email exchange, they eventually sent me a replacement part. Unfortunately, I didn’t get around to trying to install the replacement part until their company had essentially gone defunct and then I discovered the replacement part doesn’t align with my existing parts and can’t be used.
Foot Plate Adjustability
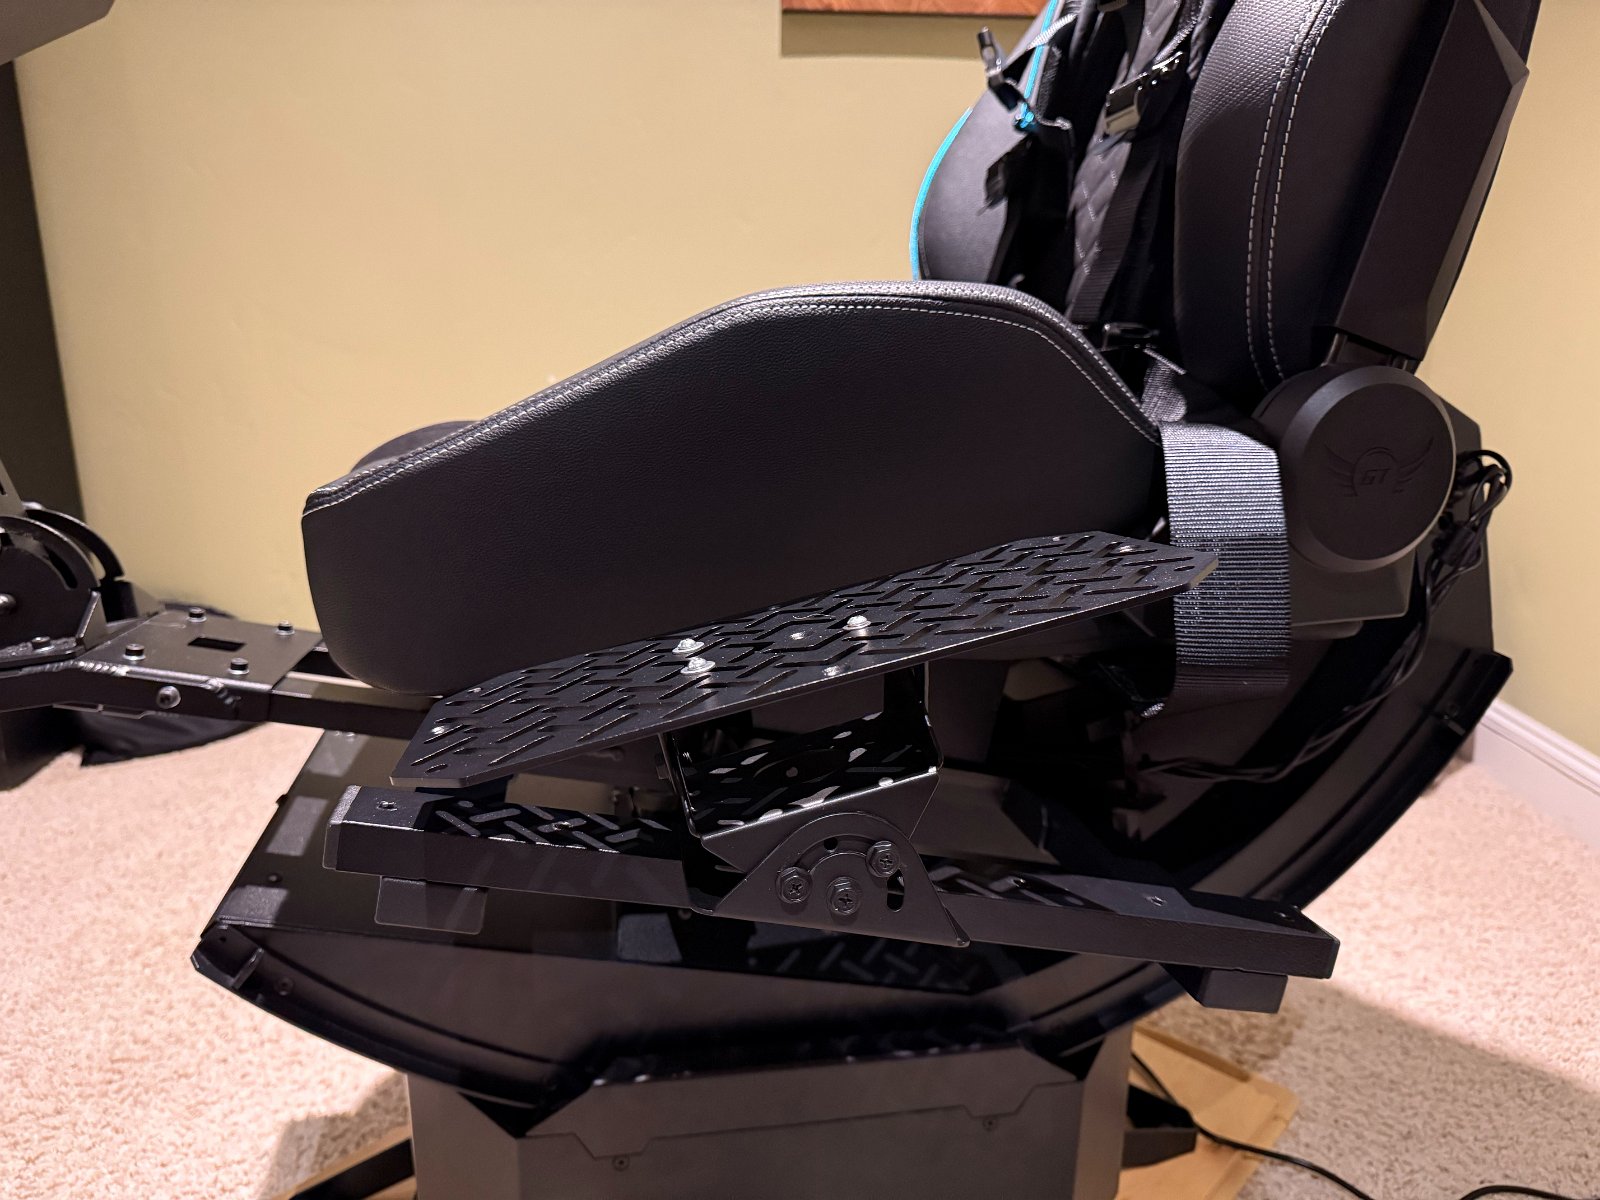
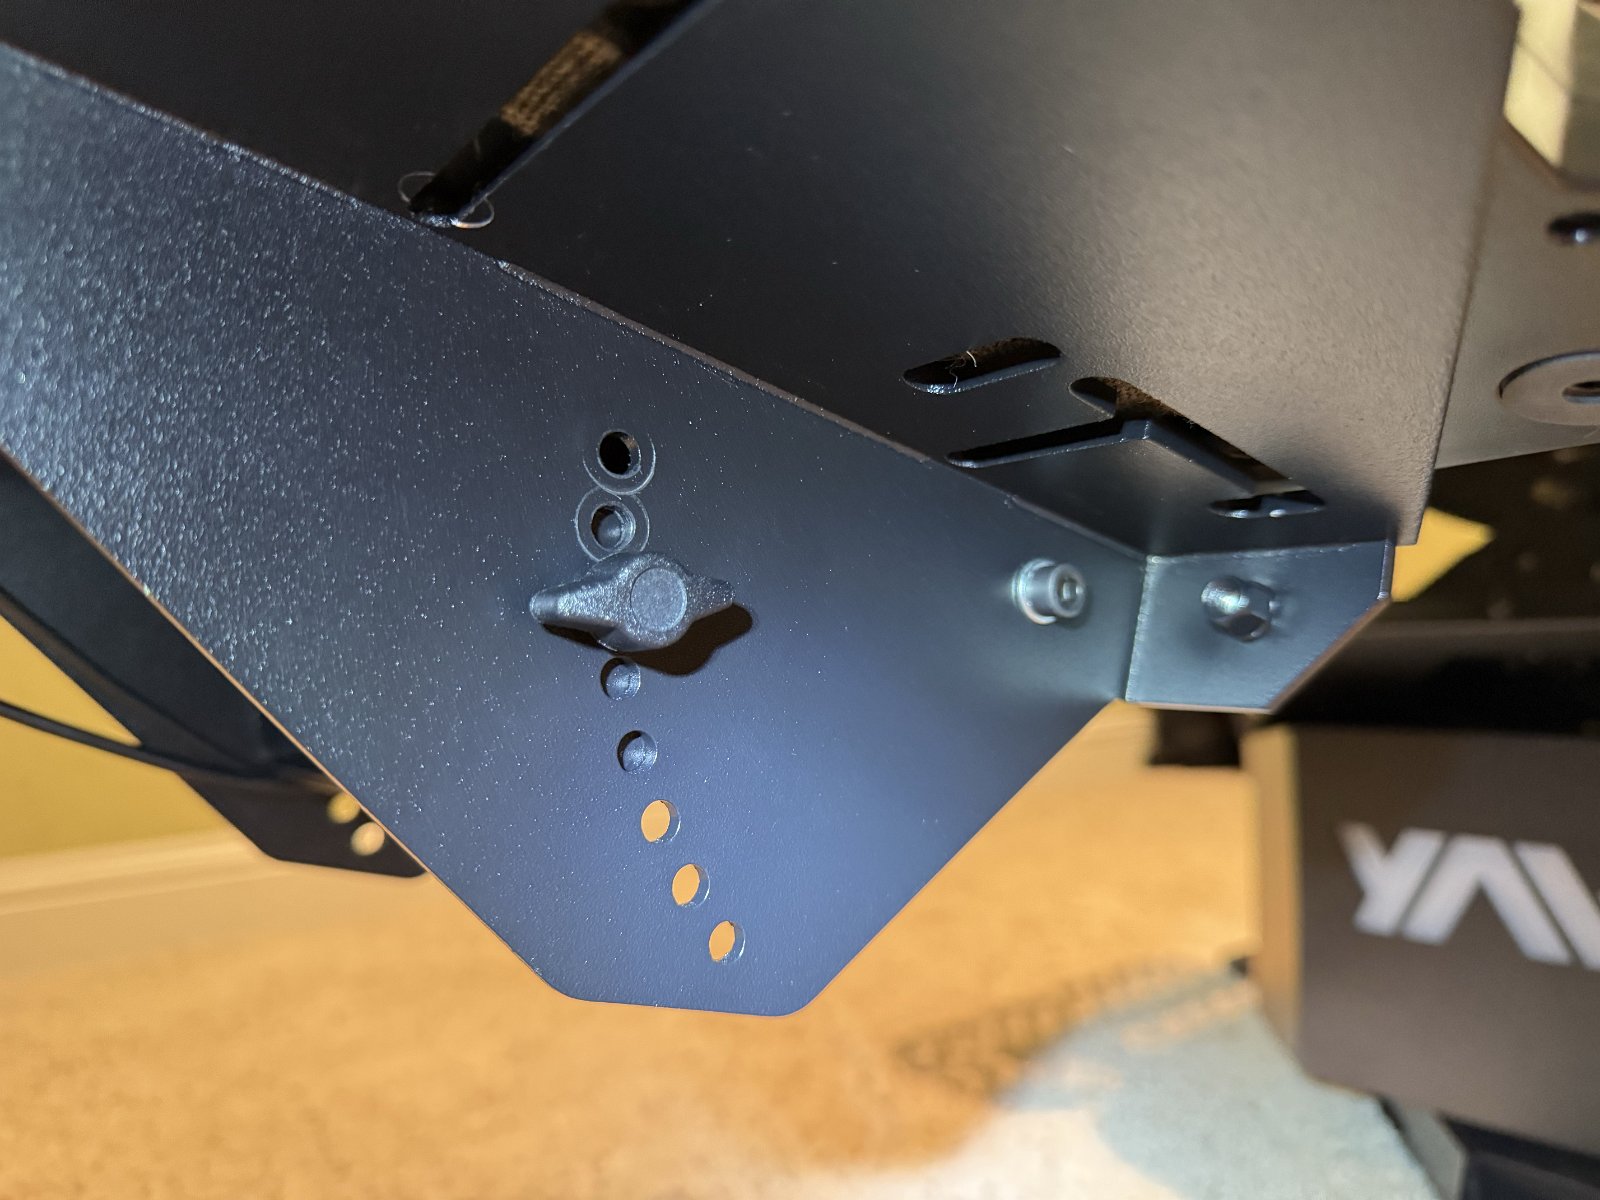 The angle of the foot plate is adjustable with a series of bolt holes and a pair of hex head bolts. I swapped these out for a knobbed bolt that can be removed without tools. (pictured)
The length of the leg extension that supports the foot plate is also adjustable but not easy to get to. It has a few inches of leeway that it can be slid in or out when securing it to the frame under the seat but it’s not accessible without removing the seat entirely. This is too much of a hassle to go through to adjust it for different guest users. I think they should rework this design to make it easily adjustable for riders of different heights. It might be enough to just invert the placement of the brackets and bolts so that they’re reachable from under the seat with knobbed handle bolts. Since that isn’t an option, I decided to not use the full extension of the leg rest despite my height (not quite 6’4″ or about 192 cm) to more likely accommodate shorter riders.
Squealing Noise from Roll Axis
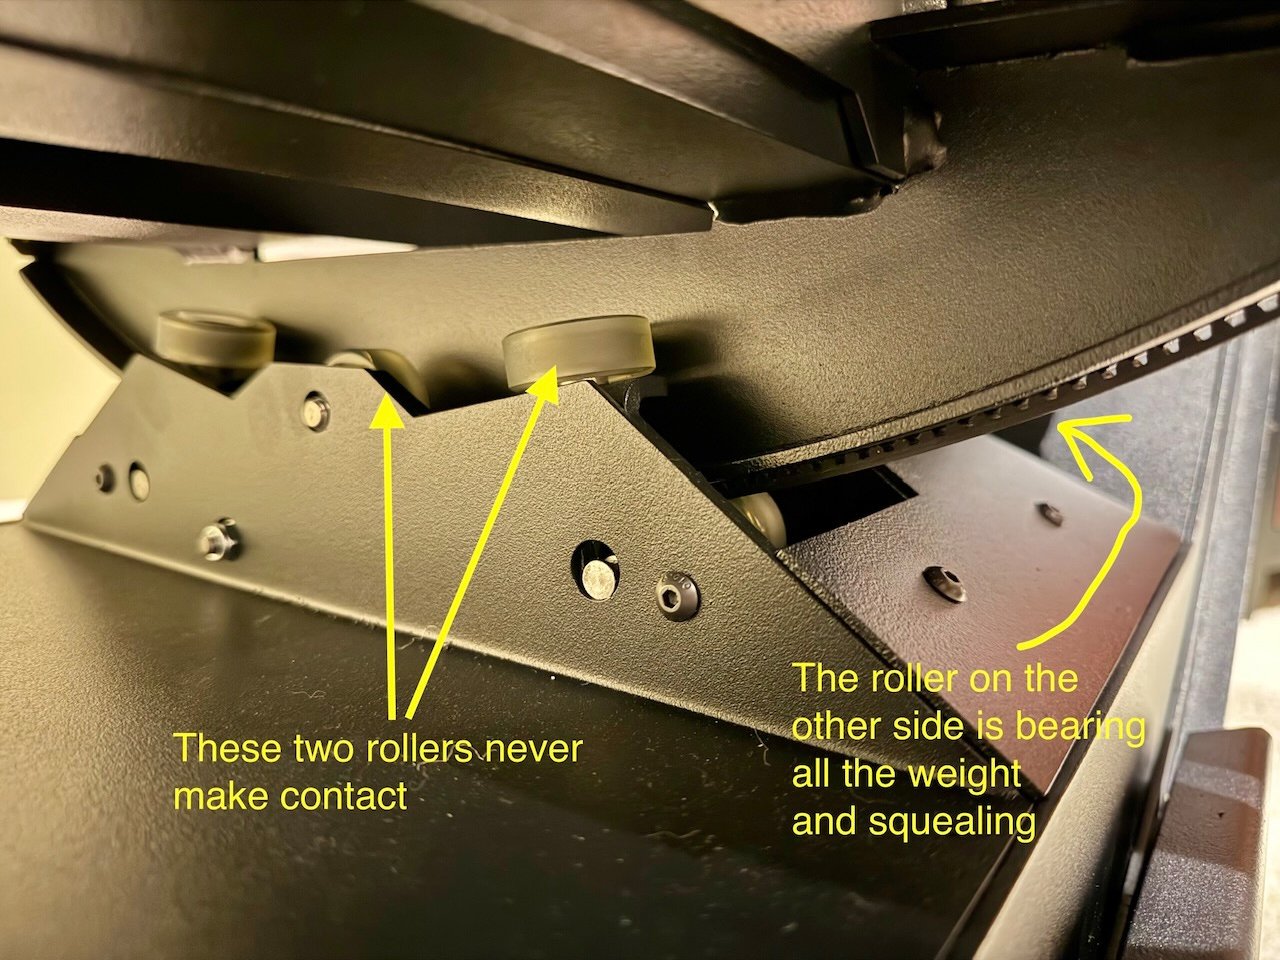 After assembly, I quickly noticed that my Yaw 3 would emit a squealing noise when you rolled it near the left end of its roll axis. I could reproduce this easily just by manually rolling it to the end of the axis while the power was off but it would also creak like this under power.
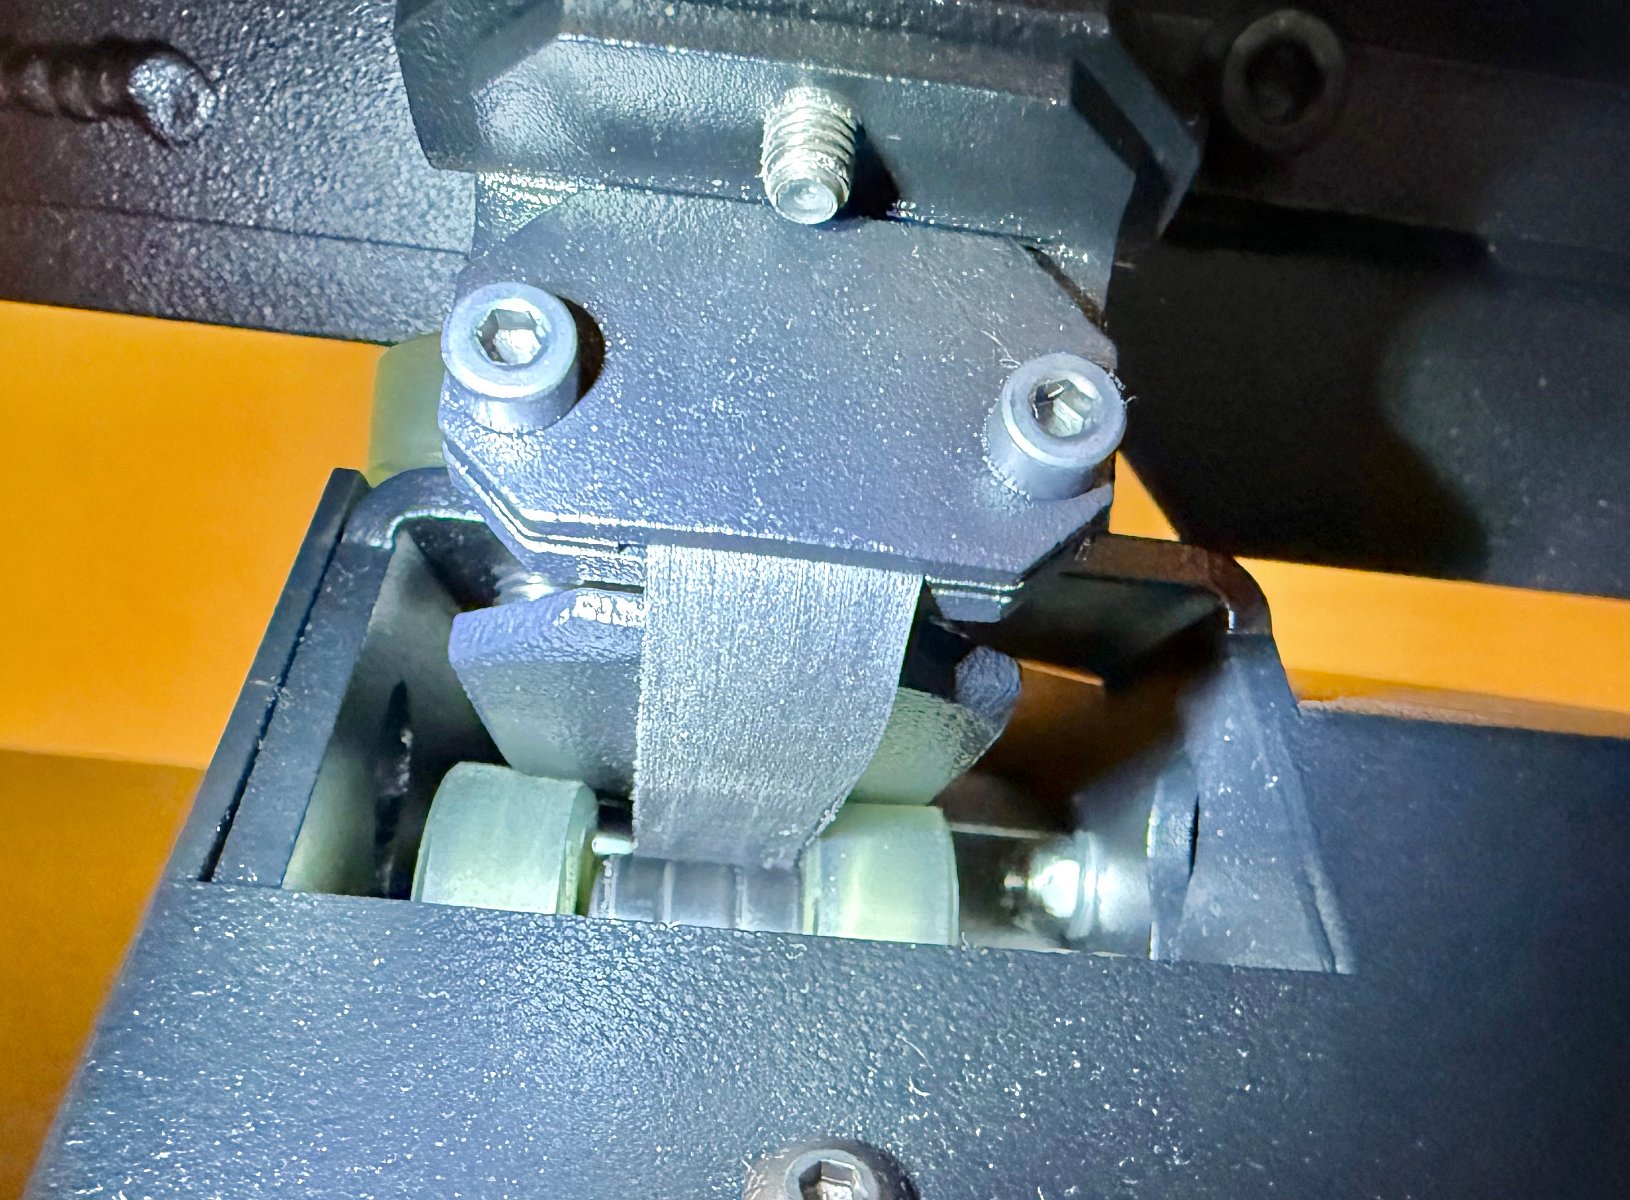
I could see that two of the three rollers on the front side never make contact with the roll axis and one roller on the back side (the leftmost one) was enduring a lot of pressure against the roll axis. Originally I thought that perhaps the noise was coming from this one roller under pressure. (Here’s a video recording of the problem before I got it figured out.)
After more days of back and forth emails with YawVR support (different time zones so always a day or two for each response/reply) and after chatting with folks on the Official YawVR Discord forum (requires invite), I eventually realized that one of the rollers underneath was rubbing against the roll axis belt. My belt is not quite centered between the two rollers on the left end of the roll axis (but it’s fine on the right end). I could see it was starting to get damaged just from me manually rolling the seat to figure out where the squeal was coming from.
In the meantime, I got another response from YawVR Support where they suggested, “apply some WD40 maybe on both sides of the belt where the sound comes from. Please let me know if it helped or not.” I pushed back on that suggestion as WD-40 is really a solvent – meant to dissolve gunk and free up stuck parts – it’s NOT a good idea to try to use it as a lubricant or to eliminate squeaks.
Once I pointed out that the belt was rubbing, they directed me to loosen the roll belt by loosening the screw on the belt attachment point enough to allow a pencil to be slipped between it and the roll axis. To do this, they explain that “you need to completely remove the screw on one side, and then put the screw back, and when you place the belt back, you don’t need to turn it completely in, just so long that it you can fit a pencil there.”
This did alleviate the squealing noise (at least up until just the last few millimeters) by apparently allowing the belt to relax and sit just barely far enough away from the one roller. It’s good that the belt is no longer rubbing on the roller but of course why is my belt so close to the roller on one end to begin with? I also still wonder why those two rollers on the front side of the roller axis don’t make any contact – perhaps my roller axis is out-of-alignment or warped? YawVR support says it was designed this way “so there wouldn’t be any room for unnecessary wobbling which could cause damages.”
Another outstanding concern is that one of the rollers below and next to my roll axis belt doesn’t sit directly under the roller axis. The weight it is supporting rests on only half of the roller. Will it eventually fail? As others are discussing on the YawVR Discord server, there seems to be a flaw with how these rollers are supposed to work as several folks have had the rubber portion of the roller come off the wheel underneath.
Anyway, the upshot on the squealing from mine was that loosening that tension screw at the top of the belt allowed the belt to move just enough away from the roller that it no longer rubbed (and squealed) except for the last few millimeters at the end of the roll axis. So I guess my belt was installed too tight from the factory – and/or it’s not quite centered.
Seat Selection and Installation
As for the seat… I opted not to buy the YawVR seat with the Yaw 3 because they said you could use your own gaming seat, I wasn’t into the idea of LED lighting on the seat and I figured it might save a bit on shipping to just order a seat here in the U.S. anyway. Well… oops. After ordering the Yaw 3 without the seat and starting my search for a seat, I discovered that wasn’t such a simple purchase. Lots of gaming seats get bad reviews for being junk, many gaming seats are actually rather small (again, I’m pretty tall) and many are so confining that wearing a VR headset while sitting in them would be a problem – keeping you from being able to look around. After a really long search over many days, I eventually settled on the GT Omega RS12 – which would ship from Europe anyway and would have to be backordered. It’s a nice seat though and plenty tall. It’s also larger width-wise for folks who might need that extra room.
The seat did eventually arrive some week or so after I got the Yaw 3 and that’s when I discovered that when YawVR said you could use your own gaming seat, they didn’t mention that you would need to fashion your own mounting bracket. Oh boy. Lots more online searching until I eventually settled on trying a couple of heavy, 5mm thick, steel “mending brackets” (affiliate link). This was followed with many days of learning better techniques for drilling through thicker steel, getting more supplies (affiliate links: titanium step bits, water-based cutting fluid for drilling, sets of grade 8 bolts and nuts), more problem solving like needing to find strong spacers to leave enough clearance for the seat’s provided slider mechanism to work, etc.
Seat Slider Is a Bad Idea
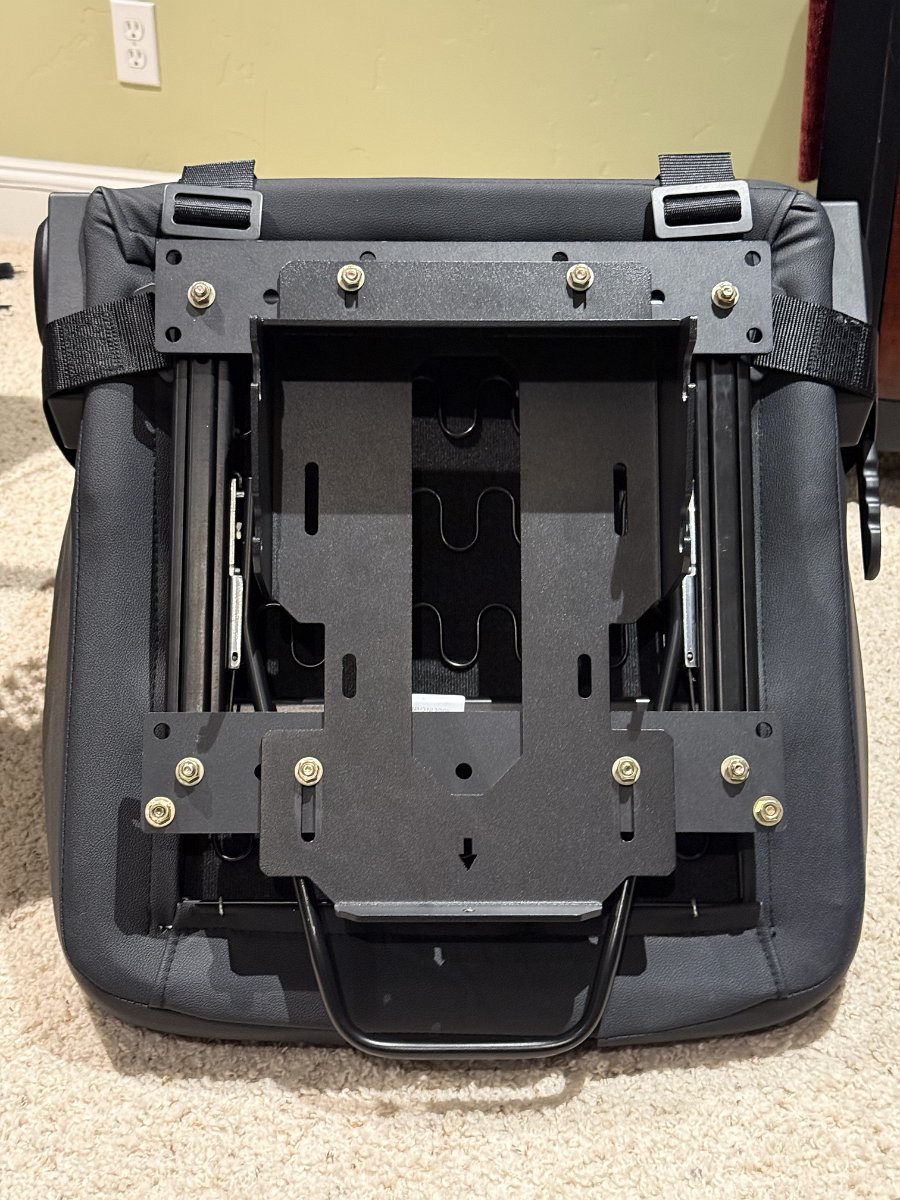 Eventually though, I did succeed in getting the GT Omega seat and slider mounted to the Yaw 3. Soon after, I injured my hand by mistakenly trying to use the slider while seated in the rig. The idea with using the included slider mechanism on the chair was that it would better accommodate riders of different heights since the leg extension to the foot plate is at a fixed distance once you finish assembly.
I found trying to use a slider with the Yaw 3 was problematic for a bunch of reasons:
- First off, it was dangerous. If you reach down and release the slider while you’re sitting in the seat, you immediately get launched forward with full force to the limit. I crushed my knuckles against the center mount the first time. I added a hard stop on the slider as a safety measure and then tried to remember not to use it while sitting but I still managed to forget some days later. At least I didn’t hurt myself the second time but because of how the seat can often be leaning forward when you’re adjusting things, you just get launched forward uncontrollably. You simply have to adjust the slide position while not seated.
- It raises your seating position both by the height of the slider mechanism itself and the additional spacers you’ll need to leave enough room for the slider bar to be usable under the seat frame. This added height makes it that more difficult to climb into the rig (it’s already on a raised platform) and more difficult to position the center mount table comfortably over my knees.
- It messes up the weight balance of the rig to move the seat position. You want to counter the weight of the leg extension and any peripherals on the center mount table or the foot plate by placing weights behind the seat back so that the pitch motor can operate smoothly. Sliding the seat forward or back shifts your body weight forward or back and dramatically screws up how you’ve balanced things.
- Once you’ve set up your motion compensation software based on the Yaw 3’s built-in tracking or on a separate fixed tracker, you’re messing up the numbers on your saved configuration that tells how far the headset is from the center of rotation for all three axes (pitch, roll and yaw). (This might not be an issue if you’re using YawVR’s InfuseVR software and your headset’s VR controller. Not sure about that.)
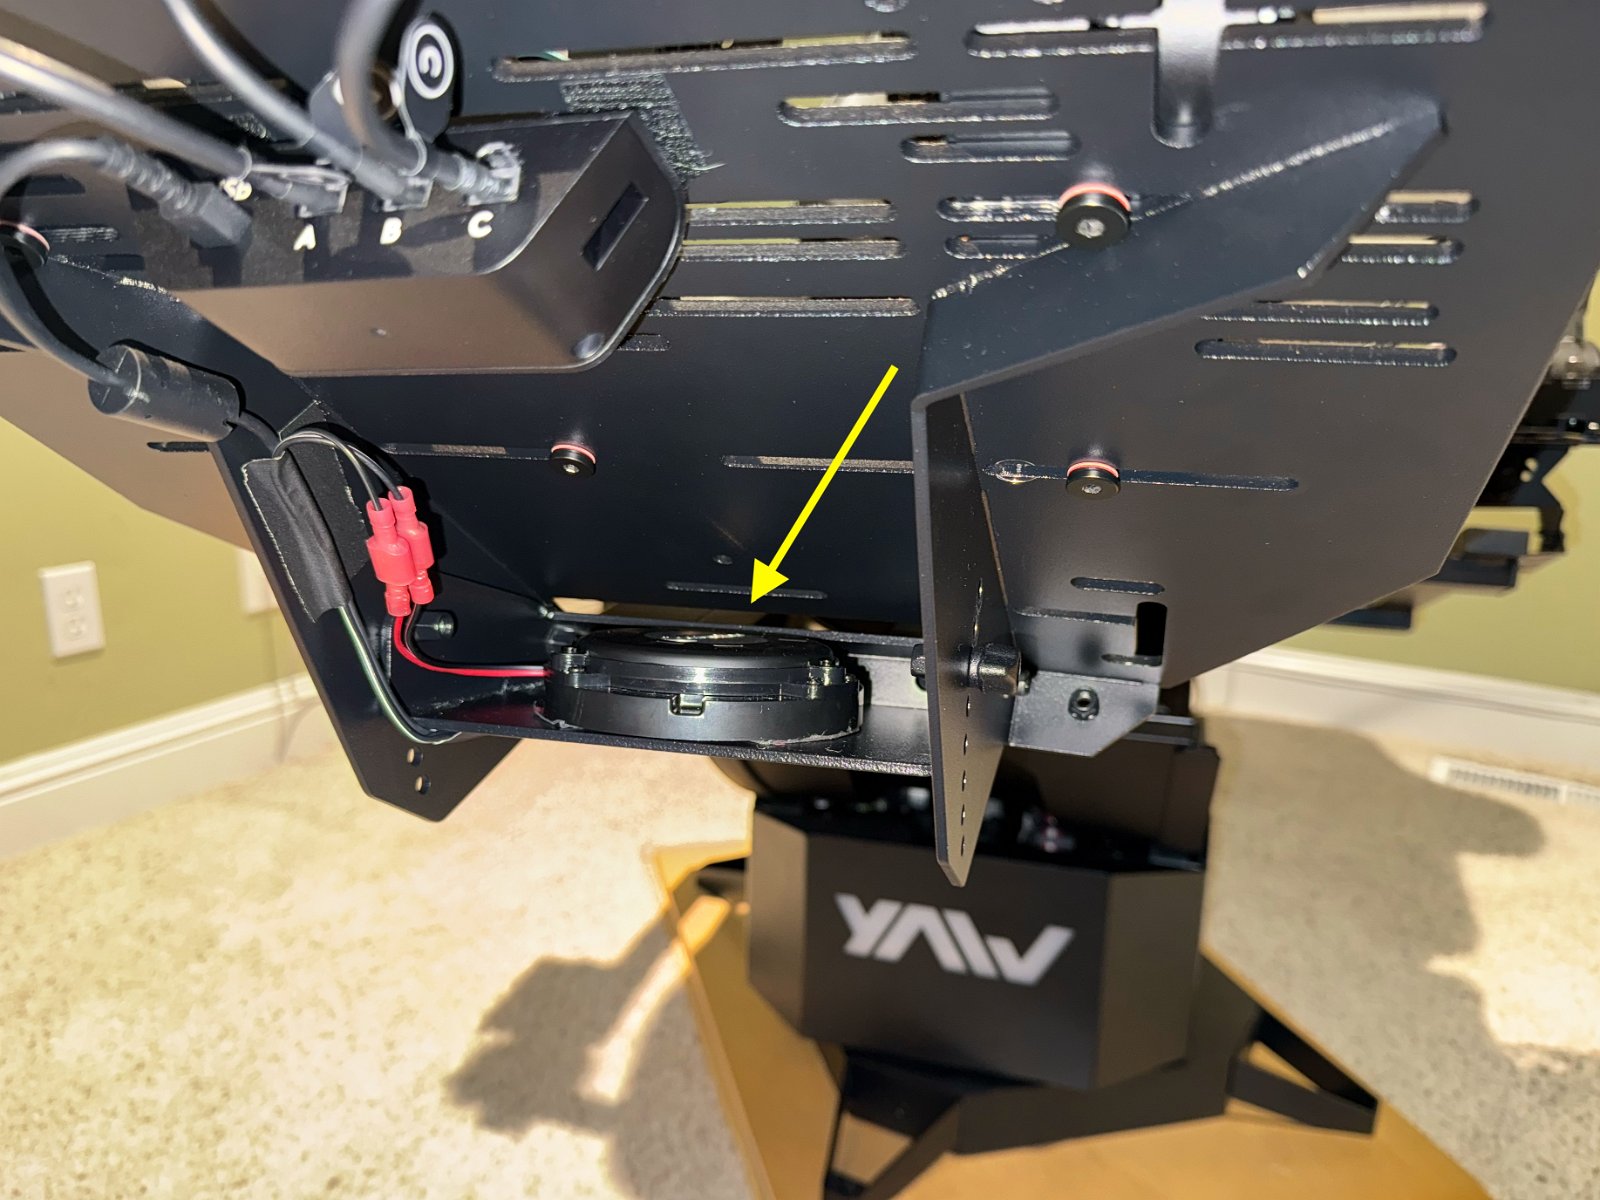
After I discovered these issues, I ended up removing the seat slider entirely – which meant I had to go and make new holes in my custom brackets so I could still mount the chair. As you can see in the picture, I also mounted a bass shaker underneath but ended up replacing it later.
Repositioning Center Table Mount
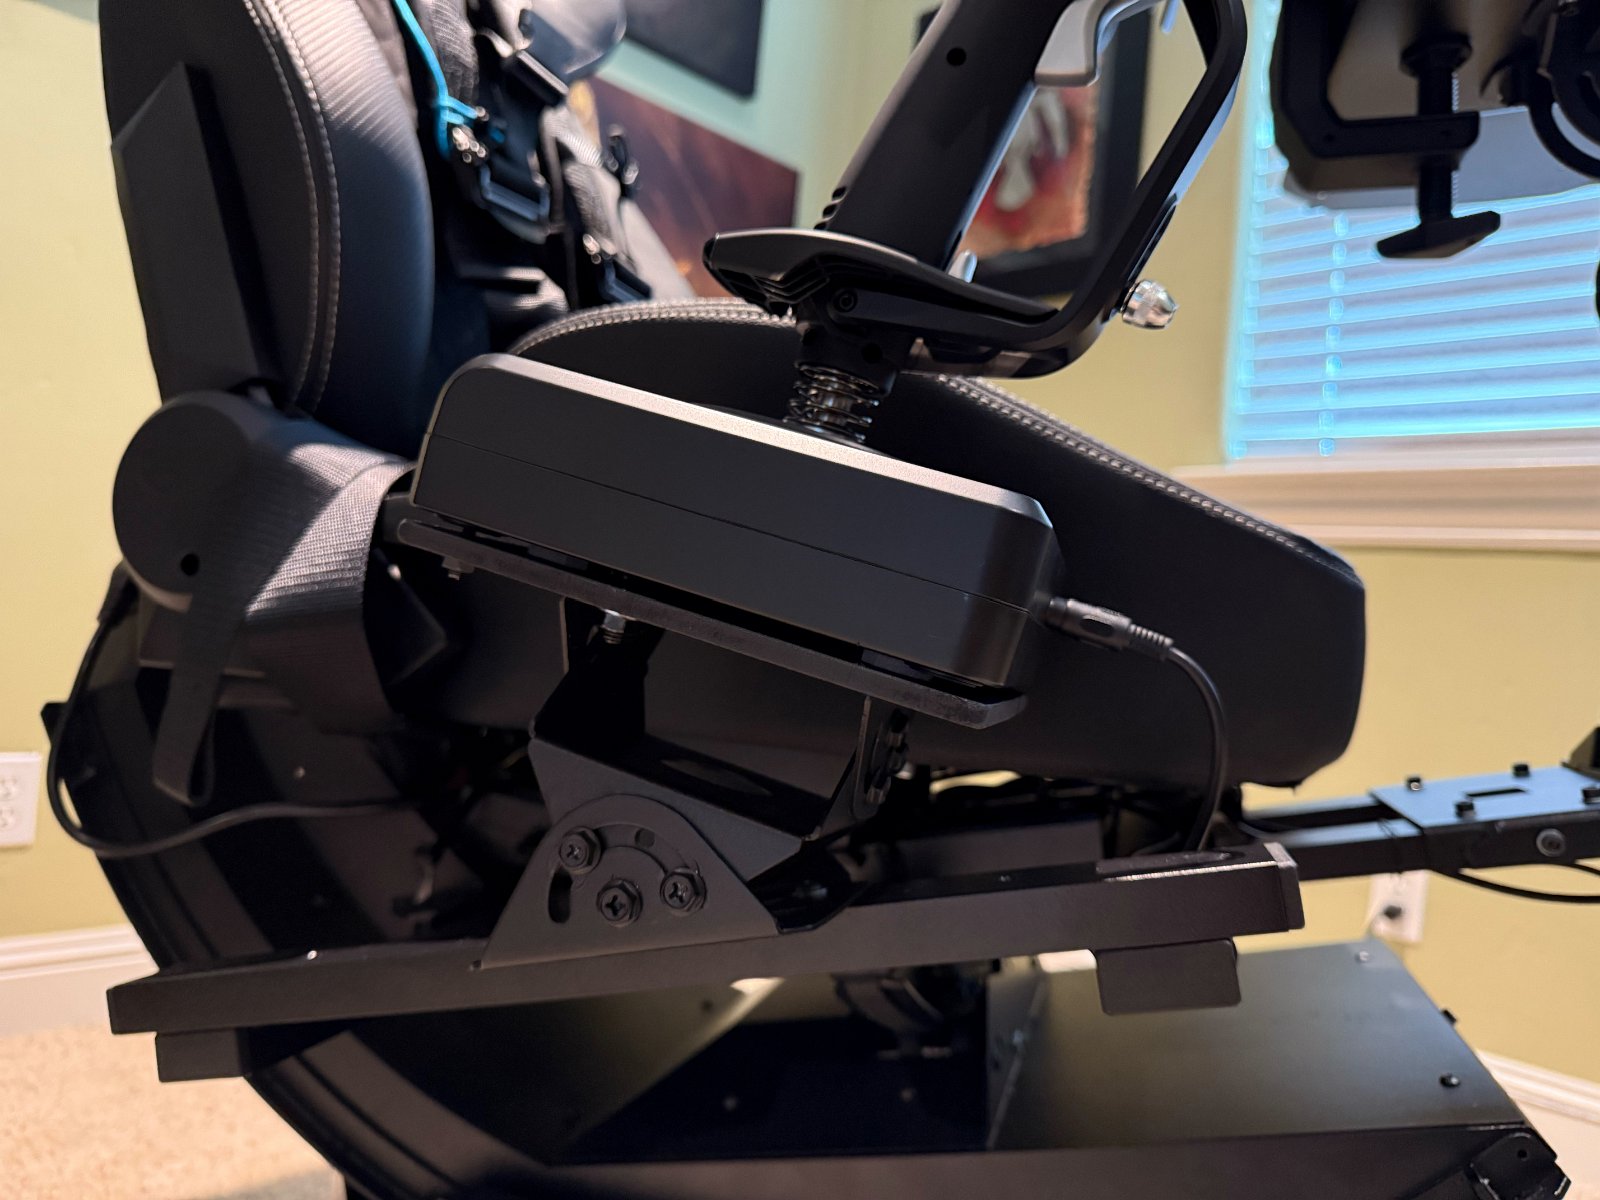
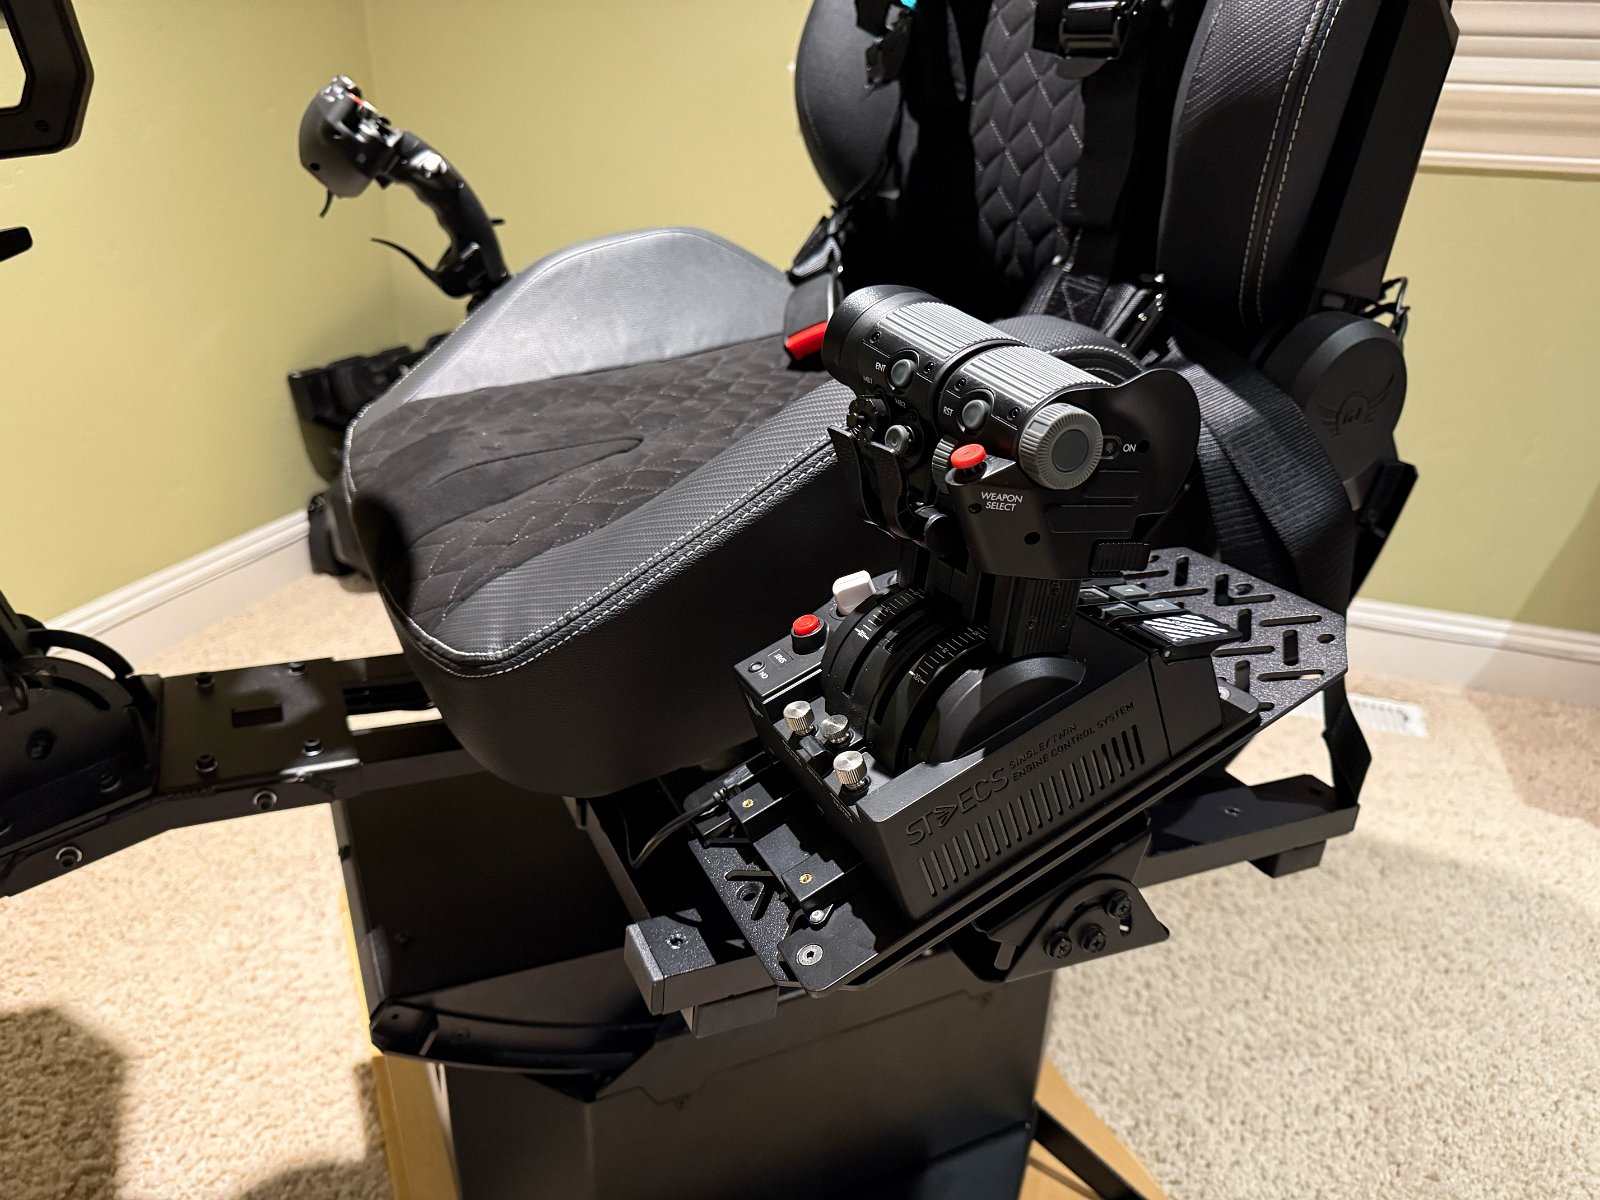
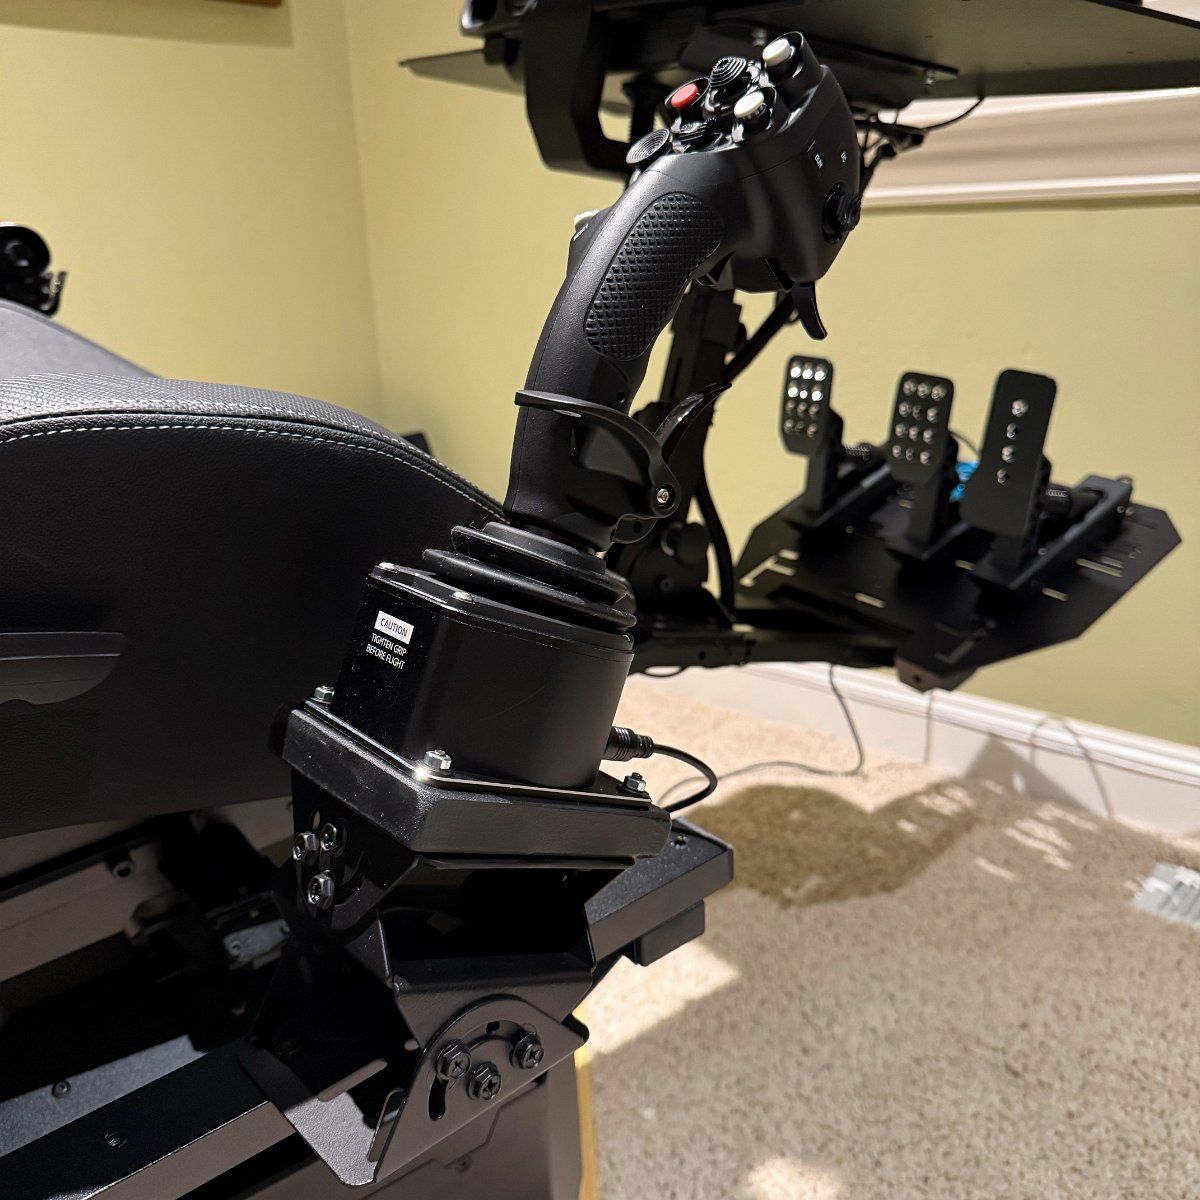
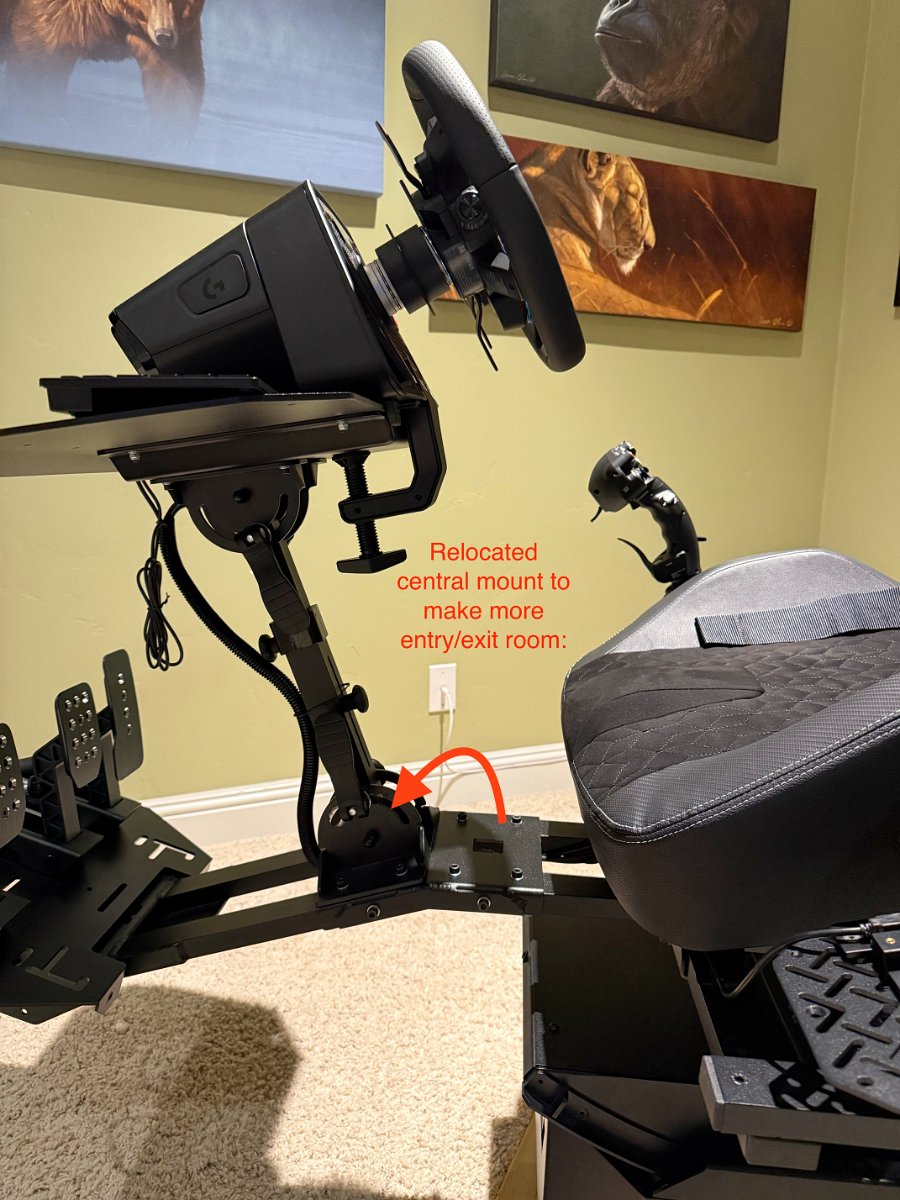 I decided to move the center table mount to the second set of bolts farther away from the seat because it was difficult to maneuver my legs around it when getting in and out of the chair. Now the chair mount is farther away but angled more towards the seat so there’s more room getting in and out. As a bonus, it’s easier to position the driving wheel farther away for my longer arms vs someone else’s. It’s very possible that the central mount position is only a problem for me because I think my non-YawVR seat (a GT Omega RS12) is larger all around: I suspect it has a taller seat back as well as a deeper and wider seat cushion. I haven’t seen or tried the YawVR seat in person though.
Balancing Pitch Axis with Weights
As I mentioned before, you need to balance the whole thing with weights added behind the seat back so that the pitch motor can operate smoothly. At the time of my purchase, there was nothing in the setup instructional video about this weight balancing but it’s mentioned in the forums and by other users and the Yaw 3 has a dedicated space behind the seat to place circular weights. Strangely, the provided bolt to hold the weights in place doesn’t include a spacer to keep any weight rings in place. (“ItsVRK” has provided a 3D-printer model of a spacer to make one though.)
I made one attempt to buy a couple of 10 lb. exercise weights but found that they were too wide by like half an inch or a couple cm’s to fit in the available slot, so I retuned them. I’m currently using some of my 5 lb. scuba diving soft bag weights totaling 25 lbs (11.3 kg) as they’re easy to slip in back there.
My Logitech G Pro wheel and pedals are heavy so I removed the pedal base and mounted the pedals directly to the foot plate to reduce the weight out that far. Choosing not to put the foot rest at its farthest extension also helps as the farther the distance any weight is from the center of rotation, the more of an effect it has. (YawVR should really make the leg extension of the foot plate adjustable without having to remove the seat.) I’m thinking I’ll eventually make a mounting plate out of wood to attach the pedals to so that it’ll be easier to swap out driving pedals for rudder pedals. In the meantime I’ll rely on the twist style Z-axis on my joystick for rudder control.
The rig only balances when I’m sitting in it, otherwise it rests forward.
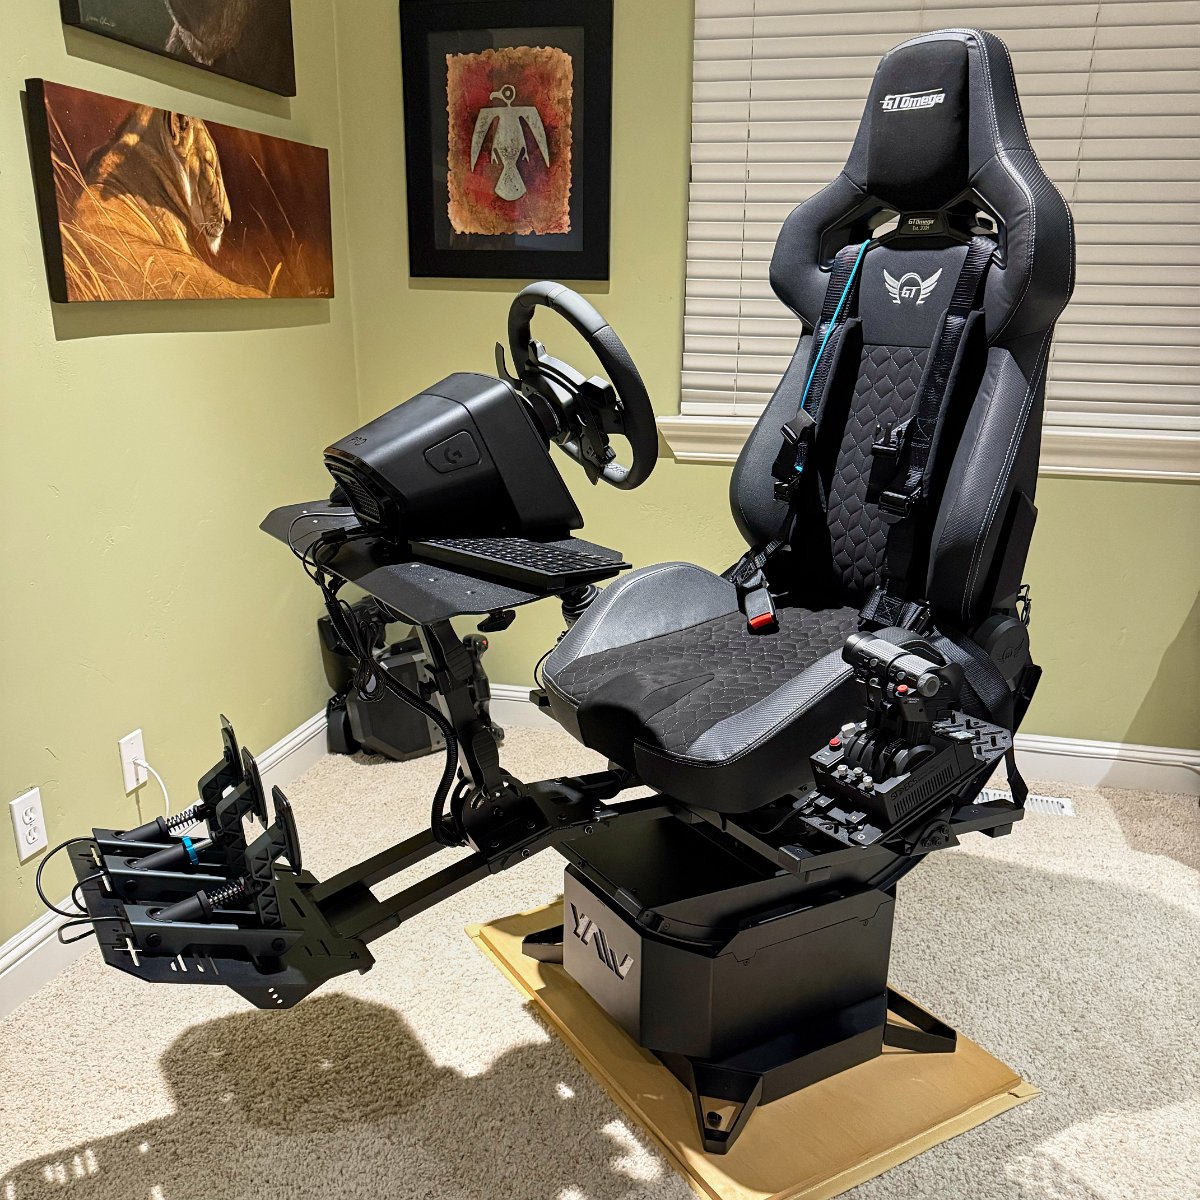
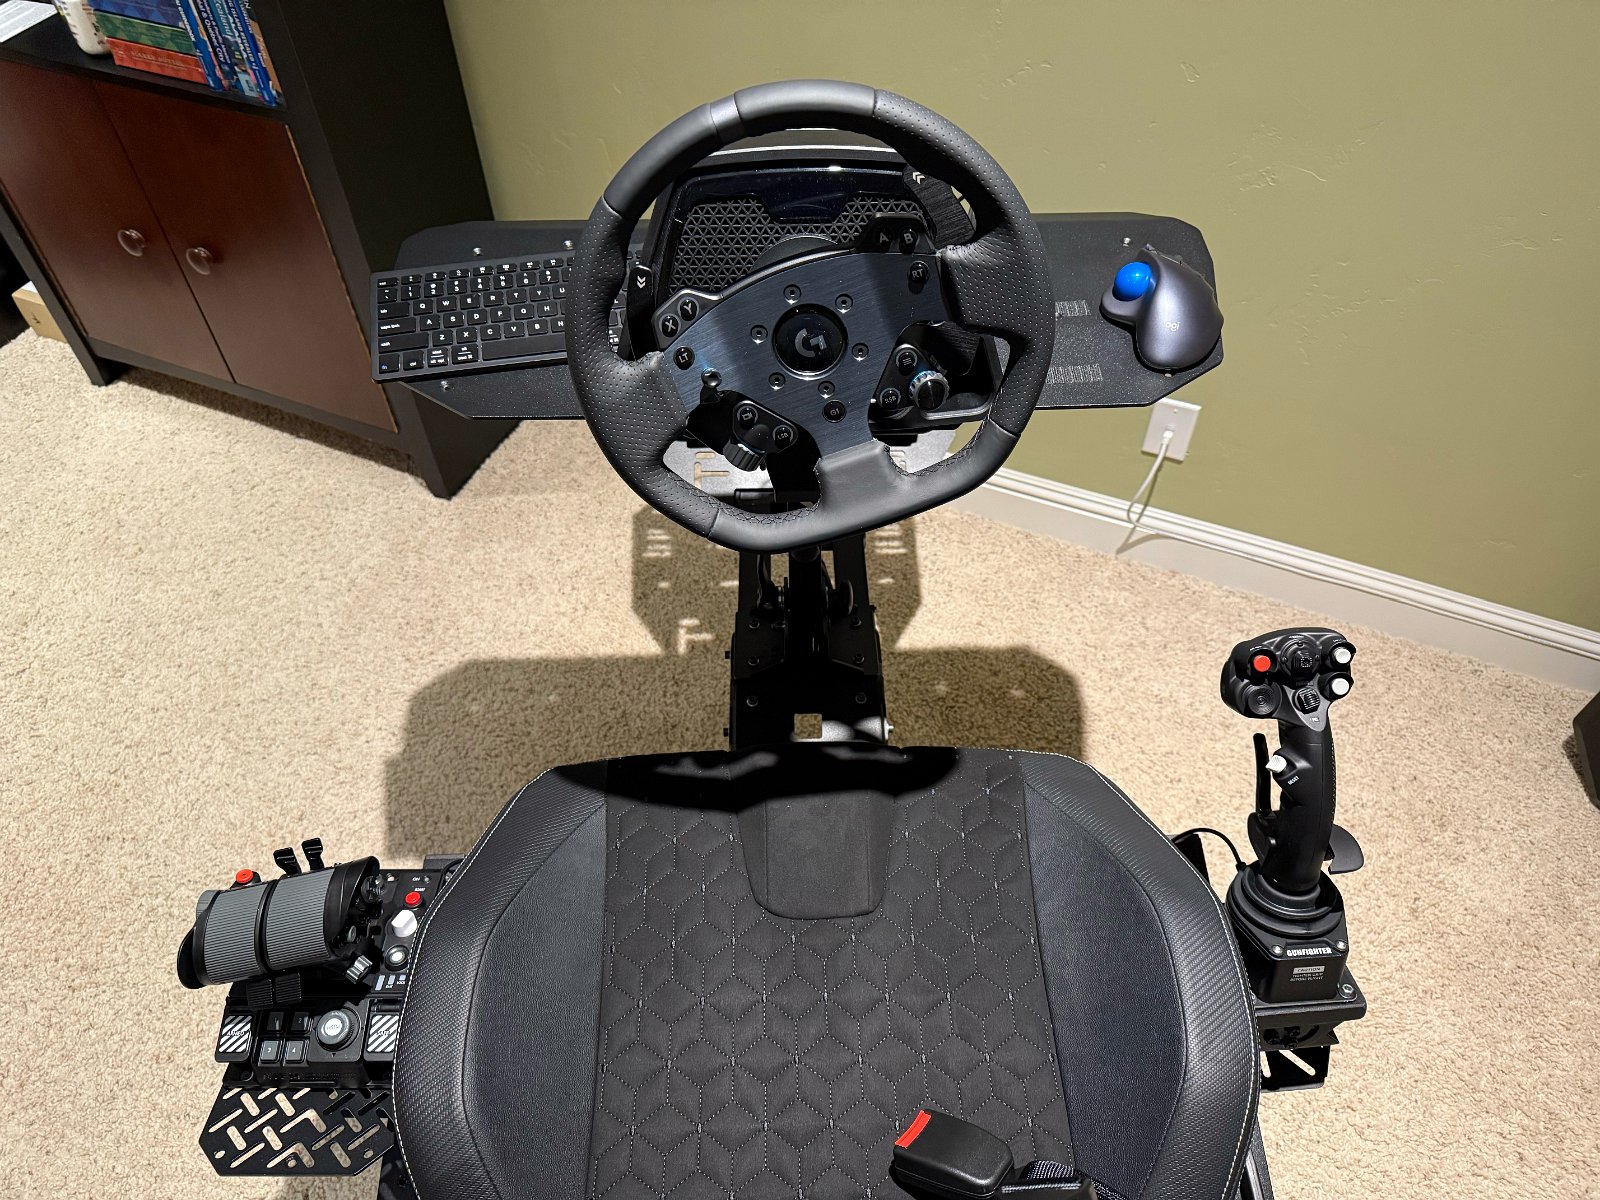
👉 So, in short, I don’t recommend trying to use a slider but I do recommend moving the center mount farther away and angling it as needed for reach and to give your legs and knees more room, as you can see in these pictures:
Adding Transducers (Bass Shakers) for Haptic Feedback
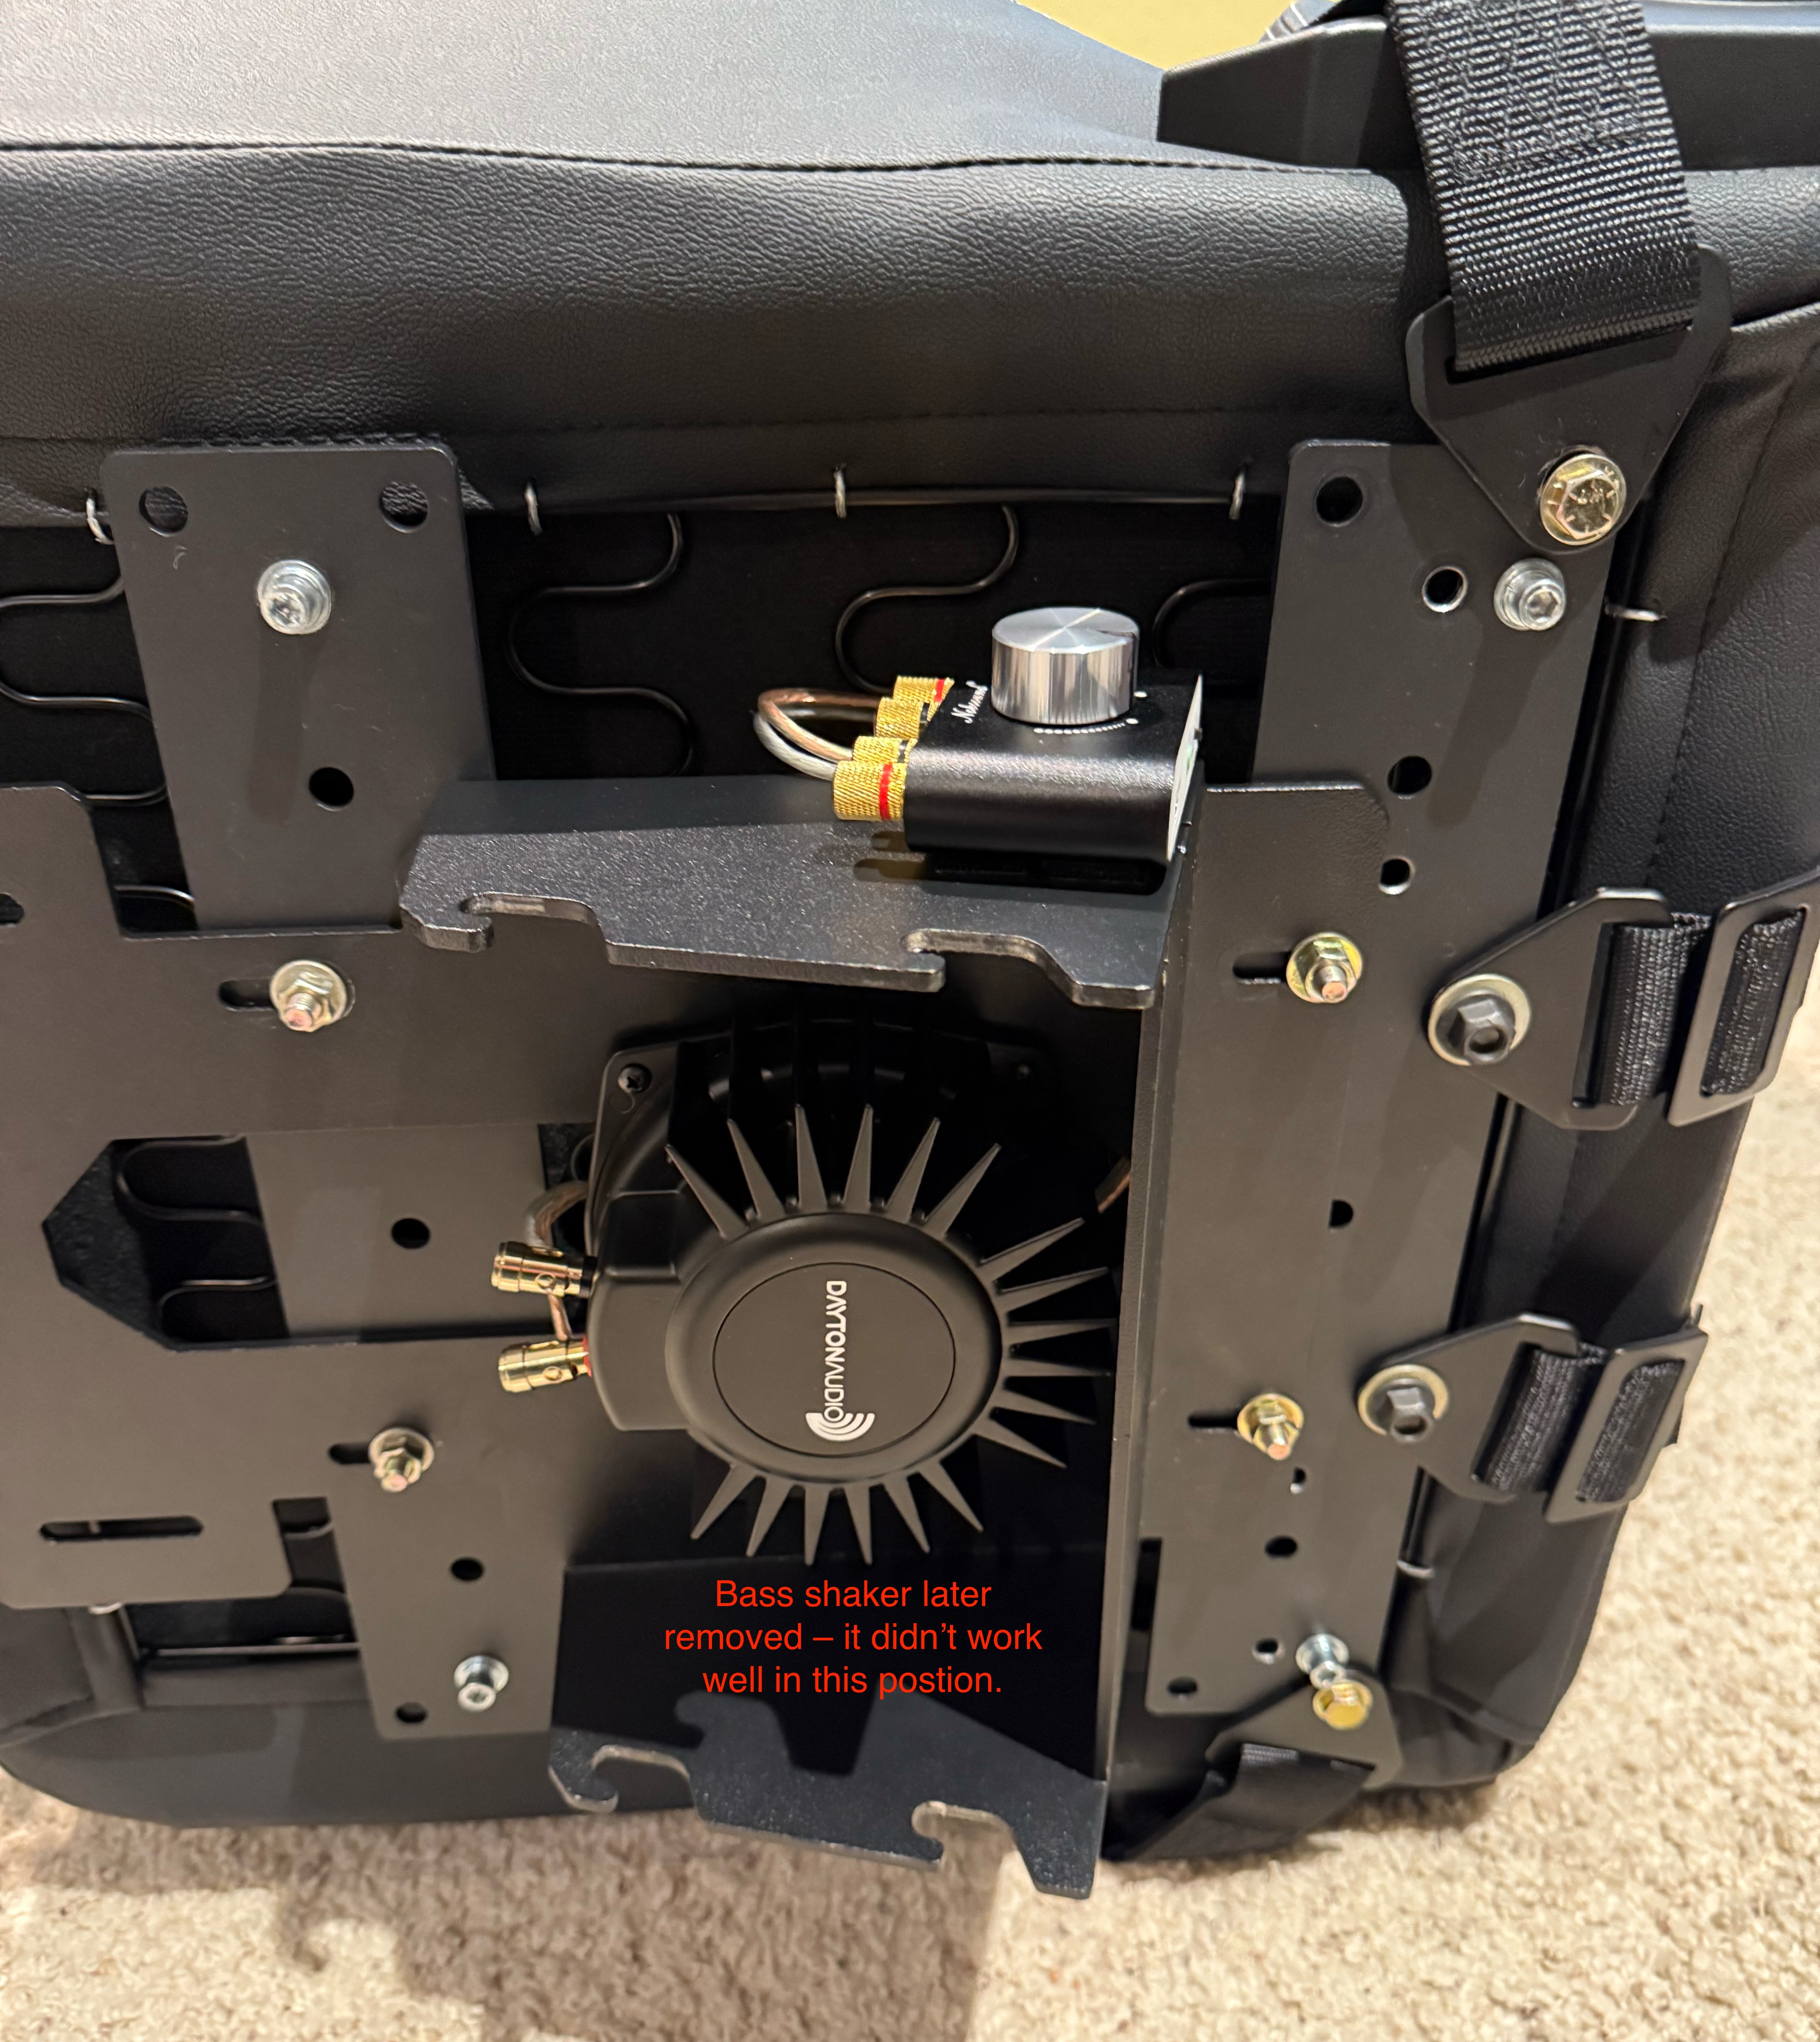 The Yaw 3 has the ability to generate vibrations – apparently by moving the roll and/or pitch axis back and forth very slightly and very quickly? It works but I found I was unable to get smooth high frequency vibrations. It seemed pretty rough and I also kept experiencing irregular jerks or spikes of motion. I also wonder if making the motors and other parts responsible for moving the rig smoothly do this constant vibrating motion is hard on those parts. Seems like it would be better to have a dedicated bass shaker that is designed for generating a whole range of frequency vibrations like this.
Based on some recommendations on the Official YawVR Discord server, I started off buying a Dayton Audio BST-1 bass shaker (affiliate link) and a little USB/Bluetooth amplifier (like the Nobsound Mini NS-01G Pro (affiliate link)) to drive it. I mounted the bass shaker to the underside of the 15 degree incline seat adapter. However, I ended up pretty underwhelmed by its performance. I could feel it conveying vibrations with my hand on the seat but it didn’t really carry through while seated. Hardly seemed worth the trouble. I think there are obvious reasons why this arrangement didn’t perform well for me: 1) when mounted to the underside of the 15 degree pitched seat adapter, half of the BST-1 sits over the open hole of the seat adapter, limiting how much contact it makes with the surface of the adapter and no contact at all with the center portion of the bass shaker; and 2) my GT Omega RS12 seat is mounted via thick steel brackets to the pitched seat adapter but it makes contact only via its four corner bolts and spacers – a very limited amount surface area to convey vibrations. Due to the size of the BST-1, it needs to be mounted here – there’s no room to mount it directly to the underside of the seat. I don’t know how the optional YawVR seat is mounted but maybe it would work better with that.
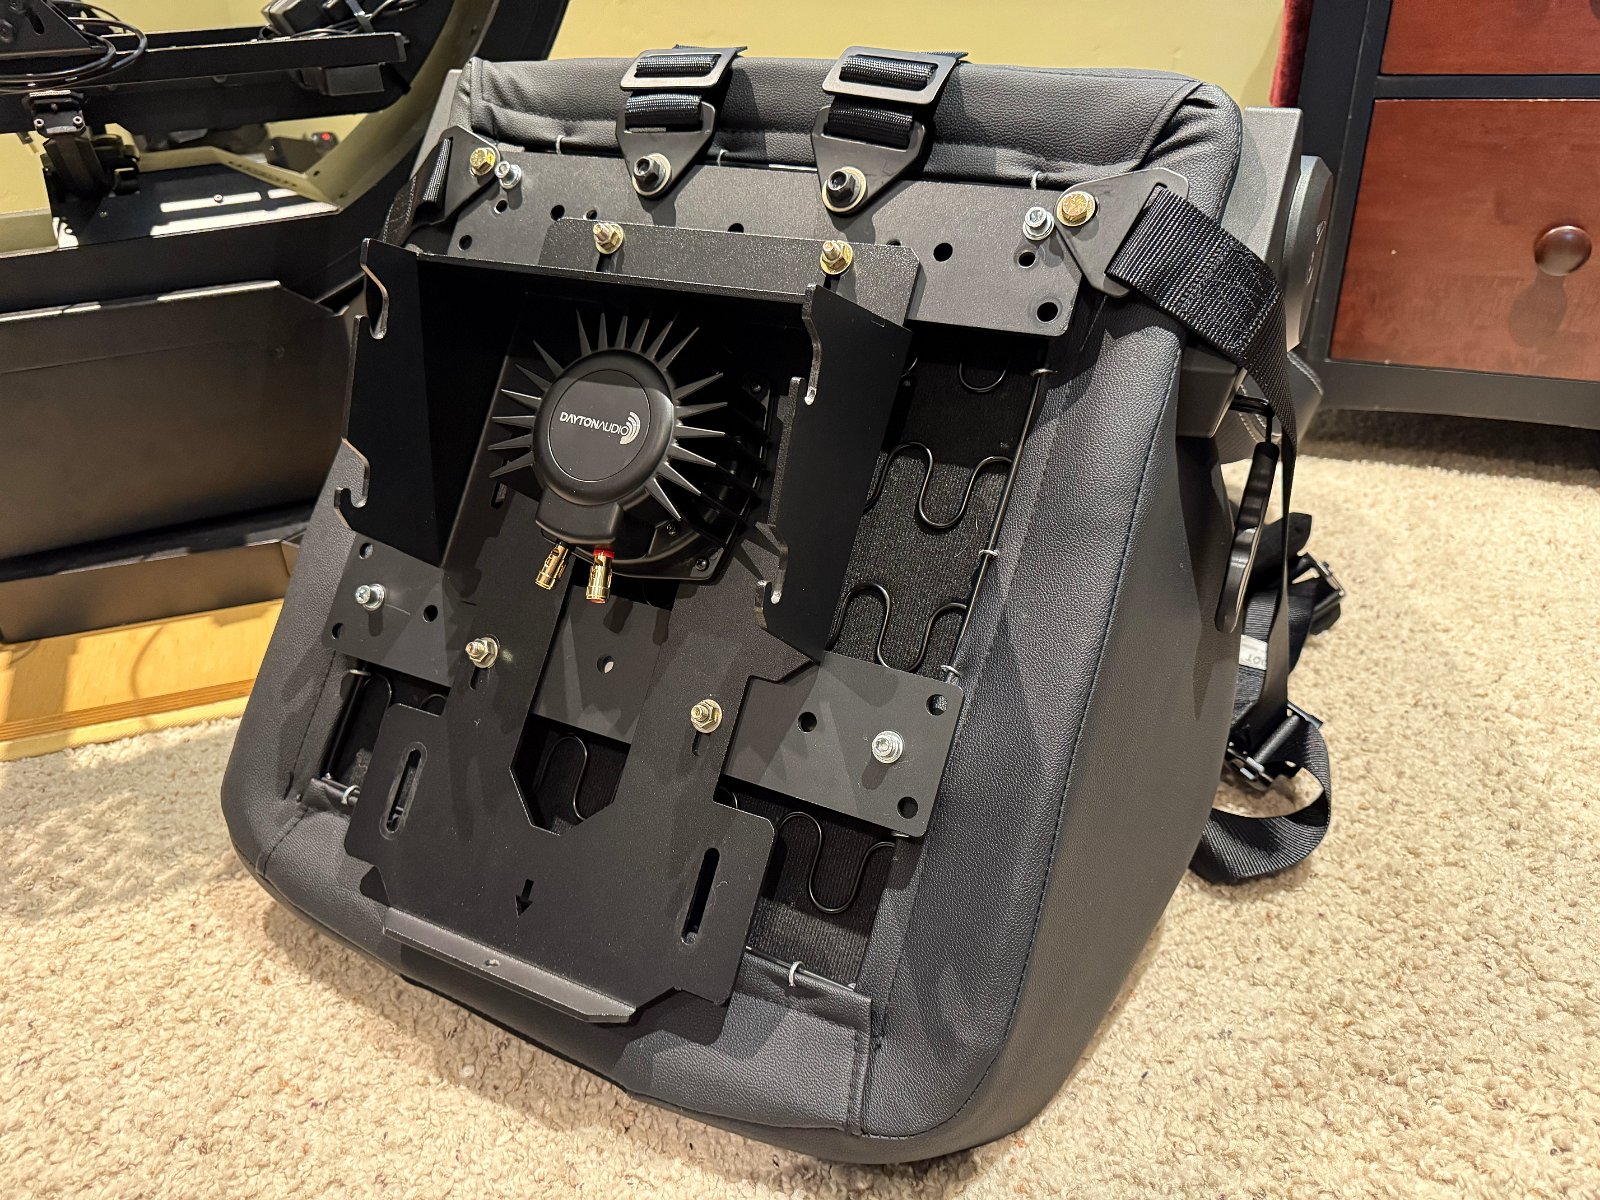
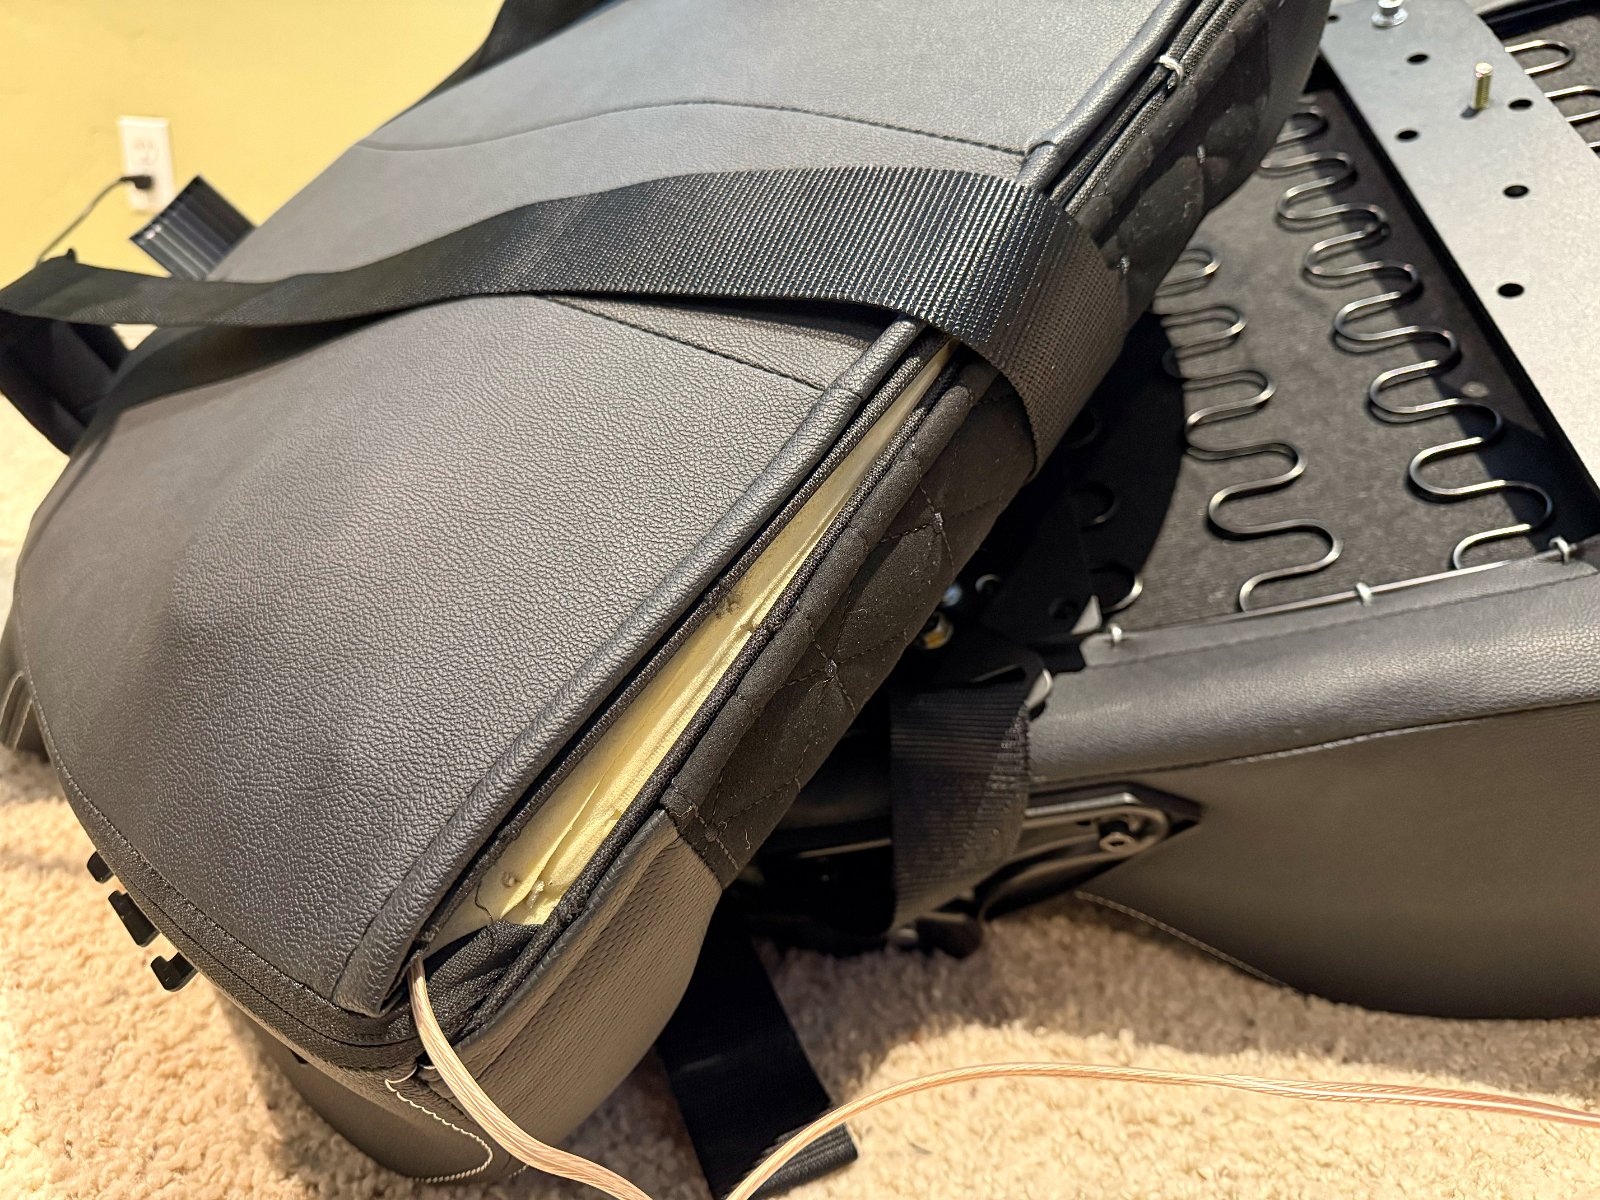
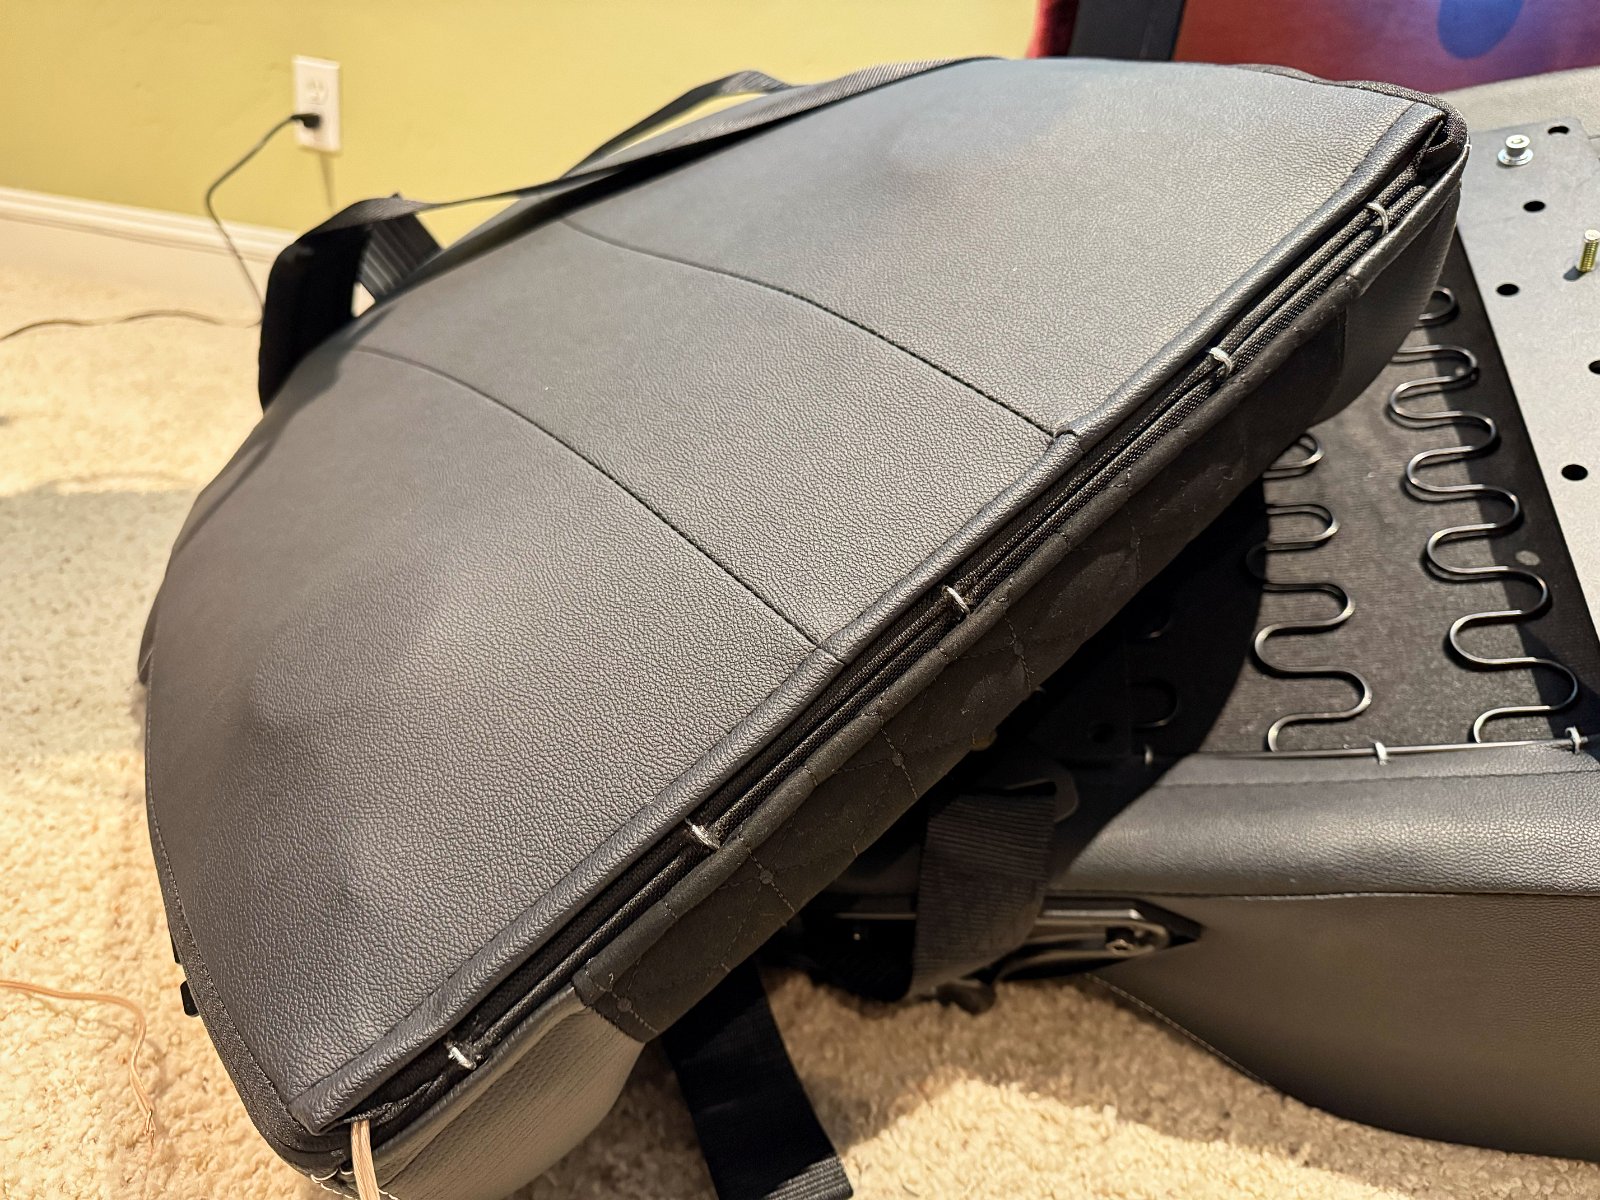
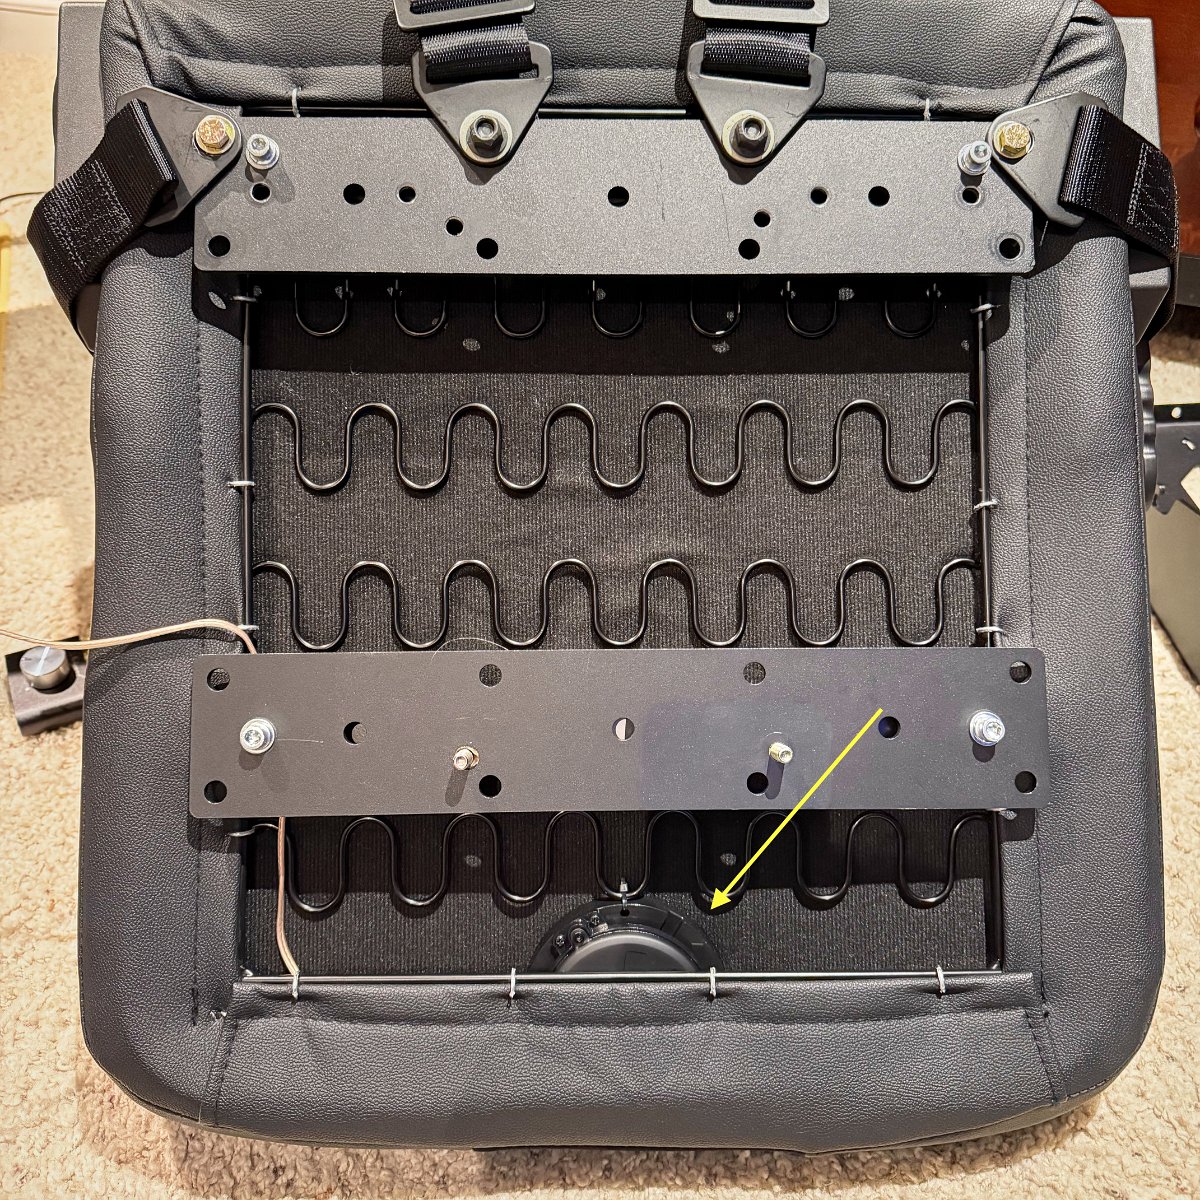 I came across someone else’s recommendation to use much smaller Dayton Audio TT25-8 puck-sized transducers (affiliate link) which are small enough to mount directly to the underside of the seat or even insert them into the back of the seat between the cushion and the upholstery. They’re also small enough to mount on the foot plate. This worked out great! I did lots of experimenting with placement, squeezing them under or zip-tied to the sinusoidal support bars/springs or under the cross bars, etc. I was hesitant to take apart the upholstery of the seat back until, after a lot of experimentation, it become obvious that it would really help to get some direct vibrations to the seat back. (This was difficult but doable – see pictures.)
I ended up using four of these TT25-8 8-ohm puck transducers since when paired up they were a good match for the two 4 ohm channels of the Nobsound Mini NS-01G Pro (affiliate link)). I placed two of them low inside the seat back. One in the center of the seat back was strong enough but it felt more convincing to have one on either side to avoid the artificial feel of the effects localized in the middle of my back. I wedged a third one under the front crossbar of the seat bottom to balance out and provide separation from the effects in the seat back. I mounted the fourth one under the foot plate in that little cubbyhole with 3M tape adhesive. This last one provides vibrations through your feet so that it doesn’t feel like only the seat is attached to the virtual aircraft or vehicle.
👉 One tip with the Nobsound: don’t mistakenly run it off of USB power by forgetting to turn on the power switch. It will run off USB power if you allow it but it makes the transducers respond poorly and noisily.
By the way, here’s the difference between using tactile transducers vs. subwoofers, as summarized by ChatGPT:
Tactile Immersion: Transducers (especially tactile transducers) add a physical dimension to sound by generating vibrations that simulate the feel of bass frequencies. They don’t emit audible bass but instead create vibrations that simulate bass, often attached to chairs, floors, or other surfaces.
Auditory Immersion: Subwoofers are all about enhancing the audible bass and creating the deep, rumbling sounds that give audio a sense of power and fullness.
If you want to feel the bass physically, such as in a gaming chair or home theater seating, go for a tactile transducer.
If you want audible low-frequency sound to complement your speakers, especially in music or movies, go for a subwoofer. For the ultimate experience, many setups combine both—a subwoofer for sound and a tactile transducer for vibration.
I’m using SimHaptic to drive the transducers. Unlike YawVR’s Game Link software and the Yaw 3’s vibration support, SimHaptic makes use of dozens of different telemetry effects beyond just engine vibration and ground surface and you can adjust each effect’s strength on different channels – like make bumps stronger through the seat bottom and engine vibrations through the seat back, etc. Plus it has different effects for different aircraft so that they feel as different as they sound when you switch between wildly different aircraft.
SimHaptic is nice and easy to set up and it automatically selects ready-made profiles for different aircraft in MSFS 2020 and 2024. At first I was concerned because I only saw a menu of like five aircraft but then I discovered it would automatically download and activate profiles for other aircraft as you select them in MSFS. (Yay!) It connects easily to the mini Nobsound amp which is plugged into the Yaw 3’s USB hub which is relayed over WiFi via VirtualHere (part of the install of YawVR’s Game Link). The Nobsound can connect via Bluetooth, USB or direct audio. I’m using USB via the Yaw 3’s wireless USB Hub (via the provided VirtualHere server). I’ve read some say that this can introduce latency and stutters for bass shaker connections. However, I’m using a dedicated router for the Yaw 3 and VirtualHere so I wonder if that’s helping?
All together these transducers and this haptic feedback software add yet another level of immersion. I definitely think it’s worthwhile and works much better than the Yaw 3’s built-in vibration support.
Here’s an explanation of how to get more immersion with transducers as summarized by ChatGPT:
To achieve maximum immersion for both VR flight and racing sims, here is a summary of recommended transducer mounting locations on a gaming rig, along with the effects they can simulate. Since a motion rig already provides large-scale physical movements (e.g., pitch, roll, heave), transducers should focus on finer, localized feedback (e.g., vibrations from road texture, engine rumble, and turbulence) that the motion rig cannot replicate.
1. Seat Bottom – Simulates vibrations and feedback felt through the seat base.
- Road texture and suspension feedback (racing).
- Ground effects during taxiing, takeoff and landing (flight)
- Engine vibrations and low-frequency rumble (both).
- Reduce emphasis on impacts (e.g., landing shocks) as the motion rig will handle those movements better.
Mounting: Secure the transducer to the metal seat frame or directly to the seat cushion (with an air gap for cooling if embedded). Use isolation mounts to focus vibrations on the seat instead of dissipating into the rig.
2. Seat Back – Provides vibrations felt through the upper body and back.
- Engine vibrations and throttle feedback (both).
- Turbulence, aerodynamic buffeting, mechanical feedback from the fuselage or control surfaces (flight).
- Acceleration, braking, and gear shifts (racing).
- Focus on engine vibrations and turbulence, as these are often too subtle for motion rigs to handle accurately.
Mounting: Attach the transducer to the seat back frame, hard foam, or upholstery. Position near the lower back for maximum perception and comfort.
Advantages of Using Both Seat Bottom and Seat Back
- Full-Body Immersion: Distributing transducers between the back and bottom provides tactile feedback across the entire body, replicating how vibrations are experienced in real life.
- Separation of Effects: Placing transducers in different areas allows you to assign specific effects to each, such as: Engine vibrations to the back. Road or ground effects to the bottom.
- Directional Feedback:Vibrations from the seat back and cushion can create a more 3D sensation, mimicking how forces are felt differently in various parts of the body during acceleration, turbulence, or impacts.
If you’re simulating aircraft or car seats, this setup allows you to accurately simulate how different vibrations and forces are distributed across the body. If constrained to just one location, prioritize based on the type of simulation: Aircraft – Use seat back. Cars – Use seat bottom.
3. Pedals – Adds tactile feedback for foot-based controls.
-
Simulate tactile feedback in the feet, such as brake ABS pulses, road imperfections, and runway vibrations.
Mounting: Attach transducers directly to the pedal deck or pedal base. Ensure secure mounting to avoid dampened vibrations from pedal materials.
4. Steering Wheel or Yoke – Simulates vibrations and force feedback through hand controls.
- Road surface vibrations and curbs (racing).
- Aircraft vibrations from engine or turbulence (flight).
Mounting: Integrate a smaller transducer onto the back of the wheel or yoke base. Coordinate with existing force feedback motors for realistic combined effects.
5. Gear Shifter or Throttle – Adds immersion through hand-operated controls.
- Gear shift vibrations (racing).
- Throttle vibration during high power or turbulence (flight).
Mounting: Attach a small transducer to the base of the shifter or throttle quadrant. Pair effects with engine RPM or gear changes for added realism.
6. Rig Frame or Floor – Provides ambient vibrations across the entire rig, less appropriate for motion rigs.
- Only for ambient effects if necessary, keep transducers off moving parts.
- General engine rumble and road texture (racing).
- Aircraft engine vibrations during startup and flight (flight).
Mounting: Avoid mounting transducers to the motion platform’s moving parts, as this can introduce noise or unintended vibrations that conflict with the platform’s precision. Attach larger transducers (e.g., Buttkickers) to the main rig frame or under the floor near the seat mount. Use isolation mounts to prevent vibration loss to the surrounding structure.
Recommended Setup for Maximum Immersion –
For both flight and racing VR sims, prioritize the following:
- Seat Bottom: Simulates road/ground effects, landing, takeoff, and engine rumble.
- Seat Back: Adds throttle, engine, turbulence, and acceleration feedback.
- Pedals: Adds tactile effects for braking and road/runway feedback.
- Steering Wheel/Yoke and Gear Shifter/Throttle: Adds hand-based feedback for controls.
Final Notes
- Use puck-sized transducers for targeted effects (e.g., pedals, seat back).
- Use larger bass shakers (e.g., Buttkickers) for broader, low-frequency effects (e.g., seat bottom or rig frame).
- Use a software platform to configure effects and assign specific transducers to different feedback types.
- Lower vibration intensity slightly since a motion rig already delivers strong physical feedback. Transducers should complement the motion effects, not overwhelm them.
- For effects like landing impacts, consider using only the motion rig to avoid duplication.
- Ensure vibrations are localized by using isolation mounts and strategically mounting transducers.
This setup ensures realistic and immersive feedback for both VR flight and racing sims.
I have focused on the seat bottom, seat back and the foot plate. I think suggestions 4 and 5 (vehicle controls) can be safely ignored. As for the entire rig frame or floor, I’m not sure there’s much point to doing so on a motion simulation rig like the Yaw 3. However, the Yaw 3 does have the ability to generate vibrations but so far they seem to be only fairly rough motions – not practical for things like engine vibration.
Miscellaneous Modifications
Loose Power Outlet
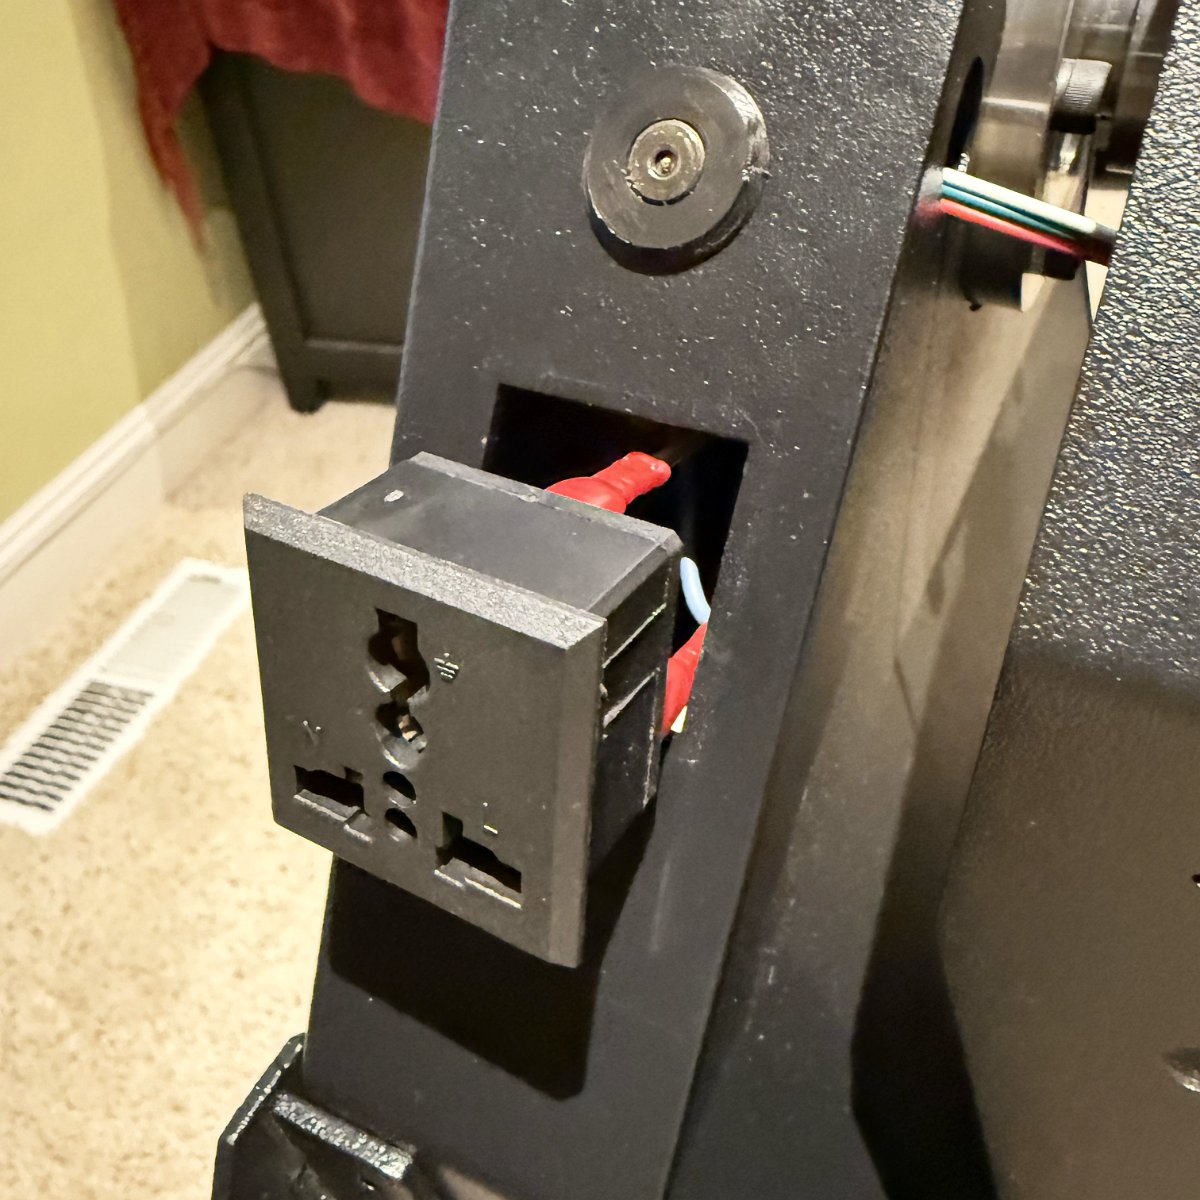
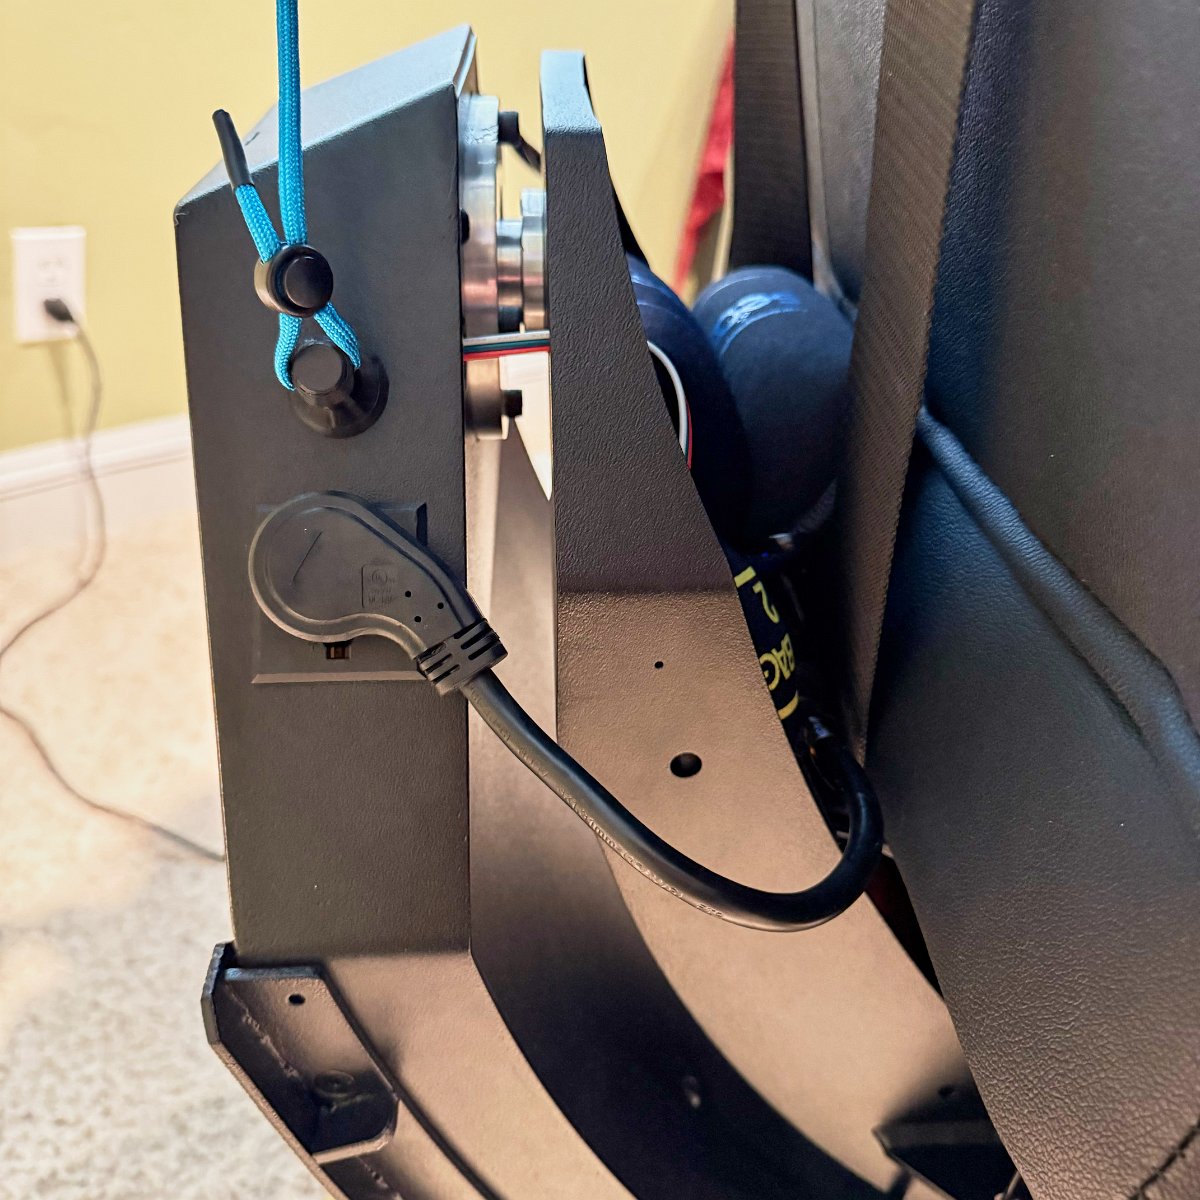
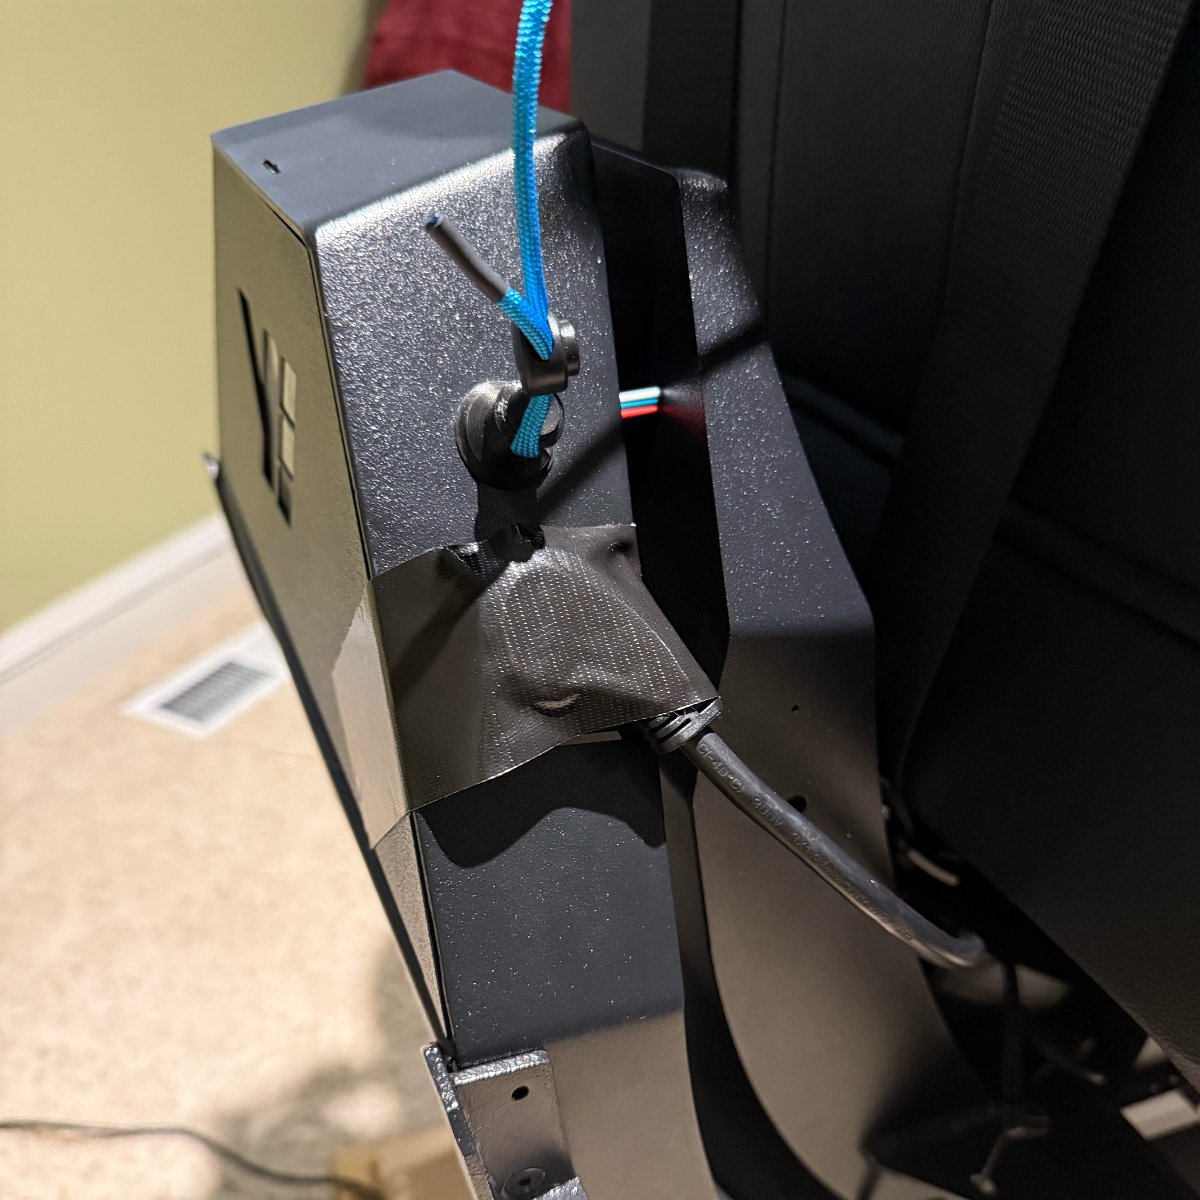
It’s very helpful that there is a power outlet provided on the unit that’s carried along with the pitch and yaw axes. The outlet is even one of those universal outlets that accepts power plugs of almost any region. However, the outlet keeps working itself loose. It’s surprising since it does seem to snap in securely but every few days I would find it had come out again.
The last time I noticed that the outlet had worked itself out, the unit was still powered on and the extension cord had also partially worked itself out of the outlet. I went to push the whole thing back into place and I got a huge spark from back behind the outlet! My best guess is that I inadvertently made contact between one of the exposed wire connectors behind the outlet and the metal case of the Yaw 3. I think the spark originated from where the grounding wire is attached to the case of the Yaw 3 back behind the outlet.
So that’s when I decided enough was enough and taped down both the plug and the outlet with very strong Gorilla tape.
I’m using a very short, angled-plug extension cord (affiliate link) to give it a lower profile and accommodate powering both my force-feedback driving wheel and the bass shaker. I also swapped out the long power cord that comes with the driving wheel with a short angled one (affiliate link).
Mounting Controllers on the Side Rails
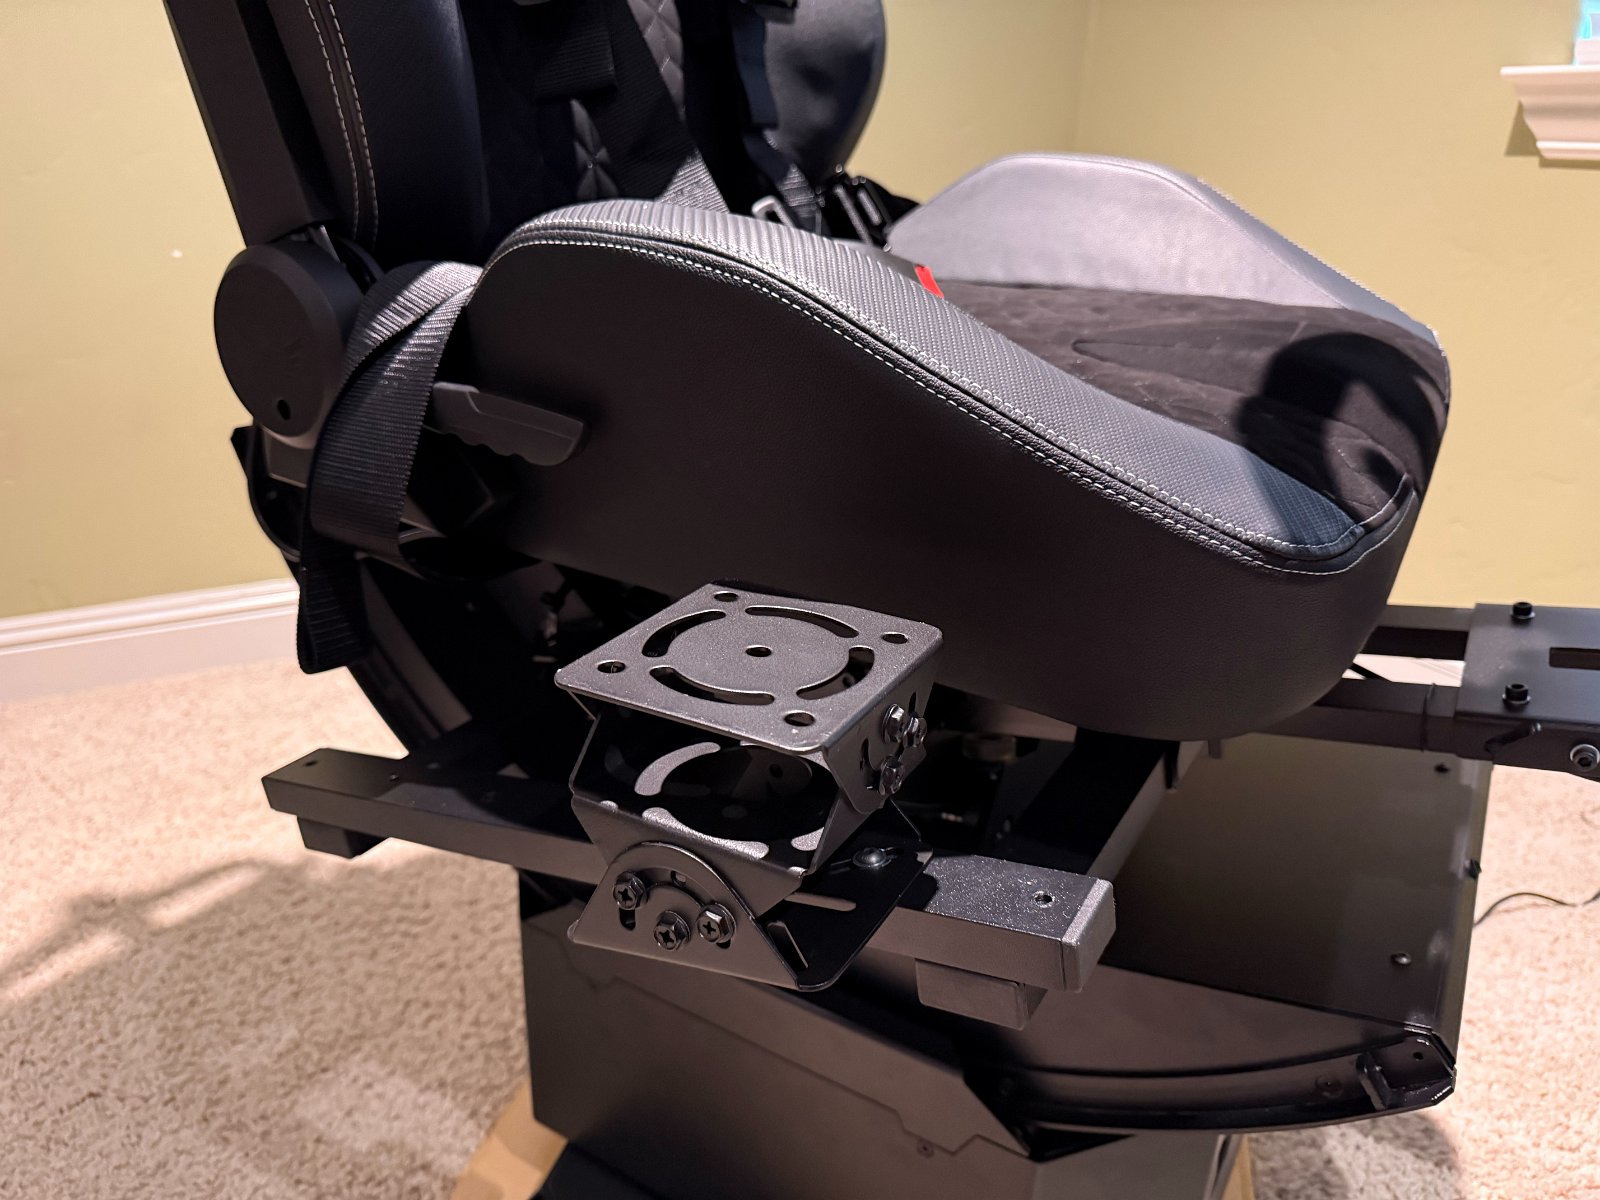
The Yaw 3 now includes a 15 degree angle seat adapter which has the benefit of providing more downward pitch range by taking it excess from the upward pitch – which is still plenty steep. One side effect of this adapter though is that it makes the optional side rails both too low and angled poorly relative to the seat for mounting controllers.
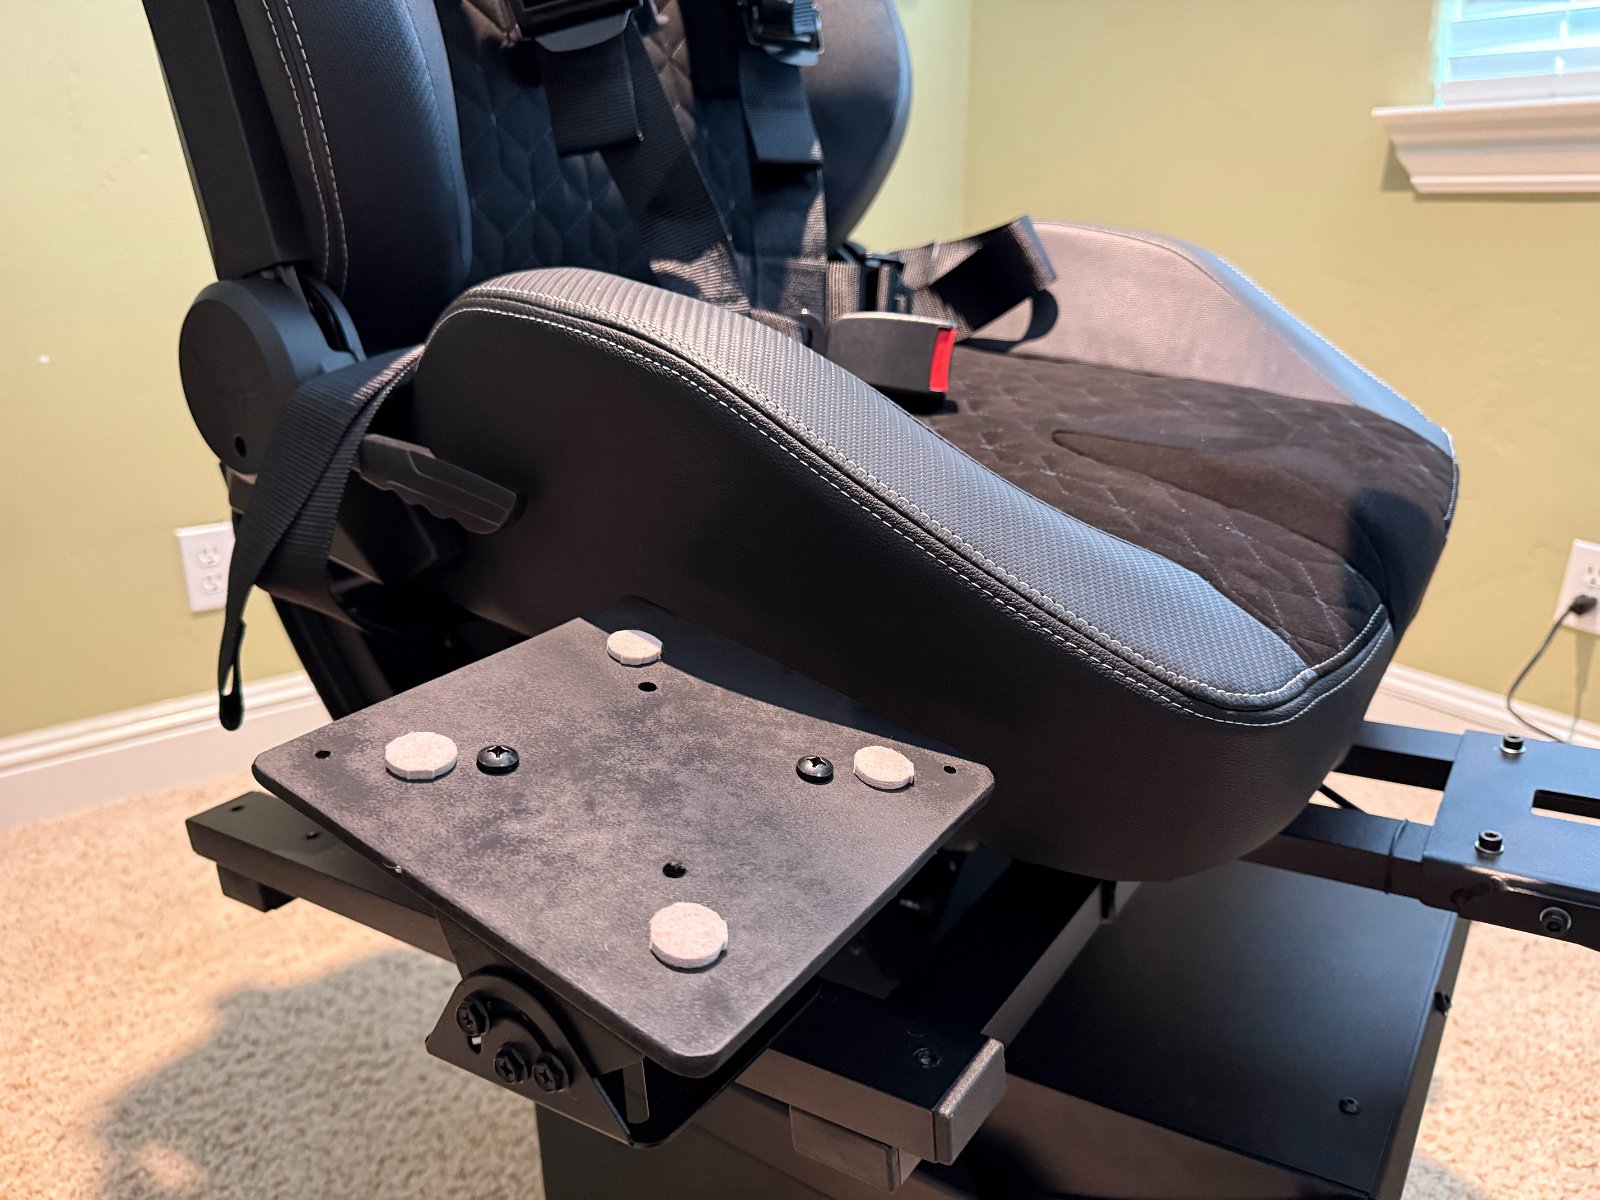
I did a bunch of hunting online and ended up finding these 3-axis joint mounts (affiliate link) on Amazon which raise up the mount and provide the ability to angle them as you wish. Unfortunately they’re only available in white so I had to paint them black, plus a matte clear coat. Then I made a couple of mounting plates out of MDF plywood to accommodate my Logitech X52 flight stick and throttle:
Later, when I upgraded to a VKB joystick and throttle, I used the mounting plate that came with the side rails for the relatively large throttle and I made a mounting block for the smaller joystick base out of solid wood: (Solid wood so I could countersink the bolt heads.)
Added a Hanger for the VR Headset
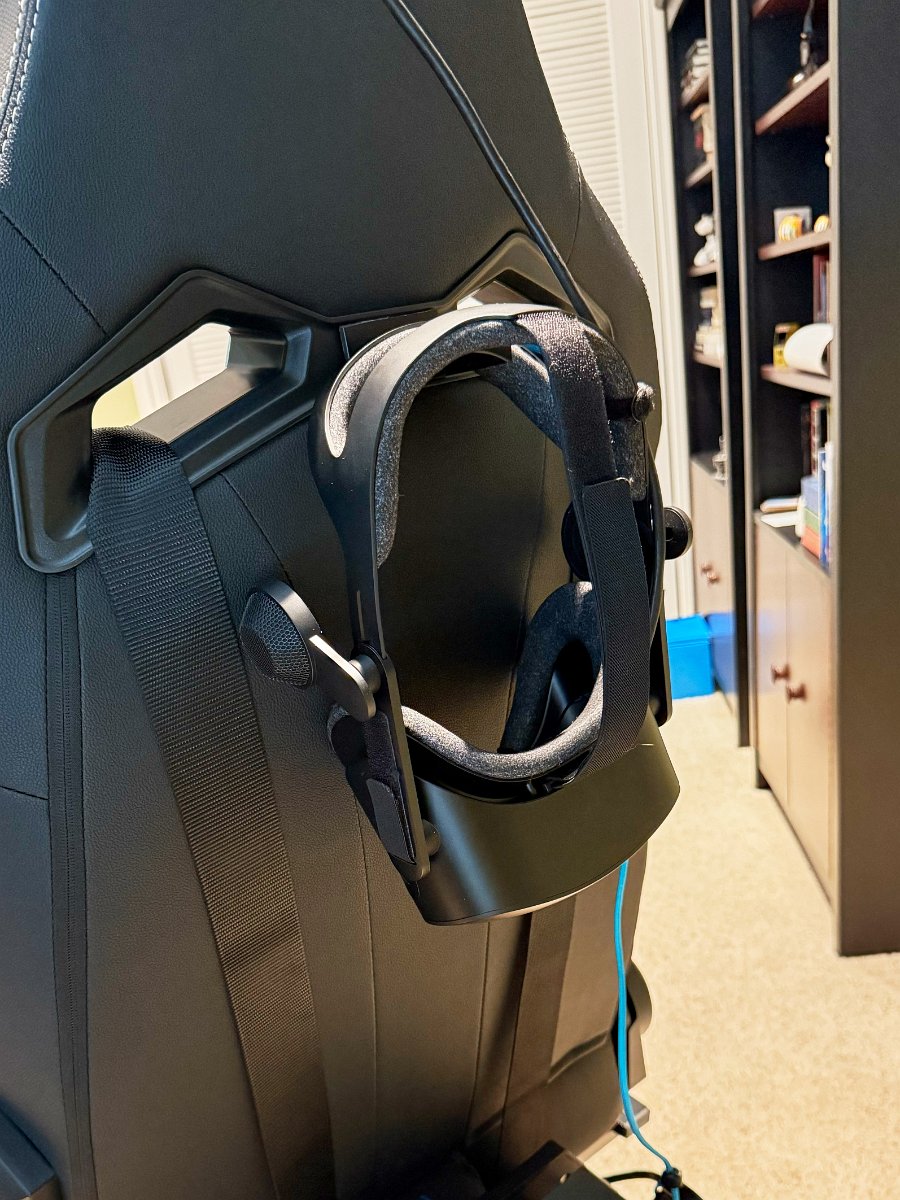 I found a little plastic hanger on Amazon (affiliate link) to hang the VR headset off the back of the chair when not in use. I also keep a protective cover over the lenses though.
Central Table Mount Accessories
> Wireless trackball and compact keyboard, usb switched hub, driving wheel or yoke…
More info to come…
Peripherals
>> Lots of peripherals to discuss here…
Accessories (includes affiliate links)
- GT Omega RS12 Simulator Seat (instead of YawVR seat)
- 5mm thick steel mending bracket (for mounting non-YawVR seat to Yaw 3)
- 3-axis joint mount (for mounting controllers on side arms)
- small wireless keyboard (for central desk mount)
- mini programmable wireless 6-key keypad (for easier start/stop of motion rig, etc)
- 4-port USB hub w/switches (for underneath central desk mount)
- transducers and mini-amp (Dayton Audio TT25-8 puck-sized transducers and Nobsound Mini NS-01G Pro)
- right angle short power cord and splitter (for Logitech racing wheel power supply and bass shaker amp)
- headset hanger (for hanging VR headset behind seat back)
- gyroscope sensor (Witmotion WT901C-232 plus usb adapter)
- I haven’t used this yet as the built-in Yaw 3 virtual tracker has been working well with OpenXR Motion Compensation.
- dedicated WiFi router set up for the Yaw 3 and it’s wireless USB hub (via VirtualHere)
- I’ve read some say they see lag with VirtualHere over WiFi – I wonder if having a dedicated router helps?
Controllers
- VKB Gunfighter IV joystick grip and base
- VKB STECS throttle
- Logitech X52 Pro H.O.T.A.S. (stick and throttle)
- Logitech Flight Yoke, Pedals and Throttle Quadrant
- Logitech G Pro Racing Wheel w/direct drive force feedback
- Logitech G Pro Racing Pedals w/load cell brake
VR Headsets
- HP Reverb G2
- Apple Vision Pro
Software Setup
- YawVR’s Game Link
- VirtualHere wireless USB support
- Infuse VR vs. ALVR
- OpenVR vs OpenXR
- OpenXR Motion Compensation
- OpenComposite
- SteamVR vs Windows Mixed Reality
Troubleshooting – Loss of Motion Control
While testing and tweaking a new profile for MSFS 2024 for a couple of hours, I started to encounter this issue where my Yaw 3 would get stuck in a rolled-to-the-right position. All it would take would be to bank to the right for a few seconds but then when I’d level out or roll to the left, I would still be stuck in the rolled to the right position. And yet the Game Link Input Monitor would show a level position for output. Sometimes if I rolled in the opposite direction and held it there long enough it would usually eventually start to come back but not always. Engaging the parking mode would actually lower the pitch and leave the roll axis tilted.
Skipping over most of the intermediate troubleshooting, I eventually figured it out by testing with and without my weight in the seat and using YawVR app’s manual control. Turns out it was just the power level setting. I had turned it way down to 10% in the midst of my testing MSFS to see if there was a way to mitigate how the Yaw 3 will stop at a target roll position so abruptly that the chair will bounce about. (At least it does so with aggressive maneuvers like in an FA-18 military jet.)
So yeah, 10% was not enough to move me and the chair out of the right rolled position. Just bumping the power level back up to 30% fixed it.
An Improved Game Link Profile for Microsoft Flight Simulator 2020/2024
The default Game Link profile for MS Flight Simulator provides only a simple one-to-one mapping of roll, pitch and heading position which merely mimics the aircraft’s orientation rather than simulating the forces you would actually feel in the aircraft.
- The goal of a motion rig is to simulate the forces a person would feel, not to mimic the physical orientation of the vehicle or aircraft.
- Since humans perceive forces mainly from linear accelerations and rotational cues, a motion rig should prioritize these over absolute orientation.
That’s what my improved profile attempts to do. It does NOT mimic the attitude of the aircraft in roll, pitch and heading. It relies on acceleration telemetry from MSFS to simulate the forces you should be feeling as much as possible. It has taken me a lot of researching, experimenting, tweaking and testing and lots of (sometimes misleading) help from ChatGPT and claude.AI but now this profile works pretty well and it’s a huge improvement over the default profile for MSFS 2020 and 2024.
| 👉 |  |
Download MSFS Immersive v2.1 (YawVR Game Link Profile) 2025-02-11 for both MSFS 2020 and 2024REQUIRES Game Link 2.73 or later |
This package includes a pair of profiles (“Coordinated” and “Raw”) that work with both MSFS 2020 and MSFS 2024 but REQUIRE version 2.73 or later of YawVR’s Game Link. My profiles depend on my updated MSFS plugins which were added to Game Link 2.73. If you try to use my profiles with older versions of Game Link, some versions will crash, some will cause bugs and some will completely reset the profile.
This profile was designed for use with the Yaw 3. I’m told it works with the Yaw 2 but I don’t know if it behaves exactly the same or if the multipliers I use should be tuned for use with the Yaw 2.
Read on for an explanation of how my Game Link profile for MSFS simulates the forces felt during flight:
Roll Axis
 While it may seem intuitive to either tilt the motion rig into the turn (to mimic the roll attitude of the aircraft) or to tilt away from the turn (to simulate centrifugal force like we experience in a car), neither motion properly simulates what you feel in a real aircraft. What actually happens in a real aircraft in a normal “coordinated turn” is that the centripetal force from the turn and the sideways force of gravity from being in a rolled position are balanced out by the lift generated by the wings. The resulting force vector points down into the seat, not to one side or the other. In other words, with your eyes closed so that your brain isn’t fooled by the tilt of the horizon, you feel only being pressed more into your seat, not to one side or the other — despite the steepness of the bank angle or the force of the turn. This would be borne out by observing a cup of water, a marble in a tray or an object hanging on a string. (Here’s a video I recorded while a passenger in an actual plane as it performed a coordinated banked turn.)
If you do feel a sideways force (either to the inside or the outside of the turn), it is because the forces are unbalanced – the aircraft is either skidding or slipping through the turn. In a proper “coordinated turn”, proper rudder and elevator input (or improved aircraft design) keep the nose pointed into the turn and keep these forces balanced. There is a mechanical device (or electronic equivalent) on the plane called a “turn coordinator ball” (or a digital marker beneath the attitude indicator) which helps illustrate when the plane is not properly coordinated but experienced pilots can feel the sensation and correct for it.
👉 This profile has two modes or versions for roll handling: The “Coordinated” version roughly simulates this effect of coordinated vs uncoordinated lateral forces but the “Raw” version does not. Both modes rely on the same lateral acceleration data from MSFS but the “Raw” version won’t try to figure out how coordinated the turn is and, as a result, it will simply always tilt in the direction of the turn, which isn’t very realistic.
Update: As of January 2026, I’ve noticed a couple of deficiencies in my profiles which I’m working on addressing and I hope to release an update soon.
I recommend using the “Coordinated” version for most aircraft – it usually works pretty well but has some limitations because it depends on MSFS’s “turn coordinator ball” variable to estimate how much acceleration to apply at any moment. This variable has built-in dampening and oscillation effects as it is simulating a mechanical device in the aircraft. Because of this less-than-ideal implementation, I decided to provide both versions: the “coordinated” version which is more realistic but less responsive and the “raw” version that’s not realistic (no coordinated forces, always tilting into turns) but can still be fun.
Expect some unintuitive but realistic behaviors with the “Coordinated” version:
-
- No sideways tilt in a banked turn when the forces are balanced and coordinated into your seat
- Feel slip or skid to the inside or outside of a turn when uncoordinated
- Pitching down in smaller planes generates an uncoordinated side force despite being level
- Different planes have different designs and will behave differently:
- dihedral wings, yaw damping, differential ailerons, swept wings, etc
- some will and some won’t need rudder correction to keep coordinated to various degrees
- some planes won’t generate any lateral force during normal banked turns
This profile also handles full rolls smoothly: midway through the roll, it will naturally start to roll back in the opposite direction so that you end up physically upright while inverted and you can continue the 360 roll all the way through. (This still isn’t directly based on the roll orientation but on the acceleration telemetry.) Despite how it sounds, it feels pretty good when all you can see is the virtual view from the cockpit. Interestingly, it is apparently quite reasonable to have the motion rig upright when the aircraft is inverted due to how such aircraft actually generate positive lift away from the ground.
Pitch Axis
As with the roll axis, this profile won’t mimic the aircraft’s pitch attitude but instead will tilt forward/backward in response to acceleration forces, including gravity and positive/negative G’s. For example, pulling harder into a turn or increasing a climb increases the vertical acceleration (g-force) and the profile will tilt the seat back proportionally to simulate this. Similarly for forward/rearward acceleration: you’ll feel almost like you’re being pressed back into your seat but it’s actually the motion rig tilting back, using the shift in orientation to simulate the acceleration. Being tilted forward will simulate deceleration or negative g-forces.
Yaw Axis
This profile incorporates rotational motion to mimic rotational acceleration around the vertical axis of the aircraft: mostly from rudder input, ground steering and tail rotor motion in a helicopter. This profile normally doesn’t need much room for yaw since it’s not following the compass heading like the default profile. For fixed wing aircraft, it will usually be just little brief motions by a few degrees and then back again — corresponding to the rotational acceleration telemetry. It’s definitely more though for helicopter flight. And I have had quite the yaw-spinning experience when I managed to put an F/A-18 Hornet into a flat spin once! If you have limited space you can of course limit the yaw travel in Game Link’s Simulator Settings panel. Side note: I’ve experienced a third-party helicopter (Airbus H135) behave very badly with the motion rig because it sends completely mixed-up X, Y and Z axis telemetry.
Vibrations / Haptics
The Yaw 3’s vibrations are pretty rough but this profile tries to mimic engine vibrations, with a much less aggressive vibration effect for non-piston engines. The profile also simulates vibrations from ground surfaces, but limited to just increasing magnitude with speed. It’s not terribly realistic but you can get many more realistic effects using transducers and software like SimHaptic to generate the vibration effects, with different effects for different aircraft and many other haptics for things like air flow over the fuselage, mechanical systems, etc. If you do continue to use the built-in vibration feature on the Yaw 3, be aware of how your vibration slider setting in Game Link’s Simulator Settings will affect the output. I’ve tuned this for vibration set to infinity on the Yaw 3.
👉 For a more detailed explanation of what each component of my profile does, plus a full version history, see this page:
“MSFS Immersive” Profile Documentation
There’s also a discussion thread dedicated to this MSFS profile on the official YawVR Discord server (requires this invitation link to join).
Demonstration Videos
The fun stuff! I want to record a few demo videos to give people an idea of what’s possible with the Yaw 3.
So… more to come here.
In the meantime, somebody asked for a test of the range of hertz and amplitude that the Yaw 3 can generate. I put this video together to get an idea of what the different values produce – and I was taken aback at how violently it can move just when generating vibrations:
Thoughts on the Yaw 3
NOTE: As of September 2025, it appears that the YawVR company has gone out-of-business and is now defunct. This is based on comments from the various YawVR user forums where people are reporting that they are unable to contact anyone, that the company’s building is now vacant and that the employees were let go over the past few months. We’ve known for sometime that they were looking for investors but apparently that effort never succeeded. It’s not known what, if anything, will happen to the company’s assets and technology.
I intended to eventually write up a full review here but now there doesn’t seem to be much point given that the company appears to have gone defunct. It’s a shame because the overall design concept is pretty slick because of how much freedom of movement the Yaw 3 provides in a relatively small space.
Unfortunately, it’s become clear that they did not have quite the right set of people to bring this product to fruition properly. From my own experiences and those of many others on the discussion forums, they apparently did not select the best quality components, there were various manufacturing issues and there was often damage caused by poor packaging for shipping. And of course these and various other business decisions led to them failing to fulfill many of their Kickstarter backers.
I will say though that when the product is working (and if you can get a good profile set up for your game), it makes for a pretty terrific immersive experience. As I mentioned before, my primary draw was to enhance flight simulation. The provided motion sim profile for MSFS 2020 and 2024 were terrible though and I spent months learning how to make it perform at least somewhat realistically. (See the details above.) This was challenging both due to bugs in the Game Link plugin that I had to find and fix and because I couldn’t find any good info on how to drive a motion simulation rig realistically based on the available telemetry. (As I’m writing this in January 2026, I’m actually working on some additional corrections for my MSFS profiles.)
I still plan to record a couple of videos to show what it looks like in action, but for now I’ll drop in a few funny anecdotes here. To be clear, these aren’t examples of it being a bad experience – I’m just expressing the funny, very immersive things that can happen:
Like forgetting that I was piloting a tail dragger when I went to test harsh braking on my motion control profile – and immediately drove my plane’s nose into the ground – which is a lot more surprising when you’re in a motion rig and you get physically thrown forward! 😝
Or testing an acrobatic plane (that I would never be able to handle experiencing in real life) and stalling it into a falling spin and just about making myself ill even though I managed to recover from the spin before having to resort to pulling the emergency stop cord on my Yaw 3. 😬
Helicopters are particularly stressful because they’re already much more difficult to learn to control than an airplane and it’s not difficult to lose control and start spinning around and even careening off the ground when you’re trying to land. When your success or failure controlling the virtual aircraft has consequences (getting physically tossed around), it is a bit more… intense. 😜
I’m still meaning to give driving sims a spin (hopefully not literally) in the Yaw 3. I’m not sure that’s going to work out for me though because the one time I tried VR with a driving sim (and no motion rig), I discovered that I immediately felt ill as I raced into the first curve of the course – due to the mismatch between what I was seeing versus what my body and inner ears were perceiving. Maybe with the Yaw 3 motion rig this will work better but I’m not confident given how fast and violent motion can be in a racing car.
For what it’s worth, I don’t have any motion sickness trouble in the Yaw 3 with flight simulators like MSFS. I guess it’s because the motion is much smoother, particularly with normal general aviation aircraft but even when climbing, diving and rolling in a fighter jet. The exception of course being getting into a loss of control situation like that flat spin I described above or if I allowed MSFS to let the aircraft tumble down a mountain side after a crash.
12 comments
Great article with lots of helpful information, thank you for taking the time to write this all down.
I got myself the Yaw 3 this summer after I made some calculations myself on how many had to be sold before they could start making any profit and found the risk too large. So I decided to pay the bit extra and got the seat before they went bankrupt (fortunately for me and very unfortunate for all the people that lost their money).
My first experiences with the seat were very bad and I got sick within a few minutes because of several reasons. My main mistake was perhaps that I tried flight sims and indeed got all the problems that you describe in the ‘Thoughts on the Yaw 3’. But another mistake was that I tried to make the motion compensation work with automobilista 2 for example and also had my Moza R5 wireless connected to the seat. The overhead was so big that it was a very stuttering experience (perhaps my graphics card was also not good enough). So after one week of being sick I didn’t touch it anymore until last weekend. I learned some new things over the last month and bought myself a 5090 meanwhile so wanted to give it another chance.
After setting up correctly this time (from router to settings) I actually worked quite well now.
The main imrovements that did it for me were
1 – Don’t use rotation with a driving sim. It is really not needed as roll and pitch work well enough. If your limits are small (I think I am using 6 on roll and pitch) it feels great and quite real and you don’t notice much that the motion compensation is not there. It might even make it more real if you are pushed in your seat and you see the steering wheel move a tiny bit forward in the game.
2 – Don’t use the wireless software for the steering wheel and just connect it directly to your pc. With rotation off this is no problem and suddenly the experience is a lot smoother
What are your experiences with this? Are you also driving wireless? Does this work good for you or do you also notice more lag?
Thanks for your comments and I’m glad to hear you’ve found this page helpful. I decided to add some more detail to my “Thoughts on the Yaw 3” section because I didn’t want you or others to think that motion sickness has been any trouble with flight sims. As I’ve just now described in that section, I’ve yet to give driving sims a try with the Yaw 3 but I’m meaning to do so in the near future. And yeah, you should definitely look to addressing any graphical stuttering experiences. Another thing to watch for is that the Game Link game profile for your game might be terrible. That was definitely the case with the one they provided for MSFS. (I go into much more detail on what was wrong and what I did to build my custom profile – which I’m actually working on improving even further this month.)
I’ll add that I am still using a wireless connection to drive the Yaw 3 motion rig as well as the haptic speakers. Lag is something I’ll be continuing to watch for as I’ve read some people commenting about latency issues via Game Link and/or VirtualHere (wireless USB). As for the VR portion, I was originally using my HP Reverb G2 (wired) but I’ve moved now to using my Vision Pro (via ALVR and wireless) to enjoy the incredible amount of edge-to-edge detail it can deliver.
Thank you for your answer.
Yesterday I have been fiddling around and found out that the GameLink app also works perfect with Virtual Desktop. For Automobilista 2 this makes a huge difference in both visuals and performance.
So now I have a smooth and beautiful experience there (90 fps stable). This without motion compensation but for this sim you don’t miss it.
Meanwhile I also found another video where someone came with a simple but effective fix for motion compensation in the steam software itself :). It is not perfect if you want to lean but in most situations you don’t do that when you are in a cockpit. If you turn off the headset tracking you actually get sort of motion compensation. And you can still look around. Tilting won’t work anymore but you don’t really miss that. I tested it and it is not bad at all.
Today I will also test this with a simple flight sim(www 1 fighter) and see how it works with seat rotation
Bloody good work!
I just got confirmation that a Yaw 3 is on its way to my studio.. This is an awesome write up and excellent resource! Outstanding job here (≡)-)
You’re doing a fantastic job. Well done and Thank You x
Finally, someone who understands flight dynamics. One of the things I noticed on sim motion rigs was that they moved incorectly to simulate actual sensations of flight. The YAW3 with its 360 degrees of rotation is the perfect tool to create the effects of spacial disorientation in a simulator. Have you thought a creating a profile that induces space D., with your understanding flight forces and think it would very simple to create, and would be a valuable tool for pilots.
Thanks for your comment. I have not tried to do anything to invoke spacial disorientation in my profile but I expect it can happen anyway since I’m merely trying to simulate the forces acting on the plane as reported by the flight simulator as much as possible given the limitations of the motion rig. As a simple example, I had to remove the VR headset much of the time while developing my profile to verify what the motion rig was actually doing because I would mistakenly sense motion that wasn’t there caused purely by the visual feedback from the VR headset.
For others reading this comment, here’s a page from the FAA explaining how spatial disorientation comes about and affects pilots: https://www.faa.gov/pilots/safety/pilotsafetybrochures/media/SpatialD.pdf
Excellent! I’m glad to see someone is finally pulling this together. I had done some rudimentary work on getting the MSFS2020 GE profile to work with G force emulation, but not attacking it as well as you seem to be doing :). One thing though I’ve not been able to find in the parameters available within the GE, or successfully implement, is turbulence reaction (which will eventually need to be transferred into the Yaw Heave unit if/when it becomes available). Have you found any parameters that are being output from MSFS and being read by the Yaw GE that relate to vertical Heave which could be translated to turbulence Pitch/Roll (until we have a Heave unit)? Also, I’ve not been able to view anything on the referred links above – seems I don’t have access (it says ‘Not Text Channels)???
Thanks and no, I haven’t found any explicit turbulence-related variables but I would expect that the various acceleration and velocity X,Y,Z axis variables (there’s both rotational and linear versions) will include the effects of turbulence and could be used for heave too. We’ll see…
I’m not sure what you mean about “referred links” or “Not Text Channels”. I’m going to guess that maybe it’s the links to threads or channels to one of the YawVR Discord servers. I think with Discord you have to receive an invite to follow those links. I’ll paste one here for the official YawVR Discord server but unfortunately they’re only valid for a day or two: https://discord.gg/qhYUSzHH
Thanks Chris, that did the trick – I now have access to those extra areas that I couldn’t see before :).
Hi Chris, this link will never expire for joining the server: https://discord.gg/pymFJxPRN4